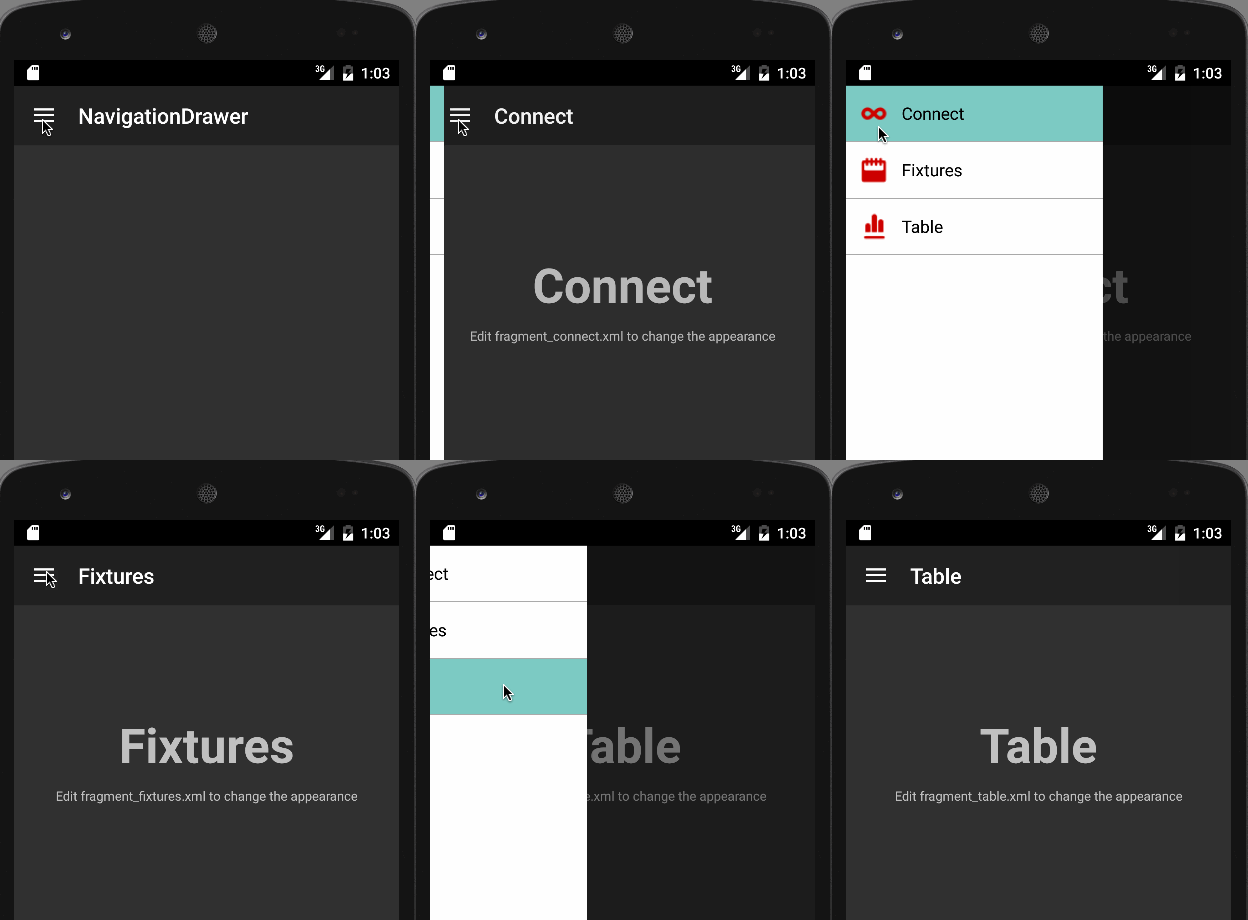
이 튜토리얼에서는 네비게이션 드로어를 안드로이드 애플리케이션에 구현할 것입니다. 안드로이드 네비게이션 드로어는 슬라이딩 메뉴로, 중요한 UI 구성 요소입니다. 대부분의 안드로이드 애플리케이션에서 네비게이션 드로어를 볼 수 있으며, 웹 사이트의 네비게이션 메뉴 바와 유사합니다.
안드로이드 네비게이션 드로어
안드로이드 네비게이션 드로어는 응용 프로그램의 중요한 링크를 표시하는 데 사용되는 슬라이딩 왼쪽 메뉴입니다. 네비게이션 드로어를 통해 이러한 링크 간에 쉽게 이동할 수 있습니다. 이는 기본적으로 표시되지 않으며, 왼쪽으로 슬라이딩하거나 ActionBar에서 해당 아이콘을 클릭하여 열어야 합니다. 보다 일반적으로 말하면, 네비게이션 드로어는 응용 프로그램의 모든 옵션과 링크를 표시하는 데 특히 지정된 활동 화면의 대체입니다. 이 안드로이드 네비게이션 드로어 튜토리얼에서는 안드로이드 지원 라이브러리에 포함된 Drawer Layout API를 사용하여 네비게이션 드로어를 구현할 것입니다. 드로어 항목에서 열 수 있는 3개의 프래그먼트 뷰를 표시합니다.
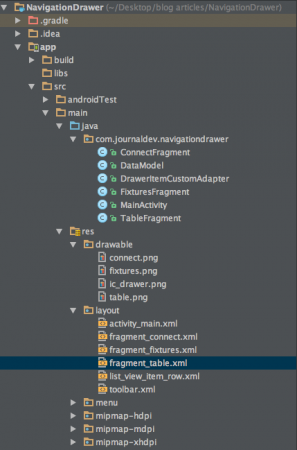
안드로이드 네비게이션 드로어 프로젝트 구조
Android Navigation Drawer 예제
네비게이션 드로어를 구현하려면 먼저 아래에 표시된 대로 활동 레이아웃의 루트로 android.support.v4.widget.DrawerLayout을 추가해야합니다. activity_main.xml
<android.support.v4.widget.DrawerLayout
    xmlns:android="https://schemas.android.com/apk/res/android"
    android:id="@+id/drawer_layout"
    android:layout_width="match_parent"
    android:layout_height="match_parent" >


    <LinearLayout
        android:layout_width="match_parent"
        android:layout_height="match_parent"
        android:orientation="vertical">

    <LinearLayout
        android:id="@+id/container_toolbar"
        android:layout_width="match_parent"
        android:layout_height="wrap_content"
        android:orientation="vertical">

        <include
            android:id="@+id/toolbar"
            layout="@layout/toolbar" />
    </LinearLayout>


    <FrameLayout
        android:id="@+id/content_frame"
        android:layout_width="match_parent"
        android:layout_height="match_parent" />

    </LinearLayout>

    <ListView
        android:id="@+id/left_drawer"
        android:layout_width="240dp"
        android:layout_height="match_parent"
        android:layout_gravity="start"
        android:background="#FFFFFF"
        android:choiceMode="singleChoice"
        android:divider="@android:color/darker_gray"
        android:dividerHeight="1dp" />

</android.support.v4.widget.DrawerLayout>
네비게이션 드로어의 메뉴 옵션은 ListView 형태로 저장됩니다. 각 옵션은 FrameLayout에서 열립니다. 여기서 우리는 ToolBar를 ActionBar 대신 사용했습니다. ToolBar는 Android 5.0부터 ActionBar의 일반화로 소개되었습니다. 이것은 더 많은 제어와 유연성을 제공하고 수정이 쉽습니다. 계층구조 내의 다른 뷰들과 쉽게 교차할 수 있습니다. 레이아웃 ToolBar는 아래의 xml 레이아웃에 정의되어 있습니다. toolbar.xml
<android.support.v7.widget.Toolbar xmlns:android="https://schemas.android.com/apk/res/android"
    xmlns:local="https://schemas.android.com/apk/res-auto"
    android:id="@+id/toolbar"
    android:layout_width="match_parent"
    android:layout_height="wrap_content"
    android:minHeight="?attr/actionBarSize"
    android:background="?attr/colorPrimary"
    local:theme="@style/ThemeOverlay.AppCompat.Dark.ActionBar"
    local:popupTheme="@style/ThemeOverlay.AppCompat.Light" />
ToolBar를 사용할 때 styles.xml에서 테마 Theme.AppCompat.NoActionBar를 사용해야합니다. 네비게이션 드로어의 ListView 행에 대한 레이아웃은 아래에서 제공됩니다. list_view_item_row.xml
<RelativeLayout xmlns:android="https://schemas.android.com/apk/res/android"
    android:layout_width="match_parent"
    android:layout_height="wrap_content"
    android:background="?android:attr/activatedBackgroundIndicator"
    android:minHeight="?android:attr/listPreferredItemHeightSmall"
    android:padding="10dp" >

    <ImageView
        android:id="@+id/imageViewIcon"
        android:layout_width="wrap_content"
        android:layout_height="wrap_content"
        android:layout_alignParentLeft="true"
        android:layout_alignParentTop="true"
        android:paddingRight="10dp" />

    <TextView
        android:id="@+id/textViewName"
        android:layout_width="wrap_content"
        android:layout_height="wrap_content"
        android:layout_centerVertical="true"
        android:layout_toRightOf="@+id/imageViewIcon"
        android:paddingRight="10dp"
        android:text="Item Name"
        android:textColor="@android:color/black"
        android:textAppearance="?android:attr/textAppearanceListItemSmall"
        />

</RelativeLayout>
네비게이션 드로어 항목은 아래에 표시된 대로 strings.xml 파일에 문자열 배열로 저장됩니다. strings.xml
<string-array name="navigation_drawer_items_array">
        <item>Connect</item>
        <item>Fixtures</item>
        <item>Table</item>
    </string-array>
DataModel.java 클래스는 드로어 리스트 항목을 정의하는 데 사용됩니다. DataModel.java
package com.journaldev.navigationdrawer;

public class DataModel {

    public int icon;
    public String name;

    // Constructor.
    public DataModel(int icon, String name) {

        this.icon = icon;
        this.name = name;
    }
}
드로어 항목은 ListView 형식으로 저장됩니다. 따라서 해당 데이터를 활동 클래스에 제공하기 위해 Adapter 클래스를 사용해야합니다. DrawerItemCustomAdapter.java
package com.journaldev.navigationdrawer;

import android.app.Activity;
import android.content.Context;
import android.view.LayoutInflater;
import android.view.View;
import android.view.ViewGroup;
import android.widget.ArrayAdapter;
import android.widget.ImageView;
import android.widget.TextView;

public class DrawerItemCustomAdapter extends ArrayAdapter<DataModel> {

    Context mContext;
    int layoutResourceId;
    DataModel data[] = null;

    public DrawerItemCustomAdapter(Context mContext, int layoutResourceId, DataModel[] data) {

        super(mContext, layoutResourceId, data);
        this.layoutResourceId = layoutResourceId;
        this.mContext = mContext;
        this.data = data;
    }

    @Override
    public View getView(int position, View convertView, ViewGroup parent) {

        View listItem = convertView;

        LayoutInflater inflater = ((Activity) mContext).getLayoutInflater();
        listItem = inflater.inflate(layoutResourceId, parent, false);

        ImageView imageViewIcon = (ImageView) listItem.findViewById(R.id.imageViewIcon);
        TextView textViewName = (TextView) listItem.findViewById(R.id.textViewName);

        DataModel folder = data[position];


        imageViewIcon.setImageResource(folder.icon);
        textViewName.setText(folder.name);

        return listItem;
    }
}
MainActivity.java 소스 코드는 아래에 제공됩니다.
package com.journaldev.navigationdrawer;

import android.support.v4.app.Fragment;
import android.support.v4.app.FragmentManager;
import android.support.v4.widget.DrawerLayout;
import android.support.v7.app.AppCompatActivity;
import android.os.Bundle;
import android.support.v7.widget.Toolbar;
import android.util.Log;
import android.view.MenuItem;
import android.view.View;
import android.widget.AdapterView;
import android.widget.ListView;

public class MainActivity extends AppCompatActivity {

    private String[] mNavigationDrawerItemTitles;
    private DrawerLayout mDrawerLayout;
    private ListView mDrawerList;
    Toolbar toolbar;
    private CharSequence mDrawerTitle;
    private CharSequence mTitle;
    android.support.v7.app.ActionBarDrawerToggle mDrawerToggle;

    @Override
    protected void onCreate(Bundle savedInstanceState) {
        super.onCreate(savedInstanceState);
        setContentView(R.layout.activity_main);
        mTitle = mDrawerTitle = getTitle();
        mNavigationDrawerItemTitles= getResources().getStringArray(R.array.navigation_drawer_items_array);
        mDrawerLayout = (DrawerLayout) findViewById(R.id.drawer_layout);
        mDrawerList = (ListView) findViewById(R.id.left_drawer);

        setupToolbar();

        DataModel[] drawerItem = new DataModel[3];

        drawerItem[0] = new DataModel(R.drawable.connect, "Connect");
        drawerItem[1] = new DataModel(R.drawable.fixtures, "Fixtures");
        drawerItem[2] = new DataModel(R.drawable.table, "Table");
        getSupportActionBar().setDisplayHomeAsUpEnabled(false);
        getSupportActionBar().setHomeButtonEnabled(true);

        DrawerItemCustomAdapter adapter = new DrawerItemCustomAdapter(this, R.layout.list_view_item_row, drawerItem);
        mDrawerList.setAdapter(adapter);
        mDrawerList.setOnItemClickListener(new DrawerItemClickListener());
        mDrawerLayout = (DrawerLayout) findViewById(R.id.drawer_layout);
        mDrawerLayout.setDrawerListener(mDrawerToggle);
        setupDrawerToggle();

    }

    private class DrawerItemClickListener implements ListView.OnItemClickListener {

        @Override
        public void onItemClick(AdapterView parent, View view, int position, long id) {
            selectItem(position);
        }

    }

    private void selectItem(int position) {

        Fragment fragment = null;

        switch (position) {
            case 0:
                fragment = new ConnectFragment();
                break;
            case 1:
                fragment = new FixturesFragment();
                break;
            case 2:
                fragment = new TableFragment();
                break;

            default:
                break;
        }

        if (fragment != null) {
            FragmentManager fragmentManager = getSupportFragmentManager();
            fragmentManager.beginTransaction().replace(R.id.content_frame, fragment).commit();

            mDrawerList.setItemChecked(position, true);
            mDrawerList.setSelection(position);
            setTitle(mNavigationDrawerItemTitles[position]);
            mDrawerLayout.closeDrawer(mDrawerList);

        } else {
            Log.e("MainActivity", "Error in creating fragment");
        }
    }

    @Override
    public boolean onOptionsItemSelected(MenuItem item) {

        if (mDrawerToggle.onOptionsItemSelected(item)) {
            return true;
        }

        return super.onOptionsItemSelected(item);
    }

    @Override
    public void setTitle(CharSequence title) {
        mTitle = title;
        getSupportActionBar().setTitle(mTitle);
    }

    @Override
    protected void onPostCreate(Bundle savedInstanceState) {
        super.onPostCreate(savedInstanceState);
        mDrawerToggle.syncState();
    }

    void setupToolbar(){
        toolbar = (Toolbar) findViewById(R.id.toolbar);
        setSupportActionBar(toolbar);
        getSupportActionBar().setDisplayShowHomeEnabled(true);
    }

    void setupDrawerToggle(){
        mDrawerToggle = new android.support.v7.app.ActionBarDrawerToggle(this,mDrawerLayout,toolbar,R.string.app_name, R.string.app_name);
         // 이것은 드로어 토글의 아이콘을 상태 변경시 변경하는 것이 필요합니다.
        mDrawerToggle.syncState();
    }
}
위 코드에서 getSupportActionBar().setDisplayHomeAsUpEnabled(false);는 기본 백 버튼을 숨기기 위해 사용됩니다. 이 코드에서는 DrawerItemClickListener 클래스를 사용하여 클릭한 항목의 해당 프래그먼트를 FragmentManager를 사용하여 로드합니다. 또한 setTitle(mNavigationDrawerItemTitles[position]);을 사용하여 ToolBar의 제목을 클릭한 목록 항목으로 변경합니다. 프래그먼트 클래스와 해당 레이아웃은 아래에 제공됩니다. ConnectFragment.java
package com.journaldev.navigationdrawer;

import android.os.Bundle;
import android.support.v4.app.Fragment;
import android.view.LayoutInflater;
import android.view.View;
import android.view.ViewGroup;

public class ConnectFragment extends Fragment {

    public ConnectFragment() {
    }

    @Override
    public View onCreateView(LayoutInflater inflater, ViewGroup container, Bundle savedInstanceState) {

        View rootView = inflater.inflate(R.layout.fragment_connect, container, false);

        return rootView;
    }

}
위 프래그먼트의 레이아웃은 아래에 정의되어 있습니다. fragment_connect.xml
<RelativeLayout xmlns:android="https://schemas.android.com/apk/res/android"
    xmlns:tools="https://schemas.android.com/tools"
    android:layout_width="match_parent"
    android:layout_height="match_parent"
    android:orientation="vertical">


    <TextView
        android:id="@+id/label"
        android:layout_alignParentTop="true"
        android:layout_marginTop="100dp"
        android:layout_width="fill_parent"
        android:layout_height="wrap_content"
        android:gravity="center_horizontal"
        android:textSize="45dp"
        android:text="Connect"
        android:textStyle="bold"/>

    <TextView
        android:layout_below="@id/label"
        android:layout_centerInParent="true"
        android:layout_width="fill_parent"
        android:layout_height="wrap_content"
        android:textSize="12dp"
        android:layout_marginTop="10dp"
        android:gravity="center_horizontal"
        android:text="Edit fragment_connect.xml to change the appearance"
        android:id="@+id/textView2" />

</RelativeLayout>
나머지 두 항목은 위와 완전히 동일한 방식으로 정의되므로 여기서 생략합니다.
네비게이션 드로어 안드로이드 예제 출력
아래는 우리의 네비게이션 드로어 안드로이드 예제 응용 프로그램에서 생성된 출력입니다.  이것은 안드로이드 네비게이션 드로어 예제 자습서를 마칩니다. 최종 안드로이드 네비게이션 드로어 프로젝트를 아래 링크에서 다운로드할 수 있습니다.
Source:
https://www.digitalocean.com/community/tutorials/android-navigation-drawer-example-tutorial


