이 튜토리얼에서는 안드로이드 레이아웃에 대한 개요를 제공합니다. 또한 화면 콘텐츠를 구성하는 데 사용되는 몇 가지 특정 레이아웃 컨트롤을 탐색할 것입니다. 구체적으로 안드로이드 LinearLayout과 Android RelativeLayout이 있습니다.
안드로이드 레이아웃
사용자 인터페이스의 기본 구성 요소는 View 클래스에서 생성된 View 객체로, 화면에서 직사각형 영역을 차지합니다. Views는 TextView, Button, EditText 등과 같은 UI 구성 요소의 기본 클래스입니다. View는 사용자 인터페이스의 기본 구성 요소인 뷰 객체입니다. ViewGroup은 View의 하위 클래스입니다. 하나 이상의 뷰를 ViewGroup으로 그룹화할 수 있습니다. ViewGroup은 뷰의 외관과 순서를 정렬할 수 있는 안드로이드 레이아웃을 제공합니다. ViewGroup의 예로는 LinearLayout, FrameLayout, RelativeLayout 등이 있습니다.
안드로이드 레이아웃 유형
안드로이드는 다음과 같은 ViewGroups 또는 레이아웃을 제공합니다:
LinearLayout: 모든 자식을 단일 방향으로 정렬하는 ViewGroup입니다. 수직 또는 수평으로RelativeLayout: 상대적인 위치에 자식 뷰를 표시하는 ViewGroup입니다.AbsoluteLayout: 자식 뷰와 위젯의 정확한 위치를 지정할 수 있게 합니다TableLayout: 자식 뷰를 행과 열로 그룹화하는 뷰입니다FrameLayout: 화면에 대한 자리 표시자로, 단일 뷰를 표시하는 데 사용됩니다ScrollView: 물리적 디스플레이보다 많은 공간을 차지하는 뷰 목록을 스크롤할 수 있게 해주는 특수한 유형의 FrameLayout입니다. ScrollView에는 일반적으로 LinearLayout인 하나의 자식 뷰 또는 ViewGroup만 포함될 수 있습니다ListView: 스크롤 가능한 항목 목록을 표시하는 뷰 그룹입니다GridView: 두 차원의 스크롤 그리드에서 항목을 표시하는 ViewGroup입니다. 그리드의 항목은 이 뷰와 관련된 ListAdapter에서 가져옵니다
이 자습서에서는 가장 많이 사용되는 두 가지 안드로이드 레이아웃에 중점을 둘 것입니다:
- LinearLayout
- RelativeLayout
Android 레이아웃 속성
- android:id : 이것은 뷰를 고유하게 식별하는 ID입니다
- android:layout_width : 레이아웃의 너비입니다
- android:layout_height : 레이아웃의 높이입니다
- android:layout_margin : 뷰 외부의 여분의 공간입니다. 예를 들어
android:marginLeft=20dp를 지정하면 뷰가 왼쪽에서 20dp 후에 배치됩니다 - android:layout_padding : 이것은 android:layout_margin과 유사하지만 뷰의 내부에 여분의 공간을 지정합니다
- android:layout_gravity : 이것은 자식 뷰의 위치를 지정합니다
- android:layout_weight : 이것은 레이아웃의 여분의 공간 중 얼마나 할당되어야 하는지 지정합니다
- android:layout_x : 이것은 레이아웃의 x 좌표를 지정합니다
- android:layout_y : 이것은 레이아웃의 y 좌표를 지정합니다
android:layout_width=wrap_content은 뷰가 콘텐츠에 필요한 크기로 자체 크기를 조절하도록 지정합니다. android:layout_width=match_parent는 뷰가 부모 뷰와 같은 크기가 되도록 지정합니다.
뷰 식별
XML 태그 내의 ID의 구문은:
- 문자열의 시작 부분에 있는 at 기호(@)는 XML 구문 분석기가 ID 문자열의 나머지 부분을 구문 분석하고 ID 리소스로 식별하도록 해야 함을 나타냅니다.
- 플러스 기호(+)는 새 리소스 이름이며 리소스에 추가해야 함을 나타냅니다.
안드로이드 LinearLayout
안드로이드 LinearLayout은 요소를 단일 라인에 정렬합니다. 우리는 android:orientation을 사용하여 해당 라인이 수직인지 수평인지 지정할 수 있습니다. 방향은 기본적으로 수평입니다. 수직 LinearLayout은 각 행당 하나의 자식만 갖게 될 것이며(따라서 단일 요소의 열이 됩니다), 수평 LinearLayout은 화면에 요소의 단일 행만 갖게 될 것입니다. android:layout_weight 속성은 요소의 중요도를 나타냅니다. 더 큰 weight를 가진 요소는 더 많은 화면 공간을 차지합니다. 여기 LinearLayout을 사용한 샘플 레이아웃 XML이 있습니다: layout_linear.xml
<LinearLayout xmlns:android="https://schemas.android.com/apk/res/android"
    android:orientation="vertical"
    android:layout_width="fill_parent"
    android:layout_height="fill_parent"
    android:layout_margin="@dimen/activity_horizontal_margin">
    <Button
        android:id="@+id/backbutton"
        android:text="Back"
        android:layout_width="wrap_content"
        android:layout_height="wrap_content" />
    <TextView
        android:text="Row 2"
        android:layout_width="wrap_content"
        android:textSize="18sp"
        android:layout_margin="10dp"
        android:layout_height="wrap_content" />
    <TextView
        android:text="Row 3"
        android:textSize="18sp"
        android:layout_margin="10dp"
        android:layout_width="wrap_content"
        android:layout_height="wrap_content" />
    <TextView
        android:text="Row 4"
        android:textSize="18sp"
        android:layout_margin="10dp"
        android:layout_width="wrap_content"
        android:layout_height="wrap_content" />
    <TextView
        android:text="Row 5"
        android:textSize="18sp"
        android:layout_margin="10dp"
        android:layout_width="wrap_content"
        android:layout_height="wrap_content" />

    <LinearLayout
        android:orientation="horizontal"
        android:layout_width="match_parent"
        android:layout_height="wrap_content">
        <Button
            android:id="@+id/next_button"
            android:text="next"
            android:layout_width="wrap_content"
            android:layout_height="wrap_content" />
        <TextView
            android:text="Row 6b"
            android:textSize="18sp"
            android:layout_margin="10dp"
            android:layout_gravity="center"
            android:layout_width="wrap_content"
            android:layout_height="wrap_content" />
        <TextView
            android:text="Row 6c"
            android:textSize="18sp"
            android:layout_margin="10dp"
            android:layout_gravity="center"
            android:layout_width="wrap_content"
            android:layout_height="wrap_content" />
        <TextView
            android:text="Row 6d"
            android:textSize="18sp"
            android:layout_margin="10dp"
            android:layout_gravity="center"
            android:layout_width="wrap_content"
            android:layout_height="wrap_content" />

    </LinearLayout>

</LinearLayout>
이 레이아웃에서는 수직 방향을 가진 부모 LinearLayout이 버튼, 텍스트뷰 및 수평 방향의 중첩된 Linear Layout(자식 뷰로)을 포함합니다. 참고: 중첩된 레이아웃은 하나의 유형이어야 하는 것은 아닙니다. 예를 들어, RelativeLayout의 자식 중 하나로 LinearLayout을 가질 수 있고 그 반대도 가능합니다.
Android RelativeLayout
Android RelativeLayout은 요소들 간 및 부모 컨테이너와의 관계에 기초하여 레이아웃을 배치합니다. 이는 가장 복잡한 레이아웃 중 하나로, 원하는 레이아웃을 얻기 위해 실제로 여러 속성이 필요합니다. RelativeLayout을 사용하면 뷰를 서로 왼쪽에, 오른쪽에, 아래에 또는 위에 배치할 수 있습니다. 또한 뷰를 부모에 대해 수평 중앙에, 수직으로 또는 둘 다에 중앙에 배치하거나 부모 RelativeLayout의 어떤 가장자리에 맞출 수도 있습니다. 자식 뷰에 이러한 속성이 지정되지 않으면 해당 뷰는 기본적으로 왼쪽 상단 위치에 렌더링됩니다.
Android RelativeLayout 속성
다음은 RelativeLayout에서 사용되는 주요 속성입니다. 이들은 세 가지 다른 범주에 걸쳐 있습니다:
컨테이너 기준
- android:layout_alignParentBottom : 요소의 하단을 컨테이너의 하단에 배치합니다
- android:layout_alignParentLeft : 요소의 왼쪽을 컨테이너의 왼쪽에 배치합니다
- android:layout_alignParentRight : 컨테이너의 오른쪽에 요소의 오른쪽을 배치합니다.
- android:layout_alignParentTop : 요소를 컨테이너의 위쪽에 배치합니다.
- android:layout_centerHorizontal : 요소를 부모 컨테이너의 가로 중앙에 가운데 정렬합니다.
- android:layout_centerInParent : 요소를 컨테이너의 가로 및 세로 중앙에 가운데 정렬합니다.
- android:layout_centerVertical : 요소를 부모 컨테이너의 세로 중앙에 가운데 정렬합니다.
형제 요소와 관련하여
- android:layout_above : 요소를 지정된 요소의 위쪽에 배치합니다.
- android:layout_below : 요소를 지정된 요소의 아래쪽에 배치합니다.
- android:layout_toLeftOf : 요소를 지정된 요소의 왼쪽에 배치합니다.
- android:layout_toRightOf : 요소를 지정된 요소의 오른쪽에 배치합니다.
“@id/XXXXX”는 id를 사용하여 요소를 참조하는 데 사용됩니다. 기억해야 할 한 가지는 선언되기 전에 요소를 참조하면 오류가 발생하므로 이러한 경우에는 @+id/를 사용해야 합니다.
다른 요소와의 정렬
- android:layout_alignBaseline : 새 요소의 기준선을 지정된 요소의 기준선과 정렬합니다.
- android:layout_alignBottom : 새 요소의 아래쪽을 지정된 요소의 아래쪽과 정렬합니다.
- android:layout_alignLeft : 새 요소의 왼쪽 가장자리를 지정된 요소의 왼쪽 가장자리와 정렬합니다.
- android:layout_alignRight: 지정된 요소의 오른쪽 가장자리와 새 요소의 오른쪽 가장자리를 정렬합니다
- android:layout_alignTop: 새 요소의 상단을 지정된 요소의 상단과 정렬합니다
다음의 XML 레이아웃은 RelativeLayout을 사용합니다: layout_relative.xml
<RelativeLayout
    android:layout_width="fill_parent"
    android:layout_height="fill_parent"
    xmlns:android="https://schemas.android.com/apk/res/android">
    <Button
        android:id="@+id/backbutton"
        android:text="Back"
        android:layout_width="wrap_content"
        android:layout_height="wrap_content" />
    <TextView
        android:id="@+id/firstName"
        android:text="First Name"
        android:textSize="18sp"
        android:layout_width="wrap_content"
        android:layout_height="wrap_content"
        android:layout_below="@id/backbutton" />
    <TextView
        android:id="@+id/editFirstName"
        android:text="JournalDev"
        android:textSize="18sp"
        android:layout_width="wrap_content"
        android:layout_marginLeft="10dp"
        android:layout_height="wrap_content"
        android:layout_toRightOf="@id/firstName"
        android:layout_below="@id/backbutton"/>
    <TextView
        android:id="@+id/editLastName"
        android:text="Layout Tutorial Example"
        android:textSize="18sp"
        android:layout_width="wrap_content"
        android:layout_height="wrap_content"
        android:layout_alignTop="@+id/lastName"
        android:layout_toRightOf="@+id/lastName"
        android:layout_toEndOf="@+id/lastName" />
    <TextView
        android:id="@+id/lastName"
        android:text="Last Name"
        android:textSize="18sp"
        android:layout_width="wrap_content"
        android:layout_height="wrap_content"
        android:layout_marginTop="48dp"
        android:layout_below="@+id/firstName"
        android:layout_alignParentLeft="true"
        android:layout_alignParentStart="true"
        android:layout_marginRight="10dp"
        android:layout_marginLeft="40dp"
        android:layout_marginStart="40dp" />

    <Button
        android:id="@+id/next"
        android:text="Next"
        android:layout_width="wrap_content"
        android:layout_height="wrap_content"
        android:layout_below="@+id/editLastName"
        android:layout_alignLeft="@+id/editLastName"
        android:layout_alignStart="@+id/editLastName"
        android:layout_marginTop="37dp" />
</RelativeLayout>
요소를 상대적인 위치에 기반하여 재배치할 수 있습니다. 다음의 XML 레이아웃은 중첩된 선형 및 상대적인 레이아웃을 가진 사용자 지정 레이아웃을 나타냅니다. layout_mixed.xml
<RelativeLayout
    android:layout_width="fill_parent"
    android:layout_height="fill_parent"
    xmlns:android="https://schemas.android.com/apk/res/android">

    <TextView
        android:id="@+id/parent_rl"
        android:text="Parent RelativeLayout"
        android:textSize="18sp"
        android:layout_width="wrap_content"
        android:layout_height="wrap_content" />

    <LinearLayout
        android:orientation="horizontal"
        android:layout_width="match_parent"
        android:layout_height="wrap_content"
        android:id="@+id/linearLayout"
        android:layout_below="@id/parent_rl"
        android:layout_alignParentRight="true"
        android:layout_alignParentEnd="true">

        <TextView
            android:text="Nested Horizontal"
            android:textSize="18sp"
            android:layout_margin="10dp"
            android:layout_width="wrap_content"
            android:layout_height="wrap_content" />

        <TextView
            android:text="LL"
            android:textSize="18sp"
            android:layout_margin="10dp"
            android:layout_width="wrap_content"
            android:layout_height="wrap_content" />


        <LinearLayout
            android:orientation="vertical"
            android:layout_width="wrap_content"
            android:layout_height="wrap_content">

            <TextView
                android:text="Double Nested"
                android:textSize="18sp"
                android:layout_margin="10dp"
                android:layout_gravity="center"
                android:layout_width="wrap_content"
                android:layout_height="wrap_content" />
            <TextView
                android:text="Vertical"
                android:textSize="18sp"
                android:layout_margin="10dp"
                android:layout_gravity="center"
                android:layout_width="wrap_content"
                android:layout_height="wrap_content" />
            <TextView
                android:text="LL"
                android:textSize="18sp"
                android:layout_margin="10dp"
                android:layout_gravity="center"
                android:layout_width="wrap_content"
                android:layout_height="wrap_content" />

        </LinearLayout>


    </LinearLayout>

    <RelativeLayout
        android:layout_width="match_parent"
        android:layout_height="match_parent"
        android:layout_below="@id/linearLayout">

    <TextView
        android:layout_width="wrap_content"
        android:layout_height="wrap_content"
        android:textAppearance="?android:attr/textAppearanceMedium"
        android:text="Nested Relative Layout"
        android:id="@+id/textView"
        android:layout_alignParentTop="true"
        android:layout_centerHorizontal="true" />

        <Button
            android:id="@+id/back_button_pressed"
            android:text="back"
            android:layout_width="wrap_content"
            android:layout_height="wrap_content"
            android:layout_below="@+id/textView"
            android:layout_centerHorizontal="true"
            android:layout_marginTop="66dp" />

    </RelativeLayout>


</RelativeLayout>
Android 레이아웃 프로젝트 구조
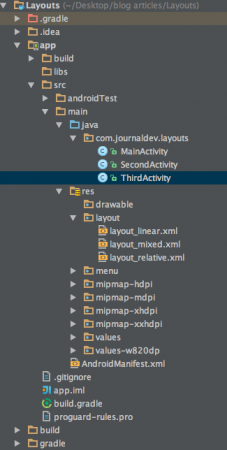
 이 프로젝트에는 세 가지 액티비티와 위에서 설명한 해당 레이아웃이 포함되어 있습니다.
Android 레이아웃 코드
애플리케이션은 MainActivity로 시작되며 다음 코드에 의해 layout_linear.xml 내용을 로드합니다:
package com.journaldev.layouts;

import android.content.Intent;
import android.support.v7.app.AppCompatActivity;
import android.os.Bundle;
import android.view.Menu;
import android.view.MenuItem;
import android.view.View;
import android.widget.Button;

public class MainActivity extends AppCompatActivity {


    Button back,next;
    @Override
    protected void onCreate(Bundle savedInstanceState) {
        super.onCreate(savedInstanceState);
        setContentView(R.layout.layout_linear);
        back=(Button)findViewById(R.id.back_button);
        next=(Button)findViewById(R.id.next_button);

        next.setOnClickListener(new View.OnClickListener() {
            @Override
            public void onClick(View v) {
                Intent intent=new Intent(MainActivity.this,SecondActivity.class);
                intent.setFlags(Intent.FLAG_ACTIVITY_CLEAR_TOP);
                startActivity(intent);
            }
        });
        back.setOnClickListener(new View.OnClickListener() {
            @Override
            public void onClick(View v) {
                finish();
            }
        });

    }

}
{
“error”: “Upstream error…”
}
package com.journaldev.layouts;

import android.app.Activity;
import android.content.Intent;
import android.os.Bundle;
import android.view.View;
import android.widget.Button;

public class SecondActivity extends Activity {
    Button back,next;
    @Override
    protected void onCreate(Bundle savedInstanceState) {
        super.onCreate(savedInstanceState);
        setContentView(R.layout.layout_relative);
        back=(Button)findViewById(R.id.backbutton);
        next=(Button)findViewById(R.id.next);

        next.setOnClickListener(new View.OnClickListener() {
            @Override
            public void onClick(View v) {
                Intent intent=new Intent(SecondActivity.this,ThirdActivity.class);
                intent.setFlags(Intent.FLAG_ACTIVITY_CLEAR_TOP);
                startActivity(intent);
            }
        });
        back.setOnClickListener(new View.OnClickListener() {
            @Override
            public void onClick(View v) {
                Intent intent=new Intent(SecondActivity.this,MainActivity.class);
                intent.setFlags(Intent.FLAG_ACTIVITY_CLEAR_TOP);
                startActivity(intent);
            }
        });

    }
}
package com.journaldev.layouts;

import android.app.Activity;
import android.content.Intent;
import android.os.Bundle;
import android.view.View;
import android.widget.Button;

public class ThirdActivity extends Activity {
    Button back;
    @Override
    protected void onCreate(Bundle savedInstanceState) {
        super.onCreate(savedInstanceState);
        setContentView(R.layout.layout_mixed);
        back=(Button)findViewById(R.id.back_button_pressed);

        back.setOnClickListener(new View.OnClickListener() {
            @Override
            public void onClick(View v) {
                Intent intent=new Intent(ThirdActivity.this,SecondActivity.class);
                intent.setFlags(Intent.FLAG_ACTIVITY_CLEAR_TOP);
                startActivity(intent);
            }
        });

    }
}
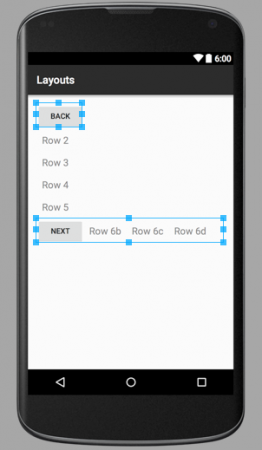
다음은 세 개의 레이아웃 파일의 이미지 출력입니다: layout_linear.xml  부모 LinearLayout에는 하나가 수평 방향으로 4개의 구성 요소를 포함하는 중첩된 LinearLayout 자식 뷰를 포함하여 총 6개의 자식 요소가 있음을 알 수 있습니다. layout_relative.xml
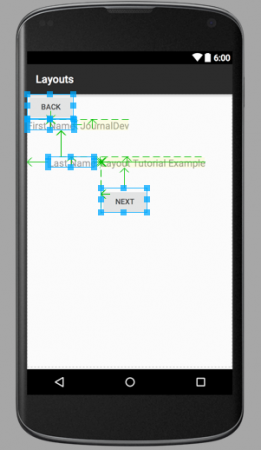
  위의 이미지에서 화살표는 형제 요소가 서로에 대해 상대적으로 배치되고 컨테이너에 대해 배치되는 방식을 보여줍니다. layout_mixed.xml
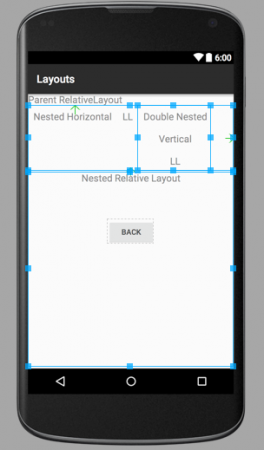
  이 상대적인 레이아웃에는 중첩된 수평 LinearLayout 내에 수직 LinearLayout과 하위 RelativeLayout이 포함되어 있습니다. 참고: 서로 다른 레이아웃에 속한 구성 요소는 형제가 아니므로 서로에 대해 상대적으로 배치할 수 없습니다. 그들의 컨테이너 레이아웃이 서로 형제이며 서로에 대해 상대적으로 배치할 수 있습니다. 파란색 선 및 화살표에 대해 궁금하다면, 이미지가 그래픽 뷰에서 xml 레이아웃에서 가져온 것이기 때문입니다. 앱을 실행하면 이러한 파란색 선 및 사각형이 표시되지 않습니다. 이것으로 안드로이드 레이아웃 자습서가 끝납니다. 다음 자습서에서 다른 안드로이드 레이아웃을 다룰 것입니다. 아래 링크에서 최종 Android Layout Project를 다운로드할 수 있습니다.
안드로이드 LinearLayout RelativeLayout 예제 프로젝트 다운로드
참고: API 문서
Source:
https://www.digitalocean.com/community/tutorials/android-layout-linearlayout-relativelayout


