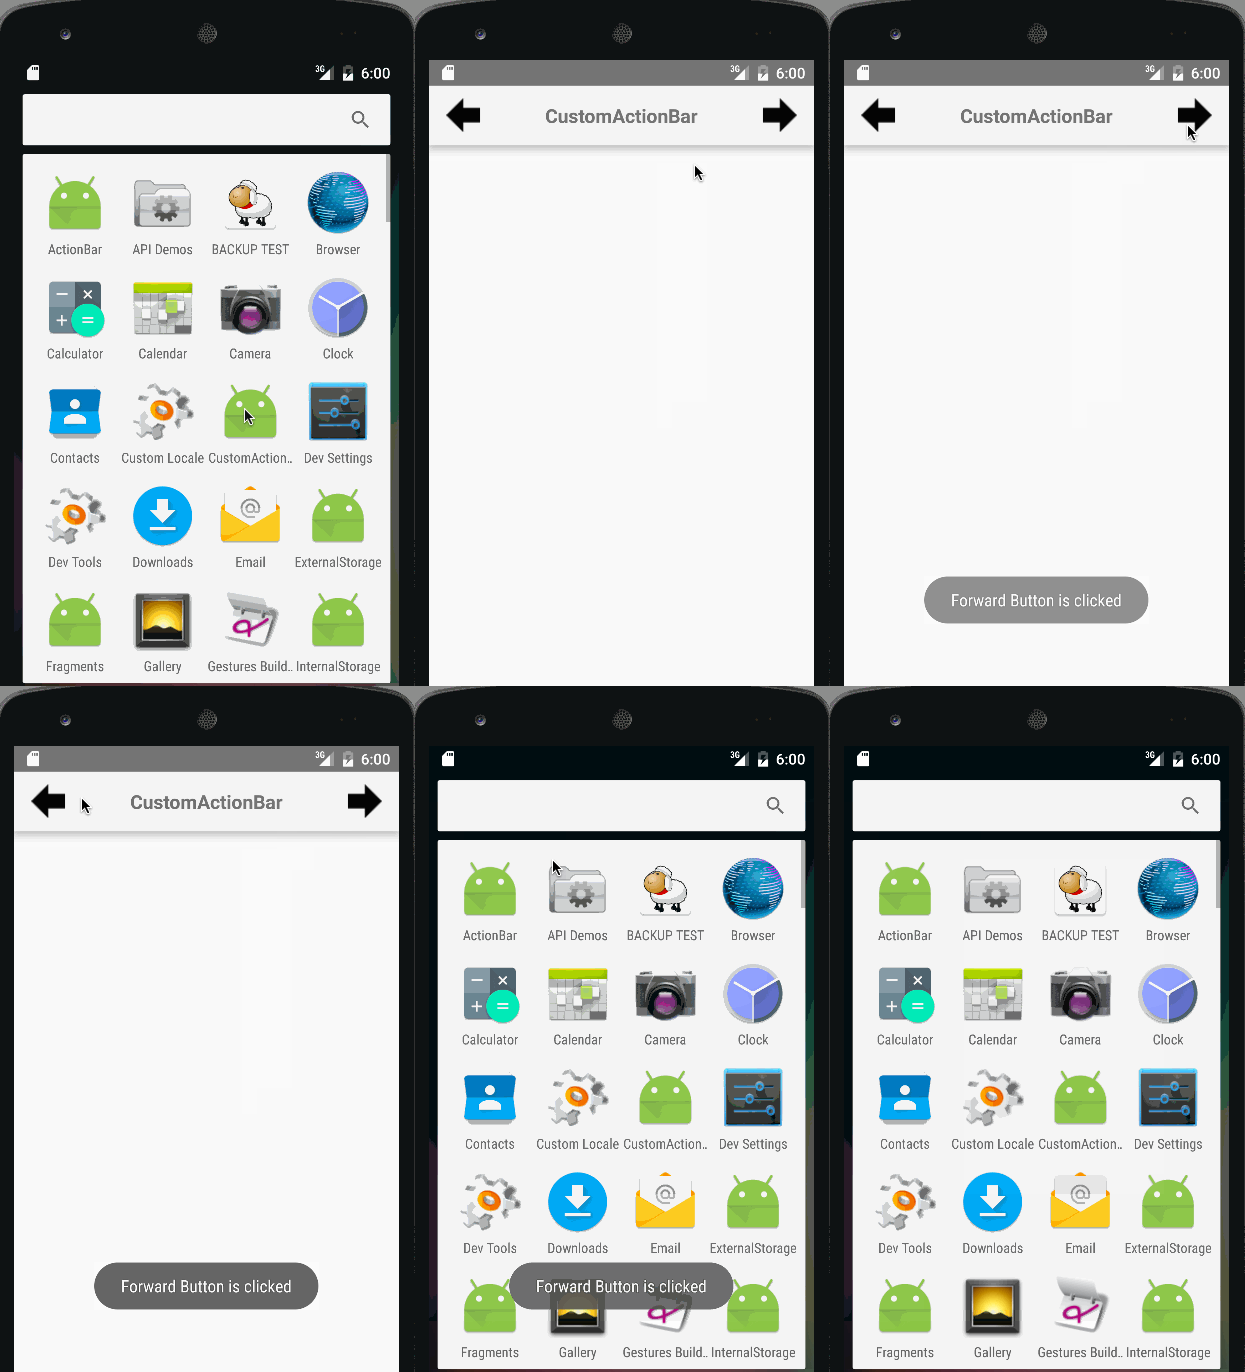
이 튜토리얼에서는 사용자 지정 레이아웃을 사용한 Android 사용자 지정 작업 표시줄이 포함된 앱을 만들 것입니다. 우리는 이 튜토리얼에서 논의된 ActionBar 구성 요소에 대한 기본적인 이해가 있다고 가정합니다.
Android 사용자 정의 작업 표시줄
ActionBar를 사용자 정의하려면 먼저 res/values/styles.xml에서 테마를 구성하고 해당 활동 클래스에 테마를 설정해야 합니다. 다음은 해당 xml 레이아웃입니다: styles.xml
<resources>

<style name="AppTheme" parent="Theme.AppCompat.Light.NoActionBar">
        <!-- Customize your theme here. -->
    </style>

    <style name="CustomTheme" parent="Theme.AppCompat.Light">

        <item name="contentInsetStart">0dp</item>
        <item name="contentInsetEnd">0dp</item>
    </style>

</resources>
위의 코드 스니펫에서 우리가 활동에 AppTheme 스타일을 사용하면 명시적으로 NoActionBar 테마를 지정하므로 null 포인터 예외가 발생합니다. 따라서 이 프로젝트에서는 CustomTheme 스타일을 사용할 것입니다. contentInsetStart와 contentInsetEnd는 패딩 값입니다. Android 3.0 이전 버전과 최대 호환성을 제공하기 때문에 AppCompatActivity을 사용할 것입니다.
사용자 지정 작업 표시줄 레이아웃
다음은 우리의 MainActivity에서 ActionBar에 설정될 뷰 레이아웃입니다. custom_action_bar_layout.xml
<?xml version="1.0" encoding="utf-8"?>
<TableLayout xmlns:android="https://schemas.android.com/apk/res/android"
    android:layout_width="match_parent"
    android:layout_height="wrap_content"
    android:orientation="horizontal"
    >

    <TableRow>

        <ImageButton
            android:layout_width="wrap_content"
            android:layout_height="wrap_content"
            android:src="@drawable/back"
            android:layout_gravity="center_vertical"
            android:background="@android:color/transparent"
            android:id="@+id/action_bar_back"
            android:layout_alignParentTop="true"
            android:layout_centerHorizontal="true" />


        <TextView
            android:layout_width="wrap_content"
            android:layout_height="wrap_content"
            android:text="@string/app_name"
            android:gravity="center_horizontal"
            android:textAppearance="?android:attr/textAppearanceMedium"
            android:textStyle="bold"
            android:padding="10dp"
            android:layout_alignParentTop="true"
            android:layout_weight="1"
            />

        <ImageButton
            android:layout_width="wrap_content"
            android:layout_height="wrap_content"
            android:src="@drawable/forward"
            android:id="@+id/action_bar_forward"
            android:layout_gravity="center_vertical"
            android:background="@android:color/transparent"
            android:layout_alignParentTop="true"
            android:layout_centerHorizontal="true" />


    </TableRow>

</TableLayout>
이 뷰 레이아웃은 두 개의 ImageButtons로 구성되어 있으며 이는 앞으로 이동 및 뒤로 이동 이미지 버튼을 나타내며 중앙에는 TextView가 있습니다.
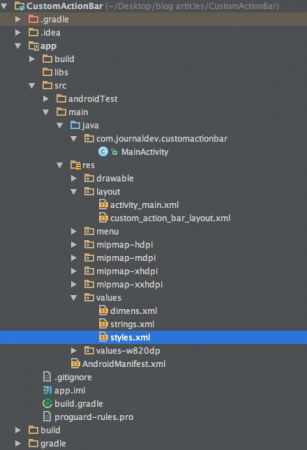
Android 사용자 정의 액션 바 프로젝트 구조
Android 사용자 정의 액션 바 코드
activity_main.xml은 ActionBar에 중점을 두기 때문에 빈 RelativeLayout입니다. MainActivity.java는 아래에 제공됩니다.
package com.journaldev.customactionbar;

import android.support.v7.app.ActionBar;
import android.support.v7.app.AppCompatActivity;
import android.os.Bundle;
import android.view.Menu;
import android.view.MenuItem;
import android.view.View;
import android.widget.ImageButton;
import android.widget.Toast;

public class MainActivity extends AppCompatActivity {

    @Override
    protected void onCreate(Bundle savedInstanceState) {
        super.onCreate(savedInstanceState);
        setContentView(R.layout.activity_main);

        getSupportActionBar().setDisplayOptions(ActionBar.DISPLAY_SHOW_CUSTOM);
        getSupportActionBar().setDisplayShowCustomEnabled(true);
        getSupportActionBar().setCustomView(R.layout.custom_action_bar_layout);
        View view =getSupportActionBar().getCustomView();

        ImageButton imageButton= (ImageButton)view.findViewById(R.id.action_bar_back);

        imageButton.setOnClickListener(new View.OnClickListener() {
            @Override
            public void onClick(View v) {
                finish();
            }
        });

        ImageButton imageButton2= (ImageButton)view.findViewById(R.id.action_bar_forward);

        imageButton2.setOnClickListener(new View.OnClickListener() {
            @Override
            public void onClick(View v) {
                Toast.makeText(getApplicationContext(),"Forward Button is clicked",Toast.LENGTH_LONG).show();
            }
        });
    }


}
위의 코드에서는 지원 라이브러리를 사용하고 있습니다. 따라서 getSupportActionBar() 대신에 getActionBar()를 사용했습니다. ActionBar에 사용자 지정 레이아웃을 추가하려면 다음 두 메서드를 호출했습니다.
- getSupportActionBar().setDisplayOptions(ActionBar.DISPLAY_SHOW_CUSTOM);
- getSupportActionBar().setDisplayShowCustomEnabled(true);
setCustomView()는 위에 표시된대로 customView를 사용하여 ActionBar를 인플레이트하는 데 사용됩니다. ActionBar 버튼에 대한 onClickListener를 설정하려면 먼저 getCustomView()를 사용하여 CustomView를 가져와야 합니다. 이 튜토리얼에서는 뒤로 버튼을 finish();로 설정하여 액티비티를 종료하고 앞으로 버튼을 Toast를 표시하도록 프로그래밍했습니다. 참고: AndroidManifest.xml에 다음 줄을 애플리케이션 태그 내에 추가하세요.
android:theme="@style/CustomTheme"
여기에는 커스텀 테마와 레이아웃이 있는 안드로이드 애플리케이션이 있습니다.  참고: 수정할 수 없는 고정된 여백이 양쪽에 있습니다. 이를 수정하려면 ActionBar를 ToolBar로 대체해야 합니다. 이에 대해서는 나중에 튜토리얼에서 설명하겠습니다. 이로써 안드로이드 커스텀 액션바 튜토리얼을 마칩니다. 최종 Android CustomActionBar 프로젝트를 아래 링크에서 다운로드할 수 있습니다.
참고: Android 문서
Source:
https://www.digitalocean.com/community/tutorials/android-custom-action-bar-example-tutorial


