Spring Transaction Managementは、Springフレームワークの最も広く使用されていて重要な機能の1つです。トランザクション管理は、企業のアプリケーションにおいて些細なタスクです。すでにJDBC APIを使用してトランザクション管理の方法を学んでいます。Springはトランザクション管理に対する幅広いサポートを提供し、システムの障害が発生した場合でも、開発者がビジネスロジックに集中できるようにし、データの整合性を心配する必要がありません。
Spring Transaction Management
 Spring Transaction Managementを使用する利点の一部は次のとおりです:
- 宣言的トランザクション管理のサポート。このモデルでは、Springはトランザクションメソッドに対してAOPを使用してデータの整合性を提供します。これが推奨されるアプローチであり、ほとんどの場合に機能します。
- サポートされているトランザクションAPIのほとんどは、JDBC、Hibernate、JPA、JDO、JTAなどです。必要なのは適切なトランザクションマネージャの実装クラスを使用するだけです。たとえば、JDBCトランザクション管理には
org.springframework.jdbc.datasource.DriverManagerDataSourceを使用し、HibernateをORMツールとして使用している場合はorg.springframework.orm.hibernate3.HibernateTransactionManagerを使用します。 - プログラムによるトランザクション管理も、
TransactionTemplateまたはPlatformTransactionManagerの実装を使用してサポートされています。
デクラレーティブなトランザクション管理でサポートされている機能のほとんどを利用できるため、このアプローチを例のプロジェクトで使用します。
Springトランザクション管理JDBCの例
単一トランザクションで複数のテーブルを更新する簡単なSpring JDBCプロジェクトを作成します。トランザクションは、すべてのJDBCステートメントが正常に実行された場合にのみコミットされ、データの整合性を保つためにロールバックされるべきです。JDBCトランザクション管理に詳しい方は、接続の自動コミットをfalseに設定し、すべてのステートメントの結果に基づいてトランザクションをコミットまたはロールバックすることができると主張するかもしれません。もちろんそれは可能ですが、トランザクション管理のために多くの雛型コードが必要になります。また、同じコードがトランザクション管理が必要なすべての場所に存在するため、密結合で保守性の低いコードになってしまいます。Springの宣言的トランザクション管理は、アスペクト指向プログラミングを使用して緩い結合を実現し、アプリケーション内の雛型コードを回避することで、これらの懸念に対処しています。簡単な例を使って、Springがどのようにそれを行うのか見てみましょう。Springプロジェクトに入る前に、使用するためのデータベースのセットアップを行いましょう。
Springトランザクション管理 – データベースのセットアップ
使用するために2つのテーブルを作成し、両方を単一のトランザクションで更新します。
CREATE TABLE `Customer` (
  `id` int(11) unsigned NOT NULL,
  `name` varchar(20) DEFAULT NULL,
  PRIMARY KEY (`id`)
) ENGINE=InnoDB DEFAULT CHARSET=utf8;
CREATE TABLE `Address` (
  `id` int(11) unsigned NOT NULL,
  `address` varchar(20) DEFAULT NULL,
  `country` varchar(20) DEFAULT NULL,
  PRIMARY KEY (`id`)
) ENGINE=InnoDB DEFAULT CHARSET=utf8;
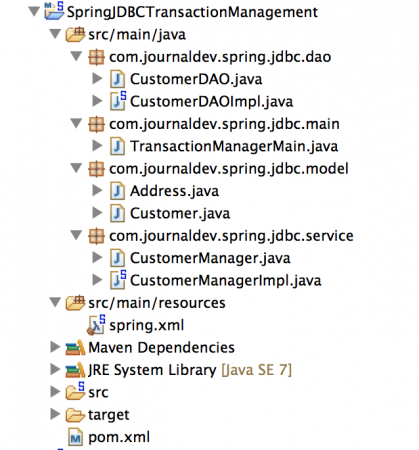
ここでアドレスid列から顧客id列への外部キー関係を定義できますが、単純化のためにここでは制約が定義されていません。私たちのデータベース設定は、Springトランザクション管理プロジェクト用に準備ができています。Spring Tool Suiteで簡単なSpring Mavenプロジェクトを作成しましょう。最終的なプロジェクト構造は以下の画像のようになります。 それぞれの部分を一つずつ見ていきましょう。それらが組み合わさると、JDBCを使用した簡単なSpringトランザクション管理の例が得られます。
Springトランザクション管理 – Maven依存関係
JDBC APIを使用しているため、アプリケーションにspring-jdbc依存関係を含める必要があります。また、MySQLデータベースに接続するためにMySQLデータベースドライバも必要ですので、mysql-connector-java依存関係も含めます。 spring-txアーティファクトは、通常はSTSによって自動的に含まれますが、そうでない場合は手動で追加する必要があります。ログ記録やユニットテストのための他の依存関係がいくつか表示されるかもしれませんが、それらのいずれも使用しません。最終的なpom.xmlファイルは以下のコードのようになります。
<project xmlns="https://maven.apache.org/POM/4.0.0" xmlns:xsi="https://www.w3.org/2001/XMLSchema-instance"
	xsi:schemaLocation="https://maven.apache.org/POM/4.0.0 https://maven.apache.org/xsd/maven-4.0.0.xsd">
	<modelVersion>4.0.0</modelVersion>
	<groupId>org.springframework.samples</groupId>
	<artifactId>SpringJDBCTransactionManagement</artifactId>
	<version>0.0.1-SNAPSHOT</version>

	<properties>

		<!-- Generic properties -->
		<java.version>1.7</java.version>
		<project.build.sourceEncoding>UTF-8</project.build.sourceEncoding>
		<project.reporting.outputEncoding>UTF-8</project.reporting.outputEncoding>

		<!-- Spring -->
		<spring-framework.version>4.0.2.RELEASE</spring-framework.version>

		<!-- Logging -->
		<logback.version>1.0.13</logback.version>
		<slf4j.version>1.7.5</slf4j.version>

		<!-- Test -->
		<junit.version>4.11</junit.version>

	</properties>

	<dependencies>
		<!-- Spring and Transactions -->
		<dependency>
			<groupId>org.springframework</groupId>
			<artifactId>spring-context</artifactId>
			<version>${spring-framework.version}</version>
		</dependency>
		<dependency>
			<groupId>org.springframework</groupId>
			<artifactId>spring-tx</artifactId>
			<version>${spring-framework.version}</version>
		</dependency>

		<!-- Spring JDBC and MySQL Driver -->
		<dependency>
			<groupId>org.springframework</groupId>
			<artifactId>spring-jdbc</artifactId>
			<version>${spring-framework.version}</version>
		</dependency>
		<dependency>
			<groupId>mysql</groupId>
			<artifactId>mysql-connector-java</artifactId>
			<version>5.0.5</version>
		</dependency>

		<!-- Logging with SLF4J & LogBack -->
		<dependency>
			<groupId>org.slf4j</groupId>
			<artifactId>slf4j-api</artifactId>
			<version>${slf4j.version}</version>
			<scope>compile</scope>
		</dependency>
		<dependency>
			<groupId>ch.qos.logback</groupId>
			<artifactId>logback-classic</artifactId>
			<version>${logback.version}</version>
			<scope>runtime</scope>
		</dependency>

		<!-- Test Artifacts -->
		<dependency>
			<groupId>org.springframework</groupId>
			<artifactId>spring-test</artifactId>
			<version>${spring-framework.version}</version>
			<scope>test</scope>
		</dependency>
		<dependency>
			<groupId>junit</groupId>
			<artifactId>junit</artifactId>
			<version>${junit.version}</version>
			<scope>test</scope>
		</dependency>

	</dependencies>
</project>
I have updated the Spring versions to the latest one as of today. Make sure MySQL database driver is compatible with your mysql installation.
Spring トランザクション管理 – モデルクラス
私たちは、Customer と Address の2つの Java Beans を作成します。これらは私たちのテーブルにマップされます。
package com.journaldev.spring.jdbc.model;

public class Address {

	private int id;
	private String address;
	private String country;

	public int getId() {
		return id;
	}
	public void setId(int id) {
		this.id = id;
	}
	public String getAddress() {
		return address;
	}
	public void setAddress(String address) {
		this.address = address;
	}
	public String getCountry() {
		return country;
	}
	public void setCountry(String country) {
		this.country = country;
	}

}
package com.journaldev.spring.jdbc.model;

public class Customer {

	private int id;
	private String name;
	private Address address;

	public int getId() {
		return id;
	}
	public void setId(int id) {
		this.id = id;
	}
	public String getName() {
		return name;
	}
	public void setName(String name) {
		this.name = name;
	}
	public Address getAddress() {
		return address;
	}
	public void setAddress(Address address) {
		this.address = address;
	}

}
Customer ビーンには、Address がその変数の1つとして含まれていることに注意してください。Customer の DAO を実装すると、顧客と住所の両方のデータを取得し、これらのテーブルに対して2つの個別の挿入クエリを実行します。そのため、データの不整合を避けるためにトランザクション管理が必要です。
Spring トランザクション管理 – DAO 実装
Customer ビーンの DAO を実装しましょう。単純化のために、顧客と住所の両方のテーブルにレコードを挿入する1つのメソッドだけを持ちます。
package com.journaldev.spring.jdbc.dao;

import com.journaldev.spring.jdbc.model.Customer;

public interface CustomerDAO {

	public void create(Customer customer);
}
package com.journaldev.spring.jdbc.dao;

import javax.sql.DataSource;

import org.springframework.jdbc.core.JdbcTemplate;

import com.journaldev.spring.jdbc.model.Customer;

public class CustomerDAOImpl implements CustomerDAO {

	private DataSource dataSource;

	public void setDataSource(DataSource dataSource) {
		this.dataSource = dataSource;
	}

	@Override
	public void create(Customer customer) {
		String queryCustomer = "insert into Customer (id, name) values (?,?)";
		String queryAddress = "insert into Address (id, address,country) values (?,?,?)";

		JdbcTemplate jdbcTemplate = new JdbcTemplate(dataSource);

		jdbcTemplate.update(queryCustomer, new Object[] { customer.getId(),
				customer.getName() });
		System.out.println("Inserted into Customer Table Successfully");
		jdbcTemplate.update(queryAddress, new Object[] { customer.getId(),
				customer.getAddress().getAddress(),
				customer.getAddress().getCountry() });
		System.out.println("Inserted into Address Table Successfully");
	}

}
CustomerDAO の実装では、トランザクション管理を行っていないことに注意してください。この方法で、関心の分離を実現しています。なぜなら、時には DAO の実装をサードパーティから取得し、これらのクラスを制御できないことがあるからです。
Spring Declarative Transaction Management – サービス
顧客DAOの実装を使用し、1つのメソッドで顧客テーブルと住所テーブルにレコードを挿入する際にトランザクション管理を提供する顧客サービスを作成しましょう。
package com.journaldev.spring.jdbc.service;

import com.journaldev.spring.jdbc.model.Customer;

public interface CustomerManager {

	public void createCustomer(Customer cust);
}
package com.journaldev.spring.jdbc.service;

import org.springframework.transaction.annotation.Transactional;

import com.journaldev.spring.jdbc.dao.CustomerDAO;
import com.journaldev.spring.jdbc.model.Customer;

public class CustomerManagerImpl implements CustomerManager {

	private CustomerDAO customerDAO;

	public void setCustomerDAO(CustomerDAO customerDAO) {
		this.customerDAO = customerDAO;
	}

	@Override
	@Transactional
	public void createCustomer(Customer cust) {
		customerDAO.create(cust);
	}

}
顧客マネージャーの実装を見ると、単に顧客を作成するために顧客DAOの実装を使用していますが、@Transactional注釈を使用してcreateCustomer()メソッドに宣言的なトランザクション管理を提供しています。これが、Springトランザクション管理の利点を得るためにコードで行う必要があるすべてです。@Transactional注釈は、メソッドだけでなく、クラス全体にも適用できます。すべてのメソッドにトランザクション管理機能を持たせたい場合は、クラスにこの注釈を付ける必要があります。注釈についての詳細は、Java Annotations Tutorialを参照してください。残っている唯一の部分は、Springビーンを配線してSpringトランザクション管理の例を機能させることです。
Springトランザクション管理 – Bean構成
Spring Bean Configuration ファイルを名前「spring.xml」として作成してください。このファイルは、Spring ビーンをワイヤリングして JDBC プログラムを実行してトランザクション管理をテストするために使用します。
<?xml version="1.0" encoding="UTF-8"?>
<beans xmlns="https://www.springframework.org/schema/beans"
	xmlns:xsi="https://www.w3.org/2001/XMLSchema-instance" xmlns:context="https://www.springframework.org/schema/context"
	xmlns:tx="https://www.springframework.org/schema/tx"
	xsi:schemaLocation="https://www.springframework.org/schema/beans https://www.springframework.org/schema/beans/spring-beans.xsd
		https://www.springframework.org/schema/context https://www.springframework.org/schema/context/spring-context-4.0.xsd
		https://www.springframework.org/schema/tx https://www.springframework.org/schema/tx/spring-tx-4.0.xsd">

	<!-- Enable Annotation based Declarative Transaction Management -->
	<tx:annotation-driven proxy-target-class="true"
		transaction-manager="transactionManager" />

	<!-- Creating TransactionManager Bean, since JDBC we are creating of type
		DataSourceTransactionManager -->
	<bean id="transactionManager"
		class="org.springframework.jdbc.datasource.DataSourceTransactionManager">
		<property name="dataSource" ref="dataSource" />
	</bean>

	<!-- MySQL DB DataSource -->
	<bean id="dataSource"
		class="org.springframework.jdbc.datasource.DriverManagerDataSource">

		<property name="driverClassName" value="com.mysql.jdbc.Driver" />
		<property name="url" value="jdbc:mysql://localhost:3306/TestDB" />
		<property name="username" value="pankaj" />
		<property name="password" value="pankaj123" />
	</bean>

	<bean id="customerDAO" class="com.journaldev.spring.jdbc.dao.CustomerDAOImpl">
		<property name="dataSource" ref="dataSource"></property>
	</bean>

	<bean id="customerManager" class="com.journaldev.spring.jdbc.service.CustomerManagerImpl">
		<property name="customerDAO" ref="customerDAO"></property>
	</bean>

</beans>
Spring ビーン構成ファイルで注意すべき重要なポイントは次のとおりです:
- tx:annotation-driven要素は、Spring コンテキストに注釈ベースのトランザクション管理構成を使用していることを伝えるために使用されます。transaction-manager属性は、トランザクションマネージャービーンの名前を指定するために使用されます。transaction-manager のデフォルト値はtransactionManagerですが、混乱を避けるためにそれをまだ指定しています。proxy-target-class属性は、クラスベースのプロキシを使用するように Spring コンテキストに指示するために使用されます。これを指定しないと、次のようなメッセージを含むランタイム例外が発生します:Exception in thread “main” org.springframework.beans.factory.BeanNotOfRequiredTypeException: Bean named ‘customerManager’ must be of type [com.journaldev.spring.jdbc.service.CustomerManagerImpl], but was actually of type [com.sun.proxy.$Proxy6]
- JDBC を使用しているため、
org.springframework.jdbc.datasource.DataSourceTransactionManager型の transactionManager ビーンを作成しています。これは非常に重要であり、トランザクション API の使用に基づいて適切なトランザクションマネージャー実装クラスを使用する必要があります。 - dataSourceビーンは、DataSource オブジェクトを作成するために使用され、driverClassName、url、username、およびpassword などのデータベース構成プロパティを提供する必要があります。これらの値は、ローカルの設定に基づいて変更してください。
- 私たちはdataSourceをcustomerDAOビーンに注入しています。同様に、customerDAOビーンをcustomerManagerビーンの定義に注入しています。
私たちのセットアップは準備ができています、単純なテストクラスを作成して、トランザクション管理の実装をテストしましょう。
package com.journaldev.spring.jdbc.main;

import org.springframework.context.support.ClassPathXmlApplicationContext;

import com.journaldev.spring.jdbc.model.Address;
import com.journaldev.spring.jdbc.model.Customer;
import com.journaldev.spring.jdbc.service.CustomerManager;
import com.journaldev.spring.jdbc.service.CustomerManagerImpl;

public class TransactionManagerMain {

	public static void main(String[] args) {
		ClassPathXmlApplicationContext ctx = new ClassPathXmlApplicationContext(
				"spring.xml");

		CustomerManager customerManager = ctx.getBean("customerManager",
				CustomerManagerImpl.class);

		Customer cust = createDummyCustomer();
		customerManager.createCustomer(cust);

		ctx.close();
	}

	private static Customer createDummyCustomer() {
		Customer customer = new Customer();
		customer.setId(2);
		customer.setName("Pankaj");
		Address address = new Address();
		address.setId(2);
		address.setCountry("India");
		// 20文字を超える値を設定しています、SQLExceptionが発生します
		address.setAddress("Albany Dr, San Jose, CA 95129");
		customer.setAddress(address);
		return customer;
	}

}
アドレス列の値を意図的に長すぎる値に設定していることに注意してください、そのため、データをアドレステーブルに挿入する際に例外が発生します。今、テストプログラムを実行すると、以下の出力が得られます。
Mar 29, 2014 7:59:32 PM org.springframework.context.support.ClassPathXmlApplicationContext prepareRefresh
INFO: Refreshing org.springframework.context.support.ClassPathXmlApplicationContext@3fa99295: startup date [Sat Mar 29 19:59:32 PDT 2014]; root of context hierarchy
Mar 29, 2014 7:59:32 PM org.springframework.beans.factory.xml.XmlBeanDefinitionReader loadBeanDefinitions
INFO: Loading XML bean definitions from class path resource [spring.xml]
Mar 29, 2014 7:59:32 PM org.springframework.jdbc.datasource.DriverManagerDataSource setDriverClassName
INFO: Loaded JDBC driver: com.mysql.jdbc.Driver
Inserted into Customer Table Successfully
Mar 29, 2014 7:59:32 PM org.springframework.beans.factory.xml.XmlBeanDefinitionReader loadBeanDefinitions
INFO: Loading XML bean definitions from class path resource [org/springframework/jdbc/support/sql-error-codes.xml]
Mar 29, 2014 7:59:32 PM org.springframework.jdbc.support.SQLErrorCodesFactory <init>
INFO: SQLErrorCodes loaded: [DB2, Derby, H2, HSQL, Informix, MS-SQL, MySQL, Oracle, PostgreSQL, Sybase]
Exception in thread "main" org.springframework.dao.DataIntegrityViolationException: PreparedStatementCallback; SQL [insert into Address (id, address,country) values (?,?,?)]; Data truncation: Data too long for column 'address' at row 1; nested exception is com.mysql.jdbc.MysqlDataTruncation: Data truncation: Data too long for column 'address' at row 1
	at org.springframework.jdbc.support.SQLStateSQLExceptionTranslator.doTranslate(SQLStateSQLExceptionTranslator.java:100)
	at org.springframework.jdbc.support.AbstractFallbackSQLExceptionTranslator.translate(AbstractFallbackSQLExceptionTranslator.java:73)
	at org.springframework.jdbc.support.AbstractFallbackSQLExceptionTranslator.translate(AbstractFallbackSQLExceptionTranslator.java:81)
	at org.springframework.jdbc.support.AbstractFallbackSQLExceptionTranslator.translate(AbstractFallbackSQLExceptionTranslator.java:81)
	at org.springframework.jdbc.core.JdbcTemplate.execute(JdbcTemplate.java:658)
	at org.springframework.jdbc.core.JdbcTemplate.update(JdbcTemplate.java:907)
	at org.springframework.jdbc.core.JdbcTemplate.update(JdbcTemplate.java:968)
	at org.springframework.jdbc.core.JdbcTemplate.update(JdbcTemplate.java:978)
	at com.journaldev.spring.jdbc.dao.CustomerDAOImpl.create(CustomerDAOImpl.java:27)
	at com.journaldev.spring.jdbc.service.CustomerManagerImpl.createCustomer(CustomerManagerImpl.java:19)
	at com.journaldev.spring.jdbc.service.CustomerManagerImpl$$FastClassBySpringCGLIB$$84f71441.invoke(<generated>)
	at org.springframework.cglib.proxy.MethodProxy.invoke(MethodProxy.java:204)
	at org.springframework.aop.framework.CglibAopProxy$CglibMethodInvocation.invokeJoinpoint(CglibAopProxy.java:711)
	at org.springframework.aop.framework.ReflectiveMethodInvocation.proceed(ReflectiveMethodInvocation.java:157)
	at org.springframework.transaction.interceptor.TransactionInterceptor$1.proceedWithInvocation(TransactionInterceptor.java:98)
	at org.springframework.transaction.interceptor.TransactionAspectSupport.invokeWithinTransaction(TransactionAspectSupport.java:262)
	at org.springframework.transaction.interceptor.TransactionInterceptor.invoke(TransactionInterceptor.java:95)
	at org.springframework.aop.framework.ReflectiveMethodInvocation.proceed(ReflectiveMethodInvocation.java:179)
	at org.springframework.aop.framework.CglibAopProxy$DynamicAdvisedInterceptor.intercept(CglibAopProxy.java:644)
	at com.journaldev.spring.jdbc.service.CustomerManagerImpl$$EnhancerBySpringCGLIB$$891ec7ac.createCustomer(<generated>)
	at com.journaldev.spring.jdbc.main.TransactionManagerMain.main(TransactionManagerMain.java:20)
Caused by: com.mysql.jdbc.MysqlDataTruncation: Data truncation: Data too long for column 'address' at row 1
	at com.mysql.jdbc.MysqlIO.checkErrorPacket(MysqlIO.java:2939)
	at com.mysql.jdbc.MysqlIO.sendCommand(MysqlIO.java:1623)
	at com.mysql.jdbc.MysqlIO.sqlQueryDirect(MysqlIO.java:1715)
	at com.mysql.jdbc.Connection.execSQL(Connection.java:3249)
	at com.mysql.jdbc.PreparedStatement.executeInternal(PreparedStatement.java:1268)
	at com.mysql.jdbc.PreparedStatement.executeUpdate(PreparedStatement.java:1541)
	at com.mysql.jdbc.PreparedStatement.executeUpdate(PreparedStatement.java:1455)
	at com.mysql.jdbc.PreparedStatement.executeUpdate(PreparedStatement.java:1440)
	at org.springframework.jdbc.core.JdbcTemplate$2.doInPreparedStatement(JdbcTemplate.java:914)
	at org.springframework.jdbc.core.JdbcTemplate$2.doInPreparedStatement(JdbcTemplate.java:907)
	at org.springframework.jdbc.core.JdbcTemplate.execute(JdbcTemplate.java:642)
	... 16 more
ログメッセージには、データが顧客テーブルに正常に挿入されたとありますが、MySQLデータベースドライバによってスローされた例外は、アドレス列の値が長すぎると明確に言っています。今、Customerテーブルをチェックしても、そこには行が見つかりません。つまり、トランザクションは完全にロールバックされています。トランザクション管理の魔法がどこで行われているのか気になるかもしれませんが、ログを注意深く確認し、Springフレームワークによって作成されたAOPとプロキシクラスに注目してください。Springフレームワークは、Aroundアドバイスを使用してCustomerManagerImplのプロキシクラスを生成し、メソッドが正常に返された場合にのみトランザクションをコミットしています。例外が発生した場合は、トランザクション全体をロールバックしています。さらに学ぶためには、Spring AOPの例を読むことをおすすめします。これでSpringトランザクション管理の例は以上です。以下のリンクからサンプルプロジェクトをダウンロードして、さらに試してみてください。
Source:
https://www.digitalocean.com/community/tutorials/spring-transaction-management-jdbc-example


