今日はAndroid Floating Action Buttonについて学びます。Material Designガイドラインに含まれる新しいコンポーネントであるFloatingActionButtonと、SnackBar、これはToastのMaterial Designバージョンです。
Android Floating Action Button
Android Floating Action Buttonは、画面上の最も重要な機能に重点を置くために使用されます。これは、ユーザーの注意を引くクールでスタイリッシュな方法です。
Android Floating Action Button 概要
プロジェクトでMaterial Designウィジェットを使用するには、以下の依存関係をbuild.gradleファイルにコンパイルする必要があります。
compile 'com.android.support:design:23.1.1'
FloatingActionButtonウィジェットは、xmlレイアウトで以下のように定義されています。
<android.support.design.widget.FloatingActionButton
      android:id="@+id/fab"
      android:layout_width="wrap_content"
      android:layout_height="wrap_content"
      android:src="@android:drawable/ic_dialog_email"
      android:layout_gravity="bottom|end"
      app:elevation="6dp"
      app:pressedTranslationZ="12dp"/>
上記のxmlレイアウトから得られたいくつかの観察結果は次のとおりです。
- FloatingActionButtonはImageViewクラスを拡張しています。これは
android:src属性から明らかです。 - 上記のXMLレイアウトでは、`elevation`属性はボタンに影を投射するために使用され、`pressedTranslationZ`は押されたときに影を拡大させます。
A FloatingActionButton is placed within a CoordinatorLayout. A CoordinatorLayout helps facilitate interactions between views contained within it, which will be useful later to describe how to animate the button depending on scroll changes. SnackBar is a more enhanced widget when compared to a Toast. A SnackBar is invoked as follows:
Snackbar.make(view, "Replace with your own action", Snackbar.LENGTH_LONG)
                        .setAction("Action", null).show();
別のチュートリアルでSnackBarについて詳しく説明しました。重要な注意: Androidのチュートリアルをよくフォローしている場合、新しいビルドツールのバージョン23.1.1への更新で、新しい空のプロジェクトのプロジェクト構造が変更され、上記のウィジェットが新しいAndroid Studioプロジェクトにデフォルトで含まれることに気付いたはずです。したがって、上記のウィジェットを実装する代わりに、新しいプロジェクト構造のクイックツアーを行いましょう。
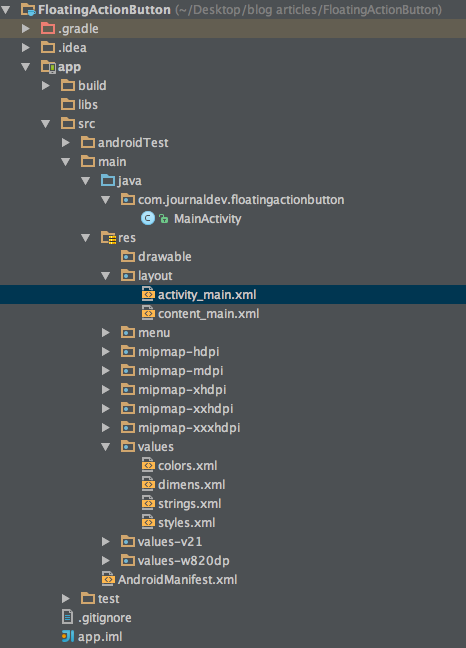
Androidフローティングアクションボタンの例:プロジェクト構造
 新しい`content_main.xml`という名前のXMLレイアウトファイルが追加されました。これは以前の`activity_main.xml`と同じです。
Androidフローティングアクションボタンの例
新しい activity_main.xml は以下のようになります:
<?xml version="1.0" encoding="utf-8"?>
<android.support.design.widget.CoordinatorLayout xmlns:android="https://schemas.android.com/apk/res/android"
    xmlns:app="https://schemas.android.com/apk/res-auto"
    xmlns:tools="https://schemas.android.com/tools"
    android:layout_width="match_parent"
    android:layout_height="match_parent"
    android:fitsSystemWindows="true"
    tools:context="com.journaldev.floatingactionbutton.MainActivity">

    <android.support.design.widget.AppBarLayout
        android:layout_width="match_parent"
        android:layout_height="wrap_content"
        android:theme="@style/AppTheme.AppBarOverlay">

        <android.support.v7.widget.Toolbar
            android:id="@+id/toolbar"
            android:layout_width="match_parent"
            android:layout_height="?attr/actionBarSize"
            android:background="?attr/colorPrimary"
            app:popupTheme="@style/AppTheme.PopupOverlay" />

    </android.support.design.widget.AppBarLayout>

    <include layout="@layout/content_main" />

    <android.support.design.widget.FloatingActionButton
        android:id="@+id/fab"
        android:layout_width="wrap_content"
        android:layout_height="wrap_content"
        android:layout_gravity="bottom|end"
        android:layout_margin="@dimen/fab_margin"
        android:src="@android:drawable/ic_dialog_email" />

</android.support.design.widget.CoordinatorLayout>
A toolbar is added by default as a replacement of an ActionBar. It’s added inside an AppBarLayout which is a direct child of CoordinatorLayout The AppBarLayout is used to achieve various scrolling behaviours such as collapse, flex space, and quick return. The MainActivity.java is defined as given below:
package com.journaldev.floatingactionbutton;

import android.os.Bundle;
import android.support.design.widget.FloatingActionButton;
import android.support.design.widget.Snackbar;
import android.support.v7.app.AppCompatActivity;
import android.support.v7.widget.Toolbar;
import android.view.View;
import android.view.Menu;
import android.view.MenuItem;

public class MainActivity extends AppCompatActivity {

    @Override
    protected void onCreate(Bundle savedInstanceState) {
        super.onCreate(savedInstanceState);
        setContentView(R.layout.activity_main);
        Toolbar toolbar = (Toolbar) findViewById(R.id.toolbar);
        setSupportActionBar(toolbar);

        FloatingActionButton fab = (FloatingActionButton) findViewById(R.id.fab);
        fab.setOnClickListener(new View.OnClickListener() {
            @Override
            public void onClick(View view) {
                Snackbar.make(view, "Replace with your own action", Snackbar.LENGTH_LONG)
                        .setAction("Action", null).show();
            }
        });
    }

    @Override
    public boolean onCreateOptionsMenu(Menu menu) {
        // メニューをインフレートし、アクションバーにアイテムを追加します。
        getMenuInflater().inflate(R.menu.menu_main, menu);
        return true;
    }

    @Override
    public boolean onOptionsItemSelected(MenuItem item) {
        // ここでアクションバーアイテムのクリックを処理します。アクションバーは
        // Home/Upボタンのクリックを自動的に処理するため、
        // AndroidManifest.xmlで親アクティビティを指定している限り。
        int id = item.getItemId();

        //noinspection SimplifiableIfStatement
        if (id == R.id.action_settings) {
            return true;
        }

        return super.onOptionsItemSelected(item);
    }
}
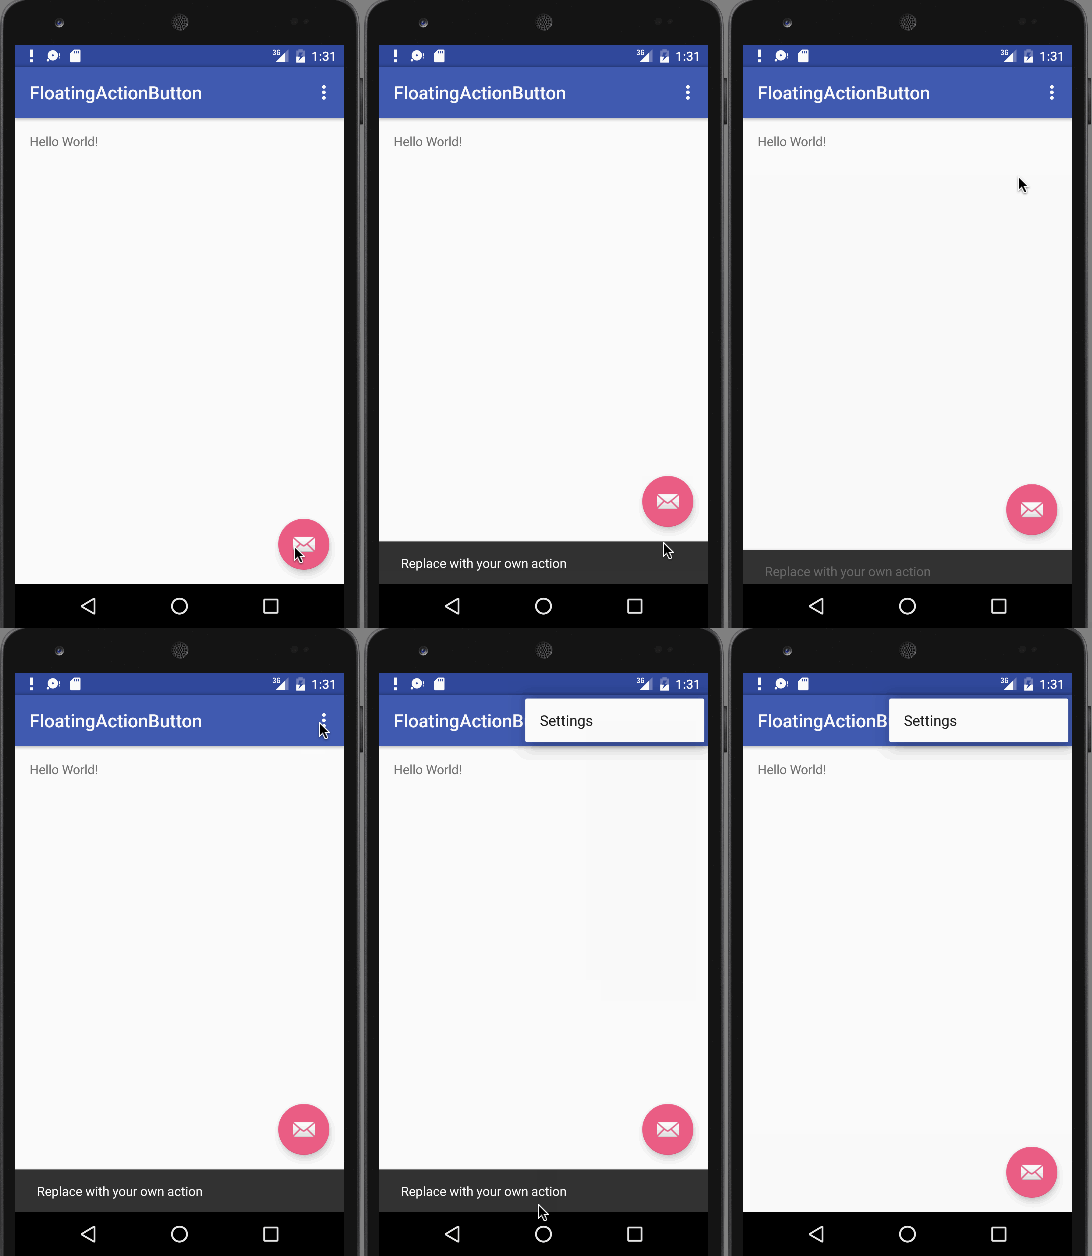
A new attribute is added to the application tag inside the AndroidManifest.xml named android:supportsRtl="true". This enables right to left layouts in the application. Running this default application produces an output like below:  As you can see, on clicking the floating action button, a SnackBar is displayed. This brings an end to this tutorial. You can create a new project in Android Studio and run it to see these features. Note: Make sure that you’re using the latest build tools. Reference: Android Reference Doc
Source:
https://www.digitalocean.com/community/tutorials/android-floating-action-button-example-tutorial


