Spring Restful WebサービスのXMLとJSONの例へようこそ。以前、私はSpring REST JSONについての記事を書きましたが、XMLをサポートするためのプログラムの変更方法についてのコメントがたくさんありました。また、アプリケーションがXMLとJSONの両方をサポートする方法についてのメールもいくつかいただきました。
Spring REST XMLとJSON
I thought to write an article about Spring REST XML and JSON application where I will show you how easily we can extend the existing application to support XML. Since I will be making changes to the existing project, make sure you first download it from below link.
Spring Restful Webサービスプロジェクトのダウンロード
次の変更をSpringビーンの設定ファイルに行ってください。
-
Jaxb2RootElementHttpMessageConverter型のビーンを定義します。<beans:bean id="xmlMessageConverter" class="org.springframework.http.converter.xml.Jaxb2RootElementHttpMessageConverter"> </beans:bean> -
上記で設定したビーンを
RequestMappingHandlerAdapterのmessageConvertersプロパティに追加します。<beans:bean class="org.springframework.web.servlet.mvc.method.annotation.RequestMappingHandlerAdapter"> <beans:property name="messageConverters"> <beans:list> <beans:ref bean="jsonMessageConverter"/> <beans:ref bean="xmlMessageConverter"/> </beans:list> </beans:property> </beans:bean>
上記の変更後、最終的なSpring Beanの設定ファイルは以下のようになります。servlet-context.xml
<?xml version="1.0" encoding="UTF-8"?>
<beans:beans xmlns="https://www.springframework.org/schema/mvc"
xmlns:xsi="https://www.w3.org/2001/XMLSchema-instance"
xmlns:beans="https://www.springframework.org/schema/beans"
xmlns:context="https://www.springframework.org/schema/context"
xsi:schemaLocation="https://www.springframework.org/schema/mvc https://www.springframework.org/schema/mvc/spring-mvc.xsd
https://www.springframework.org/schema/beans https://www.springframework.org/schema/beans/spring-beans.xsd
https://www.springframework.org/schema/context https://www.springframework.org/schema/context/spring-context.xsd">
<!-- DispatcherServlet Context: defines this servlet's request-processing infrastructure -->
<!-- Enables the Spring MVC @Controller programming model -->
<annotation-driven />
<!-- Handles HTTP GET requests for /resources/** by efficiently serving up static resources in the ${webappRoot}/resources directory -->
<resources mapping="/resources/**" location="/resources/" />
<!-- Resolves views selected for rendering by @Controllers to .jsp resources in the /WEB-INF/views directory -->
<beans:bean class="org.springframework.web.servlet.view.InternalResourceViewResolver">
<beans:property name="prefix" value="/WEB-INF/views/" />
<beans:property name="suffix" value=".jsp" />
</beans:bean>
<!-- Configure to plugin JSON as request and response in method handler -->
<beans:bean class="org.springframework.web.servlet.mvc.method.annotation.RequestMappingHandlerAdapter">
<beans:property name="messageConverters">
<beans:list>
<beans:ref bean="jsonMessageConverter"/>
<beans:ref bean="xmlMessageConverter"/>
</beans:list>
</beans:property>
</beans:bean>
<!-- Configure bean to convert JSON to POJO and vice versa -->
<beans:bean id="jsonMessageConverter" class="org.springframework.http.converter.json.MappingJackson2HttpMessageConverter">
</beans:bean>
<beans:bean id="xmlMessageConverter" class="org.springframework.http.converter.xml.Jaxb2RootElementHttpMessageConverter">
</beans:bean>
<context:component-scan base-package="com.journaldev.spring.controller" />
</beans:beans>
クラスのJAXBマーシャリングを使用するためには、@XmlRootElementアノテーションを使用する必要があります。したがって、Employeeモデルクラスにこれを追加します。Employee.java
@XmlRootElement
public class Employee implements Serializable{

//コードに変更はありません
}
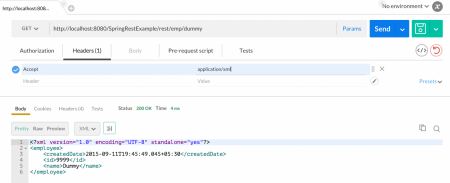
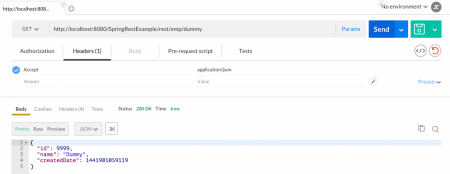
それで、終わりです。当社のSpringアプリケーションは、JSONとXMLの両方をサポートします。さらに、XMLリクエストとJSONレスポンス、およびその逆もサポートします。以下は、これが機能している様子を示すいくつかのスクリーンショットです。注意:これにはPostman Chromeアプリケーションを使用していますが、テストには任意のRESTクライアントを使用できます。 1. XML Response: “application/xml”としてAcceptヘッダーを渡すことを確認してください。 2. JSON Response: “application/json”としてAcceptヘッダーを渡すことを確認してください。
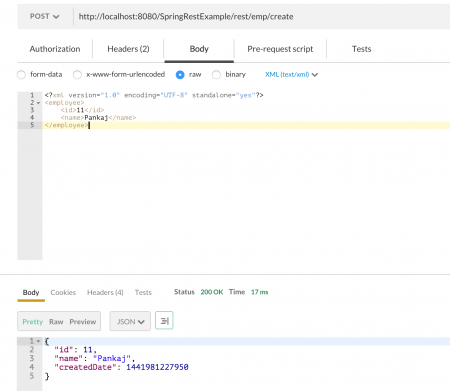
 3. XML Request with JSON Response: 下の画像に示すように、Acceptヘッダーが “application/json” であり、Content-Typeヘッダーが “text/xml” であることを確認してください。
 これで、XMLとJSONの両方をサポートするSpring Restfulウェブサービスの例が完了しました。Springフレームワークを拡張するのはどれだけ簡単かを見ることができます。これはSpringフレームワークの人気の主要な理由の一つです。
Source:
https://www.digitalocean.com/community/tutorials/spring-rest-xml-and-json-example


