このSpring MVCチュートリアルでは、Spring Tool Suiteを使用してSpring MVCウェブアプリケーションを開発する方法を学びます。Spring MVCフレームワークは、Javaのウェブアプリケーションに広く使用されています。
Spring MVC
 Strutsフレームワークと同様に、Spring MVCもJava EEのServletおよびJSPテクノロジーに基づいており、Model-View-Controllerデザインパターンを実装しています。
Spring MVCチュートリアル
以前にSpring依存性注入がどのように機能するかを見てきました。このチュートリアルでは、Spring MVCフレームワークを使用してシンプルなWebアプリケーションを作成する方法を学びます。Springプロジェクトの開発にはEclipseまたはIntelliJ IDEを使用できますが、SpringSourceはSpring Tool Suite(STS)を提供しています。これはEclipseベースのIDEであり、Apache Tomcatコンテナの上に構築され、Springベースのアプリケーションに最適化されたVMware vFabric tc Serverが組み込まれています。私はSpring MVCチュートリアルや他の将来のチュートリアルでSTSを使用するつもりです。なぜなら、開発者の生活を以下の機能を提供することで簡単にするからです:
- スケルトンSpringアプリケーション(MVC、Rest、Batchなど)の作成をサポートしており、プロジェクトをゼロから開始するのに適しています。このSpring MVCチュートリアルでは、Spring MVCプロジェクトを作成するのがどれほど簡単かをすぐに見ることができます。
- Spring設定ファイルの作成、構成ファイルおよびクラスの解析により、それらに関する有用な情報を提供します。
- Springアプリケーションの自動検証
- プロジェクトの変更を簡単に行うためのリファクタリングサポート。変更内容は構成ファイルにも反映されます。
- クラスだけでなく構成ファイルに対するコード補完機能。ほとんどの場合、使用可能なものとその詳細を知る必要があるため、この機能が好きです。
- Aspect Oriented Programming(AOP)への最高のサポートを提供するためのAspectJの統合。
すべての機能を考慮すると、STSが提供するものに魅了され、これを使用してSpringアプリケーションを使用することを決めました。今のところ、とても満足しています。STSをSTS公式ダウンロードページからダウンロードしてインストールしてください。私はEclipse 4.3.1リリースをベースにしたSTS 3.4.0.RELEASEを使用しています。 STSを使用したくない場合や、既存のEclipseでその機能を取得したい場合は、Eclipse Marketplaceからプラグインをインストールする必要があります。以下の画像を参照して、インストールするために正しいSTSバージョンを選択してください。以下のプラグインはEclipse Keplerに適しています。
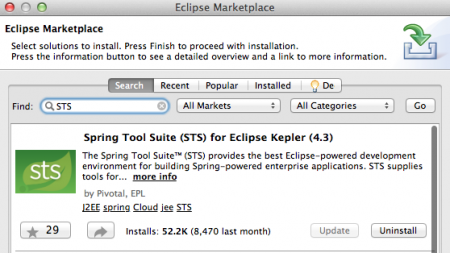 SpringSourceサーバーを使用したくない場合は、Tomcat、JBossなどの他のJava EEコンテナにアプリケーションをデプロイできます。このチュートリアルでは、STSに付属するサーバーを使用しますが、WARファイルとしてエクスポートして別個のTomcatサーバーに配置してアプリケーションをテストしましたが、正常に動作しています。サーバー環境とIDEの準備が整ったので、最初のSpring MVCプロジェクトを作成しましょう。以下の手順は、STSおよびSTSプラグインが組み込まれたEclipseの場合にも有効です。
STSまたはEclipseでSpring MVCアプリケーションを作成する
ステップ1: メニューから新しいSpringプロジェクトを作成します。  ステップ2: 新しいプロジェクトウィンドウで、名前を「SpringMVCExample」にし、テンプレートを「Spring MVC Project」に選択します。このテンプレートを初めて使用する場合、STSはそれをSpringSourceのウェブサイトからダウンロードします。必要に応じてプロジェクトを任意のワーキングセットに追加できます。
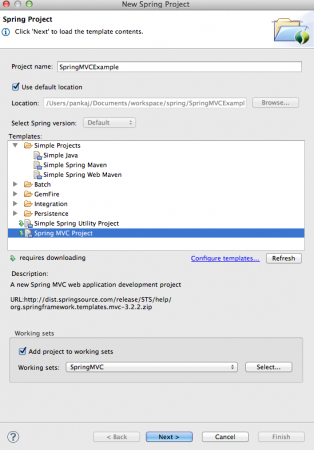
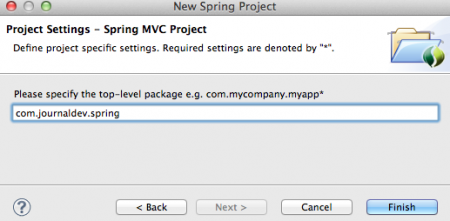
 ステップ3: テンプレートがダウンロードされたら、次の画面でトップレベルのパッケージ名を提供する必要があります。このパッケージはSpringコンポーネントの基本パッケージとして使用されます。
  ステップ4: Spring MVCテンプレートによってプロジェクトが作成されると、以下の画像のようになります。
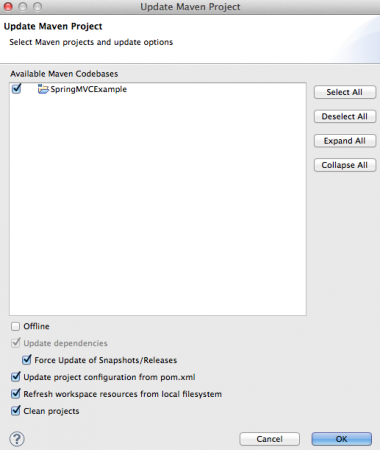
 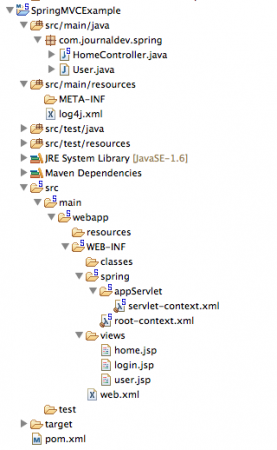 User.javaクラス、login.jsp、およびuser.jspファイルが表示されない場合は心配しないでください。これらは後で私が追加しました。プロジェクトがコンパイルされていない場合やエラーが表示される場合は、Maven/Update Projectを実行してください。「Snapshots/Releasesの強制的な更新」オプションを確認してください。参考画像は下記をご覧ください。
  全体的なプロジェクトは、いくつかのSpring構成ファイルを備えた、他のMavenベースのウェブアプリケーションと同様に見えます。プロジェクトの異なる部分を分析して少し拡張する時間です。
Spring MVC Dependencies
生成されたpom.xmlファイルは以下のようになります。
<?xml version="1.0" encoding="UTF-8"?>
<project xmlns="https://maven.apache.org/POM/4.0.0" xmlns:xsi="https://www.w3.org/2001/XMLSchema-instance"
	xsi:schemaLocation="https://maven.apache.org/POM/4.0.0 https://maven.apache.org/maven-v4_0_0.xsd">
	<modelVersion>4.0.0</modelVersion>
	<groupId>com.journaldev</groupId>
	<artifactId>SpringMVCExample</artifactId>
	<name>SpringMVCExample</name>
	<packaging>war</packaging>
	<version>1.0.0-BUILD-SNAPSHOT</version>
	<properties>
		<java-version>1.6</java-version>
		<org.springframework-version>4.0.0.RELEASE</org.springframework-version>
		<org.aspectj-version>1.7.4</org.aspectj-version>
		<org.slf4j-version>1.7.5</org.slf4j-version>
	</properties>
	<dependencies>
		<!-- Spring -->
		<dependency>
			<groupId>org.springframework</groupId>
			<artifactId>spring-context</artifactId>
			<version>${org.springframework-version}</version>
			<exclusions>
				<!-- Exclude Commons Logging in favor of SLF4j -->
				<exclusion>
					<groupId>commons-logging</groupId>
					<artifactId>commons-logging</artifactId>
				 </exclusion>
			</exclusions>
		</dependency>
		<dependency>
			<groupId>org.springframework</groupId>
			<artifactId>spring-webmvc</artifactId>
			<version>${org.springframework-version}</version>
		</dependency>

		<!-- AspectJ -->
		<dependency>
			<groupId>org.aspectj</groupId>
			<artifactId>aspectjrt</artifactId>
			<version>${org.aspectj-version}</version>
		</dependency>

		<!-- Logging -->
		<dependency>
			<groupId>org.slf4j</groupId>
			<artifactId>slf4j-api</artifactId>
			<version>${org.slf4j-version}</version>
		</dependency>
		<dependency>
			<groupId>org.slf4j</groupId>
			<artifactId>jcl-over-slf4j</artifactId>
			<version>${org.slf4j-version}</version>
			<scope>runtime</scope>
		</dependency>
		<dependency>
			<groupId>org.slf4j</groupId>
			<artifactId>slf4j-log4j12</artifactId>
			<version>${org.slf4j-version}</version>
			<scope>runtime</scope>
		</dependency>
		<dependency>
			<groupId>log4j</groupId>
			<artifactId>log4j</artifactId>
			<version>1.2.15</version>
			<exclusions>
				<exclusion>
					<groupId>javax.mail</groupId>
					<artifactId>mail</artifactId>
				</exclusion>
				<exclusion>
					<groupId>javax.jms</groupId>
					<artifactId>jms</artifactId>
				</exclusion>
				<exclusion>
					<groupId>com.sun.jdmk</groupId>
					<artifactId>jmxtools</artifactId>
				</exclusion>
				<exclusion>
					<groupId>com.sun.jmx</groupId>
					<artifactId>jmxri</artifactId>
				</exclusion>
			</exclusions>
			<scope>runtime</scope>
		</dependency>

		<!-- @Inject -->
		<dependency>
			<groupId>javax.inject</groupId>
			<artifactId>javax.inject</artifactId>
			<version>1</version>
		</dependency>

		<!-- Servlet -->
		<dependency>
			<groupId>javax.servlet</groupId>
			<artifactId>servlet-api</artifactId>
			<version>2.5</version>
			<scope>provided</scope>
		</dependency>
		<dependency>
			<groupId>javax.servlet.jsp</groupId>
			<artifactId>jsp-api</artifactId>
			<version>2.1</version>
			<scope>provided</scope>
		</dependency>
		<dependency>
			<groupId>javax.servlet</groupId>
			<artifactId>jstl</artifactId>
			<version>1.2</version>
		</dependency>

		<!-- Test -->
		<dependency>
			<groupId>junit</groupId>
			<artifactId>junit</artifactId>
			<version>4.7</version>
			<scope>test</scope>
		</dependency>
	</dependencies>
    <build>
        <plugins>
            <plugin>
                <artifactId>maven-eclipse-plugin</artifactId>
                <version>2.9</version>
                <configuration>
                    <additionalProjectnatures>
                        <projectnature>org.springframework.ide.eclipse.core.springnature</projectnature>
                    </additionalProjectnatures>
                    <additionalBuildcommands>
                        <buildcommand>org.springframework.ide.eclipse.core.springbuilder</buildcommand>
                    </additionalBuildcommands>
                    <downloadSources>true</downloadSources>
                    <downloadJavadocs>true</downloadJavadocs>
                </configuration>
            </plugin>
            <plugin>
                <groupId>org.apache.maven.plugins</groupId>
                <artifactId>maven-compiler-plugin</artifactId>
                <version>2.5.1</version>
                <configuration>
                    <source>1.6</source>
                    <target>1.6</target>
                    <compilerArgument>-Xlint:all</compilerArgument>
                    <showWarnings>true</showWarnings>
                    <showDeprecation>true</showDeprecation>
                </configuration>
            </plugin>
            <plugin>
                <groupId>org.codehaus.mojo</groupId>
                <artifactId>exec-maven-plugin</artifactId>
                <version>1.2.1</version>
                <configuration>
                    <mainClass>org.test.int1.Main</mainClass>
                </configuration>
            </plugin>
        </plugins>
    </build>
</project>
artifactIdはWebアプリケーションのservlet-contextになりますので、他のものを希望する場合は変更できます。Spring Framework、AspectJ、SLF4jバージョンのいくつかのプロパティが定義されていますが、最新のバージョンに反映されていないことがわかりましたので、本日時点の最新安定版に変更しました。興味を持っているプロジェクトの依存関係は以下です。
- spring-context:Spring Coreの依存関係。SLF4Jを使用するため、commons loggingは除外されています。
- spring-webmvc:MVCサポートのSpringアーティファクト
- aspectjrt:AspectJ APIリファレンス
- SLF4JとLog4j:ログ出力のために、SpringはSLF4Jの統合のおかげでlog4jまたはJava Logging APIを簡単に設定できます。
- javax.inject – 依存性注入のためのJSR330 API
Servlet、JSP、JSTL、およびJUnit APIなどの他の依存関係が追加されていますが、初心者向けのアプリケーションではこれらを見逃すことができます。
Spring MVCチュートリアル – Log4jの設定
生成されたlog4j.xmlファイルは以下のようになります。
<?xml version="1.0" encoding="UTF-8"?>
<!DOCTYPE log4j:configuration PUBLIC "-//APACHE//DTD LOG4J 1.2//EN" "log4j.dtd">
<log4j:configuration xmlns:log4j="https://jakarta.apache.org/log4j/">

	<!-- Appenders -->
	<appender name="console" class="org.apache.log4j.ConsoleAppender">
		<param name="Target" value="System.out" />
		<layout class="org.apache.log4j.PatternLayout">
			<param name="ConversionPattern" value="%-5p: %c - %m%n" />
		</layout>
	</appender>

	<!-- Application Loggers -->
	<logger name="com.journaldev.spring">
		<level value="info" />
	</logger>

	<!-- 3rdparty Loggers -->
	<logger name="org.springframework.core">
		<level value="info" />
	</logger>

	<logger name="org.springframework.beans">
		<level value="info" />
	</logger>

	<logger name="org.springframework.context">
		<level value="info" />
	</logger>

	<logger name="org.springframework.web">
		<level value="info" />
	</logger>

	<!-- Root Logger -->
	<root>
		<priority value="warn" />
		<appender-ref ref="console" />
	</root>

</log4j:configuration>
すべてをコンソールに出力していることに注意してください。ロギングをファイルにリダイレクトするためのアペンダを簡単に追加できます。
Spring MVCチュートリアル – デプロイメント記述子の設定
web.xmlを見て、分析しましょう。
<?xml version="1.0" encoding="UTF-8"?>
<web-app version="2.5" xmlns="https://java.sun.com/xml/ns/javaee"
	xmlns:xsi="https://www.w3.org/2001/XMLSchema-instance"
	xsi:schemaLocation="https://java.sun.com/xml/ns/javaee https://java.sun.com/xml/ns/javaee/web-app_2_5.xsd">

	<!-- The definition of the Root Spring Container shared by all Servlets and Filters -->
	<context-param>
		<param-name>contextConfigLocation</param-name>
		<param-value>/WEB-INF/spring/root-context.xml</param-value>
	</context-param>

	<!-- Creates the Spring Container shared by all Servlets and Filters -->
	<listener>
		<listener-class>org.springframework.web.context.ContextLoaderListener</listener-class>
	</listener>

	<!-- Processes application requests -->
	<servlet>
		<servlet-name>appServlet</servlet-name>
		<servlet-class>org.springframework.web.servlet.DispatcherServlet</servlet-class>
		<init-param>
			<param-name>contextConfigLocation</param-name>
			<param-value>/WEB-INF/spring/appServlet/servlet-context.xml</param-value>
		</init-param>
		<load-on-startup>1</load-on-startup>
	</servlet>

	<servlet-mapping>
		<servlet-name>appServlet</servlet-name>
		<url-pattern>/</url-pattern>
	</servlet-mapping>

</web-app>
ContextLoaderListenerはApplicationContextのライフサイクルをServletContextのライフサイクルに結びつけ、ApplicationContextの作成を自動化します。ApplicationContextはSpringビーンの場所であり、contextConfigLocationコンテキストパラメータを介してその構成を提供できます。root-context.xmlファイルはWebApplicationContextの構成詳細を提供します。DispatcherServletはSpring MVCアプリケーションのコントローラークラスであり、すべてのクライアントリクエストはこのサーブレットで処理されます。設定はservlet-context.xmlファイルから読み込まれています。
Spring MVCチュートリアル – 設定ファイル
root-context.xmlファイル:
<?xml version="1.0" encoding="UTF-8"?>
<beans xmlns="https://www.springframework.org/schema/beans"
	xmlns:xsi="https://www.w3.org/2001/XMLSchema-instance"
	xsi:schemaLocation="https://www.springframework.org/schema/beans https://www.springframework.org/schema/beans/spring-beans.xsd">

	<!-- Root Context: defines shared resources visible to all other web components -->

</beans>
ここで共有ビーンを定義することができます。現時点では何もありません。servlet-context.xmlコード:
<?xml version="1.0" encoding="UTF-8"?>
<beans:beans xmlns="https://www.springframework.org/schema/mvc"
	xmlns:xsi="https://www.w3.org/2001/XMLSchema-instance"
	xmlns:beans="https://www.springframework.org/schema/beans"
	xmlns:context="https://www.springframework.org/schema/context"
	xsi:schemaLocation="https://www.springframework.org/schema/mvc https://www.springframework.org/schema/mvc/spring-mvc.xsd
		https://www.springframework.org/schema/beans https://www.springframework.org/schema/beans/spring-beans.xsd
		https://www.springframework.org/schema/context https://www.springframework.org/schema/context/spring-context.xsd">

	<!-- DispatcherServlet Context: defines this servlet's request-processing infrastructure -->

	<!-- Enables the Spring MVC @Controller programming model -->
	<annotation-driven />

	<!-- Handles HTTP GET requests for /resources/** by efficiently serving up static resources in the ${webappRoot}/resources directory -->
	<resources mapping="/resources/**" location="/resources/" />

	<!-- Resolves views selected for rendering by @Controllers to .jsp resources in the /WEB-INF/views directory -->
	<beans:bean class="org.springframework.web.servlet.view.InternalResourceViewResolver">
		<beans:property name="prefix" value="/WEB-INF/views/" />
		<beans:property name="suffix" value=".jsp" />
	</beans:bean>

	<context:component-scan base-package="com.journaldev.spring" />

</beans:beans>
これが標準のSpring設定ファイルの見た目です。これを自分で書くことを想像してみてください。そうすれば、STSツールが好きになります。annotation-driven要素は、コントローラーサーブレットに注釈が使用されることを知らせます。 resources要素は、画像、HTMLページなどの静的ファイルを配置する場所を定義します。これらはSpringフレームワークを介して取得したくないものです。InternalResourceViewResolverはビューリゾルバーであり、プレフィックスとサフィックスのプロパティを介してビューページの場所を指定できます。したがって、すべてのJSPページは/WEB-INF/views/ディレクトリにある必要があります。 context:component-scan要素は、コントローラークラスをスキャンするための基本パッケージの場所を指定します。プロジェクト作成時に指定したトップレベルパッケージの値を覚えておいてください。ここで使用されている値は同じです。
Spring MVCコントローラークラス
HomeControllerはhome()メソッドで自動的に作成されますが、loginPage()とlogin()メソッドを追加して拡張しました。
package com.journaldev.spring;

import java.text.DateFormat;
import java.util.Date;
import java.util.Locale;

import org.slf4j.Logger;
import org.slf4j.LoggerFactory;
import org.springframework.stereotype.Controller;
import org.springframework.ui.Model;
import org.springframework.validation.annotation.Validated;
import org.springframework.web.bind.annotation.RequestMapping;
import org.springframework.web.bind.annotation.RequestMethod;

/**
 * Handles requests for the application home page.
 */
@Controller
public class HomeController {

	private static final Logger logger = LoggerFactory.getLogger(HomeController.class);

	/**
	 * Simply selects the home view to render by returning its name.
	 */
	@RequestMapping(value = "/", method = RequestMethod.GET)
	public String home(Locale locale, Model model) {
		logger.info("Welcome home! The client locale is {}.", locale);

		Date date = new Date();
		DateFormat dateFormat = DateFormat.getDateTimeInstance(DateFormat.LONG, DateFormat.LONG, locale);

		String formattedDate = dateFormat.format(date);

		model.addAttribute("serverTime", formattedDate );

		return "home";
	}

	@RequestMapping(value = "/login", method = RequestMethod.GET)
	public String loginPage(Locale locale, Model model) {
		return "login";
	}

	@RequestMapping(value = "/home", method = RequestMethod.POST)
	public String login(@Validated User user, Model model) {
		model.addAttribute("userName", user.getUserName());
		return "user";
	}
}
@Controller注釈は、これがウェブコントローラクラスであることを示すために使用されます。@RequestMappingは、クラスやメソッドと共に使用され、クライアントのリクエストを特定のハンドラメソッドにリダイレクトします。ハンドラメソッドはStringを返すことに注意してください。これは応答として使用されるビューページの名前である必要があります。3つの異なる文字列を返すメソッドがあるため、同じ名前のJSPページを作成する必要があります。login()メソッドはHTTPメソッドがPOSTで呼び出されるため、ここでフォームデータが期待されています。したがって、Userモデルクラスがあり、@Validated注釈を使用して検証されています。各メソッドにはModelが引数として含まれ、JSPの応答ページで後で使用する属性を設定できます。
Spring MVCモデルクラス
モデルクラスはフォーム変数を保持するために使用され、当社のUserモデルビーンは以下のように見えます。
package com.journaldev.spring;

public class User {

	private String userName;

	public String getUserName() {
		return userName;
	}

	public void setUserName(String userName) {
		this.userName = userName;
	}

}
A simple java bean with the variable name and its getter and setter methods.
Spring MVCチュートリアル – ビューページ
私たちは以下のような3つのJSPページを持っています。home.jspのコード:
<%@ taglib uri="https://java.sun.com/jsp/jstl/core" prefix="c" %>
<%@ page session="false" %>
<html>
<head>
	<title>Home</title>
</head>
<body>
<h1>
	Hello world!
</h1>

<P>  The time on the server is ${serverTime}. </P>
</body>
</html>
JSP式言語の使用に注目して、属性値を取得します。login.jspのコード:
<%@ page language="java" contentType="text/html; charset=UTF-8"
    pageEncoding="UTF-8"%>
<!DOCTYPE html PUBLIC "-//W3C//DTD HTML 4.01 Transitional//EN" "https://www.w3.org/TR/html4/loose.dtd">
<html>
<head>
<meta http-equiv="Content-Type" content="text/html; charset=UTF-8">
<title>Login Page</title>
</head>
<body>
<form action="home" method="post">
<input type="text" name="userName"><br>
<input type="submit" value="Login">
</form>
</body>
</html>
A simple JSP page for the user to provide the userName as input. Notice that form variable name is same as User class variable name. Also, form action is “home” and method is “post”. It’s clear that HomeController login() method will handle this request. user.jsp code:
<%@ page language="java" contentType="text/html; charset=UTF-8"
    pageEncoding="UTF-8"%>
<!DOCTYPE html PUBLIC "-//W3C//DTD HTML 4.01 Transitional//EN" "https://www.w3.org/TR/html4/loose.dtd">
<html>
<head>
<meta http-equiv="Content-Type" content="text/html; charset=UTF-8">
<title>User Home Page</title>
</head>
<body>
<h3>Hi ${userName}</h3>
</body>
</html>
ユーザーのためのシンプルなホームページで、ユーザー名が表示されます。ログインメソッドでこの属性を設定していることに注意してください。
Spring MVCの例のアプリケーションテスト
アプリケーションは実行の準備ができています。VMware tc Serverまたは他の任意のサーブレットコンテナで実行するだけで、以下のページが応答として表示されます。それがSpring MVCチュートリアルのすべてです。Spring MVCアプリケーションをSTSプラグインを使用して作成するのはどれほど簡単かを見ることができます。コードサイズは非常に小さく、ほとんどの設定はSpring MVCによって処理されるため、ビジネスロジックに集中できます。以下のリンクからサンプルSpring MVCプロジェクトをダウンロードして試してみてください。
Source:
https://www.digitalocean.com/community/tutorials/spring-mvc-tutorial


