ようこそ、Spring 国際化(i18n)チュートリアルへ。世界中のユーザーを対象とした Web アプリケーションでは、国際化(i18n)またはローカリゼーション(L10n)がユーザーとのより良いインタラクションのために非常に重要です。ほとんどの Web アプリケーションフレームワークは、ユーザーのロケール設定に基づいてアプリケーションをローカライズする簡単な方法を提供しています。Spring も同様のパターンに従い、Spring インターセプター、ロケールリゾルバ、および異なるロケールのためのリソースバンドルを使用した国際化(i18n)に対する広範なサポートを提供しています。Java におけるi18nに関するいくつかの以前の記事もあります。
Spring国際化(i18n)
単純なSpring MVCプロジェクトを作成しましょう。ここでは、ユーザーロケールを取得するためにリクエストパラメータを使用し、それに基づいてロケール固有のリソースバンドルから応答ページのラベル値を設定します。

Spring i18n Maven構成
<?xml version="1.0" encoding="UTF-8"?>
<project xmlns="https://maven.apache.org/POM/4.0.0" xmlns:xsi="https://www.w3.org/2001/XMLSchema-instance"
	xsi:schemaLocation="https://maven.apache.org/POM/4.0.0 https://maven.apache.org/maven-v4_0_0.xsd">
	<modelVersion>4.0.0</modelVersion>
	<groupId>com.journaldev</groupId>
	<artifactId>spring</artifactId>
	<name>Springi18nExample</name>
	<packaging>war</packaging>
	<version>1.0.0-BUILD-SNAPSHOT</version>
	<properties>
		<java-version>1.6</java-version>
		<org.springframework-version>4.0.2.RELEASE</org.springframework-version>
		<org.aspectj-version>1.7.4</org.aspectj-version>
		<org.slf4j-version>1.7.5</org.slf4j-version>
	</properties>
	<dependencies>
		<!-- Spring -->
		<dependency>
			<groupId>org.springframework</groupId>
			<artifactId>spring-context</artifactId>
			<version>${org.springframework-version}</version>
			<exclusions>
				<!-- Exclude Commons Logging in favor of SLF4j -->
				<exclusion>
					<groupId>commons-logging</groupId>
					<artifactId>commons-logging</artifactId>
				 </exclusion>
			</exclusions>
		</dependency>
		<dependency>
			<groupId>org.springframework</groupId>
			<artifactId>spring-webmvc</artifactId>
			<version>${org.springframework-version}</version>
		</dependency>

		<!-- AspectJ -->
		<dependency>
			<groupId>org.aspectj</groupId>
			<artifactId>aspectjrt</artifactId>
			<version>${org.aspectj-version}</version>
		</dependency>

		<!-- Logging -->
		<dependency>
			<groupId>org.slf4j</groupId>
			<artifactId>slf4j-api</artifactId>
			<version>${org.slf4j-version}</version>
		</dependency>
		<dependency>
			<groupId>org.slf4j</groupId>
			<artifactId>jcl-over-slf4j</artifactId>
			<version>${org.slf4j-version}</version>
			<scope>runtime</scope>
		</dependency>
		<dependency>
			<groupId>org.slf4j</groupId>
			<artifactId>slf4j-log4j12</artifactId>
			<version>${org.slf4j-version}</version>
			<scope>runtime</scope>
		</dependency>
		<dependency>
			<groupId>log4j</groupId>
			<artifactId>log4j</artifactId>
			<version>1.2.15</version>
			<exclusions>
				<exclusion>
					<groupId>javax.mail</groupId>
					<artifactId>mail</artifactId>
				</exclusion>
				<exclusion>
					<groupId>javax.jms</groupId>
					<artifactId>jms</artifactId>
				</exclusion>
				<exclusion>
					<groupId>com.sun.jdmk</groupId>
					<artifactId>jmxtools</artifactId>
				</exclusion>
				<exclusion>
					<groupId>com.sun.jmx</groupId>
					<artifactId>jmxri</artifactId>
				</exclusion>
			</exclusions>
			<scope>runtime</scope>
		</dependency>

		<!-- @Inject -->
		<dependency>
			<groupId>javax.inject</groupId>
			<artifactId>javax.inject</artifactId>
			<version>1</version>
		</dependency>

		<!-- Servlet -->
		<dependency>
			<groupId>javax.servlet</groupId>
			<artifactId>servlet-api</artifactId>
			<version>2.5</version>
			<scope>provided</scope>
		</dependency>
		<dependency>
			<groupId>javax.servlet.jsp</groupId>
			<artifactId>jsp-api</artifactId>
			<version>2.1</version>
			<scope>provided</scope>
		</dependency>
		<dependency>
			<groupId>javax.servlet</groupId>
			<artifactId>jstl</artifactId>
			<version>1.2</version>
		</dependency>

		<!-- Test -->
		<dependency>
			<groupId>junit</groupId>
			<artifactId>junit</artifactId>
			<version>4.7</version>
			<scope>test</scope>
		</dependency>
	</dependencies>
    <build>
        <plugins>
            <plugin>
                <artifactId>maven-eclipse-plugin</artifactId>
                <version>2.9</version>
                <configuration>
                    <additionalProjectnatures>
                        <projectnature>org.springframework.ide.eclipse.core.springnature</projectnature>
                    </additionalProjectnatures>
                    <additionalBuildcommands>
                        <buildcommand>org.springframework.ide.eclipse.core.springbuilder</buildcommand>
                    </additionalBuildcommands>
                    <downloadSources>true</downloadSources>
                    <downloadJavadocs>true</downloadJavadocs>
                </configuration>
            </plugin>
            <plugin>
                <groupId>org.apache.maven.plugins</groupId>
                <artifactId>maven-compiler-plugin</artifactId>
                <version>2.5.1</version>
                <configuration>
                    <source>1.6</source>
                    <target>1.6</target>
                    <compilerArgument>-Xlint:all</compilerArgument>
                    <showWarnings>true</showWarnings>
                    <showDeprecation>true</showDeprecation>
                </configuration>
            </plugin>
            <plugin>
                <groupId>org.codehaus.mojo</groupId>
                <artifactId>exec-maven-plugin</artifactId>
                <version>1.2.1</version>
                <configuration>
                    <mainClass>org.test.int1.Main</mainClass>
                </configuration>
            </plugin>
        </plugins>
    </build>
</project>
ほとんどのコードはSTSによって自動生成されていますが、Springのバージョンを最新の4.0.2.RELEASEに更新しました。他の依存関係のバージョンを削除または更新することもできますが、シンプルさのためにそのままにしています。
Springリソースバンドル
シンプルにするために、アプリケーションは2つのロケール、enとfrのみをサポートすると仮定しましょう。ユーザーのロケールが指定されていない場合、デフォルトのロケールとして英語を使用します。これらのロケール用のSpringリソースバンドルを作成しましょう。これらはJSPページで使用されます。messages_en.propertiesのコード:
label.title=Login Page
label.firstName=First Name
label.lastName=Last Name
label.submit=Login
messages_fr.propertiesのコード:
label.title=Connectez-vous page
label.firstName=Pr\u00E9nom
label.lastName=Nom
label.submit=Connexion
フランス語のロケールリソースバンドルでは特殊文字をUnicodeで使用していることに注意してください。これにより、クライアントリクエストに送信される応答HTMLで適切に解釈されます。さらに重要な点として、両方のリソースバンドルがアプリケーションのクラスパスにあり、その名前が「messages_{locale}.properties」のパターンになっていることに注意してください。これらが後でなぜ重要なのかを見ていきます。
Spring i18n コントローラークラス
当社のコントローラークラスは非常にシンプルです。ユーザーロケールをログに記録し、home.jspページを応答として返します。
package com.journaldev.spring;

import java.util.Locale;

import org.slf4j.Logger;
import org.slf4j.LoggerFactory;
import org.springframework.stereotype.Controller;
import org.springframework.ui.Model;
import org.springframework.web.bind.annotation.RequestMapping;
import org.springframework.web.bind.annotation.RequestMethod;

/**
 * Handles requests for the application home page.
 */
@Controller
public class HomeController {

	private static final Logger logger = LoggerFactory.getLogger(HomeController.class);

	/**
	 * Simply selects the home view to render by returning its name.
	 */
	@RequestMapping(value = "/", method = RequestMethod.GET)
	public String home(Locale locale, Model model) {
		logger.info("Welcome home! The client locale is {}.", locale);

		return "home";
	}

}
Spring i18n JSP ページ
私たちのhome.jspページのコードは以下のようになります。
<%@taglib uri="https://www.springframework.org/tags" prefix="spring"%>
<%@ page session="false"%>
<html>
<head>
<title><spring:message code="label.title" /></title>
</head>
<body>
	<form method="post" action="login">
		<table>
			<tr>
				<td><label> <strong><spring:message
								code="label.firstName" /></strong>
				</label></td>
				<td><input name="firstName" /></td>
			</tr>
			<tr>
				<td><label> <strong><spring:message
								code="label.lastName" /></strong>
				</label></td>
				<td><input name="lastName" /></td>
			</tr>
			<tr>
				<spring:message code="label.submit" var="labelSubmit"></spring:message>
				<td colspan="2"><input type="submit" value="${labelSubmit}" /></td>
			</tr>
		</table>
	</form>
</body>
</html>
唯一言及する価値があるのは、spring:messageを使用して指定されたコードでメッセージを取得することです。taglib jsp directiveを使用してSpringタグライブラリを設定してください。Springは適切なリソースバンドルメッセージをロードし、JSPページで使用できるようにします。
Spring 国際化 i18n – Bean設定ファイル
Spring Bean設定ファイルは、すべての魔法が起こる場所です。これはSpringフレームワークの美しさであり、私たちが些細なタスクのコーディングではなく、ビジネスロジックにもっと集中できるように助けてくれます。私たちのspring bean設定ファイルがどのように見えるか見てみましょう、そして私たちは一つ一つのbeanを見ていきます。servlet-context.xml コード:
<?xml version="1.0" encoding="UTF-8"?>
<beans:beans xmlns="https://www.springframework.org/schema/mvc"
	xmlns:xsi="https://www.w3.org/2001/XMLSchema-instance" xmlns:beans="https://www.springframework.org/schema/beans"
	xmlns:context="https://www.springframework.org/schema/context"
	xsi:schemaLocation="https://www.springframework.org/schema/mvc https://www.springframework.org/schema/mvc/spring-mvc.xsd
		https://www.springframework.org/schema/beans https://www.springframework.org/schema/beans/spring-beans.xsd
		https://www.springframework.org/schema/context https://www.springframework.org/schema/context/spring-context.xsd">

	<!-- DispatcherServlet Context: defines this servlet's request-processing
		infrastructure -->

	<!-- Enables the Spring MVC @Controller programming model -->
	<annotation-driven />

	<!-- Handles HTTP GET requests for /resources/** by efficiently serving
		up static resources in the ${webappRoot}/resources directory -->
	<resources mapping="/resources/**" location="/resources/" />

	<!-- Resolves views selected for rendering by @Controllers to .jsp resources
		in the /WEB-INF/views directory -->
	<beans:bean
		class="org.springframework.web.servlet.view.InternalResourceViewResolver">
		<beans:property name="prefix" value="/WEB-INF/views/" />
		<beans:property name="suffix" value=".jsp" />
	</beans:bean>

	<beans:bean id="messageSource"
		class="org.springframework.context.support.ReloadableResourceBundleMessageSource">
		<beans:property name="basename" value="classpath:messages" />
		<beans:property name="defaultEncoding" value="UTF-8" />
	</beans:bean>

	<beans:bean id="localeResolver"
		class="org.springframework.web.servlet.i18n.CookieLocaleResolver">
		<beans:property name="defaultLocale" value="en" />
		<beans:property name="cookieName" value="myAppLocaleCookie"></beans:property>
		<beans:property name="cookieMaxAge" value="3600"></beans:property>
	</beans:bean>

	<interceptors>
		<beans:bean
			class="org.springframework.web.servlet.i18n.LocaleChangeInterceptor">
			<beans:property name="paramName" value="locale" />
		</beans:bean>
	</interceptors>

	<context:component-scan base-package="com.journaldev.spring" />

</beans:beans>
-
annotation-drivenタグは、コントローラープログラミングモデルを有効にし、これがなければSpringは私たちのHomeControllerをクライアントリクエストのハンドラーとして認識しません。
-
context:component-scanは、Springが注釈付きコンポーネントを探し、自動的にSpring beanとして登録するパッケージを提供します。
-
messageSourceビーンは、アプリケーションのi18nを有効にするように構成されています。basenameプロパティは、リソースバンドルの場所を指定します。
classpath:messagesは、リソースバンドルがクラスパスにあり、messages_{locale}.propertiesという名前のパターンに従うことを意味します。defaultEncodingプロパティは、メッセージに使用されるエンコーディングを定義するために使用されます。 -
localeResolverビーンのタイプ
org.springframework.web.servlet.i18n.CookieLocaleResolverは、クライアントリクエストにクッキーを設定し、その後のリクエストでユーザーロケールを簡単に認識できるようにします。たとえば、Webアプリケーションを初めて起動する際にユーザーにロケールの選択を求め、クッキーを使用してユーザーロケールを識別し、自動的にロケール固有の応答を送信できます。デフォルトのロケール、クッキーの名前、クライアントブラウザによってクッキーが期限切れになる前の最大年齢も指定できます。アプリケーションがユーザーセッションを維持する場合は、ユーザーセッション内のロケール属性を使用するためにorg.springframework.web.servlet.i18n.SessionLocaleResolverをlocaleResolverとして使用できます。設定はCookieLocaleResolverと類似しています。<bean id="localeResolver" class="org.springframework.web.servlet.i18n.SessionLocaleResolver"> <property name="defaultLocale" value="en" /> </bean>「localeResolver」が登録されていない場合、デフォルトでAcceptHeaderLocaleResolverが使用され、クライアントHTTPリクエストの
accept-languageヘッダーを確認してユーザーロケールを解決します。 -
org.springframework.web.servlet.i18n.LocaleChangeInterceptorインターセプターは、ユーザーリクエストをインターセプトしてユーザーのロケールを識別するように構成されています。パラメーター名は設定可能で、私たちはロケールのリクエストパラメーター名として「locale」を使用しています。このインターセプターがないと、ユーザーのロケールを変更して新しいロケール設定に基づいて応答を送信することができません。これはinterceptors要素の一部である必要があります。さもないと、Springはそれをインターセプターとして構成しません。
Springフレームワークに私たちのコンテキスト設定をロードするように指示する構成について疑問がある場合は、MVCアプリケーションのデプロイメント記述子に存在します。
<servlet>
	<servlet-name>appServlet</servlet-name>
	<servlet-class>org.springframework.web.servlet.DispatcherServlet</servlet-class>
	<init-param>
		<param-name>contextConfigLocation</param-name>
		<param-value>/WEB-INF/spring/appServlet/servlet-context.xml</param-value>
	</init-param>
	<load-on-startup>1</load-on-startup>
</servlet>

<servlet-mapping>
	<servlet-name>appServlet</servlet-name>
	<url-pattern>/</url-pattern>
</servlet-mapping>
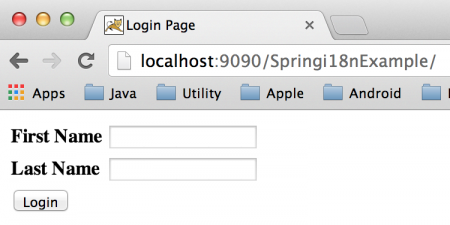
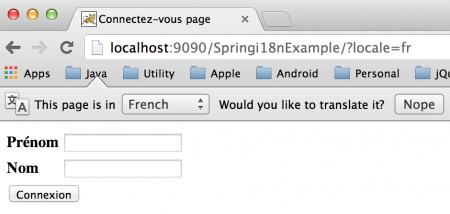
私たちは、web.xmlの構成を変更することで、コンテキストファイルの場所や名前を変更できます。Springのi18nアプリケーションは準備ができており、任意のサーブレットコンテナに展開するだけです。通常、スタンドアロンのTomcatウェブサーバーのwebappsディレクトリにWARファイルとしてエクスポートします。以下は、異なるロケールでのアプリケーションホームページのスクリーンショットです。デフォルトのホームページ(enロケール):  パラメータとしてロケールを渡す(frロケール):
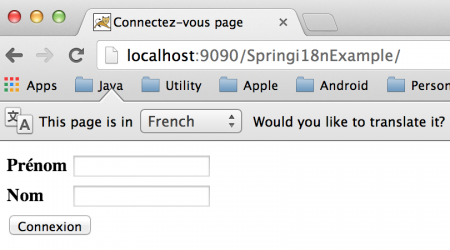
  ロケールなしでの追加のリクエスト:
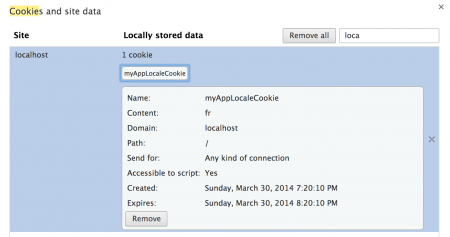
  上記の画像でわかるように、クライアントリクエストでロケール情報を渡していませんが、アプリケーションはユーザーのロケールを特定しています。これは、Springビーン構成ファイルで構成したCookieLocaleResolverビーンのおかげです。ただし、ブラウザのクッキーデータを確認して確認できます。私はChromeを使用しており、以下の画像はアプリケーションによって保存されたクッキーデータを示しています。
  クッキーの有効期限が1時間、つまりcookieMaxAgeプロパティで設定された3600秒であることに注意してください。サーバーログを確認すると、ロケールがログに記録されていることがわかります。
INFO : com.journaldev.spring.HomeController - Welcome home! The client locale is en.
INFO : com.journaldev.spring.HomeController - Welcome home! The client locale is fr.
INFO : com.journaldev.spring.HomeController - Welcome home! The client locale is fr.
それでSpring i18nの例題アプリケーションは以上です。以下のリンクから例題プロジェクトをダウンロードして、さらに詳しく学んでみてください。


