ファイルのアップロードは、どのウェブアプリケーションでも非常に一般的なタスクです。以前にも、ServletでのファイルアップロードとStruts2でのファイルアップロードの方法を見てきました。今日は、Springファイルアップロードについて、特に単一ファイルと複数ファイルのSpring MVCファイルアップロードについて学びましょう。
Spring MVCファイルアップロード
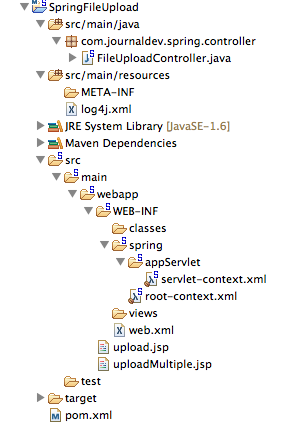
Spring MVCフレームワークは、Apache Commons FileUpload APIを統合することでファイルのアップロードをサポートしています。ファイルのアップロードプロセスは非常に簡単で、簡単な設定が必要です。以下の画像のような、STSで作成されるシンプルなSpring MVCプロジェクトを作成します。 ほとんどの部分は、STSツールによって生成されるボイラープレートコードですが、Springファイルアップロードの統合に必要な変更に焦点を当てます。
Apache Commons FileUploadのMaven依存関係
まず最初に、必要なjarファイルがWebアプリケーションの一部となるように、pom.xmlファイルにApache Commons FileUploadの依存関係を追加する必要があります。以下は、私のpom.xmlファイルからの依存関係のスニペットです。
<!-- Apache Commons FileUpload -->
<dependency>
	<groupId>commons-fileupload</groupId>
	<artifactId>commons-fileupload</artifactId>
	<version>1.3.1</version>
</dependency>

<!-- Apache Commons IO -->
<dependency>
	<groupId>commons-io</groupId>
	<artifactId>commons-io</artifactId>
	<version>2.4</version>
</dependency>
Springファイルアップロードフォームビュー
Spring Webアプリケーションで単一および複数のファイルのアップロードを許可するために、2つのJSPページを作成します。upload.jspビューコード:
<%@ taglib uri="https://java.sun.com/jsp/jstl/core" prefix="c" %>
<%@ page session="false" %>
<html>
<head>
<title>Upload File Request Page</title>
</head>
<body>
	<form method="POST" action="uploadFile" enctype="multipart/form-data">
		File to upload: <input type="file" name="file"><br />
		Name: <input type="text" name="name"><br /> <br />
		<input type="submit" value="Upload"> Press here to upload the file!
	</form>
</body>
</html>
uploadMultiple.jspビューコード:
<%@ taglib uri="https://java.sun.com/jsp/jstl/core" prefix="c" %>
<%@ page session="false" %>
<html>
<head>
<title>Upload Multiple File Request Page</title>
</head>
<body>
	<form method="POST" action="uploadMultipleFile" enctype="multipart/form-data">
		File1 to upload: <input type="file" name="file"><br />
		Name1: <input type="text" name="name"><br /> <br />
		File2 to upload: <input type="file" name="file"><br />
		Name2: <input type="text" name="name"><br /> <br />
		<input type="submit" value="Upload"> Press here to upload the file!
	</form>
</body>
</html>
これらのファイルは単純なHTMLファイルであることに注意してください。複雑さを避けるために、JSPやSpringタグは使用していません。重要なポイントは、フォームのenctypeがmultipart/form-dataである必要があるため、Spring Webアプリケーションがリクエストにファイルデータが含まれていることを認識し、処理する必要があることです。また、複数のファイルの場合、フォームフィールドの「file」と「name」が入力フィールドで同じであることに注意してください。これにより、データが配列の形式で送信されます。入力配列を取り、ファイルデータを解析して指定されたファイル名に保存します。
Spring MVC マルチパート設定
マルチパートリクエストを処理するために、Apache Commons FileUploadを使用するには、multipartResolverビーンを以下のようにorg.springframework.web.multipart.commons.CommonsMultipartResolverクラスで構成するだけです。最終的なSpringの設定ファイルは以下のようになります。servlet-context.xmlコード:
<?xml version="1.0" encoding="UTF-8"?>
<beans:beans xmlns="https://www.springframework.org/schema/mvc"
	xmlns:xsi="https://www.w3.org/2001/XMLSchema-instance" xmlns:beans="https://www.springframework.org/schema/beans"
	xmlns:context="https://www.springframework.org/schema/context"
	xsi:schemaLocation="https://www.springframework.org/schema/mvc https://www.springframework.org/schema/mvc/spring-mvc.xsd
		https://www.springframework.org/schema/beans https://www.springframework.org/schema/beans/spring-beans.xsd
		https://www.springframework.org/schema/context https://www.springframework.org/schema/context/spring-context.xsd">

	<!-- DispatcherServlet Context: defines this servlet's request-processing
		infrastructure -->

	<!-- Enables the Spring MVC @Controller programming model -->
	<annotation-driven />

	<!-- Handles HTTP GET requests for /resources/** by efficiently serving
		up static resources in the ${webappRoot}/resources directory -->
	<resources mapping="/**" location="/" />

	<!-- Resolves views selected for rendering by @Controllers to .jsp resources
		in the /WEB-INF/views directory -->
	<beans:bean
		class="org.springframework.web.servlet.view.InternalResourceViewResolver">
		<beans:property name="prefix" value="/WEB-INF/views/" />
		<beans:property name="suffix" value=".jsp" />
	</beans:bean>

	<beans:bean id="multipartResolver"
		class="org.springframework.web.multipart.commons.CommonsMultipartResolver">

		 <!-- setting maximum upload size -->
		<beans:property name="maxUploadSize" value="100000" />

	</beans:bean>

	<context:component-scan base-package="com.journaldev.spring.controller" />

</beans:beans>
multipartResolverビーンのmaxUploadSizeプロパティ値を指定して最大アップロードサイズ制限を設定していることに注意してください。DispatcherServletクラスのソースコードを確認すると、以下のメソッドで名前がmultipartResolverのMultipartResolver変数が定義および初期化されていることがわかります。
private void initMultipartResolver(ApplicationContext context)
  {
    try
    {
      this.multipartResolver = ((MultipartResolver)context.getBean("multipartResolver", MultipartResolver.class));
      if (this.logger.isDebugEnabled()) {
        this.logger.debug("Using MultipartResolver [" + this.multipartResolver + "]");
      }
    }
    catch (NoSuchBeanDefinitionException ex)
    {
      this.multipartResolver = null;
      if (this.logger.isDebugEnabled())
        this.logger.debug("Unable to locate MultipartResolver with name 'multipartResolver': no multipart request handling provided");
    }
  }
この構成では、enctypeがmultipart/form-dataのリクエストは、Controllerクラスに渡される前にmultipartResolverによって処理されます。
Springファイルアップロードコントローラクラス
コントローラクラスのコードは非常にシンプルです。uploadFileおよびuploadMultipleFileのURIのハンドラメソッドを定義する必要があります。FileUploadController.javaコード:
package com.journaldev.spring.controller;

import java.io.BufferedOutputStream;
import java.io.File;
import java.io.FileOutputStream;

import org.slf4j.Logger;
import org.slf4j.LoggerFactory;
import org.springframework.stereotype.Controller;
import org.springframework.web.bind.annotation.RequestMapping;
import org.springframework.web.bind.annotation.RequestMethod;
import org.springframework.web.bind.annotation.RequestParam;
import org.springframework.web.bind.annotation.ResponseBody;
import org.springframework.web.multipart.MultipartFile;

/**
 * Handles requests for the application file upload requests
 */
@Controller
public class FileUploadController {

	private static final Logger logger = LoggerFactory
			.getLogger(FileUploadController.class);

	/**
	 * Upload single file using Spring Controller
	 */
	@RequestMapping(value = "/uploadFile", method = RequestMethod.POST)
	public @ResponseBody
	String uploadFileHandler(@RequestParam("name") String name,
			@RequestParam("file") MultipartFile file) {

		if (!file.isEmpty()) {
			try {
				byte[] bytes = file.getBytes();

				// ファイルを保存するディレクトリを作成
				String rootPath = System.getProperty("catalina.home");
				File dir = new File(rootPath + File.separator + "tmpFiles");
				if (!dir.exists())
					dir.mkdirs();

				// サーバー上でファイルを作成
				File serverFile = new File(dir.getAbsolutePath()
						+ File.separator + name);
				BufferedOutputStream stream = new BufferedOutputStream(
						new FileOutputStream(serverFile));
				stream.write(bytes);
				stream.close();

				logger.info("Server File Location="
						+ serverFile.getAbsolutePath());

				return "You successfully uploaded file=" + name;
			} catch (Exception e) {
				return "You failed to upload " + name + " => " + e.getMessage();
			}
		} else {
			return "You failed to upload " + name
					+ " because the file was empty.";
		}
	}

	/**
	 * Upload multiple file using Spring Controller
	 */
	@RequestMapping(value = "/uploadMultipleFile", method = RequestMethod.POST)
	public @ResponseBody
	String uploadMultipleFileHandler(@RequestParam("name") String[] names,
			@RequestParam("file") MultipartFile[] files) {

		if (files.length != names.length)
			return "Mandatory information missing";

		String message = "";
		for (int i = 0; i < files.length; i++) {
			MultipartFile file = files[i];
			String name = names[i];
			try {
				byte[] bytes = file.getBytes();

				// ファイルを保存するディレクトリを作成
				String rootPath = System.getProperty("catalina.home");
				File dir = new File(rootPath + File.separator + "tmpFiles");
				if (!dir.exists())
					dir.mkdirs();

				// サーバー上でファイルを作成
				File serverFile = new File(dir.getAbsolutePath()
						+ File.separator + name);
				BufferedOutputStream stream = new BufferedOutputStream(
						new FileOutputStream(serverFile));
				stream.write(bytes);
				stream.close();

				logger.info("Server File Location="
						+ serverFile.getAbsolutePath());

				message = message + "You successfully uploaded file=" + name
						+ "
";
			} catch (Exception e) {
				return "You failed to upload " + name + " => " + e.getMessage();
			}
		}
		return message;
	}
}
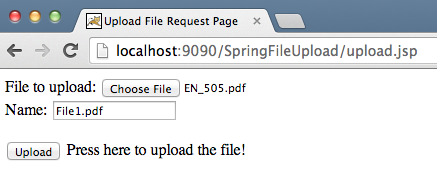
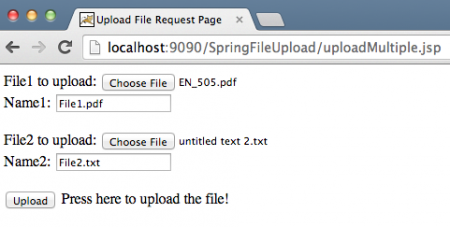
Springの注釈の使用に注目してください。これにより、コードがより読みやすくなります。 uploadFileHandler メソッドは単一のファイルのアップロードシナリオを処理するために使用され、uploadMultipleFileHandler メソッドは複数のファイルのアップロードシナリオを処理するために使用されます。実際には、両方のシナリオを処理するための単一のメソッドを持つことができました。アプリケーションをWARファイルとしてエクスポートし、それをTomcatサーブレットコンテナにデプロイします。アプリケーションを実行すると、以下の画像がリクエストとレスポンスを示します。
Spring MVCファイルアップロードの例


 ファイルが保存された場所を知るためにサーバーログを確認できます。上記のリンクからプロジェクトをダウンロードして、試してみて、もっと学んでください。


