ようこそSpring MVCの例へ。以前、Spring MVCチュートリアルで、Spring Tool Suiteを使用してSpring MVCアプリケーションを作成する方法を説明しました。しかし、今日は、MavenとEclipseを使用して基本的なhello world spring MVCアプリケーションを作成します。
Spring MVCの例
Spring MVCは、モデルビューコントローラーアーキテクチャに基づいています。以下のイメージは、高レベルでのSpring MVCのアーキテクチャを示しています。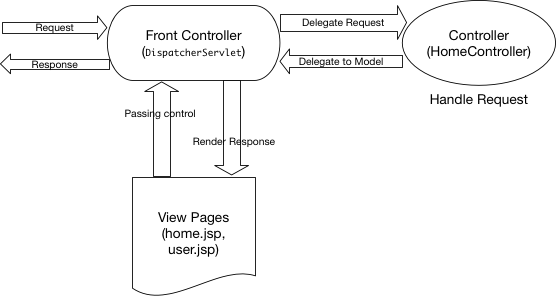
DispatcherServletは、すべてのリクエストを受け取り、処理を開始するフロントコントローラークラスです。これはweb.xmlファイルで構成する必要があります。その役割は、リクエストを適切なコントローラークラスに渡し、ビューページがレスポンスページをレンダリングしたときに応答を送信することです。 HomeController.javaは、当社のspring mvcの例アプリケーションでの唯一のコントローラークラスになります。 home.jsp、user.jspは、当社のspring mvc hello worldの例アプリケーションのビューページです。 User.javaは、当社のspring mvcの例のWebアプリケーションで唯一のモデルクラスになります。
Spring MVCの例 こんにちは 世界 エクリプス プロジェクト
以下の画像は、EclipseでのSpring MVCの例プロジェクトを示しています。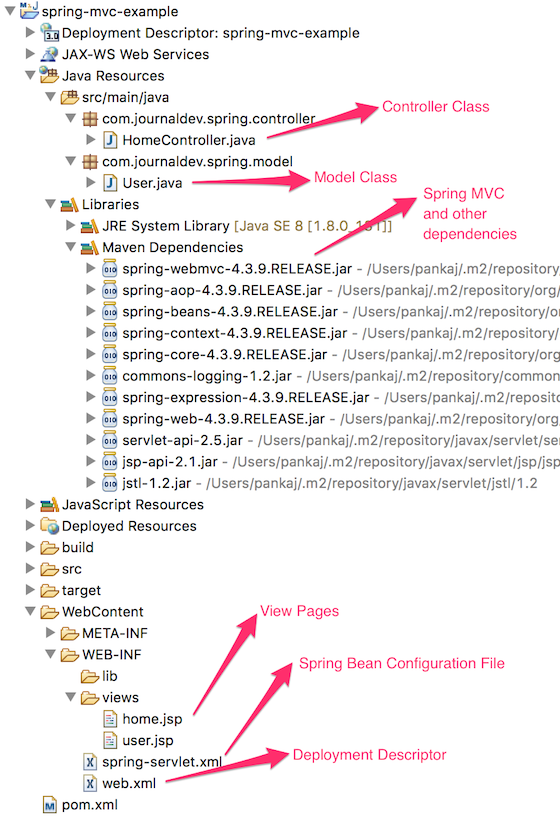 さあ始めましょう。ゼロからプロジェクトを作成しましょう。
Spring MVCの例 Eclipseプロジェクトのセットアップ
 WebアプリケーションでMavenを依存関係の管理に使用したい場合、まず動的Webアプリケーションを作成し、それをMavenプロジェクトに変換する必要があります。以下の画像は、これを行い、プロジェクトの骨組みを整える方法を示しています。プロジェクトエクスプローラーウィンドウで右クリックし、「新規 -> Dynamic Web Project」をクリックします(以下の画像参照)。
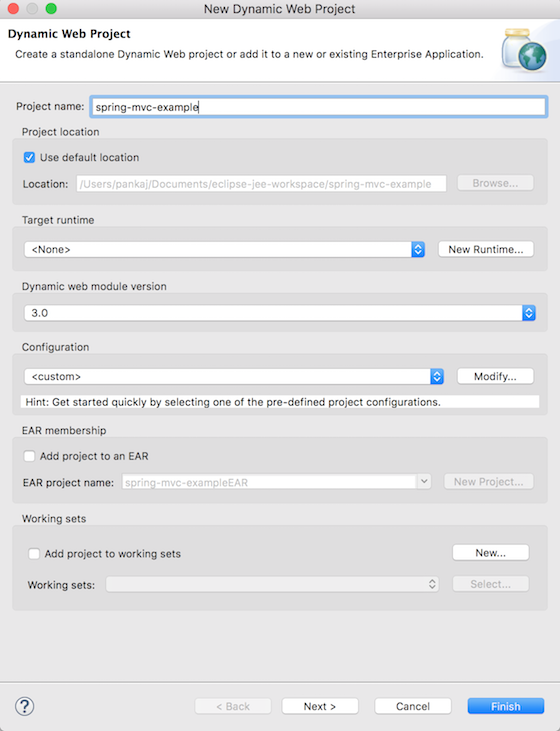 次に表示されるポップアップページで、名前を「spring-mvc-example」と入力し、その他の設定は変更する必要はありません。
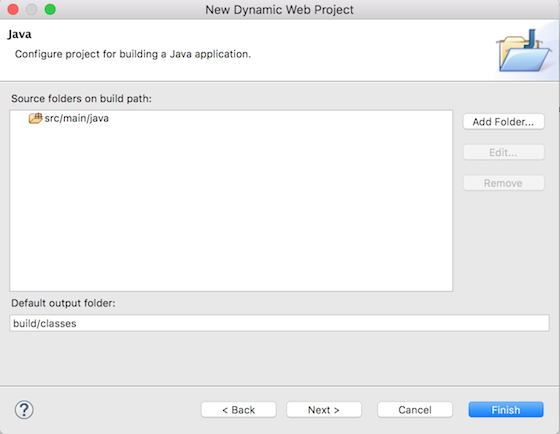 次のページで、ソースフォルダーを「src/main/java」として指定します。これを追加する前にリストから「src」フォルダーを削除する必要があるかもしれません。
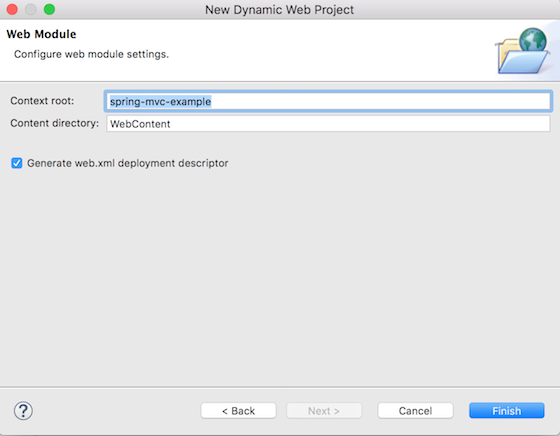 次はWebモジュールページで、アプリケーションのコンテキストルートを「spring-mvc-example」として指定し、「web.xmlデプロイ記述子を生成」オプションを確認してください。Finishをクリックすると、Eclipseのプロジェクトエクスプローラーに新しいDynamic Web Projectが作成されます。
ダイナミックWebプロジェクトをMavenプロジェクトに変換する
Spring MVCの依存関係を簡単に管理するためにMavenを使用したいです。ですので、WebプロジェクトをMavenに変換しましょう。プロジェクトを右クリックし、「Configure -> Maven Projectに変換」を選択します。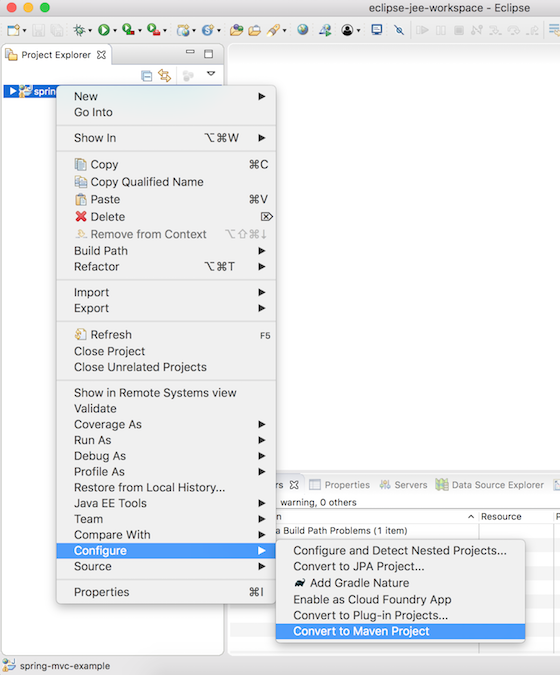 次に、以下に示すようにpom.xmlの設定を提供します。
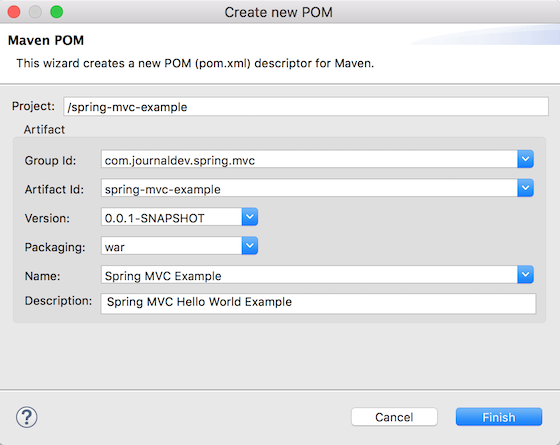 私たちのMavenウェブアプリケーションプロジェクトのスケルトンコードは準備ができています。これで、変更を加えてSpring MVCのハローワールドの例アプリケーションを作成できます。
pom.xmlにSpring MVCの依存関係を追加
pom.xmlにspring-webとspring-webmvcの依存関係を追加する必要があります。また、servlet-api、jsp-api、およびjstlの依存関係も追加してください。最終的なpom.xmlファイルは以下のようになります。
<project xmlns="https://maven.apache.org/POM/4.0.0" xmlns:xsi="https://www.w3.org/2001/XMLSchema-instance"
	xsi:schemaLocation="https://maven.apache.org/POM/4.0.0 https://maven.apache.org/xsd/maven-4.0.0.xsd">
	<modelVersion>4.0.0</modelVersion>
	<groupId>com.journaldev.spring.mvc</groupId>
	<artifactId>spring-mvc-example</artifactId>
	<version>0.0.1-SNAPSHOT</version>
	<packaging>war</packaging>
	<name>Spring MVC Example</name>
	<description>Spring MVC Hello World Example</description>

	<!-- Add Spring Web and MVC dependencies -->
	<dependencies>
		<dependency>
			<groupId>org.springframework</groupId>
			<artifactId>spring-webmvc</artifactId>
			<version>4.3.9.RELEASE</version>
		</dependency>
		<dependency>
			<groupId>org.springframework</groupId>
			<artifactId>spring-web</artifactId>
			<version>4.3.9.RELEASE</version>
		</dependency>
		<!-- Servlet -->
		<dependency>
			<groupId>javax.servlet</groupId>
			<artifactId>servlet-api</artifactId>
			<version>2.5</version>
			<scope>provided</scope>
		</dependency>
		<dependency>
			<groupId>javax.servlet.jsp</groupId>
			<artifactId>jsp-api</artifactId>
			<version>2.1</version>
			<scope>provided</scope>
		</dependency>
		<dependency>
			<groupId>javax.servlet</groupId>
			<artifactId>jstl</artifactId>
			<version>1.2</version>
		</dependency>
	</dependencies>

	<build>
		<plugins>
			<plugin>
				<artifactId>maven-compiler-plugin</artifactId>
				<version>3.6.1</version>
				<configuration>
					<source>1.8</source>
					<target>1.8</target>
				</configuration>
			</plugin>
			<plugin>
				<artifactId>maven-war-plugin</artifactId>
				<version>3.0.0</version>
				<configuration>
					<warSourceDirectory>WebContent</warSourceDirectory>
				</configuration>
			</plugin>
		</plugins>
		<finalName>${project.artifactId}</finalName> <!-- added to remove Version from WAR file -->
	</build>
</project>
ビルドの中でfinalName構成を注意してください。プロジェクトがEclipseによってビルドされると、すべてのJARがMavenの依存関係セクションに表示されることに注意してください。
Spring MVCディスパッチャーサーブレットをフロントコントローラーとして
Spring MVCフレームワークをWebアプリケーションに追加する必要があります。そのためには、以下に示すようにweb.xmlでDispatcherServletを構成する必要があります。
<?xml version="1.0" encoding="UTF-8"?>
<web-app xmlns:xsi="https://www.w3.org/2001/XMLSchema-instance" xmlns="https://java.sun.com/xml/ns/javaee" xsi:schemaLocation="https://java.sun.com/xml/ns/javaee https://java.sun.com/xml/ns/javaee/web-app_3_0.xsd" id="WebApp_ID" version="3.0">
  <display-name>spring-mvc-example</display-name>

	<!-- Add Spring MVC DispatcherServlet as front controller -->
	<servlet>
        <servlet-name>spring</servlet-name>
        <servlet-class>
                org.springframework.web.servlet.DispatcherServlet
        </servlet-class>
        <init-param>
       		<param-name>contextConfigLocation</param-name>
       		<param-value>/WEB-INF/spring-servlet.xml</param-value>
    		</init-param>
        <load-on-startup>1</load-on-startup>
    </servlet>

    <servlet-mapping>
        <servlet-name>spring</servlet-name>
        <url-pattern>/</url-pattern>
    </servlet-mapping>

 </web-app>
contextConfigLocation init-paramは、Spring Bean構成ファイルの場所を提供するために使用されます。
Spring MVCの例のBean構成ファイル
次のステップは、次に示すようにSpring Bean構成ファイルspring-servlet.xmlを作成することです。
<?xml version="1.0" encoding="UTF-8"?>
<beans:beans xmlns="https://www.springframework.org/schema/mvc"
	xmlns:xsi="https://www.w3.org/2001/XMLSchema-instance" xmlns:beans="https://www.springframework.org/schema/beans"
	xmlns:context="https://www.springframework.org/schema/context"
	xsi:schemaLocation="https://www.springframework.org/schema/mvc https://www.springframework.org/schema/mvc/spring-mvc.xsd
		https://www.springframework.org/schema/beans https://www.springframework.org/schema/beans/spring-beans.xsd
		https://www.springframework.org/schema/context https://www.springframework.org/schema/context/spring-context.xsd">

	<!-- DispatcherServlet Context: defines this servlet's request-processing
		infrastructure -->

	<!-- Enables the Spring MVC @Controller programming model -->
	<annotation-driven />
	<context:component-scan base-package="com.journaldev.spring" />

	<!-- Resolves views selected for rendering by @Controllers to .jsp resources
		in the /WEB-INF/views directory -->
	<beans:bean
		class="org.springframework.web.servlet.view.InternalResourceViewResolver">
		<beans:property name="prefix" value="/WEB-INF/views/" />
		<beans:property name="suffix" value=".jsp" />
	</beans:bean>

</beans:beans>
3つの重要な構成があります。
annotation-drivenは、@Controllerアノテーションを使用してコントローラークラスを検索するようにDispatcherServletに指示します。context:component-scanは、DispatcherServletがコントローラークラスを探す場所を指定します。InternalResourceViewResolverビーン構成を使用して、ビューページの場所と使用されるサフィックスを指定します。コントローラークラスのメソッドはビューページの名前を返し、その後、レスポンスをレンダリングするために使用するビューページを特定するためにサフィックスが追加されます。
Spring MVCコントローラークラス
ホームページ用の「/」とユーザーページ用の「/user」の2つのURIに応答する単一のコントローラークラスがあります。
package com.journaldev.spring.controller;

import java.text.DateFormat;
import java.util.Date;
import java.util.Locale;

import org.springframework.stereotype.Controller;
import org.springframework.ui.Model;
import org.springframework.validation.annotation.Validated;
import org.springframework.web.bind.annotation.RequestMapping;
import org.springframework.web.bind.annotation.RequestMethod;

import com.journaldev.spring.model.User;

@Controller
public class HomeController {

	/**
	 * Simply selects the home view to render by returning its name.
	 */
	@RequestMapping(value = "/", method = RequestMethod.GET)
	public String home(Locale locale, Model model) {
		System.out.println("Home Page Requested, locale = " + locale);
		Date date = new Date();
		DateFormat dateFormat = DateFormat.getDateTimeInstance(DateFormat.LONG, DateFormat.LONG, locale);

		String formattedDate = dateFormat.format(date);

		model.addAttribute("serverTime", formattedDate);

		return "home";
	}

	@RequestMapping(value = "/user", method = RequestMethod.POST)
	public String user(@Validated User user, Model model) {
		System.out.println("User Page Requested");
		model.addAttribute("userName", user.getUserName());
		return "user";
	}
}
シンプルさのために、log4jなどのロギングフレームワークは使用していません。
Spring MVCモデルクラス
単一の変数とそのgetter-setterメソッドを持つ単純なモデルクラスがあります。これは単純なPOJOクラスです。
package com.journaldev.spring.model;

public class User {
	private String userName;

	public String getUserName() {
		return userName;
	}

	public void setUserName(String userName) {
		this.userName = userName;
	}
}
Spring MVCビューページ
以下に定義された2つのビューページがあります。home.jsp
<%@ page language="java" contentType="text/html; charset=UTF-8"
	pageEncoding="UTF-8"%>
<%@ taglib uri="https://java.sun.com/jsp/jstl/core" prefix="c"%>
<%@ page session="false"%>
<html>
<head>
<title>Home</title>
</head>
<body>
	<h1>Hello world!</h1>

	<P>The time on the server is ${serverTime}.</p>

	<form action="user" method="post">
		<input type="text" name="userName"><br> <input
			type="submit" value="Login">
	</form>
</body>
</html>
user.jsp
<%@ page language="java" contentType="text/html; charset=UTF-8"
    pageEncoding="UTF-8"%>
<!DOCTYPE html PUBLIC "-//W3C//DTD HTML 4.01 Transitional//EN" "https://www.w3.org/TR/html4/loose.dtd">
<html>
<head>
<meta http-equiv="Content-Type" content="text/html; charset=UTF-8">
<title>User Home Page</title>
</head>
<body>
<h3>Hi ${userName}</h3>
</body>
</html>
注意してください、Spring MVCはフォーム変数をモデルクラスの変数にマッピングするため、両方の場所に同じ変数名があるのです。これで、Spring MVCの例題プロジェクトが展開されてテストする準備が整いました。
Spring MVC Eclipseプロジェクトの展開
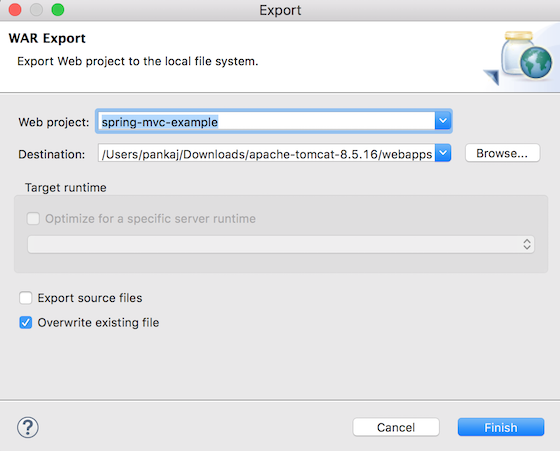
私たちは、EclipseのWARファイルとしてエクスポートするオプションを使用して、それを直接実行中のTomcatサーバーのwebappsディレクトリに展開できます。ただし、プロジェクトをビルドしてから、お気に入りのサーブレットコンテナの展開ディレクトリにコピーするために、コマンドラインも使用できます。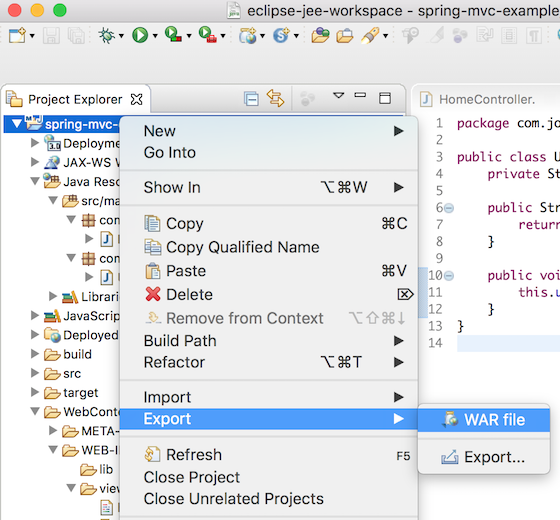
Spring MVCの例題テスト
一度Spring MVCプロジェクトが展開されると、ホームページにはhttps://localhost:8080/spring-mvc-example/からアクセスできます。Tomcatポートとコンテキストルートを適切に変更してください。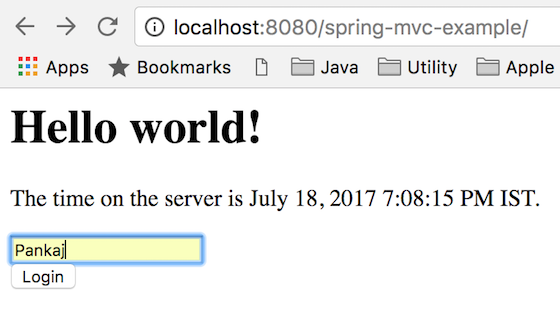
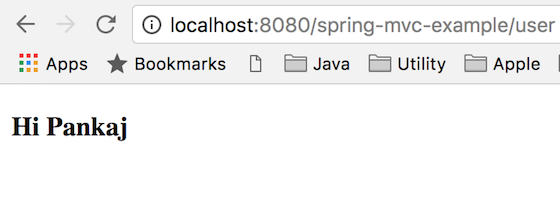 これでSpring MVCの例はすべてです。できるだけシンプルに保つように努めましたが、何か問題が発生した場合はコメントでお知らせください。お手伝いさせていただきます。最終的なSpring MVCの例プロジェクトは以下のリンクからダウンロードできます。
参考文献:公式ページ
Source:
https://www.digitalocean.com/community/tutorials/spring-mvc-example


