Spring IoCの例チュートリアルへようこそ。Spring Frameworkは、制御の反転の原則に基づいて構築されています。依存性の注入は、アプリケーションでIoCを実装するための技術です。
Spring IoC
 今日はSpring IoCコンテナについて説明します。また、Spring Beanについても説明します。以下は、Spring IoCチュートリアルの異なるセクションに素早く移動するための目次です。
Spring IoCコンテナ
Spring IoCは、オブジェクト間の依存関係を緩やかにするメカニズムです。ランタイムでオブジェクトの依存関係を緩やかにし、動的なバインディングを実現するために、他のアセンブラオブジェクトによってオブジェクトの依存関係が注入されます。Spring IoCコンテナは、オブジェクトに依存関係を注入し、それを使用可能にするプログラムです。org.springframework.beansおよびorg.springframework.contextパッケージの一部です。Spring IoCコンテナは、オブジェクトの依存関係を切り離すためのさまざまな方法を提供します。BeanFactoryはSpring IoCコンテナのルートインターフェースです。ApplicationContextはBeanFactoryインターフェースの子インターフェースであり、Spring AOP機能、i18nなどを提供します。ApplicationContextの有用な子インターフェースのいくつかには、ConfigurableApplicationContextとWebApplicationContextがあります。Spring Frameworkは、Springコンテキストを取得し、その後Spring Beanを取得するために使用できる、多数の有用なApplicationContext実装クラスを提供します。使用する一部の有用なApplicationContext実装には、
- AnnotationConfigApplicationContextがあります。これは、単独のJavaアプリケーションでSpringを使用し、構成に注釈を使用している場合に、コンテナを初期化してビーンオブジェクトを取得するために使用できます。
- ClassPathXmlApplicationContext:スタンドアロンアプリケーションでSpringビーン構成xmlファイルを持っている場合、このクラスを使用してファイルをロードし、コンテナオブジェクトを取得できます。
- FileSystemXmlApplicationContext:これはClassPathXmlApplicationContextと似ていますが、xml構成ファイルをファイルシステムのどこからでもロードできます。
- AnnotationConfigWebApplicationContextとXmlWebApplicationContextはWebアプリケーション向けです。
通常、Spring MVCアプリケーションで作業していて、アプリケーションがSpringフレームワークを使用するように構成されている場合、Spring IoCコンテナはアプリケーションの起動時に初期化され、ビーンが要求されると依存関係が自動的に注入されます。ただし、スタンドアロンアプリケーションの場合、アプリケーションのどこかでコンテナを初期化し、それを使用してSpringビーンを取得する必要があります。
Springビーン
Springビーンは特別なものではありません。Springコンテナを介して初期化するSpringフレームワーク内の任意のオブジェクトがSpringビーンと呼ばれます。通常のJava POJOクラスは、構成メタデータ情報を提供してコンテナを介して初期化される場合、Springビーンになります。
Springビーンのスコープ
Spring Beansには5つのスコープが定義されています。
- singleton – 各コンテナに対してビーンの唯一のインスタンスが作成されます。これはSpring Beansのデフォルトのスコープです。このスコープを使用する際は、ビーンに共有のインスタンス変数がないことを確認してください。そうしないとデータの不整合の問題が発生する可能性があります。
- prototype – ビーンが要求されるたびに新しいインスタンスが作成されます。
- request – これはプロトタイプスコープと同じですが、Webアプリケーションで使用するためのものです。HTTPリクエストごとにビーンの新しいインスタンスが作成されます。
- session – コンテナによって各HTTPセッションごとに新しいビーンが作成されます。
- global-session – これはPortletアプリケーションのためにグローバルセッションビーンを作成するために使用されます。
Spring Frameworkは拡張可能で、独自のスコープを作成することもできます。ただし、ほとんどの場合、フレームワークで提供されるスコープで十分です。
Spring Bean Configuration
Spring Frameworkでは、アプリケーションで使用するためにビーンを構成する3つの方法が提供されています。
- アノテーションベースの構成 – @Serviceまたは@Componentアノテーションを使用します。スコープの詳細は@Scopeアノテーションで指定できます。
- XMLベースの構成 – Spring構成XMLファイルを作成してビーンを構成します。Spring MVCフレームワークを使用している場合、xmlベースの構成はweb.xmlファイルにいくつかのボイラープレートコードを書くことで自動的に読み込まれます。
- Javaベースの構成 – Spring 3.0以降、Javaプログラムを使用してSpringビーンを構成できます。Javaベースの構成に使用される重要なアノテーションには@Configuration、@ComponentScan、および@Beanがあります。
Spring IoCおよびSpring Beanの例プロジェクト
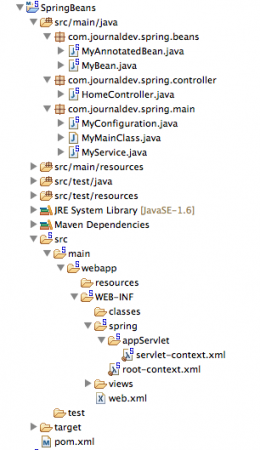
さまざまな側面でSpring IoCコンテナとSpring Beanの設定を見てみましょう。単純なSpringプロジェクトでSpring MVCプロジェクトを作成します。例として、Spring Tool SuiteでSpring MVCプロジェクトを作成しています。Spring Tool SuiteやSpring MVCが初めての方は、Spring Tool SuiteでSpring MVCチュートリアルをお読みください。最終的なプロジェクト構造は以下の画像のようになります。 Spring IoCとSpring Beanプロジェクトのさまざまなコンポーネントを一つずつ見ていきましょう。
XMLベースのSpring Bean設定
MyBeanは単純なJava POJOクラスです。
package com.journaldev.spring.beans;

public class MyBean {

	private String name;

	public String getName() {
		return name;
	}
	public void setName(String name) {
		this.name = name;
	}

}
Springの設定XMLファイル
servlet-context.xmlのコード:
<?xml version="1.0" encoding="UTF-8"?>
<beans:beans xmlns="https://www.springframework.org/schema/mvc"
	xmlns:xsi="https://www.w3.org/2001/XMLSchema-instance"
	xmlns:beans="https://www.springframework.org/schema/beans"
	xmlns:context="https://www.springframework.org/schema/context"
	xsi:schemaLocation="https://www.springframework.org/schema/mvc https://www.springframework.org/schema/mvc/spring-mvc.xsd
		https://www.springframework.org/schema/beans https://www.springframework.org/schema/beans/spring-beans.xsd
		https://www.springframework.org/schema/context https://www.springframework.org/schema/context/spring-context.xsd">

	<!-- DispatcherServlet Context: defines this servlet's request-processing infrastructure -->

	<!-- Enables the Spring MVC @Controller programming model -->
	<annotation-driven />

	<!-- Handles HTTP GET requests for /resources/** by efficiently serving up static resources in the ${webappRoot}/resources directory -->
	<resources mapping="/resources/**" location="/resources/" />

	<!-- Resolves views selected for rendering by @Controllers to .jsp resources in the /WEB-INF/views directory -->
	<beans:bean class="org.springframework.web.servlet.view.InternalResourceViewResolver">
		<beans:property name="prefix" value="/WEB-INF/views/" />
		<beans:property name="suffix" value=".jsp" />
	</beans:bean>

	<context:component-scan base-package="com.journaldev.spring" />

	<beans:bean name="myBean" class="com.journaldev.spring.beans.MyBean" scope="singleton" ></beans:bean>

</beans:beans>
MyBeanがsingletonスコープでbean要素を使用して設定されていることに注目してください。
注釈ベースのSpring Bean設定
package com.journaldev.spring.beans;

import org.springframework.context.annotation.Scope;
import org.springframework.stereotype.Service;
import org.springframework.web.context.WebApplicationContext;

@Service
@Scope(WebApplicationContext.SCOPE_REQUEST)
public class MyAnnotatedBean {

	private int empId;

	public int getEmpId() {
		return empId;
	}

	public void setEmpId(int empId) {
		this.empId = empId;
	}

}
私のAnnotatedBeanは、@Serviceを使用して構成され、スコープはRequestに設定されています。
Spring IoCコントローラークラス
HomeControllerクラスは、アプリケーションのホームページのHTTPリクエストを処理します。私たちはWebApplicationContextコンテナを介してこのコントローラークラスにSpringのビーンをインジェクトします。
package com.journaldev.spring.controller;

import java.text.DateFormat;
import java.util.Date;
import java.util.Locale;

import org.springframework.beans.factory.annotation.Autowired;
import org.springframework.context.annotation.Scope;
import org.springframework.stereotype.Controller;
import org.springframework.ui.Model;
import org.springframework.web.bind.annotation.RequestMapping;
import org.springframework.web.bind.annotation.RequestMethod;

import com.journaldev.spring.beans.MyAnnotatedBean;
import com.journaldev.spring.beans.MyBean;

@Controller
@Scope("request")
public class HomeController {

	private MyBean myBean;

	private MyAnnotatedBean myAnnotatedBean;

	@Autowired
	public void setMyBean(MyBean myBean) {
		this.myBean = myBean;
	}

	@Autowired
	public void setMyAnnotatedBean(MyAnnotatedBean obj) {
		this.myAnnotatedBean = obj;
	}

	/**
	 * Simply selects the home view to render by returning its name.
	 */
	@RequestMapping(value = "/", method = RequestMethod.GET)
	public String home(Locale locale, Model model) {
		System.out.println("MyBean hashcode="+myBean.hashCode());
		System.out.println("MyAnnotatedBean hashcode="+myAnnotatedBean.hashCode());

		Date date = new Date();
		DateFormat dateFormat = DateFormat.getDateTimeInstance(DateFormat.LONG, DateFormat.LONG, locale);

		String formattedDate = dateFormat.format(date);

		model.addAttribute("serverTime", formattedDate );

		return "home";
	}

}
デプロイメント記述子
Spring Frameworkのためにアプリケーションを構成する必要があります。設定メタデータがロードされ、コンテキストが初期化されます。
<?xml version="1.0" encoding="UTF-8"?>
<web-app version="2.5" xmlns="https://java.sun.com/xml/ns/javaee"
	xmlns:xsi="https://www.w3.org/2001/XMLSchema-instance"
	xsi:schemaLocation="https://java.sun.com/xml/ns/javaee https://java.sun.com/xml/ns/javaee/web-app_2_5.xsd">

	<!-- The definition of the Root Spring Container shared by all Servlets and Filters -->
	<context-param>
		<param-name>contextConfigLocation</param-name>
		<param-value>/WEB-INF/spring/root-context.xml</param-value>
	</context-param>

	<!-- Creates the Spring Container shared by all Servlets and Filters -->
	<listener>
		<listener-class>org.springframework.web.context.ContextLoaderListener</listener-class>
	</listener>

	<!-- Processes application requests -->
	<servlet>
		<servlet-name>appServlet</servlet-name>
		<servlet-class>org.springframework.web.servlet.DispatcherServlet</servlet-class>
		<init-param>
			<param-name>contextConfigLocation</param-name>
			<param-value>/WEB-INF/spring/appServlet/servlet-context.xml</param-value>
		</init-param>
		<load-on-startup>1</load-on-startup>
	</servlet>

	<servlet-mapping>
		<servlet-name>appServlet</servlet-name>
		<url-pattern>/</url-pattern>
	</servlet-mapping>

</web-app>
ほとんどの構成はSTSツールによって自動生成されるボイラープレートコードです。
Spring IoC Beanの例アプリケーションを実行する
今、Webアプリケーションを起動すると、ホームページがロードされ、ページを複数回更新すると、コンソールに以下のログが表示されます。
MyBean hashcode=118267258
MyAnnotatedBean hashcode=1703899856
MyBean hashcode=118267258
MyAnnotatedBean hashcode=1115599742
MyBean hashcode=118267258
MyAnnotatedBean hashcode=516457106
MyBeanがシングルトンで構成されていることに注意してください。そのため、コンテナは常に同じインスタンスを返し、ハッシュコードも常に同じです。同様に、各リクエストごとに異なるハッシュコードでMyAnnotatedBeanの新しいインスタンスが作成されます。
JavaベースのSpring Beanの構成
独立したアプリケーションでは、アノテーションベースの構成とXMLベースの構成の両方を使用できます。唯一の要件は、プログラムのどこかでコンテキストを初期化することです。
package com.journaldev.spring.main;

import java.util.Date;

public class MyService {

	public void log(String msg){
		System.out.println(new Date()+"::"+msg);
	}
}
MyServiceはいくつかのメソッドを持つシンプルなJavaクラスです。
package com.journaldev.spring.main;

import org.springframework.context.annotation.Bean;
import org.springframework.context.annotation.ComponentScan;
import org.springframework.context.annotation.Configuration;

@Configuration
@ComponentScan(value="com.journaldev.spring.main")
public class MyConfiguration {

	@Bean
	public MyService getService(){
		return new MyService();
	}
}
Springコンテナを初期化するために使用されるアノテーションベースの構成クラスです。
package com.journaldev.spring.main;

import org.springframework.context.annotation.AnnotationConfigApplicationContext;

public class MyMainClass {

	public static void main(String[] args) {

		AnnotationConfigApplicationContext ctx = new AnnotationConfigApplicationContext(
				MyConfiguration.class);
		MyService service = ctx.getBean(MyService.class);

		service.log("Hi");

		MyService newService = ctx.getBean(MyService.class);
		System.out.println("service hashcode="+service.hashCode());
		System.out.println("newService hashcode="+newService.hashCode());
		ctx.close();
	}

}
A simple test program where we are initializing the AnnotationConfigApplicationContext context and then using getBean() method to get the instance of MyService. Notice that I am calling getBean method two times and printing the hashcode. Since there is no scope defined for MyService, it should be a singleton and hence hashcode should be the same for both the instances. When we run the above application, we get following console output confirming our understanding.
Sat Dec 28 22:49:18 PST 2013::Hi
service hashcode=678984726
newService hashcode=678984726
XMLベースの構成をお探しの場合は、SpringのXML構成ファイルを作成し、次のコードスニペットでコンテキストを初期化してください。
ClassPathXmlApplicationContext context = new ClassPathXmlApplicationContext(
                "applicationContext.xml");
        MyService app = context.getBean(MyService.class);
これで、Spring IoCの例チュートリアル、Spring Beanのスコープと構成の詳細が終わりました。以下のリンクからSpring IoCとSpring Beanの例プロジェクトをダウンロードして、理解を深めるために試してみてください。
Source:
https://www.digitalocean.com/community/tutorials/spring-ioc-bean-example-tutorial


