今日はSpringの依存性注入について見ていきます。Springフレームワークのコアコンセプトは「依存性注入」と「アスペクト指向プログラミング」です。以前、Javaの依存性注入について書いたことがあり、Google Guiceフレームワークを使用してこのプロセスをアプリケーションで自動化する方法について説明しました。
Springの依存性注入
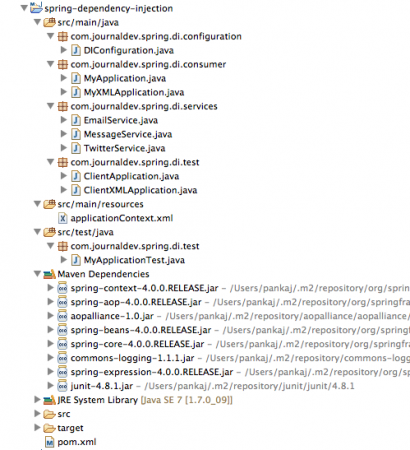
 このチュートリアルは、注釈ベースの構成とXMLファイルベースの構成の両方を使用したSpring Dependency Injectionの詳細を提供することを目的としています。また、テスト可能性の容易さが依存性の注入の主な利点の一つであるため、アプリケーションのJUnitテストケースの例も提供します。spring-dependency-injection Mavenプロジェクトを作成しました。その構造は以下の画像のようになっています。
 それでは、各コンポーネントを1つずつ見ていきましょう。
Spring Dependency Injection – Maven Dependencies
I have added Spring and JUnit maven dependencies in pom.xml file, final pom.xml code is below.
<project xmlns="https://maven.apache.org/POM/4.0.0" xmlns:xsi="https://www.w3.org/2001/XMLSchema-instance"
	xsi:schemaLocation="https://maven.apache.org/POM/4.0.0 https://maven.apache.org/xsd/maven-4.0.0.xsd">
	<modelVersion>4.0.0</modelVersion>
	<groupId>com.journaldev.spring</groupId>
	<artifactId>spring-dependency-injection</artifactId>
	<version>0.0.1-SNAPSHOT</version>

	<dependencies>
		<dependency>
			<groupId>org.springframework</groupId>
			<artifactId>spring-context</artifactId>
			<version>4.0.0.RELEASE</version>
		</dependency>
		<dependency>
			<groupId>junit</groupId>
			<artifactId>junit</artifactId>
			<version>4.8.1</version>
			<scope>test</scope>
		</dependency>
	</dependencies>

</project>
現在の安定版のSpring Frameworkは4.0.0.RELEASEであり、JUnitの現在のバージョンは4.8.1です。他のバージョンを使用している場合は、プロジェクトにいくつかの変更が必要な場合があります。プロジェクトをビルドすると、上記の画像のようにトランジティブな依存関係のためにいくつかの他のJARファイルもMavenの依存関係に追加されることに気付くでしょう。
Springの依存性注入 – サービスクラス
ユーザーに電子メールメッセージとTwitterメッセージを送信したいとします。依存性注入のために、サービス用の基底クラスが必要です。したがって、MessageService インターフェースを持ち、メッセージを送信するための単一のメソッド宣言があります。
package com.journaldev.spring.di.services;

public interface MessageService {

	boolean sendMessage(String msg, String rec);
}
今、実際の実装クラスを作成して、電子メールメッセージとTwitterメッセージを送信します。
package com.journaldev.spring.di.services;

public class EmailService implements MessageService {

	public boolean sendMessage(String msg, String rec) {
		System.out.println("Email Sent to "+rec+ " with Message="+msg);
		return true;
	}

}
package com.journaldev.spring.di.services;

public class TwitterService implements MessageService {

	public boolean sendMessage(String msg, String rec) {
		System.out.println("Twitter message Sent to "+rec+ " with Message="+msg);
		return true;
	}

}
サービスが準備できたので、サービスを消費するComponentクラスに移動できます。
Springの依存性注入 – Componentクラス
上記のサービス用の消費者クラスを作成しましょう。Springのアノテーションを使用して自動配線するクラスと、アノテーションなしで配線構成をXML構成ファイルで指定するクラスの2つがあります。
package com.journaldev.spring.di.consumer;

import org.springframework.beans.factory.annotation.Autowired;
import org.springframework.context.annotation.ComponentScan;
import org.springframework.stereotype.Component;

import com.journaldev.spring.di.services.MessageService;

@Component
public class MyApplication {

	//フィールドベースの依存性注入
	//@Autowired
	private MessageService service;

//	コンストラクタベースの依存性注入
//	@Autowired
//	public MyApplication(MessageService svc){
//		this.service=svc;
//	}

	@Autowired
	public void setService(MessageService svc){
		this.service=svc;
	}

	public boolean processMessage(String msg, String rec){
		//バリデーション、ログなどの魔法のようなもの
		return this.service.sendMessage(msg, rec);
	}
}
MyApplicationクラスに関するいくつかの重要なポイント:
@Componentアノテーションがクラスに追加されると、Springフレームワークがコンポーネントをスキャンする際に、このクラスがコンポーネントとして扱われます。@Componentアノテーションはクラスにのみ適用され、その保持ポリシーはランタイムです。アノテーションの保持ポリシーに慣れていない場合は、Javaアノテーションチュートリアルを読むことをお勧めします。@Autowiredアノテーションは、Springに自動ワイヤリングが必要であることを知らせるために使用されます。これはフィールド、コンストラクタ、およびメソッドに適用できます。このアノテーションにより、コンストラクタベース、フィールドベース、またはメソッドベースの依存性注入をコンポーネントに実装できます。- この例では、メソッドベースの依存性注入を使用しています。コンストラクタベースの依存性注入に切り替えるには、コンストラクタメソッドのコメントアウトを解除できます。
さて、同様のクラスをアノテーションなしで書いてみましょう。
package com.journaldev.spring.di.consumer;

import com.journaldev.spring.di.services.MessageService;

public class MyXMLApplication {

	private MessageService service;

	//コンストラクタベースの依存性注入
//	public MyXMLApplication(MessageService svc) {
//		this.service = svc;
//	}

	//setterベースの依存性注入
	public void setService(MessageService svc){
		this.service=svc;
	}

	public boolean processMessage(String msg, String rec) {
		//バリデーション、ロギングなどのいくつかのマジック
		return this.service.sendMessage(msg, rec);
	}
}
A simple application class consuming the service. For XML based configuration, we can use implement either constructor-based spring dependency injection or method-based spring dependency injection. Note that method-based and setter-based injection approaches are same, it’s just that some prefer calling it setter-based and some call it method-based.
アノテーションを使用したSpring依存性注入の設定
アノテーションベースの構成では、実装ビーンをコンポーネントプロパティに注入するために使用されるConfiguratorクラスを記述する必要があります。
package com.journaldev.spring.di.configuration;

import org.springframework.context.annotation.Bean;
import org.springframework.context.annotation.ComponentScan;
import org.springframework.context.annotation.Configuration;

import com.journaldev.spring.di.services.EmailService;
import com.journaldev.spring.di.services.MessageService;

@Configuration
@ComponentScan(value={"com.journaldev.spring.di.consumer"})
public class DIConfiguration {

	@Bean
	public MessageService getMessageService(){
		return new EmailService();
	}
}
上記クラスに関連するいくつかの重要なポイントは次のとおりです:
@Configurationアノテーションは、Springにこれが構成クラスであることを知らせるために使用されます。@ComponentScanアノテーションは、@Configurationアノテーションと共に使用され、コンポーネントクラスを検索するパッケージを指定します。@Beanアノテーションは、このメソッドがコンポーネントクラスに注入するビーンの実装を取得するために使用されることをSpringフレームワークに知らせるために使用されます。
アノテーションベースのSpring依存性注入の例をテストするために、簡単なプログラムを書いてみましょう。
package com.journaldev.spring.di.test;

import org.springframework.context.annotation.AnnotationConfigApplicationContext;

import com.journaldev.spring.di.configuration.DIConfiguration;
import com.journaldev.spring.di.consumer.MyApplication;

public class ClientApplication {

	public static void main(String[] args) {
		AnnotationConfigApplicationContext context = new AnnotationConfigApplicationContext(DIConfiguration.class);
		MyApplication app = context.getBean(MyApplication.class);

		app.processMessage("Hi Pankaj", "[email protected]");

		//コンテキストを閉じる
		context.close();
	}

}
AnnotationConfigApplicationContextはAbstractApplicationContext抽象クラスの実装であり、アノテーションが使用される場合にサービスをコンポーネントに自動配線するために使用されます。AnnotationConfigApplicationContextのコンストラクタは、コンポーネントクラスにインジェクトするために使用されるBean実装を取るクラスを取ります。getBean(Class)メソッドはコンポーネントオブジェクトを返し、オブジェクトの自動配線の構成を使用します。コンテキストオブジェクトはリソースを消費するので、使用が完了したら閉じる必要があります。上記のプログラムを実行すると、以下の出力が得られます。
Dec 16, 2013 11:49:20 PM org.springframework.context.support.AbstractApplicationContext prepareRefresh
INFO: Refreshing org.springframework.context.annotation.AnnotationConfigApplicationContext@3067ed13: startup date [Mon Dec 16 23:49:20 PST 2013]; root of context hierarchy
Email Sent to [email protected] with Message=Hi Pankaj
Dec 16, 2013 11:49:20 PM org.springframework.context.support.AbstractApplicationContext doClose
INFO: Closing org.springframework.context.annotation.AnnotationConfigApplicationContext@3067ed13: startup date [Mon Dec 16 23:49:20 PST 2013]; root of context hierarchy
Spring Dependency Injection XMLベースの設定
以下のデータでSpring設定ファイルを作成します。ファイル名は任意です。applicationContext.xmlのコード:
<?xml version="1.0" encoding="UTF-8"?>
<beans xmlns="https://www.springframework.org/schema/beans"
	xmlns:xsi="https://www.w3.org/2001/XMLSchema-instance"
	xsi:schemaLocation="
https://www.springframework.org/schema/beans https://www.springframework.org/schema/beans/spring-beans-4.0.xsd">

<!--
	<bean id="MyXMLApp" class="com.journaldev.spring.di.consumer.MyXMLApplication">
		<constructor-arg>
			<bean class="com.journaldev.spring.di.services.TwitterService" />
		</constructor-arg>
	</bean>
-->
	<bean id="twitter" class="com.journaldev.spring.di.services.TwitterService"></bean>
	<bean id="MyXMLApp" class="com.journaldev.spring.di.consumer.MyXMLApplication">
		<property name="service" ref="twitter"></property>
	</bean>
</beans>
上記のXMLには、コンストラクタベースとセッターベースのSpring依存性インジェクションの両方の設定が含まれていることに注意してください。MyXMLApplicationがインジェクションにセッターメソッドを使用しているため、Bean構成にはproperty要素が含まれています。コンストラクタベースのインジェクションの場合、constructor-arg要素を使用する必要があります。構成XMLファイルはソースディレクトリに配置されているため、ビルド後にクラスディレクトリにあります。単純なプログラムでXMLベースの構成を使用する方法を見てみましょう。
package com.journaldev.spring.di.test;

import org.springframework.context.support.ClassPathXmlApplicationContext;

import com.journaldev.spring.di.consumer.MyXMLApplication;

public class ClientXMLApplication {

	public static void main(String[] args) {
		ClassPathXmlApplicationContext context = new ClassPathXmlApplicationContext(
				"applicationContext.xml");
		MyXMLApplication app = context.getBean(MyXMLApplication.class);

		app.processMessage("Hi Pankaj", "[email protected]");

		// コンテキストを閉じる
		context.close();
	}

}
ClassPathXmlApplicationContextは、設定ファイルの場所を指定してApplicationContextオブジェクトを取得するために使用されます。複数のオーバーロードされたコンストラクタがあり、複数の設定ファイルも指定できます。コードの残り部分は、アノテーションベースの構成テストプログラムと類似していますが、違いは設定に基づいてApplicationContextオブジェクトを取得する方法です。上記のプログラムを実行すると、次の出力が得られます。
Dec 17, 2013 12:01:23 AM org.springframework.context.support.AbstractApplicationContext prepareRefresh
INFO: Refreshing org.springframework.context.support.ClassPathXmlApplicationContext@4eeaabad: startup date [Tue Dec 17 00:01:23 PST 2013]; root of context hierarchy
Dec 17, 2013 12:01:23 AM org.springframework.beans.factory.xml.XmlBeanDefinitionReader loadBeanDefinitions
INFO: Loading XML bean definitions from class path resource [applicationContext.xml]
Twitter message Sent to [email protected] with Message=Hi Pankaj
Dec 17, 2013 12:01:23 AM org.springframework.context.support.AbstractApplicationContext doClose
INFO: Closing org.springframework.context.support.ClassPathXmlApplicationContext@4eeaabad: startup date [Tue Dec 17 00:01:23 PST 2013]; root of context hierarchy
出力の一部はSpring Frameworkによって書かれていることに注意してください。Spring Frameworkはログ出力のためにlog4jを使用しており、それが構成されていないため、出力がコンソールに書き込まれています。
Spring Dependency Injection JUnitテストケース
Springの依存性注入の主な利点の1つは、実際のサービスを使用する代わりにモックサービスクラスを持つことの容易さです。したがって、上記の学習すべてを組み合わせて、Springの依存性注入の単一のJUnit 4テストクラスにすべてを記述しました。
package com.journaldev.spring.di.test;

import org.junit.Assert;
import org.junit.After;
import org.junit.Before;
import org.junit.Test;
import org.springframework.context.annotation.AnnotationConfigApplicationContext;
import org.springframework.context.annotation.Bean;
import org.springframework.context.annotation.ComponentScan;
import org.springframework.context.annotation.Configuration;

import com.journaldev.spring.di.consumer.MyApplication;
import com.journaldev.spring.di.services.MessageService;

@Configuration
@ComponentScan(value="com.journaldev.spring.di.consumer")
public class MyApplicationTest {

	private AnnotationConfigApplicationContext context = null;

	@Bean
	public MessageService getMessageService() {
		return new MessageService(){

			public boolean sendMessage(String msg, String rec) {
				System.out.println("Mock Service");
				return true;
			}

		};
	}

	@Before
	public void setUp() throws Exception {
		context = new AnnotationConfigApplicationContext(MyApplicationTest.class);
	}

	@After
	public void tearDown() throws Exception {
		context.close();
	}

	@Test
	public void test() {
		MyApplication app = context.getBean(MyApplication.class);
		Assert.assertTrue(app.processMessage("Hi Pankaj", "[email protected]"));
	}

}
クラスは、@Configurationと@ComponentScanのアノテーションで注釈が付けられていますが、getMessageService()メソッドがMessageServiceのモック実装を返すためです。そのため、getMessageService()は@Beanアノテーションで注釈が付けられています。注釈で構成されたMyApplicationクラスをテストしているので、AnnotationConfigApplicationContextを使用し、そのオブジェクトをsetUp()メソッドで作成しています。コンテキストはtearDown()メソッドで閉じられています。test()メソッドのコードは、単にコンテキストからコンポーネントオブジェクトを取得してテストしています。Spring Frameworkがどのようにオートワイヤリングを行い、Spring Frameworkには未知のメソッドを呼び出すか気になりますか。それはJava Reflectionの大規模な使用によって行われます。これを使用してクラスの振る舞いを解析および変更できます。
Spring Dependency Injectionプロジェクトをダウンロード
上記URLからサンプルのSpring Dependency Injection(DI)プロジェクトをダウンロードして、さらに学習してください。
Source:
https://www.digitalocean.com/community/tutorials/spring-dependency-injection


