春@Autowired注釈は自動的な依存性注入に使用されます。Springフレームワークは依存性注入に基づいて構築され、クラスの依存関係はSpring Bean設定ファイルを通じて注入されます。
Spring @Autowired注釈
 通常、Spring Bean設定ファイルでBeanの設定詳細を提供し、
ref属性を使用して他のBeanに注入されるBeanも指定します。しかし、Springフレームワークは自動配線の機能も提供しており、Beanの注入詳細を明示的に指定する必要はありません。春のBeanを自動的に配線するためのさまざまな方法があります。
- byNameで自動配線 – このタイプの自動配線では、依存関係の注入にはセッターメソッドが使用されます。また、依存関係を注入するクラスとSpring Bean設定ファイルの変数名は同じである必要があります。
- autowire byType-このタイプの自動ワイヤリングでは、クラスの型が使用されます。したがって、Springのbean設定ファイルでこのタイプのために1つのbeanのみが設定されている必要があります。
- autowire by constructor-これはほぼautowire byTypeと同じですが、依存関係を注入するためにコンストラクタが使用されます。
- autowire by autodetect- Spring 3.0以前のバージョンを使用している場合、これは利用可能なautowireオプションの1つです。このオプションは、SpringコンテナによってコンストラクタまたはbyTypeでのautowireが決定されるため、既に多くのオプションがあるため、このオプションは非推奨とされています。このチュートリアルではこのオプションについては説明しません。
@Autowiredアノテーション- Springの@Autowiredアノテーションを使用してSpringのbeanの自動ワイヤリングを行うことができます。 @Autowiredアノテーションは、byTypeによるワイヤリングのために変数やメソッドに適用することができます。また、@Autowiredアノテーションをコンストラクタに適用して、コンストラクタベースのSpringの自動ワイヤリングを行うこともできます。 @Autowiredアノテーションが動作するためには、Springのbean設定ファイルでアノテーションベースの設定を有効にする必要があります。これはcontext:annotation-config要素を使用するか、org.springframework.beans.factory.annotation.AutowiredAnnotationBeanPostProcessor型のbeanを定義することで行うことができます。@Qualifier注釈 – この注釈は、ビーンマッピングでの競合を回避するために使用され、オートワイヤリングに使用されるビーン名を指定する必要があります。これにより、同じ型の複数のビーンが定義されている場合に問題が回避されます。この注釈は通常、@Autowired注釈と共に使用されます。複数の引数を持つコンストラクタの場合、この注釈をメソッド内の引数名と共に使用できます。
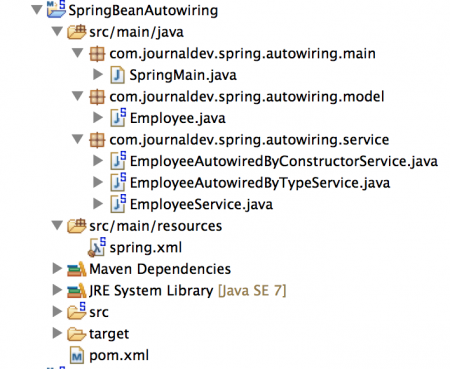
デフォルトでは、Springビーンのオートワイヤリングはオフになっています。Springビーンのオートワイヤリングのデフォルト値は「デフォルト」であり、これはオートワイヤリングが実行されないことを意味します。オートワイヤリング値「no」も同じ動作をします。Spring Beanオートワイヤリングの使用を示すために、シンプルなSpring Mavenプロジェクトを作成しましょう。最終的なプロジェクトは以下の画像のようになります。 それぞれのオートワイヤリングオプションを一つずつ見ていきましょう。そのために、モデルビーンとサービスクラスを作成し、モデルビーンをインジェクトします。
Spring @Autowired注釈 – Maven依存関係
Springのオートワイヤリングには、追加の依存関係を追加する必要はありません。pom.xmlファイルにはSpringフレームワークのコア依存関係が含まれており、以下のようになります。
<project xmlns="https://maven.apache.org/POM/4.0.0" xmlns:xsi="https://www.w3.org/2001/XMLSchema-instance"
	xsi:schemaLocation="https://maven.apache.org/POM/4.0.0 https://maven.apache.org/xsd/maven-4.0.0.xsd">
	<modelVersion>4.0.0</modelVersion>
	<groupId>org.springframework.samples</groupId>
	<artifactId>SpringBeanAutowiring</artifactId>
	<version>0.0.1-SNAPSHOT</version>

	<properties>

		<!-- Generic properties -->
		<java.version>1.6</java.version>
		<project.build.sourceEncoding>UTF-8</project.build.sourceEncoding>
		<project.reporting.outputEncoding>UTF-8</project.reporting.outputEncoding>

		<!-- Spring -->
		<spring-framework.version>4.0.2.RELEASE</spring-framework.version>

		<!-- Logging -->
		<logback.version>1.0.13</logback.version>
		<slf4j.version>1.7.5</slf4j.version>

	</properties>

	<dependencies>
		<!-- Spring and Transactions -->
		<dependency>
			<groupId>org.springframework</groupId>
			<artifactId>spring-context</artifactId>
			<version>${spring-framework.version}</version>
		</dependency>
		<dependency>
			<groupId>org.springframework</groupId>
			<artifactId>spring-tx</artifactId>
			<version>${spring-framework.version}</version>
		</dependency>

		<!-- Logging with SLF4J & LogBack -->
		<dependency>
			<groupId>org.slf4j</groupId>
			<artifactId>slf4j-api</artifactId>
			<version>${slf4j.version}</version>
			<scope>compile</scope>
		</dependency>
		<dependency>
			<groupId>ch.qos.logback</groupId>
			<artifactId>logback-classic</artifactId>
			<version>${logback.version}</version>
			<scope>runtime</scope>
		</dependency>

	</dependencies>
</project>
Spring @Autowired アノテーション – モデル Bean
簡単なJava Bean、Employeeという名前のBeanを作成しましょう。このBeanには、getterとsetterメソッドが1つのプロパティを持ちます。このプロパティの値は、SpringのBean構成ファイルで初期化します。
package com.journaldev.spring.autowiring.model;

public class Employee {

	private String name;

	public String getName() {
		return name;
	}

	public void setName(String name) {
		this.name = name;
	}
}
Spring @Autowired アノテーション – サービスクラス
Springの自動配線を通じてEmployee Beanをインジェクトするサービスクラスを作成しましょう。
package com.journaldev.spring.autowiring.service;

import com.journaldev.spring.autowiring.model.Employee;

public class EmployeeService {

	private Employee employee;

	// コンストラクタは自動配線によって使用されます
	public EmployeeService(Employee emp) {
		System.out.println("Autowiring by constructor used");
		this.employee = emp;
	}

	// 自動配線のためのBeanInstantiationExceptionを回避するためのデフォルトコンストラクタ
	// byNameまたはbyType
	public EmployeeService() {
		System.out.println("Default Constructor used");
	}

	// byNameとbyTypeの自動配線に使用します
	public void setEmployee(Employee emp) {
		this.employee = emp;
	}

	public Employee getEmployee() {
		return this.employee;
	}
}
同じサービスクラスを使用して、springのautowiringをbyName、byType、およびコンストラクタで実行します。setterメソッドはspringのautowiring byNameおよびbyTypeに使用され、コンストラクタベースのインジェクションはコンストラクタautowire属性に使用されます。springのautowireをbyNameまたはbyTypeで使用する場合、デフォルトのコンストラクタが使用されます。そのため、EmployeeServiceビーンのデフォルトコンストラクタを明示的に定義しています。
Spring @Autowired アノテーション – autowiring byTypeの例
Spring @Autowired アノテーションを使用して、byTypeのautowiringを行うための別のクラスを作成しましょう。
package com.journaldev.spring.autowiring.service;

import org.springframework.beans.factory.annotation.Autowired;

import com.journaldev.spring.autowiring.model.Employee;

public class EmployeeAutowiredByTypeService {

	//変数/セッターに対するAutowiredアノテーションはautowire="byType"と同等です
	@Autowired
	private Employee employee;

	@Autowired
	public void setEmployee(Employee emp){
		this.employee=emp;
	}

	public Employee getEmployee(){
		return this.employee;
	}
}
注意: Employee変数とそのsetterメソッドの両方にSpring @Autowired アノテーションを付けましたが、これらのうちのどちらか一方でspring beanのautowiringが十分です。
Spring @Autowiredアノテーションと@Qualifier Beanコンストラクターによる自動配線の例
別のサービスクラスを作成しましょう。ここではコンストラクターをベースとしたインジェクションに@Autowiredアノテーションを使用します。また、@Qualifierアノテーションの使用方法も見ていきます。
package com.journaldev.spring.autowiring.service;

import org.springframework.beans.factory.annotation.Autowired;
import org.springframework.beans.factory.annotation.Qualifier;

import com.journaldev.spring.autowiring.model.Employee;

public class EmployeeAutowiredByConstructorService {

	private Employee employee;

	//コンストラクター上の@Autowiredアノテーションはautowire="constructor"と等価です。
	@Autowired(required=false)
	public EmployeeAutowiredByConstructorService(@Qualifier("employee") Employee emp){
		this.employee=emp;
	}

	public Employee getEmployee() {
		return this.employee;
	}
}
このBeanがSpringフレームワークによって初期化されると、名前が「employee」のBeanが自動配線に使用されます。Spring @Autowiredアノテーションはデフォルト値がTRUEのboolean型の引数「required」を受け入れます。適切なBeanが自動配線に見つからない場合、Springフレームワークが例外をスローしないように、「false」に定義できます。
春 @Autowired 注釈 – Bean 設定ファイル
Spring ビーン設定ファイルは、任意のSpringアプリケーションの主要な部分です。さて、Springビーン設定ファイルがどのように見えるかを見て、その各部分を見てみましょう。
<?xml version="1.0" encoding="UTF-8"?>
<beans xmlns="https://www.springframework.org/schema/beans"
	xmlns:xsi="https://www.w3.org/2001/XMLSchema-instance"
	xmlns:context="https://www.springframework.org/schema/context"
	xsi:schemaLocation="https://www.springframework.org/schema/beans https://www.springframework.org/schema/beans/spring-beans.xsd
		https://www.springframework.org/schema/context https://www.springframework.org/schema/context/spring-context-4.0.xsd"

		default-autowire="byName" default-autowire-candidates="*" >

<bean name="employee" class="com.journaldev.spring.autowiring.model.Employee">
	<property name="name" value="Pankaj"></property>
</bean>

<bean name="employee1" class="com.journaldev.spring.autowiring.model.Employee" autowire-candidate="false">
	<property name="name" value="Dummy Name"></property>
</bean>

<!-- autowiring byName, bean name should be same as the property name -->
<bean name="employeeServiceByName" class="com.journaldev.spring.autowiring.service.EmployeeService" autowire="byName" />

<!-- autowiring byType, there should be only one bean definition for the mapping -->
<bean name="employeeServiceByType" class="com.journaldev.spring.autowiring.service.EmployeeService" autowire="byType" />

<!-- autowiring by constructor -->
<bean name="employeeServiceConstructor" class="com.journaldev.spring.autowiring.service.EmployeeService" autowire="constructor" />

<!-- Enable Annotation based configuration -->
<context:annotation-config />

<!-- using @Autowiring annotation in below beans, byType and constructor -->
<bean name="employeeAutowiredByTypeService" class="com.journaldev.spring.autowiring.service.EmployeeAutowiredByTypeService" />
<bean name="employeeAutowiredByConstructorService" class="com.journaldev.spring.autowiring.service.EmployeeAutowiredByConstructorService" />
</beans>
Springビーン設定ファイルに関する重要なポイントは次のとおりです:
- beans 要素
default-autowireは、デフォルトの自動配線メソッドを定義するために使用されます。ここでは、デフォルトの自動配線メソッドをbyNameに定義しています。 - beans 要素
default-autowire-candidatesは、自動配線に使用できるビーン名のパターンを提供するために使用されます。簡単のため、すべてのビーン定義を自動配線の対象としますが、自動配線のためにいくつかのパターンを定義することもできます。たとえば、DAOビーン定義のみを自動配線対象にしたい場合は、default-autowire-candidates="*DAO"と指定できます。 autowire-candidate="false"は、ビーン定義で自動配線の対象外にするために使用されます。たとえば、単一の型に対して複数のビーン定義がある場合で、いくつかのビーンを自動配線しないようにしたい場合に役立ちます。例えば、上記のSpringビーン設定では、”employee1″ ビーンは自動配線に使用されません。- autowire属性のbyName、byType、constructorは自明であり、説明する必要はほとんどありません。
context:annotation-configは、アノテーションベースの設定サポートを有効にするために使用されます。employeeAutowiredByTypeServiceとemployeeAutowiredByConstructorServiceのビーンにはautowire属性がないことに注意してください。
Spring @Autowiredアノテーション – テストプログラム
今、私たちのSpringアプリケーションは全種類のSpringオートワイヤリングで準備ができているので、それが期待どおりに機能するかどうか確認するために、簡単なテストプログラムを書いてみましょう。
package com.journaldev.spring.autowiring.main;

import org.springframework.context.support.ClassPathXmlApplicationContext;

import com.journaldev.spring.autowiring.service.EmployeeAutowiredByConstructorService;
import com.journaldev.spring.autowiring.service.EmployeeAutowiredByTypeService;
import com.journaldev.spring.autowiring.service.EmployeeService;

public class SpringMain {

	public static void main(String[] args) {
		ClassPathXmlApplicationContext ctx = new ClassPathXmlApplicationContext("spring.xml");

		EmployeeService serviceByName = ctx.getBean("employeeServiceByName", EmployeeService.class);

		System.out.println("Autowiring byName. Employee Name="+serviceByName.getEmployee().getName());

		EmployeeService serviceByType = ctx.getBean("employeeServiceByType", EmployeeService.class);

		System.out.println("Autowiring byType. Employee Name="+serviceByType.getEmployee().getName());

		EmployeeService serviceByConstructor = ctx.getBean("employeeServiceConstructor", EmployeeService.class);

		System.out.println("Autowiring by Constructor. Employee Name="+serviceByConstructor.getEmployee().getName());

		//すべてのオブジェクトが異なるタイプであることを確認するためにハッシュコードを出力する
		System.out.println(serviceByName.hashCode()+"::"+serviceByType.hashCode()+"::"+serviceByConstructor.hashCode());

		//@Autowiredアノテーションのテスト
		EmployeeAutowiredByTypeService autowiredByTypeService = ctx.getBean("employeeAutowiredByTypeService",EmployeeAutowiredByTypeService.class);

		System.out.println("@Autowired byType. Employee Name="+autowiredByTypeService.getEmployee().getName());

		EmployeeAutowiredByConstructorService autowiredByConstructorService = ctx.getBean("employeeAutowiredByConstructorService",EmployeeAutowiredByConstructorService.class);

		System.out.println("@Autowired by Constructor. Employee Name="+autowiredByConstructorService.getEmployee().getName());

		ctx.close();
	}
}
プログラムはシンプルで、Springアプリケーションコンテキストを作成し、さまざまなビーンを取得して従業員の名前を出力しています。上記のアプリケーションを実行すると、以下の出力が得られます。
Mar 31, 2014 10:41:58 PM org.springframework.context.support.ClassPathXmlApplicationContext prepareRefresh
INFO: Refreshing org.springframework.context.support.ClassPathXmlApplicationContext@3fa99295: startup date [Mon Mar 31 22:41:58 PDT 2014]; root of context hierarchy
Mar 31, 2014 10:41:58 PM org.springframework.beans.factory.xml.XmlBeanDefinitionReader loadBeanDefinitions
INFO: Loading XML bean definitions from class path resource [spring.xml]
Default Constructor used
Default Constructor used
Autowiring by constructor used
Autowiring byName. Employee Name=Pankaj
Autowiring byType. Employee Name=Pankaj
Autowiring by Constructor. Employee Name=Pankaj
21594592::15571401::1863015320
@Autowired byType. Employee Name=Pankaj
@Autowired by Constructor. Employee Name=Pankaj
Mar 31, 2014 10:41:58 PM org.springframework.context.support.ClassPathXmlApplicationContext doClose
INFO: Closing org.springframework.context.support.ClassPathXmlApplicationContext@3fa99295: startup date [Mon Mar 31 22:41:58 PDT 2014]; root of context hierarchy
見ての通り、autowire byName および byType の場合、デフォルトの引数なしコンストラクタがビーンの初期化に使用されます。autowire by constructor の場合は、パラメーターベースのコンストラクタが使用されます。すべての変数のハッシュコードからわかるように、すべてのSpringビーンは異なるオブジェクトであり、同じオブジェクトを参照していません。”employee1″ をautowiringの対象ビーンのリストから削除したため、ビーンのマッピングに混乱はありませんでした。もし”employee1″ の定義から autowire-candidate="false" を削除すると、上記のメインメソッドを実行する際に以下のエラーメッセージが表示されます。
Exception in thread "main" org.springframework.beans.factory.UnsatisfiedDependencyException: Error creating bean with name 'employeeServiceByType' defined in class path resource [spring.xml]: Unsatisfied dependency expressed through bean property 'employee': : No qualifying bean of type [com.journaldev.spring.autowiring.model.Employee] is defined: expected single matching bean but found 2: employee,employee1; nested exception is org.springframework.beans.factory.NoUniqueBeanDefinitionException: No qualifying bean of type [com.journaldev.spring.autowiring.model.Employee] is defined: expected single matching bean but found 2: employee,employee1
	at org.springframework.beans.factory.support.AbstractAutowireCapableBeanFactory.autowireByType(AbstractAutowireCapableBeanFactory.java:1278)
	at org.springframework.beans.factory.support.AbstractAutowireCapableBeanFactory.populateBean(AbstractAutowireCapableBeanFactory.java:1170)
	at org.springframework.beans.factory.support.AbstractAutowireCapableBeanFactory.doCreateBean(AbstractAutowireCapableBeanFactory.java:537)
	at org.springframework.beans.factory.support.AbstractAutowireCapableBeanFactory.createBean(AbstractAutowireCapableBeanFactory.java:475)
	at org.springframework.beans.factory.support.AbstractBeanFactory$1.getObject(AbstractBeanFactory.java:304)
	at org.springframework.beans.factory.support.DefaultSingletonBeanRegistry.getSingleton(DefaultSingletonBeanRegistry.java:228)
	at org.springframework.beans.factory.support.AbstractBeanFactory.doGetBean(AbstractBeanFactory.java:300)
	at org.springframework.beans.factory.support.AbstractBeanFactory.getBean(AbstractBeanFactory.java:195)
	at org.springframework.beans.factory.support.DefaultListableBeanFactory.preInstantiateSingletons(DefaultListableBeanFactory.java:700)
	at org.springframework.context.support.AbstractApplicationContext.finishBeanFactoryInitialization(AbstractApplicationContext.java:760)
	at org.springframework.context.support.AbstractApplicationContext.refresh(AbstractApplicationContext.java:482)
	at org.springframework.context.support.ClassPathXmlApplicationContext.<init>(ClassPathXmlApplicationContext.java:139)
	at org.springframework.context.support.ClassPathXmlApplicationContext.<init>(ClassPathXmlApplicationContext.java:83)
	at com.journaldev.spring.autowiring.main.SpringMain.main(SpringMain.java:12)
Caused by: org.springframework.beans.factory.NoUniqueBeanDefinitionException: No qualifying bean of type [com.journaldev.spring.autowiring.model.Employee] is defined: expected single matching bean but found 2: employee,employee1
	at org.springframework.beans.factory.support.DefaultListableBeanFactory.doResolveDependency(DefaultListableBeanFactory.java:967)
	at org.springframework.beans.factory.support.DefaultListableBeanFactory.resolveDependency(DefaultListableBeanFactory.java:855)
	at org.springframework.beans.factory.support.AbstractAutowireCapableBeanFactory.autowireByType(AbstractAutowireCapableBeanFactory.java:1263)
	... 13 more
Springの@AutowiredアノテーションとSpringのautowiring機能に関する説明はこれで終了です。例のプロジェクトは以下のリンクからダウンロードし、詳細を学習してください。
Source:
https://www.digitalocean.com/community/tutorials/spring-autowired-annotation


