Android SQLiteの例のチュートリアルへようこそ。Android SQLiteは、Androidアプリケーションのデータを保存するためのほとんどの選択肢です。多くのアプリケーションでは、SQLiteが直接使用されるか、サードパーティのラッパーを介して使用されることがアプリのバックボーンとなっています。以下は、Android SQLiteデータベースを使用して今日作成する最終的なアプリです。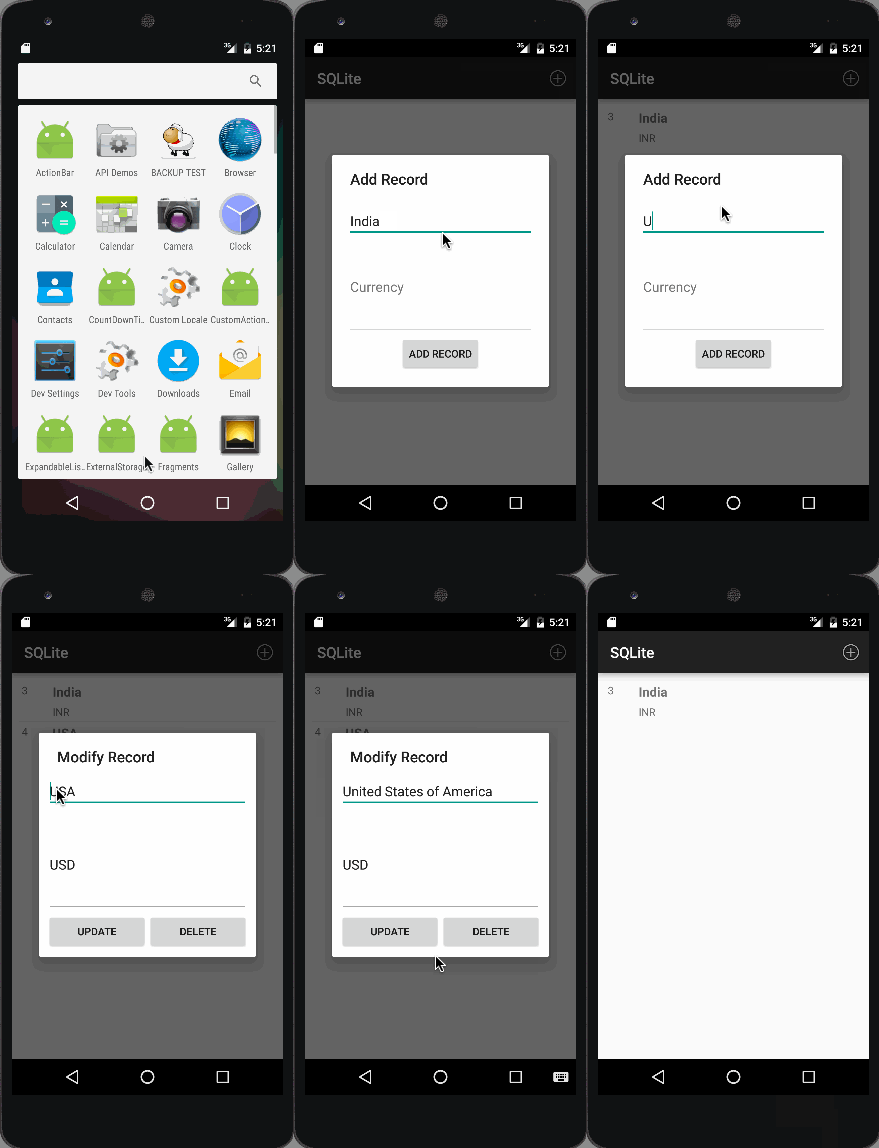
Android SQLite
Android SQLiteは、Android OSに含まれる非常に軽量なデータベースです。Android SQLiteは、クリーンなSQLインターフェースと非常に小さなメモリフットプリント、そしてまずまずの速度を組み合わせています。Androidにおいて、SQLiteはAndroidランタイムに組み込まれているため、すべてのAndroidアプリケーションは独自のSQLiteデータベースを作成することができます。Android SQLiteのネイティブAPIはJDBCではなく、JDBCはメモリ制限のあるスマートフォンにとってオーバーヘッドが大きすぎる可能性があります。データベースが正常に作成されると、Android Device Monitorからアクセスできるdata/data//databases/に保存されます。SQLiteは、テーブル(行と列から構成される)やインデックスなどを含む、典型的な関係データベースです。データを保持するために、独自のテーブルを作成することができます。この構造はスキーマと呼ばれます。
Android SQLite SQLiteOpenHelper
Androidの中には、ほとんどがSQLiteOpenHelperクラスを使用しているデータベーススキーマの変更を処理するための機能があります。SQLiteOpenHelperは、2つの非常に一般的な問題を解決するために設計されています。
- アプリケーションが初めて実行されるとき – この時点ではデータベースがまだ存在しません。そのため、テーブル、インデックス、初期データなどを作成する必要があります。
- アプリケーションが新しいスキーマにアップグレードされるとき – データベースはまだアプリの古いバージョンの古いスキーマのままです。データベーススキーマを変更してアプリの残りの部分のニーズに合わせるオプションがあります。
SQLiteOpenHelperは、これらのロジックをラップして、指定された仕様に基づいてデータベースを作成およびアップグレードするために必要です。そのためには、少なくとも次の3つのメソッドを実装したSQLiteOpenHelperのカスタムサブクラスを作成する必要があります。
-
コンストラクタ:これにはコンテキスト(たとえば、アクティビティ)、データベースの名前、オプションのカーソルファクトリ(これについては後で説明します)、およびデータベーススキーマのバージョンを表す整数(通常は1から始まり、後で増分)が含まれます。
public DatabaseHelper(Context context) { super(context, DB_NAME, null, DB_VERSION); } -
onCreate(SQLiteDatabase db):データベースがない場合に呼び出され、アプリが1つ必要なときに呼び出されます。新しく作成されたデータベースを指す
SQLiteDatabaseオブジェクトが渡され、テーブルと初期データを追加できます。 -
onUpgrade(SQLiteDatabase db, int oldVersion, int newVersion):必要なスキーマバージョンがデータベースのスキーマバージョンと一致しない場合に呼び出されます。古いスキーマから新しいスキーマにデータベースを変換する最適な方法を見つけることができるように、SQLiteDatabaseオブジェクトと古いバージョン番号と新しいバージョン番号が渡されます。
すべてのデータベースCRUD(作成、読み取り、更新、削除)操作を実行する DBManager クラスを定義します。
Android SQLiteデータベース接続の開始と終了
テーブル内のレコードを挿入、更新、削除などのデータベース操作を行う前に、以下に示すようにgetWritableDatabase()メソッドを呼び出してデータベース接続を開きます。
public DBManager open() throws SQLException {
        dbHelper = new DatabaseHelper(context);
        database = dbHelper.getWritableDatabase();
        return this;
    }
dbHelperはSQLiteOpenHelperのサブクラスのインスタンスです。データベース接続を閉じるには、次のメソッドが呼び出されます。
 public void close() {
        dbHelper.close();
    }
Android SQLiteデータベーステーブルに新しいレコードを挿入する
以下のコードスニペットは、Android SQLiteデータベースに新しいレコードを挿入する方法を示しています。
public void insert(String name, String desc) {
        ContentValues contentValue = new ContentValues();
        contentValue.put(DatabaseHelper.SUBJECT, name);
        contentValue.put(DatabaseHelper.DESC, desc);
        database.insert(DatabaseHelper.TABLE_NAME, null, contentValue);
    }
Content Valuesは指定された初期サイズを使用して空の値セットを作成します。コーディング部分に入るときに他のインスタンス値について説明します。
Android SQLiteデータベーステーブルでのレコードの更新
次のコードは、単一のレコードを更新する方法を示しています。
public int update(long _id, String name, String desc) {
        ContentValues contentValues = new ContentValues();
        contentValues.put(DatabaseHelper.SUBJECT, name);
        contentValues.put(DatabaseHelper.DESC, desc);
        int i = database.update(DatabaseHelper.TABLE_NAME, contentValues, DatabaseHelper._ID + " = " + _id, null);
        return i;
    }
Android SQLite – レコードの削除
以下に示すように、削除するレコードのIDを渡すだけです。
public void delete(long _id) {
        database.delete(DatabaseHelper.TABLE_NAME, DatabaseHelper._ID + "=" + _id, null);
    }
Android SQLite カーソル
A Cursor represents the entire result set of the query. Once the query is fetched a call to cursor.moveToFirst() is made. Calling moveToFirst() does two things:
- これにより、クエリが空のセットを返したかどうかをテストできます(戻り値をテストすることにより)
- (セットが空でない場合)最初の結果にカーソルを移動させます。
次のコードは、すべてのレコードを取得するために使用されます:
 public Cursor fetch() {
        String[] columns = new String[] { DatabaseHelper._ID, DatabaseHelper.SUBJECT, DatabaseHelper.DESC };
        Cursor cursor = database.query(DatabaseHelper.TABLE_NAME, columns, null, null, null, null, null);
        if (cursor != null) {
            cursor.moveToFirst();
        }
        return cursor;
    }
カーソルを使用する別の方法は、それをCursorAdapterでラップすることです。ArrayAdapterが配列を適応するのと同様に、CursorAdapterがCursorオブジェクトを適応し、そのデータをListViewなどのAdapterViewに利用可能にします。SQLiteを使用して意味のあるデータを保存するプロジェクトに移動しましょう。
Android SQLite の例題プロジェクトの構造
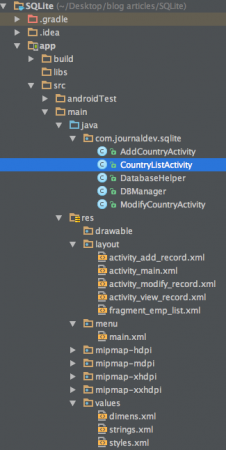 このアプリケーションでは、ListView形式で国名とそれに対応する通貨を保存するレコードを作成したいと考えています。私たちは上記で議論されたすべての機能をカバーしています。
Android SQLiteプロジェクトコード
このアプリケーションは5つのクラスで構成されています。まずは、以下のようにSQLiteOpenHelperのサブクラスであるDatabaseHelperの定義から始めます:DatabaseHelper.java
package com.journaldev.sqlite;

import android.content.Context;
import android.database.sqlite.SQLiteDatabase;
import android.database.sqlite.SQLiteOpenHelper;

public class DatabaseHelper extends SQLiteOpenHelper {

    // テーブル名
    public static final String TABLE_NAME = "COUNTRIES";

    // テーブルの列
    public static final String _ID = "_id";
    public static final String SUBJECT = "subject";
    public static final String DESC = "description";

    // データベース情報
    static final String DB_NAME = "JOURNALDEV_COUNTRIES.DB";

    // データベースのバージョン
    static final int DB_VERSION = 1;

    // テーブル作成クエリ
    private static final String CREATE_TABLE = "create table " + TABLE_NAME + "(" + _ID
            + " INTEGER PRIMARY KEY AUTOINCREMENT, " + SUBJECT + " TEXT NOT NULL, " + DESC + " TEXT);";

    public DatabaseHelper(Context context) {
        super(context, DB_NAME, null, DB_VERSION);
    }

    @Override
    public void onCreate(SQLiteDatabase db) {
        db.execSQL(CREATE_TABLE);
    }

    @Override
    public void onUpgrade(SQLiteDatabase db, int oldVersion, int newVersion) {
        db.execSQL("DROP TABLE IF EXISTS " + TABLE_NAME);
        onCreate(db);
    }
}
上記で議論されたように、コンストラクタの他にonCreate()とonUpgrade()メソッドをオーバーライドしています。データベースとテーブルの名前はそれぞれJOURNALDEV_COUNTRIES.DBとCOUNTRIESです。インデックス列は新しい行が挿入されるたびに自動的に増分されます。国名と通貨の列名はそれぞれ「subject」と「description」です。DBManagerクラスでは、DatabaseHelperが初期化され、CRUD操作が定義されています。以下はこのクラスのコードです:DBManager.java
package com.journaldev.sqlite;


import android.content.ContentValues;
import android.content.Context;
import android.database.Cursor;
import android.database.SQLException;
import android.database.sqlite.SQLiteDatabase;

public class DBManager {

    private DatabaseHelper dbHelper;

    private Context context;

    private SQLiteDatabase database;

    public DBManager(Context c) {
        context = c;
    }

    public DBManager open() throws SQLException {
        dbHelper = new DatabaseHelper(context);
        database = dbHelper.getWritableDatabase();
        return this;
    }

    public void close() {
        dbHelper.close();
    }

    public void insert(String name, String desc) {
        ContentValues contentValue = new ContentValues();
        contentValue.put(DatabaseHelper.SUBJECT, name);
        contentValue.put(DatabaseHelper.DESC, desc);
        database.insert(DatabaseHelper.TABLE_NAME, null, contentValue);
    }

    public Cursor fetch() {
        String[] columns = new String[] { DatabaseHelper._ID, DatabaseHelper.SUBJECT, DatabaseHelper.DESC };
        Cursor cursor = database.query(DatabaseHelper.TABLE_NAME, columns, null, null, null, null, null);
        if (cursor != null) {
            cursor.moveToFirst();
        }
        return cursor;
    }

    public int update(long _id, String name, String desc) {
        ContentValues contentValues = new ContentValues();
        contentValues.put(DatabaseHelper.SUBJECT, name);
        contentValues.put(DatabaseHelper.DESC, desc);
        int i = database.update(DatabaseHelper.TABLE_NAME, contentValues, DatabaseHelper._ID + " = " + _id, null);
        return i;
    }

    public void delete(long _id) {
        database.delete(DatabaseHelper.TABLE_NAME, DatabaseHelper._ID + "=" + _id, null);
    }

}
CountryListActivity.javaクラスは、アプリケーションが起動したときに起動されるアクティビティです。以下はそのために定義されたレイアウトです:fragment_emp_list.xml
<?xml version="1.0" encoding="utf-8"?>
<RelativeLayout xmlns:android="https://schemas.android.com/apk/res/android"
    android:layout_width="fill_parent"
    android:layout_height="fill_parent" >

    <ListView
        android:id="@+id/list_view"
        android:layout_width="match_parent"
        android:layout_height="wrap_content"
        android:dividerHeight="1dp"
        android:padding="10dp" >
    </ListView>

    <TextView
        android:id="@+id/empty"
        android:layout_width="wrap_content"
        android:layout_height="wrap_content"
        android:layout_centerInParent="true"
        android:text="@string/empty_list_text" />

</RelativeLayout>
ここでは、データベースに保存されたレコードが含まれるListViewコンポーネントが定義されています。最初はListViewは空になるため、同じものを表示するためにTextViewが使用されます。CountryListActivity.java
package com.journaldev.sqlite;

import android.content.Intent;
import android.database.Cursor;
import android.os.Bundle;
import android.support.v4.widget.SimpleCursorAdapter;
import android.support.v7.app.ActionBarActivity;
import android.view.Menu;
import android.view.MenuItem;
import android.view.View;
import android.widget.AdapterView;
import android.widget.ListView;
import android.widget.TextView;

public class CountryListActivity extends ActionBarActivity {

    private DBManager dbManager;

    private ListView listView;

    private SimpleCursorAdapter adapter;

    final String[] from = new String[] { DatabaseHelper._ID,
            DatabaseHelper.SUBJECT, DatabaseHelper.DESC };

    final int[] to = new int[] { R.id.id, R.id.title, R.id.desc };

    @Override
    protected void onCreate(Bundle savedInstanceState) {
        super.onCreate(savedInstanceState);

        setContentView(R.layout.fragment_emp_list);

        dbManager = new DBManager(this);
        dbManager.open();
        Cursor cursor = dbManager.fetch();

        listView = (ListView) findViewById(R.id.list_view);
        listView.setEmptyView(findViewById(R.id.empty));

        adapter = new SimpleCursorAdapter(this, R.layout.activity_view_record, cursor, from, to, 0);
        adapter.notifyDataSetChanged();

        listView.setAdapter(adapter);

        // リストアイテムのOnClickリスナー
        listView.setOnItemClickListener(new AdapterView.OnItemClickListener() {
            @Override
            public void onItemClick(AdapterView parent, View view, int position, long viewId) {
                TextView idTextView = (TextView) view.findViewById(R.id.id);
                TextView titleTextView = (TextView) view.findViewById(R.id.title);
                TextView descTextView = (TextView) view.findViewById(R.id.desc);

                String id = idTextView.getText().toString();
                String title = titleTextView.getText().toString();
                String desc = descTextView.getText().toString();

                Intent modify_intent = new Intent(getApplicationContext(), ModifyCountryActivity.class);
                modify_intent.putExtra("title", title);
                modify_intent.putExtra("desc", desc);
                modify_intent.putExtra("id", id);

                startActivity(modify_intent);
            }
        });
    }

    @Override
    public boolean onCreateOptionsMenu(Menu menu) {
        getMenuInflater().inflate(R.menu.main, menu);
        return true;
    }

    @Override
    public boolean onOptionsItemSelected(MenuItem item) {

        int id = item.getItemId();
        if (id == R.id.add_record) {

            Intent add_mem = new Intent(this, AddCountryActivity.class);
            startActivity(add_mem);

        }
        return super.onOptionsItemSelected(item);
    }

}
このアクティビティでは、CRUD操作を実行するためにDBManagerオブジェクトが呼び出されます。SimpleCursorAdapterは、カーソルオブジェクトで返されるクエリ結果からリストに要素を追加するために定義されています。リストアイテムをクリックすると、ModifyCountryActivityクラスを開くためにインテントが実行されます。メニューには、ActionBarから新しいレコードを追加するアイテムが含まれています。ここでも、インテントが実行されてAddCountryActivityクラスを開きます。以下はmenu.xmlのコードです。menu.xml
<menu xmlns:android="https://schemas.android.com/apk/res/android"
    xmlns:app="https://schemas.android.com/apk/res-auto"
    xmlns:tools="https://schemas.android.com/tools"
    tools:context="com.example.sqlitesample.MainActivity" >

    <item
        android:id="@+id/add_record"
        android:icon="@android:drawable/ic_menu_add"
        android:orderInCategory="100"
        android:title="@string/add_record"
        app:showAsAction="always"/>

</menu>
AddCountryActivity.javaファイルのXMLレイアウトとコードは以下のように定義されています:activity_add_record.xml
<?xml version="1.0" encoding="utf-8"?>
<LinearLayout xmlns:android="https://schemas.android.com/apk/res/android"
    android:layout_width="match_parent"
    android:layout_height="match_parent"
    android:orientation="vertical"
    android:padding="20dp" >

    <EditText
        android:id="@+id/subject_edittext"
        android:layout_width="match_parent"
        android:layout_height="wrap_content"
        android:ems="10"
        android:hint="@string/enter_title" >

        <requestFocus />
    </EditText>

    <EditText
        android:id="@+id/description_edittext"
        android:layout_width="match_parent"
        android:layout_height="wrap_content"
        android:ems="10"
        android:hint="@string/enter_desc"
        android:inputType="textMultiLine"
        android:minLines="5" >
    </EditText>

    <Button
        android:id="@+id/add_record"
        android:layout_width="wrap_content"
        android:layout_height="wrap_content"
        android:layout_gravity="center"
        android:text="@string/add_record" />

</LinearLayout>
国と通貨の入力を受け取る2つのEditTextコンポーネントと、値をデータベースに追加し、ListViewに表示するためのボタンが定義されています。AddCountryActivity.java
package com.journaldev.sqlite;

import android.app.Activity;
import android.content.Intent;
import android.os.Bundle;
import android.view.View;
import android.view.View.OnClickListener;
import android.widget.Button;
import android.widget.EditText;

public class AddCountryActivity extends Activity implements OnClickListener {

    private Button addTodoBtn;
    private EditText subjectEditText;
    private EditText descEditText;

    private DBManager dbManager;

    @Override
    protected void onCreate(Bundle savedInstanceState) {
        super.onCreate(savedInstanceState);

        setTitle("Add Record");

        setContentView(R.layout.activity_add_record);

        subjectEditText = (EditText) findViewById(R.id.subject_edittext);
        descEditText = (EditText) findViewById(R.id.description_edittext);

        addTodoBtn = (Button) findViewById(R.id.add_record);

        dbManager = new DBManager(this);
        dbManager.open();
        addTodoBtn.setOnClickListener(this);
    }

    @Override
    public void onClick(View v) {
        switch (v.getId()) {
            case R.id.add_record:

                final String name = subjectEditText.getText().toString();
                final String desc = descEditText.getText().toString();

                dbManager.insert(name, desc);

                Intent main = new Intent(AddCountryActivity.this, CountryListActivity.class)
                        .setFlags(Intent.FLAG_ACTIVITY_CLEAR_TOP);

                startActivity(main);
                break;
        }
    }

}
ここで行われるCRUD操作は、データベースに新しいレコードを追加することです。ModifyCountryActivity.javaファイルのXMLレイアウトとコードは以下のように定義されています:activity_modify_record.xml
<?xml version="1.0" encoding="utf-8"?>
<LinearLayout xmlns:android="https://schemas.android.com/apk/res/android"
    android:layout_width="match_parent"
    android:layout_height="match_parent"
    android:orientation="vertical"
    android:padding="10dp" >

    <EditText
        android:id="@+id/subject_edittext"
        android:layout_width="match_parent"
        android:layout_height="wrap_content"
        android:layout_marginBottom="10dp"
        android:ems="10"
        android:hint="@string/enter_title" />

    <EditText
        android:id="@+id/description_edittext"
        android:layout_width="match_parent"
        android:layout_height="wrap_content"
        android:ems="10"
        android:hint="@string/enter_desc"
        android:inputType="textMultiLine"
        android:minLines="5" >
    </EditText>


    <LinearLayout
        android:layout_width="fill_parent"
        android:layout_height="wrap_content"
        android:weightSum="2"
        android:gravity="center_horizontal"
        android:orientation="horizontal" >

        <Button
            android:id="@+id/btn_update"
            android:layout_width="wrap_content"
            android:layout_height="wrap_content"
            android:layout_weight="1"
            android:text="@string/btn_update" />

        <Button
            android:id="@+id/btn_delete"
            android:layout_width="wrap_content"
            android:layout_height="wrap_content"
            android:layout_weight="1"
            android:text="@string/btn_delete" />
    </LinearLayout>

</LinearLayout>
前のレイアウトと似ていますが、変更と削除のボタンが追加されています。ModifyCountryActivity.java
package com.journaldev.sqlite;

import android.app.Activity;
import android.content.Intent;
import android.os.Bundle;
import android.view.View;
import android.view.View.OnClickListener;
import android.widget.Button;
import android.widget.EditText;

public class ModifyCountryActivity extends Activity implements OnClickListener {

    private EditText titleText;
    private Button updateBtn, deleteBtn;
    private EditText descText;

    private long _id;

    private DBManager dbManager;

    @Override
    protected void onCreate(Bundle savedInstanceState) {
        super.onCreate(savedInstanceState);

        setTitle("Modify Record");

        setContentView(R.layout.activity_modify_record);

        dbManager = new DBManager(this);
        dbManager.open();

        titleText = (EditText) findViewById(R.id.subject_edittext);
        descText = (EditText) findViewById(R.id.description_edittext);

        updateBtn = (Button) findViewById(R.id.btn_update);
        deleteBtn = (Button) findViewById(R.id.btn_delete);

        Intent intent = getIntent();
        String id = intent.getStringExtra("id");
        String name = intent.getStringExtra("title");
        String desc = intent.getStringExtra("desc");

        _id = Long.parseLong(id);

        titleText.setText(name);
        descText.setText(desc);

        updateBtn.setOnClickListener(this);
        deleteBtn.setOnClickListener(this);
    }

    @Override
    public void onClick(View v) {
        switch (v.getId()) {
            case R.id.btn_update:
                String title = titleText.getText().toString();
                String desc = descText.getText().toString();

                dbManager.update(_id, title, desc);
                this.returnHome();
                break;

            case R.id.btn_delete:
                dbManager.delete(_id);
                this.returnHome();
                break;
        }
    }

    public void returnHome() {
        Intent home_intent = new Intent(getApplicationContext(), CountryListActivity.class)
                .setFlags(Intent.FLAG_ACTIVITY_CLEAR_TOP);
        startActivity(home_intent);
    }
}
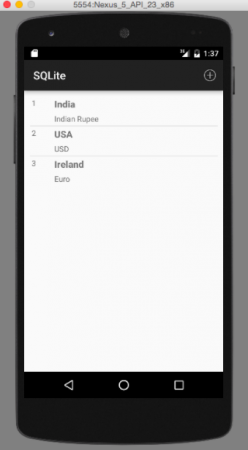
ここで実行されるCRUD操作は、レコードの更新と削除です。以下の画像は、プロジェクトの最終出力のスクリーンショットです。最初の画像は、アプリケーションが初めて起動されたときに表示される出力です。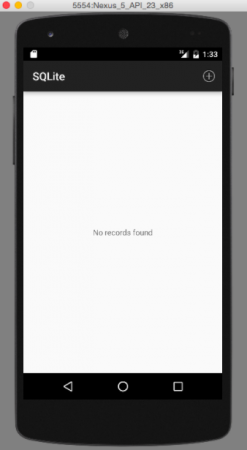 2番目の画像は、ActionBarからメニューオプションをクリックして新しいレコードを追加した結果を示しています。
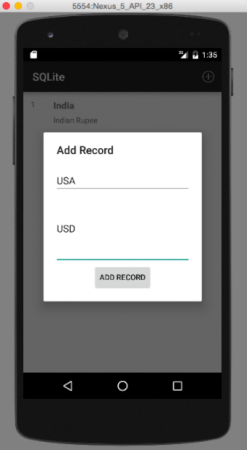 3番目の画像は、3つのレコードが追加されたときの出力を示しています:
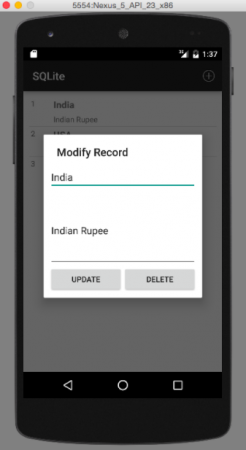
 4番目の画像は、リストアイテムをクリックしてレコードを修正または削除したときの出力を示しています:
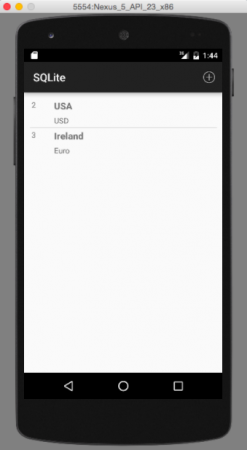
 最後の画像は、レコードが削除されたときの出力です。この例では、最初のレコードを削除します:
Android SQLiteデータベースファイルを開く
以下のチュートリアルで既に話し合ったように、データベースファイルは内部ストレージに保存されています。これはAndroidデバイスモニターからアクセスでき、以下の画像で確認できます。 このデータベースを表示するには、このファイルをデバイスからデスクトップに引き出す必要があります。これは、以下の画像で右上のメニューオプションをクリックすることで行われます。
 このファイルを開くには、こちらのリンクからSQLiteBrowserをダウンロードしてください。以下のスニペットは、ブラウザ内のスキーマとテーブルを示しています。
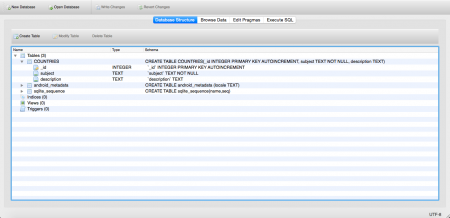 テーブルを表示するには、上部の「ブラウズデータ」タブに移動します。以下の画像が表示されます:
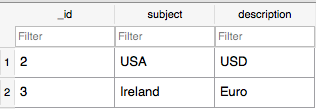 これでAndroid SQLiteチュートリアルは終了です。最終的なAndroid SQLiteプロジェクトは以下のリンクからダウンロードできます。
Source:
https://www.digitalocean.com/community/tutorials/android-sqlite-database-example-tutorial


