このチュートリアルでは、Androidのレイアウトについて概説します。また、画面のコンテンツを整理するために使用できる特定のレイアウトコントロールであるAndroid LinearLayoutとAndroid RelativeLayoutについても探求します。
Androidレイアウト
ユーザーインターフェースの基本的な構成要素は、Viewクラスから作成されるViewオブジェクトであり、画面上の矩形領域を占有します。Viewは、TextView、Button、EditTextなどのUIコンポーネントの基本クラスです。ViewGroupはViewのサブクラスであり、1つ以上のViewをグループ化することができます。ViewGroupは、ビューの表示順序やシーケンスを指定するためのAndroidレイアウトを提供します。LinearLayout、FrameLayout、RelativeLayoutなどがViewGroupの例です。
Androidのレイアウトの種類
Androidは以下のViewGroupまたはレイアウトを提供しています:
LinearLayout:すべての子ビューを単一の方向(垂直または水平)に整列するViewGroupです。RelativeLayout:子ビューを相対的な位置に表示するViewGroupです。AbsoluteLayout:子ビューとウィジェットの正確な位置を指定できますTableLayout:その子ビューを行と列にグループ化するビューですFrameLayout:画面上のプレースホルダーで、単一のビューを表示するために使用されますScrollView:物理的なディスプレイよりも多くのスペースを占有するビューのリストをスクロールできるようにする特別なタイプのFrameLayoutです。ScrollViewには、通常はLinearLayoutである1つの子ビューまたはViewGroupのみを含めることができますListView:スクロール可能なアイテムのリストを表示するビューグループですGridView:2次元のスクロール可能なグリッドでアイテムを表示するViewGroupです。グリッド内のアイテムは、このビューに関連付けられたListAdapterから取得されます
このチュートリアルでは、最もよく使用される2つのAndroidレイアウトに焦点を当てます:
- LinearLayout
- RelativeLayout
Androidレイアウト属性
- android:id:これはビューを一意に識別するIDです。
- android:layout_width:これはレイアウトの幅です。
- android:layout_height:これはレイアウトの高さです。
- android:layout_margin:これはビューの外側の余分なスペースです。たとえば、
android:marginLeft=20dpを指定すると、ビューは左から20dp後に配置されます。 - android:layout_padding:これはandroid:layout_marginと似ていますが、ビューの内側の余分なスペースを指定します。
- android:layout_gravity:これは子ビューが配置される方法を指定します。
- android:layout_weight:これはレイアウト内の余分なスペースのうち、ビューに割り当てられる量を指定します。
- android:layout_x:これはレイアウトのx座標を指定します。
- android:layout_y:これはレイアウトのy座標を指定します。
android:layout_width=wrap_contentは、ビューをそのコンテンツに必要な寸法に合わせるように指定します。android:layout_width=match_parentは、ビューをその親ビューと同じ大きさにするように指定します。
ビューの識別
XMLタグ内のIDの構文は:
- 文字列の先頭にある@記号は、XMLパーサがID文字列を解析し展開し、それをIDリソースとして識別することを示しています。
- プラス記号(+)は、これが新しいリソース名であり、リソースに追加される必要があることを意味します。
Android LinearLayout
Android LinearLayoutは、要素を1行に沿って整理します。 android:orientationを使用して、その行が垂直または水平であるかを指定できます。デフォルトでは、水平方向になります。垂直LinearLayoutは、1行ごとに1つの子要素のみを持ちます(つまり、単一要素の列です)、水平LinearLayoutは画面上に1つの行の要素のみを持ちます。android:layout_weight属性は、要素の重要性を示します。重みの大きい要素は、より多くの画面スペースを占有します。LinearLayoutを使用したサンプルのレイアウトXMLは次のとおりです:layout_linear.xml
<LinearLayout xmlns:android="https://schemas.android.com/apk/res/android"
    android:orientation="vertical"
    android:layout_width="fill_parent"
    android:layout_height="fill_parent"
    android:layout_margin="@dimen/activity_horizontal_margin">
    <Button
        android:id="@+id/backbutton"
        android:text="Back"
        android:layout_width="wrap_content"
        android:layout_height="wrap_content" />
    <TextView
        android:text="Row 2"
        android:layout_width="wrap_content"
        android:textSize="18sp"
        android:layout_margin="10dp"
        android:layout_height="wrap_content" />
    <TextView
        android:text="Row 3"
        android:textSize="18sp"
        android:layout_margin="10dp"
        android:layout_width="wrap_content"
        android:layout_height="wrap_content" />
    <TextView
        android:text="Row 4"
        android:textSize="18sp"
        android:layout_margin="10dp"
        android:layout_width="wrap_content"
        android:layout_height="wrap_content" />
    <TextView
        android:text="Row 5"
        android:textSize="18sp"
        android:layout_margin="10dp"
        android:layout_width="wrap_content"
        android:layout_height="wrap_content" />

    <LinearLayout
        android:orientation="horizontal"
        android:layout_width="match_parent"
        android:layout_height="wrap_content">
        <Button
            android:id="@+id/next_button"
            android:text="next"
            android:layout_width="wrap_content"
            android:layout_height="wrap_content" />
        <TextView
            android:text="Row 6b"
            android:textSize="18sp"
            android:layout_margin="10dp"
            android:layout_gravity="center"
            android:layout_width="wrap_content"
            android:layout_height="wrap_content" />
        <TextView
            android:text="Row 6c"
            android:textSize="18sp"
            android:layout_margin="10dp"
            android:layout_gravity="center"
            android:layout_width="wrap_content"
            android:layout_height="wrap_content" />
        <TextView
            android:text="Row 6d"
            android:textSize="18sp"
            android:layout_margin="10dp"
            android:layout_gravity="center"
            android:layout_width="wrap_content"
            android:layout_height="wrap_content" />

    </LinearLayout>

</LinearLayout>
このレイアウトでは、親のLinearLayoutが垂直方向に配置され、ボタン、テキストビュー、および水平方向のネストされたLinearLayoutを子ビューとして含んでいます。注意:ネストされたレイアウトは同じタイプである必要はありません。たとえば、RelativeLayoutの子としてLinearLayoutを持つことも、その逆も可能です。
Android RelativeLayout
Android RelativeLayoutは要素同士や親コンテナとの関係に基づいて要素を配置します。これは最も複雑なレイアウトの1つであり、実際に望むレイアウトを得るためにいくつかのプロパティが必要です。RelativeLayoutを使用すると、ビューをtoLeftOf、toRightOf、belowまたはaboveその他のビューに配置できます。また、ビューを親に対して水平方向に中央に配置、垂直方向に中央に配置、またはRelativeLayoutの任意の辺と整列させることもできます。子ビューにこれらの属性が指定されていない場合、そのビューはデフォルトで左上の位置にレンダリングされます。
Android RelativeLayoutの属性
以下は、RelativeLayout全体で使用される主要な属性です。これらは3つの異なるカテゴリにまたがっています。
コンテナに対する相対
- android:layout_alignParentBottom:要素の底をコンテナの底に配置
- android:layout_alignParentLeft:要素の左をコンテナの左側に配置
- android:layout_alignParentRight:コンテナの右側に要素の右側を配置します
- android:layout_alignParentTop:要素をコンテナの上部に配置します
- android:layout_centerHorizontal:要素を親コンテナ内で水平に中央配置します
- android:layout_centerInParent:要素をコンテナ内で水平および垂直に中央配置します
- android:layout_centerVertical:要素を親コンテナ内で垂直に中央配置します
兄弟要素に対する相対配置
- android:layout_above:指定された要素の上に要素を配置します
- android:layout_below:指定された要素の下に要素を配置します
- android:layout_toLeftOf:指定された要素の左側に要素を配置します
- android:layout_toRightOf:指定された要素の右側に要素を配置します
“@id/XXXXX”は、そのidによって要素を参照するために使用されます。覚えておくべき1つのことは、宣言される前に要素を参照するとエラーが発生するため、そのような場合には@+id/を使用する必要があるということです。
他の要素との整列
- android:layout_alignBaseline:新しい要素のベースラインを指定された要素のベースラインに整列させます
- android:layout_alignBottom:新しい要素のボトムを指定された要素のボトムに整列させます
- android:layout_alignLeft:新しい要素の左端を指定された要素の左端に整列させます
- android:layout_alignRight:指定された要素の右端と新しい要素の右端を整列させます
- android:layout_alignTop:指定された要素の上端と新しい要素の上端を整列させます
次のxmlレイアウトはRelativeLayoutを使用しています:layout_relative.xml
<RelativeLayout
    android:layout_width="fill_parent"
    android:layout_height="fill_parent"
    xmlns:android="https://schemas.android.com/apk/res/android">
    <Button
        android:id="@+id/backbutton"
        android:text="Back"
        android:layout_width="wrap_content"
        android:layout_height="wrap_content" />
    <TextView
        android:id="@+id/firstName"
        android:text="First Name"
        android:textSize="18sp"
        android:layout_width="wrap_content"
        android:layout_height="wrap_content"
        android:layout_below="@id/backbutton" />
    <TextView
        android:id="@+id/editFirstName"
        android:text="JournalDev"
        android:textSize="18sp"
        android:layout_width="wrap_content"
        android:layout_marginLeft="10dp"
        android:layout_height="wrap_content"
        android:layout_toRightOf="@id/firstName"
        android:layout_below="@id/backbutton"/>
    <TextView
        android:id="@+id/editLastName"
        android:text="Layout Tutorial Example"
        android:textSize="18sp"
        android:layout_width="wrap_content"
        android:layout_height="wrap_content"
        android:layout_alignTop="@+id/lastName"
        android:layout_toRightOf="@+id/lastName"
        android:layout_toEndOf="@+id/lastName" />
    <TextView
        android:id="@+id/lastName"
        android:text="Last Name"
        android:textSize="18sp"
        android:layout_width="wrap_content"
        android:layout_height="wrap_content"
        android:layout_marginTop="48dp"
        android:layout_below="@+id/firstName"
        android:layout_alignParentLeft="true"
        android:layout_alignParentStart="true"
        android:layout_marginRight="10dp"
        android:layout_marginLeft="40dp"
        android:layout_marginStart="40dp" />

    <Button
        android:id="@+id/next"
        android:text="Next"
        android:layout_width="wrap_content"
        android:layout_height="wrap_content"
        android:layout_below="@+id/editLastName"
        android:layout_alignLeft="@+id/editLastName"
        android:layout_alignStart="@+id/editLastName"
        android:layout_marginTop="37dp" />
</RelativeLayout>
要素を相対的な位置に基づいて再配置できることがわかります。次のxmlレイアウトは、入れ子になった線形および相対レイアウトを持つカスタムレイアウトを表します。layout_mixed.xml
<RelativeLayout
    android:layout_width="fill_parent"
    android:layout_height="fill_parent"
    xmlns:android="https://schemas.android.com/apk/res/android">

    <TextView
        android:id="@+id/parent_rl"
        android:text="Parent RelativeLayout"
        android:textSize="18sp"
        android:layout_width="wrap_content"
        android:layout_height="wrap_content" />

    <LinearLayout
        android:orientation="horizontal"
        android:layout_width="match_parent"
        android:layout_height="wrap_content"
        android:id="@+id/linearLayout"
        android:layout_below="@id/parent_rl"
        android:layout_alignParentRight="true"
        android:layout_alignParentEnd="true">

        <TextView
            android:text="Nested Horizontal"
            android:textSize="18sp"
            android:layout_margin="10dp"
            android:layout_width="wrap_content"
            android:layout_height="wrap_content" />

        <TextView
            android:text="LL"
            android:textSize="18sp"
            android:layout_margin="10dp"
            android:layout_width="wrap_content"
            android:layout_height="wrap_content" />


        <LinearLayout
            android:orientation="vertical"
            android:layout_width="wrap_content"
            android:layout_height="wrap_content">

            <TextView
                android:text="Double Nested"
                android:textSize="18sp"
                android:layout_margin="10dp"
                android:layout_gravity="center"
                android:layout_width="wrap_content"
                android:layout_height="wrap_content" />
            <TextView
                android:text="Vertical"
                android:textSize="18sp"
                android:layout_margin="10dp"
                android:layout_gravity="center"
                android:layout_width="wrap_content"
                android:layout_height="wrap_content" />
            <TextView
                android:text="LL"
                android:textSize="18sp"
                android:layout_margin="10dp"
                android:layout_gravity="center"
                android:layout_width="wrap_content"
                android:layout_height="wrap_content" />

        </LinearLayout>


    </LinearLayout>

    <RelativeLayout
        android:layout_width="match_parent"
        android:layout_height="match_parent"
        android:layout_below="@id/linearLayout">

    <TextView
        android:layout_width="wrap_content"
        android:layout_height="wrap_content"
        android:textAppearance="?android:attr/textAppearanceMedium"
        android:text="Nested Relative Layout"
        android:id="@+id/textView"
        android:layout_alignParentTop="true"
        android:layout_centerHorizontal="true" />

        <Button
            android:id="@+id/back_button_pressed"
            android:text="back"
            android:layout_width="wrap_content"
            android:layout_height="wrap_content"
            android:layout_below="@+id/textView"
            android:layout_centerHorizontal="true"
            android:layout_marginTop="66dp" />

    </RelativeLayout>


</RelativeLayout>
Androidレイアウトプロジェクト構造
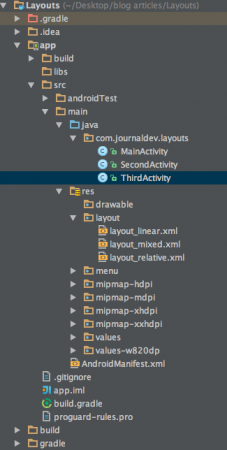
 このプロジェクトには、上記で説明した3つのアクティビティとそれに対応するレイアウトが含まれています。
Androidレイアウトコード
アプリケーションはMainActivityに起動し、次のコードによってlayout_linear.xmlの内容を読み込みます:
package com.journaldev.layouts;

import android.content.Intent;
import android.support.v7.app.AppCompatActivity;
import android.os.Bundle;
import android.view.Menu;
import android.view.MenuItem;
import android.view.View;
import android.widget.Button;

public class MainActivity extends AppCompatActivity {


    Button back,next;
    @Override
    protected void onCreate(Bundle savedInstanceState) {
        super.onCreate(savedInstanceState);
        setContentView(R.layout.layout_linear);
        back=(Button)findViewById(R.id.back_button);
        next=(Button)findViewById(R.id.next_button);

        next.setOnClickListener(new View.OnClickListener() {
            @Override
            public void onClick(View v) {
                Intent intent=new Intent(MainActivity.this,SecondActivity.class);
                intent.setFlags(Intent.FLAG_ACTIVITY_CLEAR_TOP);
                startActivity(intent);
            }
        });
        back.setOnClickListener(new View.OnClickListener() {
            @Override
            public void onClick(View v) {
                finish();
            }
        });

    }

}
{
“error”: “Upstream error…”
}
package com.journaldev.layouts;

import android.app.Activity;
import android.content.Intent;
import android.os.Bundle;
import android.view.View;
import android.widget.Button;

public class SecondActivity extends Activity {
    Button back,next;
    @Override
    protected void onCreate(Bundle savedInstanceState) {
        super.onCreate(savedInstanceState);
        setContentView(R.layout.layout_relative);
        back=(Button)findViewById(R.id.backbutton);
        next=(Button)findViewById(R.id.next);

        next.setOnClickListener(new View.OnClickListener() {
            @Override
            public void onClick(View v) {
                Intent intent=new Intent(SecondActivity.this,ThirdActivity.class);
                intent.setFlags(Intent.FLAG_ACTIVITY_CLEAR_TOP);
                startActivity(intent);
            }
        });
        back.setOnClickListener(new View.OnClickListener() {
            @Override
            public void onClick(View v) {
                Intent intent=new Intent(SecondActivity.this,MainActivity.class);
                intent.setFlags(Intent.FLAG_ACTIVITY_CLEAR_TOP);
                startActivity(intent);
            }
        });

    }
}
package com.journaldev.layouts;

import android.app.Activity;
import android.content.Intent;
import android.os.Bundle;
import android.view.View;
import android.widget.Button;

public class ThirdActivity extends Activity {
    Button back;
    @Override
    protected void onCreate(Bundle savedInstanceState) {
        super.onCreate(savedInstanceState);
        setContentView(R.layout.layout_mixed);
        back=(Button)findViewById(R.id.back_button_pressed);

        back.setOnClickListener(new View.OnClickListener() {
            @Override
            public void onClick(View v) {
                Intent intent=new Intent(ThirdActivity.this,SecondActivity.class);
                intent.setFlags(Intent.FLAG_ACTIVITY_CLEAR_TOP);
                startActivity(intent);
            }
        });

    }
}
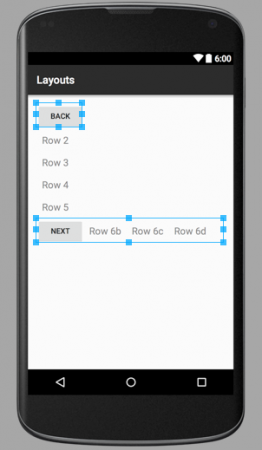
次のレイアウトファイルの画像出力が以下に示されています: layout_linear.xml  親LinearLayoutは、1つのネストされたLinearLayout子ビューを含む、単一の垂直列で6つの子要素で構成されていることがわかります。ネストされたLinearLayout子ビューには、水平方向に配置された4つのコンポーネントが含まれています。 layout_relative.xml
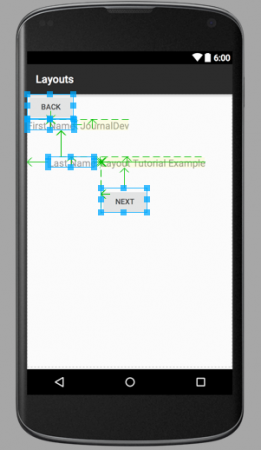
  上記の画像で示されている矢印は、兄弟要素がお互いにおよびコンテナに対してどのように配置されているかを示しています。 layout_mixed.xml
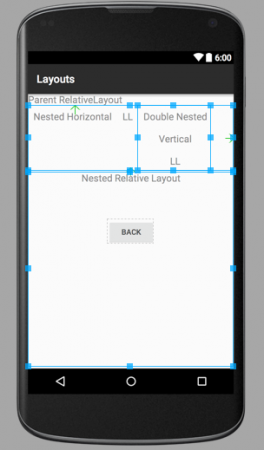
  このRelative Layoutには、ネストされた水平LinearLayout内の垂直LinearLayoutとChild RelativeLayoutが含まれています。注: 異なるレイアウトに属するコンポーネントは兄弟ではないため、お互いに相対的に配置することはできません。兄弟であるのはそれらのコンテナレイアウトであり、それらはお互いに相対的に配置できます。青い線と矢印について疑問に思っている場合、それは画像がXMLレイアウトからのものであるためです。アプリを実行すると、これらの青い線と矩形は表示されません。これでAndroidレイアウトチュートリアルは終了です。次のチュートリアルでは他の androidレイアウト をカバーします。最終的な Androidレイアウトプロジェクト は以下のリンクからダウンロードできます。
Android LinearLayout RelativeLayout のサンプルプロジェクトをダウンロードしてください。
参照:APIドキュメント
Source:
https://www.digitalocean.com/community/tutorials/android-layout-linearlayout-relativelayout


