


このチュートリアルでは、Androidのインテントについて説明し、アプリケーションでKotlinを使用して実装します。
学ぶことは何ですか?
- インテントとは何ですか?
- インテントの種類は?
- アクティビティ間でのインテントの使用
- Androidインテントを使用したデータの送信
- オブジェクトを渡すためにParcelableとSerializableを使用する
- 短縮インテントの作成
Androidインテント
名前の通り、IntentはAndroidアプリケーションのフローに関連したアクションを実行するために使用されます。 インテントは以下のように使用できます:
- 新しいアクティビティを開始し、データを渡す。
- フラグメントの開始/フラグメント間の通信。
- サービスの開始/終了。
- ブロードキャストレシーバーからアクティビティを起動します。
このチュートリアルでは、主にアクティビティを処理するためのインテントを見ていきます。 インテントの定義は、主に現在のアクティビティのインスタンスで構成されます。 呼び出すアクティビティの完全修飾クラス名。 このタイプのインテントは明示的インテントです。 URL、電話番号、場所などのアクション。 これらのタイプの利用可能なアプリケーションがすべて表示されます。 これは暗黙的インテントのカテゴリに属します。 Kotlinでは、次のようにしてアクティビティを作成します。
val intent = Intent(this, OtherActivity::class.java)
startActivity(intent)
`startActivity`はアクティビティスタックに`OtherActivity`を追加し、それを起動します。アプリケーションは、どのアクティビティが最初に呼び出されるかをどのように認識しますか? AndroidManifest.xmlでは、最初にアプリケーションが開かれるときに起動される最初のアクティビティに対して、インテントフィルターにアクションandroid.intent.action.MAINとカテゴリーandroid.intent.category.LAUNCHERを設定します。finish()はアクティビティを破棄し、スタックから削除するために使用されます。
インテントフラグ
フラグは、起動プロセスをカスタマイズするためにインテントに設定できるオプションのようなものです。毎回同じアクティビティを起動すると、新しいインスタンスが作成され、アクティビティスタックに追加されます。これを防ぐために、フラグを使用できます:FLAG_ACTIVITY_SINGLE_TOP – 設定されている場合、アクティビティはすでにアクティビティスタックの先頭で実行されている場合には起動されません。
intent.flags = Intent.FLAG_ACTIVITY_SINGLE_TOP
同様に、フラグFLAG_ACTIVITY_CLEAR_TOPを使用すると、既に存在するアクティビティの別のインスタンスは起動されません。このフラグは、呼び出されたアクティビティの上にあるすべてのアクティビティをクリアし、スタックの先頭に設定します。
インテントを介したデータの送信
新しいアクティビティにデータを渡すには、putExtra、putStringArrayListExtraなどの関数内でキー値ペアを使用します。putExtraは一般的に、Int、Float、Char、Double、Boolean、Stringなどの基本的な型を渡し、さらに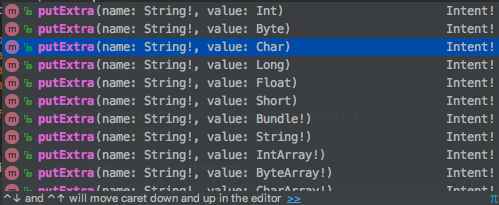 IntArrayなどを渡します。
val intent = Intent(this, OtherActivity::class.java)
intent.putExtra("keyString", "Androidly String data")
これらの追加フィールドは、最終的に渡すすべてのデータを保持するBundleオブジェクトに包まれます。他のアクティビティでデータを取得するには、extrasプロパティを使用する必要があります。bundlesの上にあります。新しいアクティビティでデータを取得する
val bundle: Bundle? = intent.extras
val string: String? = intent.getString("keyString")
val myArray: ArrayList<String>? = intent.getStringArrayList("myArray")
intent、extrasはJavaでのgetIntent()、getExtras()に相当します。データが存在しない場合にNullPointerExceptionsを防ぐために、null許容型Bundle?を使用しました。同様に、キーを使用して取得されるデータに対して、キーが正しくない場合に発生するNPEを防ぐために、null許容型を使用しました。
ParcelableとSerializableデータの使用
時々、1つのアクティビティから別のアクティビティに完全なオブジェクトを渡す必要があります。ParcelableまたはSerializableインターフェースを実装しない限り、これは不可能です。ParcelableとSerializableの違い
- ParcelableインターフェースはAndroid SDKの一部です。SerializableはJavaの標準インターフェースです。
- Parcelableでは、渡すデータをすべてParcelオブジェクトに設定し、またwriteToParcel()メソッドなどをオーバーライドする必要があります。Serializableでは、インターフェースを実装するだけでデータを渡すのに十分です。
ParcelableはSerializableよりも高速です。
Kotlinは、writeToParcel()メソッドをオーバーライドせずにParcelable上でデータを設定するための便利なアノテーションを提供しています。代わりに、以下に示すように@Parcelizeアノテーションを使用できます。
@Parcelize
data class Student(
        val name: String = "Anupam",
        val age: Int = 24
) : Parcelable
注意:現在、build.gradleには次のコードを追加する必要があります。@Parcelizeアノテーションを使用するには:
android {
    androidExtensions {
        experimental = true
    }
//..
....
}
Activityで次のようにします:
val student = Student()
val intent = Intent(this, OtherActivity::class.java)
intent.putExtra("studentData", student)
startActivity(intent)
Serializableデータの送信
data class Blog(val name: String = "Androidly", val year: Int = 2018) : Serializable

val blog = Blog("a", 1)
val intent = Intent(this, OtherActivity::class.java)
intent.putExtra("blogData", blog as Serializable)
startActivity(intent)
上記の知識をAndroid Studioプロジェクトで活用しましょう。
プロジェクトの構造

レイアウトコード
次に、activity_main.xml レイアウトのコードが以下に示されています:
<?xml version="1.0" encoding="utf-8"?>
<LinearLayout xmlns:android="http://schemas.android.com/apk/res/android"
    xmlns:tools="http://schemas.android.com/tools"
    android:layout_width="match_parent"
    android:layout_height="match_parent"
    android:gravity="center"
    android:orientation="vertical"
    tools:context=".MainActivity">

    <Button
        android:id="@+id/btnSimpleIntent"
        android:layout_width="wrap_content"
        android:layout_height="wrap_content"
        android:text="SIMPLE INTENT" />


    <Button
        android:id="@+id/btnSimpleIntentAndData"
        android:layout_width="wrap_content"
        android:layout_height="wrap_content"
        android:text="SIMPLE INTENT WITH DATA" />


    <Button
        android:id="@+id/btnParcelableIntent"
        android:layout_width="wrap_content"
        android:layout_height="wrap_content"
        android:text="Parcelable Intent" />


    <Button
        android:id="@+id/btnSerializableIntent"
        android:layout_width="wrap_content"
        android:layout_height="wrap_content"
        android:text="Serializable Intent" />

    <Button
        android:id="@+id/btnBrowserIntent"
        android:layout_width="wrap_content"
        android:layout_height="wrap_content"
        android:text="Browser Intent" />


    <Button
        android:id="@+id/btnMapsIntent"
        android:layout_width="wrap_content"
        android:layout_height="wrap_content"
        android:text="Maps Intent" />


    <Button
        android:id="@+id/btnGenericIntent"
        android:layout_width="wrap_content"
        android:layout_height="wrap_content"
        android:text="Generic Intent" />

</LinearLayout>
activity_other.xml レイアウトのコードは以下の通りです:
<?xml version="1.0" encoding="utf-8"?>
<LinearLayout xmlns:android="http://schemas.android.com/apk/res/android"
    xmlns:tools="http://schemas.android.com/tools"
    android:layout_width="match_parent"
    android:layout_height="match_parent"
    android:gravity="center"
    android:orientation="vertical"
    tools:context=".MainActivity">

    <TextView
        android:id="@+id/textView"
        android:layout_width="wrap_content"
        android:layout_height="wrap_content"
        android:text="Intent Data goes here" />


</LinearLayout>
アクティビティコード
次に、MainActivity.kt クラスのコードが以下に示されています:
package net.androidly.androidlyintents

import android.app.Activity
import android.content.ComponentName
import android.content.Context
import android.content.Intent
import android.net.Uri
import android.support.v7.app.AppCompatActivity
import android.os.Bundle
import android.os.Parcelable
import android.view.View
import android.widget.Toast
import android.widget.Toast.LENGTH_LONG
import kotlinx.android.parcel.Parcelize
import kotlinx.android.synthetic.main.activity_main.*
import java.io.Serializable


@Parcelize
data class Student(
        val name: String = "Anupam",
        val age: Int = 24
) : Parcelable

data class Blog(val name: String = "Androidly", val year: Int = 2018) : Serializable


class MainActivity : AppCompatActivity(), View.OnClickListener {


    fun Context.gotoClass(targetType: Class<*>) =
            ComponentName(this, targetType)

    fun Context.startActivity(f: Intent.() -> Unit): Unit =
            Intent().apply(f).run(this::startActivity)

    inline fun <reified T : Activity> Context.start(
            noinline createIntent: Intent.() -> Unit = {}
    ) = startActivity {
        component = gotoClass(T::class.java)
        createIntent(this)
    }


    var arrayList = ArrayList<String>()

    override fun onCreate(savedInstanceState: Bundle?) {
        super.onCreate(savedInstanceState)
        setContentView(R.layout.activity_main)
        btnSimpleIntent.setOnClickListener(this)
        btnSimpleIntentAndData.setOnClickListener(this)
        btnParcelableIntent.setOnClickListener(this)
        btnSerializableIntent.setOnClickListener(this)
        btnBrowserIntent.setOnClickListener(this)
        btnMapsIntent.setOnClickListener(this)
        btnGenericIntent.setOnClickListener(this)

        arrayList.add("Androidly")
        arrayList.add("Android")
        arrayList.add("Intents")
    }

    override fun onClick(v: View?) {
        when (v?.id) {
            R.id.btnSimpleIntent -> {
                val intent = Intent(this, OtherActivity::class.java)
                startActivity(intent)
            }
            R.id.btnSimpleIntentAndData -> {
                val intent = Intent(this, OtherActivity::class.java)
                with(intent)
                {
                    putExtra("keyString", "Androidly String data")
                    putStringArrayListExtra("arrayList", arrayList)
                    putExtra("keyBoolean", true)
                    putExtra("keyFloat", 1.2f)
                }
                startActivity(intent)
            }
            R.id.btnParcelableIntent -> {

                val student = Student()
                val intent = Intent(this, OtherActivity::class.java)
                intent.putExtra("studentData", student)
                startActivity(intent)
            }
            R.id.btnSerializableIntent -> {
                val blog = Blog("a", 1)
                val intent = Intent(this, OtherActivity::class.java)
                intent.putExtra("blogData", blog as Serializable)
                startActivity(intent)
            }
            R.id.btnBrowserIntent -> {
                val url = "https://www.androidly.net"
                val uri = Uri.parse(url)
                val intent = Intent(Intent.ACTION_VIEW, uri)

                if (intent.resolveActivity(packageManager) != null) {
                    startActivity(intent)
                } else {
                    Toast.makeText(applicationContext, "No application found", LENGTH_LONG).show()
                }
            }
            R.id.btnMapsIntent -> {
                val loc = "12.9538477,77.3507442"

                val addressUri = Uri.parse("geo:0,0?q=" + loc)
                val intent = Intent(Intent.ACTION_VIEW, addressUri)


                if (intent.resolveActivity(packageManager) != null) {
                    startActivity(intent)
                } else {
                    Toast.makeText(applicationContext, "No application found", LENGTH_LONG).show()
                }
            }
            else -> start<OtherActivity> {
                putExtra("keyString", "Androidly Generic Intent")
            }
        }
    }

}
上記のコードでは、各種の Intent に対してボタンを使用しています。毎回データをintentオブジェクトに設定するのを防ぐために、Kotlinのwith式を使用しています。さらに、既に説明したもの以外にも、3つの異なる Intent を作成しています。ブラウザ Intent は、インテント内の URL をブラウザアプリで開くために使用されます。Intent(Intent.ACTION_VIEW, uri)を使用しています。位置情報 Intent は、lat、lng の位置情報をマップアプリで開くために使用されます。これらはいずれも暗黙的な Intent です。最後に、一般的な Intent を使用し、Kotlinの拡張機能とラムダ式を使用して、Intent を起動するための簡略化された関数を作成しています。以下の関数を使用しています:
fun Context.gotoClass(targetType: Class<*>) =
            ComponentName(this, targetType)

    fun Context.startActivity(createIntent: Intent.() -> Unit): Unit =
            Intent().apply(createIntent).run(this::startActivity)

    inline fun <reified T : Activity> Context.start(
            noinline createIntent: Intent.() -> Unit = {}
    ) = startActivity {
        component = gotoClass(T::class.java)
        createIntent(this)
    }
startActivityは、パラメーターとして高階関数を探す拡張機能です。 これにより、start<OtherActivity>のようにわずかな行でインテントを起動できるようになりました。 OtherActivity.ktクラスのコードは以下の通りです。
package net.androidly.androidlyintents

import android.content.Context
import android.support.v7.app.AppCompatActivity
import android.os.Bundle
import android.widget.Toast
import kotlinx.android.synthetic.main.activity_other.*

class OtherActivity : AppCompatActivity() {


    override fun onCreate(savedInstanceState: Bundle?) {
        super.onCreate(savedInstanceState)
        setContentView(R.layout.activity_other)

        val bundle: Bundle? = intent.extras

        bundle?.let {

            bundle.apply {
                //データ付きインテント
                val string: String? = getString("keyString")
                textView.text = string

                val myArray: ArrayList? = getStringArrayList("myArray")
                showToast(message = "MyArrayList size:${myArray?.size}")

                val arrayList: ArrayList? = getStringArrayList("arrayList")
                showToast(message = "ArrayList size:${arrayList?.size}")

                val float: Float? = bundle.get("keyFloat") as Float?
                var boolean = bundle.get("boolean") as? Boolean

                showToast(message = "Float data is:$float")
                showToast(message = "Boolean data is:$boolean")
                boolean = bundle.get("keyBoolean") as? Boolean
                showToast(message = "Boolean correct key data is:$boolean")

            }


            bundle.apply {
                //Serializableデータ
                val blog = getSerializable("blogData") as Blog?
                if (blog != null) {
                    textView.text = "Blog name is ${blog?.name}. Year started: ${blog?.year}"

                }
            }

            bundle.apply {
                //Parcelableデータ
                val student: Student? = getParcelable("studentData")
                if (student != null) {
                    textView.text = "Name is ${student?.name}. Age: ${student?.age}"
                }
            }
        }
    }

    private fun showToast(context: Context = applicationContext, message: String, duration: Int = Toast.LENGTH_SHORT) {
        if (!message.contains("null"))
            Toast.makeText(context, message, duration).show()
    }
}
私たちはletとapplyを使用して、nullable typesを処理し、すべての行でbundle.fieldを行うのを防いでいます。 上記のアプリケーションの動作の出力は以下の通りです: これで、KotlinでのAndroidインテントのチュートリアルは終了です。 プロジェクトは以下のリンクからダウンロードできます。