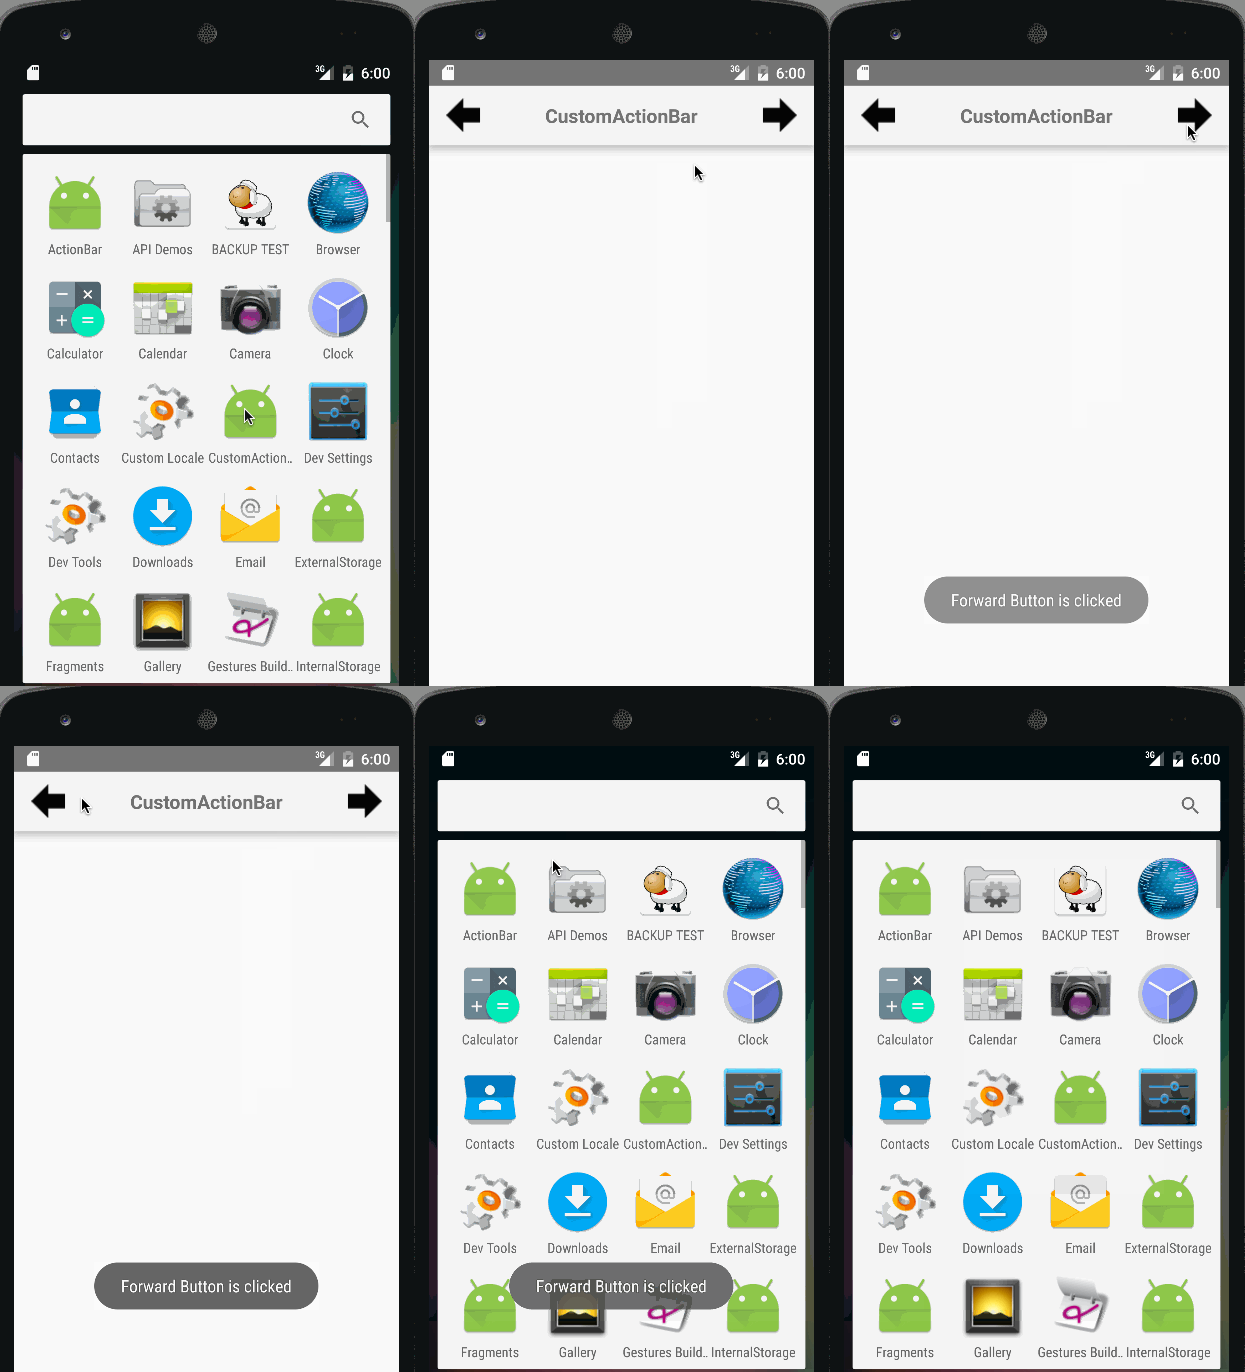
このチュートリアルでは、Androidカスタムアクションバーとカスタムレイアウトで構成されたアプリを作成します。 このチュートリアルで説明されているActionBarコンポーネントの基本的な理解を持っていることを前提としています。
Androidカスタムアクションバー
ActionBarをカスタマイズするには、まずres/values/styles.xmlでテーマを設定し、AndroidManifest.xmlで対応するアクティビティクラスにテーマを設定する必要があります。次に示すのは、そのためのxmlレイアウトです:styles.xml
<resources>

<style name="AppTheme" parent="Theme.AppCompat.Light.NoActionBar">
        <!-- Customize your theme here. -->
    </style>

    <style name="CustomTheme" parent="Theme.AppCompat.Light">

        <item name="contentInsetStart">0dp</item>
        <item name="contentInsetEnd">0dp</item>
    </style>

</resources>
上記のスニペットを使用すると、アクティビティにAppThemeスタイルを使用するとnullポインタ例外が発生します。したがって、このプロジェクトではCustomThemeスタイルを使用します。 contentInsetStartとcontentInsetEndはパディング値です。注意すべきは、AppCompatActivityを使用することです。これは、3.0未満のAndroidバージョンとの最大の互換性を提供します。
カスタムアクションバーレイアウト
以下は、MainActivityからActionBarに設定される表示レイアウトです。 custom_action_bar_layout.xmlです。
<?xml version="1.0" encoding="utf-8"?>
<TableLayout xmlns:android="https://schemas.android.com/apk/res/android"
    android:layout_width="match_parent"
    android:layout_height="wrap_content"
    android:orientation="horizontal"
    >

    <TableRow>

        <ImageButton
            android:layout_width="wrap_content"
            android:layout_height="wrap_content"
            android:src="@drawable/back"
            android:layout_gravity="center_vertical"
            android:background="@android:color/transparent"
            android:id="@+id/action_bar_back"
            android:layout_alignParentTop="true"
            android:layout_centerHorizontal="true" />


        <TextView
            android:layout_width="wrap_content"
            android:layout_height="wrap_content"
            android:text="@string/app_name"
            android:gravity="center_horizontal"
            android:textAppearance="?android:attr/textAppearanceMedium"
            android:textStyle="bold"
            android:padding="10dp"
            android:layout_alignParentTop="true"
            android:layout_weight="1"
            />

        <ImageButton
            android:layout_width="wrap_content"
            android:layout_height="wrap_content"
            android:src="@drawable/forward"
            android:id="@+id/action_bar_forward"
            android:layout_gravity="center_vertical"
            android:background="@android:color/transparent"
            android:layout_alignParentTop="true"
            android:layout_centerHorizontal="true" />


    </TableRow>

</TableLayout>
表示レイアウトには、進むと戻るの2つのImageButtonsと中央のTextViewが含まれています。
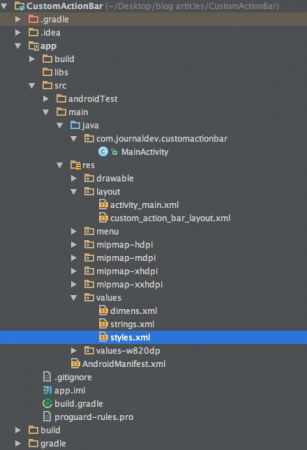
Androidカスタムアクションバーのプロジェクト構造
Androidカスタムアクションバーコード
activity_main.xmlは空のRelativeLayoutです。ここでは、アクションバーに焦点を当てています。MainActivity.javaは以下の通りです。
package com.journaldev.customactionbar;

import android.support.v7.app.ActionBar;
import android.support.v7.app.AppCompatActivity;
import android.os.Bundle;
import android.view.Menu;
import android.view.MenuItem;
import android.view.View;
import android.widget.ImageButton;
import android.widget.Toast;

public class MainActivity extends AppCompatActivity {

    @Override
    protected void onCreate(Bundle savedInstanceState) {
        super.onCreate(savedInstanceState);
        setContentView(R.layout.activity_main);

        getSupportActionBar().setDisplayOptions(ActionBar.DISPLAY_SHOW_CUSTOM);
        getSupportActionBar().setDisplayShowCustomEnabled(true);
        getSupportActionBar().setCustomView(R.layout.custom_action_bar_layout);
        View view =getSupportActionBar().getCustomView();

        ImageButton imageButton= (ImageButton)view.findViewById(R.id.action_bar_back);

        imageButton.setOnClickListener(new View.OnClickListener() {
            @Override
            public void onClick(View v) {
                finish();
            }
        });

        ImageButton imageButton2= (ImageButton)view.findViewById(R.id.action_bar_forward);

        imageButton2.setOnClickListener(new View.OnClickListener() {
            @Override
            public void onClick(View v) {
                Toast.makeText(getApplicationContext(),"Forward Button is clicked",Toast.LENGTH_LONG).show();
            }
        });
    }


}
上記のコードでは、サポートライブラリを使用しています。したがって、getSupportActionBar()をgetActionBar()の代わりに使用しています。カスタムレイアウトをActionBarに追加するには、次の2つのメソッドをgetSupportActionBar()で呼び出しています:
- getSupportActionBar().setDisplayOptions(ActionBar.DISPLAY_SHOW_CUSTOM);
- getSupportActionBar().setDisplayShowCustomEnabled(true);
setCustomView()が呼び出され、ActionBarを上記のようにカスタムビューで膨らませます。ActionBarボタンのonClickListenersを設定するには、最初にgetCustomView()を使用してCustomViewを取得する必要があります。このチュートリアルでは、バックボタンをfinish();を使用してアクティビティを閉じ、フォワードボタンをToastで表示するようにプログラムしました。注意:アプリケーションタグ内のAndroidManifest.xmlに以下の行を追加します。
android:theme="@style/CustomTheme"
以下は、カスタムテーマとレイアウトを備えたAndroidアプリケーションです。 注意:修正できない両側の固定マージンがあります。そのため、ActionBarをToolBarに置き換える必要があります。これについては後のチュートリアルで説明します。これで、androidカスタムアクションバーチュートリアルは終了です。最終的なAndroid CustomActionBarプロジェクトは、以下のリンクからダウンロードできます。
Androidカスタムアクションバープロジェクトのダウンロード
参考:Android Doc
Source:
https://www.digitalocean.com/community/tutorials/android-custom-action-bar-example-tutorial


