Javaの例でAbstract Factoryデザインパターンへようこそ。Abstract Factoryデザインパターンは、Creationalパターンの1つです。Abstract Factoryパターンは、Factoryパターンとほぼ同じですが、ファクトリーのファクトリーのようなものです。
Abstract Factory
 もしJavaのファクトリーデザインパターンに詳しい場合、単一のファクトリークラスがあることに気付くでしょう。このファクトリークラスは、入力に基づいて異なるサブクラスを返します。ファクトリークラスは、if-elseまたはswitch文を使用してこれを実現します。Abstract Factoryパターンでは、if-elseブロックを取り除き、各サブクラスに対応するファクトリークラスを持ちます。そして、入力されたファクトリークラスに基づいてサブクラスを返すAbstract Factoryクラスがあります。最初は混乱するかもしれませんが、実装を見るとFactoryパターンとAbstract Factoryパターンの微妙な違いを理解するのは本当に簡単です。ファクトリーパターンの記事と同様に、同じスーパークラスとサブクラスを使用します。
抽象ファクトリーデザインパターンのスーパークラスとサブクラス
Computer.java
package com.journaldev.design.model;

public abstract class Computer {

    public abstract String getRAM();
    public abstract String getHDD();
    public abstract String getCPU();

    @Override
    public String toString(){
        return "RAM= "+this.getRAM()+", HDD="+this.getHDD()+", CPU="+this.getCPU();
    }
}
PC.java
package com.journaldev.design.model;

public class PC extends Computer {

    private String ram;
    private String hdd;
    private String cpu;

    public PC(String ram, String hdd, String cpu){
        this.ram=ram;
        this.hdd=hdd;
        this.cpu=cpu;
    }
    @Override
    public String getRAM() {
        return this.ram;
    }

    @Override
    public String getHDD() {
        return this.hdd;
    }

    @Override
    public String getCPU() {
        return this.cpu;
    }

}
Server.java
package com.journaldev.design.model;


public class Server extends Computer {

    private String ram;
    private String hdd;
    private String cpu;

    public Server(String ram, String hdd, String cpu){
        this.ram=ram;
        this.hdd=hdd;
        this.cpu=cpu;
    }
    @Override
    public String getRAM() {
        return this.ram;
    }

    @Override
    public String getHDD() {
        return this.hdd;
    }

    @Override
    public String getCPU() {
        return this.cpu;
    }

}
各サブクラスのためのファクトリークラス
まず、抽象ファクトリーのインターフェースまたは抽象クラスを作成する必要があります。 ComputerAbstractFactory.java
package com.journaldev.design.abstractfactory;

import com.journaldev.design.model.Computer;

public interface ComputerAbstractFactory {

	public Computer createComputer();

}
createComputer()メソッドがスーパークラスComputerのインスタンスを返していることに注意してください。次に、ファクトリークラスはこのインターフェースを実装し、それぞれのサブクラスを返します。 PCFactory.java
package com.journaldev.design.abstractfactory;

import com.journaldev.design.model.Computer;
import com.journaldev.design.model.PC;

public class PCFactory implements ComputerAbstractFactory {

	private String ram;
	private String hdd;
	private String cpu;

	public PCFactory(String ram, String hdd, String cpu){
		this.ram=ram;
		this.hdd=hdd;
		this.cpu=cpu;
	}
	@Override
	public Computer createComputer() {
		return new PC(ram,hdd,cpu);
	}

}
同様に、Serverサブクラスのためのファクトリークラスも作成します。 ServerFactory.java
package com.journaldev.design.abstractfactory;

import com.journaldev.design.model.Computer;
import com.journaldev.design.model.Server;

public class ServerFactory implements ComputerAbstractFactory {

	private String ram;
	private String hdd;
	private String cpu;

	public ServerFactory(String ram, String hdd, String cpu){
		this.ram=ram;
		this.hdd=hdd;
		this.cpu=cpu;
	}

	@Override
	public Computer createComputer() {
		return new Server(ram,hdd,cpu);
	}

}
次に、クライアントクラスがサブクラスを作成するためのエントリーポイントを提供するコンシューマークラスを作成します。 ComputerFactory.java
package com.journaldev.design.abstractfactory;

import com.journaldev.design.model.Computer;

public class ComputerFactory {

	public static Computer getComputer(ComputerAbstractFactory factory){
		return factory.createComputer();
	}
}
注意してください。これはシンプルなクラスです。getComputerメソッドはComputerAbstractFactory引数を受け取り、Computerオブジェクトを返します。この時点で、実装は明確になるはずです。単純なテストメソッドを書いて、サブクラスのインスタンスを取得するために抽象ファクトリを使用する方法を見てみましょう。TestDesignPatterns.java
package com.journaldev.design.test;

import com.journaldev.design.abstractfactory.PCFactory;
import com.journaldev.design.abstractfactory.ServerFactory;
import com.journaldev.design.factory.ComputerFactory;
import com.journaldev.design.model.Computer;

public class TestDesignPatterns {

	public static void main(String[] args) {
		testAbstractFactory();
	}

	private static void testAbstractFactory() {
		Computer pc = com.journaldev.design.abstractfactory.ComputerFactory.getComputer(new PCFactory("2 GB","500 GB","2.4 GHz"));
		Computer server = com.journaldev.design.abstractfactory.ComputerFactory.getComputer(new ServerFactory("16 GB","1 TB","2.9 GHz"));
		System.out.println("AbstractFactory PC Config::"+pc);
		System.out.println("AbstractFactory Server Config::"+server);
	}
}
上記のプログラムの出力は次のとおりです:
AbstractFactory PC Config::RAM= 2 GB, HDD=500 GB, CPU=2.4 GHz
AbstractFactory Server Config::RAM= 16 GB, HDD=1 TB, CPU=2.9 GHz
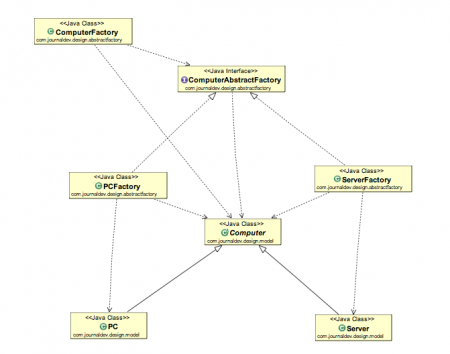
ここに、抽象ファクトリデザインパターンのクラス図があります。
抽象ファクトリデザインパターンの利点
- 抽象ファクトリデザインパターンは、実装ではなくインターフェースに対してコードを記述するアプローチを提供します。
- 抽象ファクトリパターンは「ファクトリのファクトリ」であり、さらに製品を追加するのが簡単です。たとえば、別のサブクラスであるLaptopとLaptopFactoryを追加できます。
- 抽象ファクトリパターンは堅牢であり、ファクトリパターンの条件付きロジックを回避します。
JDKにおける抽象ファクトリデザインパターンの例
- javax.xml.parsers.DocumentBuilderFactory#newInstance()
- javax.xml.transform.TransformerFactory#newInstance()
- javax.xml.xpath.XPathFactory#newInstance()
抽象ファクトリデザインパターンのビデオチュートリアル
I recently uploaded a video on YouTube for abstract factory design pattern. In the video, I discuss when and how to implement an abstract factory pattern. I have also discussed what is the difference between the factory pattern and abstract factory design pattern. https://youtu.be/BPkYkyVWOaw
私のGitHubプロジェクトから例のコードをダウンロードできます。
Source:
https://www.digitalocean.com/community/tutorials/abstract-factory-design-pattern-in-java


