


Spring è uno dei framework Java EE più utilizzati. Abbiamo già visto come utilizzare Spring MVC per creare applicazioni web basate su Java. Oggi impareremo a creare Servizi Web Restful di Spring utilizzando Spring MVC e poi li testeremo con il client Rest. Alla fine, esamineremo anche come invocare il servizio web Restful di Spring utilizzando l’API Spring RestTemplate. 
Spring REST
Utilizzeremo l’ultima versione di Spring 4.0.0.RELEASE e utilizzeremo l’integrazione di Spring Jackson JSON per inviare una risposta JSON nella risposta della chiamata REST. Il tutorial è sviluppato nell’IDE Spring STS per creare facilmente del codice scheletro Spring MVC e poi esteso per implementare l’architettura Restful. Crea un nuovo progetto Spring MVC nell’STS, il nostro progetto finale assomiglierà all’immagine sottostante. Esamineremo ciascuno dei componenti uno per uno. 
File di configurazione XML di Spring REST
Il nostro file pom.xml è simile al seguente.
<?xml version="1.0" encoding="UTF-8"?>
<project xmlns="https://maven.apache.org/POM/4.0.0" xmlns:xsi="https://www.w3.org/2001/XMLSchema-instance"
	xsi:schemaLocation="https://maven.apache.org/POM/4.0.0 https://maven.apache.org/maven-v4_0_0.xsd">
	<modelVersion>4.0.0</modelVersion>
	<groupId>com.journaldev</groupId>
	<artifactId>SpringRestExample</artifactId>
	<name>SpringRestExample</name>
	<packaging>war</packaging>
	<version>1.0.0-BUILD-SNAPSHOT</version>
	<properties>
		<java-version>1.6</java-version>
		<org.springframework-version>4.0.0.RELEASE</org.springframework-version>
		<org.aspectj-version>1.7.4</org.aspectj-version>
		<org.slf4j-version>1.7.5</org.slf4j-version>
		<jackson.databind-version>2.2.3</jackson.databind-version>
	</properties>
	<dependencies>
		<!-- Jackson -->
		<dependency>
			<groupId>com.fasterxml.jackson.core</groupId>
			<artifactId>jackson-databind</artifactId>
			<version>${jackson.databind-version}</version>
		</dependency>
		<!-- Spring -->
		<dependency>
			<groupId>org.springframework</groupId>
			<artifactId>spring-context</artifactId>
			<version>${org.springframework-version}</version>
			<exclusions>
				<!-- Exclude Commons Logging in favor of SLF4j -->
				<exclusion>
					<groupId>commons-logging</groupId>
					<artifactId>commons-logging</artifactId>
				</exclusion>
			</exclusions>
		</dependency>
		<dependency>
			<groupId>org.springframework</groupId>
			<artifactId>spring-webmvc</artifactId>
			<version>${org.springframework-version}</version>
		</dependency>

		<!-- AspectJ -->
		<dependency>
			<groupId>org.aspectj</groupId>
			<artifactId>aspectjrt</artifactId>
			<version>${org.aspectj-version}</version>
		</dependency>

		<!-- Logging -->
		<dependency>
			<groupId>org.slf4j</groupId>
			<artifactId>slf4j-api</artifactId>
			<version>${org.slf4j-version}</version>
		</dependency>
		<dependency>
			<groupId>org.slf4j</groupId>
			<artifactId>jcl-over-slf4j</artifactId>
			<version>${org.slf4j-version}</version>
			<scope>runtime</scope>
		</dependency>
		<dependency>
			<groupId>org.slf4j</groupId>
			<artifactId>slf4j-log4j12</artifactId>
			<version>${org.slf4j-version}</version>
			<scope>runtime</scope>
		</dependency>
		<dependency>
			<groupId>log4j</groupId>
			<artifactId>log4j</artifactId>
			<version>1.2.15</version>
			<exclusions>
				<exclusion>
					<groupId>javax.mail</groupId>
					<artifactId>mail</artifactId>
				</exclusion>
				<exclusion>
					<groupId>javax.jms</groupId>
					<artifactId>jms</artifactId>
				</exclusion>
				<exclusion>
					<groupId>com.sun.jdmk</groupId>
					<artifactId>jmxtools</artifactId>
				</exclusion>
				<exclusion>
					<groupId>com.sun.jmx</groupId>
					<artifactId>jmxri</artifactId>
				</exclusion>
			</exclusions>
			<scope>runtime</scope>
		</dependency>

		<!-- @Inject -->
		<dependency>
			<groupId>javax.inject</groupId>
			<artifactId>javax.inject</artifactId>
			<version>1</version>
		</dependency>

		<!-- Servlet -->
		<dependency>
			<groupId>javax.servlet</groupId>
			<artifactId>servlet-api</artifactId>
			<version>2.5</version>
			<scope>provided</scope>
		</dependency>
		<dependency>
			<groupId>javax.servlet.jsp</groupId>
			<artifactId>jsp-api</artifactId>
			<version>2.1</version>
			<scope>provided</scope>
		</dependency>
		<dependency>
			<groupId>javax.servlet</groupId>
			<artifactId>jstl</artifactId>
			<version>1.2</version>
		</dependency>

		<!-- Test -->
		<dependency>
			<groupId>junit</groupId>
			<artifactId>junit</artifactId>
			<version>4.7</version>
			<scope>test</scope>
		</dependency>
	</dependencies>
	<build>
		<plugins>
			<plugin>
				<artifactId>maven-eclipse-plugin</artifactId>
				<version>2.9</version>
				<configuration>
					<additionalProjectnatures>
						<projectnature>org.springframework.ide.eclipse.core.springnature</projectnature>
					</additionalProjectnatures>
					<additionalBuildcommands>
						<buildcommand>org.springframework.ide.eclipse.core.springbuilder</buildcommand>
					</additionalBuildcommands>
					<downloadSources>true</downloadSources>
					<downloadJavadocs>true</downloadJavadocs>
				</configuration>
			</plugin>
			<plugin>
				<groupId>org.apache.maven.plugins</groupId>
				<artifactId>maven-compiler-plugin</artifactId>
				<version>2.5.1</version>
				<configuration>
					<source>1.6</source>
					<target>1.6</target>
					<compilerArgument>-Xlint:all</compilerArgument>
					<showWarnings>true</showWarnings>
					<showDeprecation>true</showDeprecation>
				</configuration>
			</plugin>
			<plugin>
				<groupId>org.codehaus.mojo</groupId>
				<artifactId>exec-maven-plugin</artifactId>
				<version>1.2.1</version>
				<configuration>
					<mainClass>org.test.int1.Main</mainClass>
				</configuration>
			</plugin>
		</plugins>

	</build>
</project>
Lo strumento STS genera il file pom.xml per noi. Tuttavia, ho aggiornato la versione di Spring Framework, AspectJ, SLF4J e Jackson all’ultima disponibile ad oggi. La maggior parte del lavoro è comune e generata automaticamente, il punto importante da notare è che ho aggiunto le librerie Jackson JSON nelle dipendenze perché le useremo per convertire gli oggetti in JSON e viceversa.
<?xml version="1.0" encoding="UTF-8"?>
<web-app version="2.5" xmlns="https://java.sun.com/xml/ns/javaee"
	xmlns:xsi="https://www.w3.org/2001/XMLSchema-instance"
	xsi:schemaLocation="https://java.sun.com/xml/ns/javaee https://java.sun.com/xml/ns/javaee/web-app_2_5.xsd">

	<!-- The definition of the Root Spring Container shared by all Servlets and Filters -->
	<context-param>
		<param-name>contextConfigLocation</param-name>
		<param-value>/WEB-INF/spring/root-context.xml</param-value>
	</context-param>

	<!-- Creates the Spring Container shared by all Servlets and Filters -->
	<listener>
		<listener-class>org.springframework.web.context.ContextLoaderListener</listener-class>
	</listener>

	<!-- Processes application requests -->
	<servlet>
		<servlet-name>appServlet</servlet-name>
		<servlet-class>org.springframework.web.servlet.DispatcherServlet</servlet-class>
		<init-param>
			<param-name>contextConfigLocation</param-name>
			<param-value>/WEB-INF/spring/appServlet/servlet-context.xml</param-value>
		</init-param>
		<load-on-startup>1</load-on-startup>
	</servlet>

	<servlet-mapping>
		<servlet-name>appServlet</servlet-name>
		<url-pattern>/</url-pattern>
	</servlet-mapping>

</web-app>
Questo file viene generato automaticamente e non ho apportato alcuna modifica. Tuttavia, se desideri modificare i file di configurazione del contesto e la loro posizione, puoi farlo nel file web.xml.
<?xml version="1.0" encoding="UTF-8"?>
<beans xmlns="https://www.springframework.org/schema/beans"
	xmlns:xsi="https://www.w3.org/2001/XMLSchema-instance"
	xsi:schemaLocation="https://www.springframework.org/schema/beans https://www.springframework.org/schema/beans/spring-beans.xsd">

	<!-- Root Context: defines shared resources visible to all other web components -->

</beans>
Questo file contiene le risorse condivise che saranno visibili a tutti i componenti web. Svilupperemo un semplice servizio REST e per questo motivo non ho apportato alcuna modifica qui.
<?xml version="1.0" encoding="UTF-8"?>
<beans:beans xmlns="https://www.springframework.org/schema/mvc"
	xmlns:xsi="https://www.w3.org/2001/XMLSchema-instance"
	xmlns:beans="https://www.springframework.org/schema/beans"
	xmlns:context="https://www.springframework.org/schema/context"
	xsi:schemaLocation="https://www.springframework.org/schema/mvc https://www.springframework.org/schema/mvc/spring-mvc.xsd
		https://www.springframework.org/schema/beans https://www.springframework.org/schema/beans/spring-beans.xsd
		https://www.springframework.org/schema/context https://www.springframework.org/schema/context/spring-context.xsd">

	<!-- DispatcherServlet Context: defines this servlet's request-processing infrastructure -->

	<!-- Enables the Spring MVC @Controller programming model -->
	<annotation-driven />

	<!-- Handles HTTP GET requests for /resources/** by efficiently serving up static resources in the ${webappRoot}/resources directory -->
	<resources mapping="/resources/**" location="/resources/" />

	<!-- Resolves views selected for rendering by @Controllers to .jsp resources in the /WEB-INF/views directory -->
	<beans:bean class="org.springframework.web.servlet.view.InternalResourceViewResolver">
		<beans:property name="prefix" value="/WEB-INF/views/" />
		<beans:property name="suffix" value=".jsp" />
	</beans:bean>

	<!-- Configure to plugin JSON as request and response in method handler -->
	<beans:bean class="org.springframework.web.servlet.mvc.method.annotation.RequestMappingHandlerAdapter">
		<beans:property name="messageConverters">
			<beans:list>
				<beans:ref bean="jsonMessageConverter"/>
			</beans:list>
		</beans:property>
	</beans:bean>

	<!-- Configure bean to convert JSON to POJO and vice versa -->
	<beans:bean id="jsonMessageConverter" class="org.springframework.http.converter.json.MappingJackson2HttpMessageConverter">
	</beans:bean>

	<context:component-scan base-package="com.journaldev.spring.controller" />

</beans:beans>
La maggior parte della parte è generata automaticamente e contiene configurazioni di base. Tuttavia, i punti importanti da notare sono l’elemento annotation-driven per supportare la configurazione basata su annotazioni e l’inserimento di MappingJackson2HttpMessageConverter nel RequestMappingHandlerAdapter messageConverters in modo che venga utilizzata l’API di Jackson per convertire JSON in Java Beans e viceversa. Con questa configurazione, utilizzeremo JSON nel corpo della richiesta e riceveremo dati JSON nella risposta.
Classi di modello REST di Spring
Scriviamo una semplice classe POJO che servirà come input e output per i nostri metodi di servizio web RESTful.
package com.journaldev.spring.model;

import java.io.Serializable;
import java.util.Date;

import com.fasterxml.jackson.databind.annotation.JsonSerialize;
import com.fasterxml.jackson.databind.ser.std.DateSerializer;

public class Employee implements Serializable{

	private static final long serialVersionUID = -7788619177798333712L;

	private int id;
	private String name;
	private Date createdDate;

	public int getId() {
		return id;
	}
	public void setId(int id) {
		this.id = id;
	}
	public String getName() {
		return name;
	}
	public void setName(String name) {
		this.name = name;
	}

	@JsonSerialize(using=DateSerializer.class)
	public Date getCreatedDate() {
		return createdDate;
	}
	public void setCreatedDate(Date createdDate) {
		this.createdDate = createdDate;
	}


}
L’unico punto importante da notare è l’uso dell’annotazione @JsonSerialize per utilizzare la classe DateSerializer per la conversione delle date dal tipo Java al formato JSON e viceversa.
Endpoint del servizio Web Restful di Primavera
Avere i seguenti endpoint dei servizi Web REST.
| Sl. No | URI | HTTP Method | Details |
|---|---|---|---|
| 1 | /rest/emp/dummy | GET | Health Check service, to insert a dummy data in the Employees data storage |
| 2 | /rest/emp/{id} | GET | To get the Employee object based on the id |
| 3 | /rest/emps | GET | To get the list of all the Employees in the data store |
| 4 | /rest/emp/create | POST | To create the Employee object and store it |
| 5 | /rest/emp/delete/{id} | PUT | To delete the Employee object from the data storage based on the id |
Avere una classe che definisce tutti questi URI come costanti di stringa.
package com.journaldev.spring.controller;

public class EmpRestURIConstants {

	public static final String DUMMY_EMP = "/rest/emp/dummy";
	public static final String GET_EMP = "/rest/emp/{id}";
	public static final String GET_ALL_EMP = "/rest/emps";
	public static final String CREATE_EMP = "/rest/emp/create";
	public static final String DELETE_EMP = "/rest/emp/delete/{id}";
}
Classe del controller del servizio Web REST di Primavera
La nostra classe EmployeeController pubblicherà tutti gli endpoint del servizio Web menzionati sopra. Diamo un’occhiata al codice della classe e poi impareremo in dettaglio ciascuno dei metodi.
package com.journaldev.spring.controller;

import java.util.ArrayList;
import java.util.Date;
import java.util.HashMap;
import java.util.List;
import java.util.Map;
import java.util.Set;

import org.slf4j.Logger;
import org.slf4j.LoggerFactory;
import org.springframework.stereotype.Controller;
import org.springframework.web.bind.annotation.PathVariable;
import org.springframework.web.bind.annotation.RequestBody;
import org.springframework.web.bind.annotation.RequestMapping;
import org.springframework.web.bind.annotation.RequestMethod;
import org.springframework.web.bind.annotation.ResponseBody;

import com.journaldev.spring.model.Employee;

/**
 * Handles requests for the Employee service.
 */
@Controller
public class EmployeeController {

	private static final Logger logger = LoggerFactory.getLogger(EmployeeController.class);

	//Mappa per memorizzare dipendenti, idealmente dovremmo usare un database
	Map empData = new HashMap();

	@RequestMapping(value = EmpRestURIConstants.DUMMY_EMP, method = RequestMethod.GET)
	public @ResponseBody Employee getDummyEmployee() {
		logger.info("Start getDummyEmployee");
		Employee emp = new Employee();
		emp.setId(9999);
		emp.setName("Dummy");
		emp.setCreatedDate(new Date());
		empData.put(9999, emp);
		return emp;
	}

	@RequestMapping(value = EmpRestURIConstants.GET_EMP, method = RequestMethod.GET)
	public @ResponseBody Employee getEmployee(@PathVariable("id") int empId) {
		logger.info("Start getEmployee. ID="+empId);

		return empData.get(empId);
	}

	@RequestMapping(value = EmpRestURIConstants.GET_ALL_EMP, method = RequestMethod.GET)
	public @ResponseBody List getAllEmployees() {
		logger.info("Start getAllEmployees.");
		List emps = new ArrayList();
		Set empIdKeys = empData.keySet();
		for(Integer i : empIdKeys){
			emps.add(empData.get(i));
		}
		return emps;
	}

	@RequestMapping(value = EmpRestURIConstants.CREATE_EMP, method = RequestMethod.POST)
	public @ResponseBody Employee createEmployee(@RequestBody Employee emp) {
		logger.info("Start createEmployee.");
		emp.setCreatedDate(new Date());
		empData.put(emp.getId(), emp);
		return emp;
	}

	@RequestMapping(value = EmpRestURIConstants.DELETE_EMP, method = RequestMethod.PUT)
	public @ResponseBody Employee deleteEmployee(@PathVariable("id") int empId) {
		logger.info("Start deleteEmployee.");
		Employee emp = empData.get(empId);
		empData.remove(empId);
		return emp;
	}

}
Per semplicità, sto memorizzando tutti i dati dell’impiegato nell’HashMap `empData`. L’annotazione `@RequestMapping` viene utilizzata per mappare l’URI della richiesta al metodo del gestore. Possiamo anche specificare il metodo HTTP che dovrebbe essere utilizzato dall’applicazione client per invocare il metodo REST. L’annotazione `@ResponseBody` viene utilizzata per mappare l’oggetto di risposta nel corpo della risposta. Una volta che l’oggetto di risposta viene restituito dal metodo del gestore, interviene `MappingJackson2HttpMessageConverter` e lo converte in una risposta JSON. L’annotazione `@PathVariable` è il modo semplice per estrarre i dati dall’URI REST e mapparli all’argomento del metodo. L’annotazione `@RequestBody` viene utilizzata per mappare i dati JSON del corpo della richiesta nell’oggetto Employee, anche questo viene fatto dalla mappatura di `MappingJackson2HttpMessageConverter`. Il resto del codice è semplice e autoesplicativo, la nostra applicazione è pronta per essere distribuita e testata. Esportala come file WAR e copiala nella directory dell’applicazione web del contenitore servlet. Se hai configurato il server in STS, puoi semplicemente eseguirlo sul server per distribuirlo. Sto utilizzando WizTools RestClient per invocare le chiamate REST, ma puoi anche utilizzare l’estensione Chrome Postman. Di seguito, gli screenshot mostrano le diverse invocazioni delle API REST esposte dalla nostra applicazione e il relativo output. `Health Check – Get Dummy Employee Rest Call` ` ` `Create Employee POST Rest Call`: Assicurati che l’header Content-Type della richiesta sia impostato su “application/json”, altrimenti otterrai l’HTTP Error Code 415. `
 ` `Get Employee Rest Call` `
 ` `Delete Employee Rest Call` `
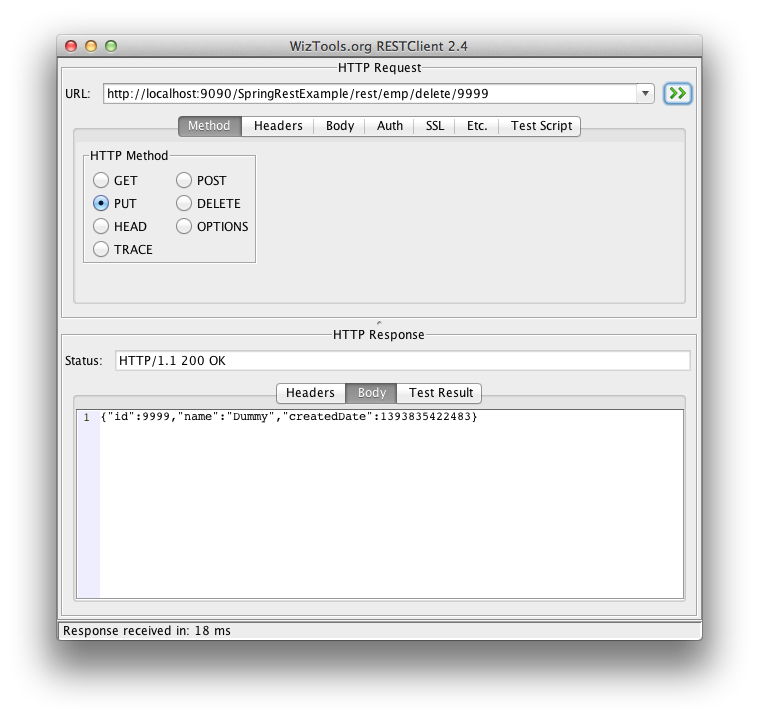 ` `Get All Employees Rest Call` `
 `
`
Programma client Rest di Primavera
I client REST sono utili per testare il nostro servizio web REST, ma nella maggior parte dei casi, abbiamo bisogno di invocare i servizi REST attraverso il nostro programma. Possiamo utilizzare Spring RestTemplate per invocare facilmente questi metodi. Di seguito è riportato un semplice programma che invoca i metodi REST della nostra applicazione utilizzando l’API RestTemplate.
package com.journaldev.spring;

import java.util.LinkedHashMap;
import java.util.List;

import org.springframework.web.client.RestTemplate;

import com.journaldev.spring.controller.EmpRestURIConstants;
import com.journaldev.spring.model.Employee;

public class TestSpringRestExample {

	public static final String SERVER_URI = "https://localhost:9090/SpringRestExample";

	public static void main(String args[]){

		testGetDummyEmployee();
		System.out.println("*****");
		testCreateEmployee();
		System.out.println("*****");
		testGetEmployee();
		System.out.println("*****");
		testGetAllEmployee();
	}

	private static void testGetAllEmployee() {
		RestTemplate restTemplate = new RestTemplate();
		// non possiamo ottenere List perché il convertitore JSON non conosce il tipo di
		// oggetto nella lista e quindi lo converte al tipo di oggetto JSON predefinito LinkedHashMap
		List emps = restTemplate.getForObject(SERVER_URI+EmpRestURIConstants.GET_ALL_EMP, List.class);
		System.out.println(emps.size());
		for(LinkedHashMap map : emps){
			System.out.println("ID="+map.get("id")+",Name="+map.get("name")+",CreatedDate="+map.get("createdDate"));;
		}
	}

	private static void testCreateEmployee() {
		RestTemplate restTemplate = new RestTemplate();
		Employee emp = new Employee();
		emp.setId(1);emp.setName("Pankaj Kumar");
		Employee response = restTemplate.postForObject(SERVER_URI+EmpRestURIConstants.CREATE_EMP, emp, Employee.class);
		printEmpData(response);
	}

	private static void testGetEmployee() {
		RestTemplate restTemplate = new RestTemplate();
		Employee emp = restTemplate.getForObject(SERVER_URI+"/rest/emp/1", Employee.class);
		printEmpData(emp);
	}

	private static void testGetDummyEmployee() {
		RestTemplate restTemplate = new RestTemplate();
		Employee emp = restTemplate.getForObject(SERVER_URI+EmpRestURIConstants.DUMMY_EMP, Employee.class);
		printEmpData(emp);
	}

	public static void printEmpData(Employee emp){
		System.out.println("ID="+emp.getId()+",Name="+emp.getName()+",CreatedDate="+emp.getCreatedDate());
	}
}
La maggior parte del programma è semplice da capire, tuttavia quando si invoca un metodo REST che restituisce una Collezione, dobbiamo utilizzare LinkedHashMap perché la conversione da JSON a oggetto non conosce l’oggetto Employee e lo converte alla collezione di LinkedHashMap. Possiamo scrivere un metodo di utilità per convertire da LinkedHashMap al nostro oggetto Java Bean. Quando eseguiamo il programma sopra, otteniamo l’output seguente nella console.
ID=9999,Name=Dummy,CreatedDate=Tue Mar 04 21:02:41 PST 2014
*****
ID=1,Name=Pankaj Kumar,CreatedDate=Tue Mar 04 21:02:41 PST 2014
*****
ID=1,Name=Pankaj Kumar,CreatedDate=Tue Mar 04 21:02:41 PST 2014
*****
2
ID=1,Name=Pankaj Kumar,CreatedDate=1393995761654
ID=9999,Name=Dummy,CreatedDate=1393995761381
Un altro punto è che i metodi put di RestTemplate non hanno l’opzione per impostare l’oggetto di risposta perché il metodo PUT dovrebbe essere utilizzato per memorizzare qualcosa sul server e un semplice codice di stato HTTP 200 dovrebbe essere sufficiente.
Scarica il progetto Spring Restful Webservice
Ecco tutto per il tutorial sull’applicazione web Spring Restful. Scarica il progetto di esempio dal link sopra e sperimenta con esso per imparare di più. AGGIORNAMENTO: A causa di numerose richieste di fornire un esempio simile con XML e di supportare sia XML che JSON, ho esteso questa applicazione in Esempio Spring REST XML JSON per supportare richieste e risposte sia in XML che in JSON. Ti suggerisco vivamente di dare un’occhiata per apprezzare la bellezza del framework Spring e quanto sia facile ottenere questo risultato.
Puoi scaricare l’intero progetto dal nostro Repository GitHub.