Benvenuti al tutorial sull’esempio di configurazione del DataSource JNDI di Spring per Tomcat. In precedenza abbiamo visto come implementare operazioni di database utilizzando l’integrazione di Spring JDBC. Tuttavia, nella maggior parte dei casi, le applicazioni enterprise vengono distribuite in un container servlet come Tomcat, JBoss, ecc.
Spring DataSource
Sappiamo che DataSource con JNDI è il modo preferito per ottenere il pooling delle connessioni e beneficiare delle implementazioni dei container. Oggi vedremo come configurare un’applicazione web di Spring per utilizzare le connessioni JNDI fornite da Tomcat. Per il mio esempio, utilizzerò il server di database MySQL e creerò una semplice tabella con alcune righe. Creeremo un servizio web Rest di Spring che restituirà la risposta JSON con l’elenco di tutti i dati nella tabella.
Configurazione del database
CREATE TABLE `Employee` (
  `id` int(11) unsigned NOT NULL,
  `name` varchar(20) DEFAULT NULL,
  `role` varchar(20) DEFAULT NULL,
  PRIMARY KEY (`id`)
) ENGINE=InnoDB DEFAULT CHARSET=utf8;

INSERT INTO `Employee` (`id`, `name`, `role`)
VALUES
	(1, 'Pankaj', 'CEO'),
	(2, 'David', 'Manager');
commit;
Progetto Spring DataSource MVC
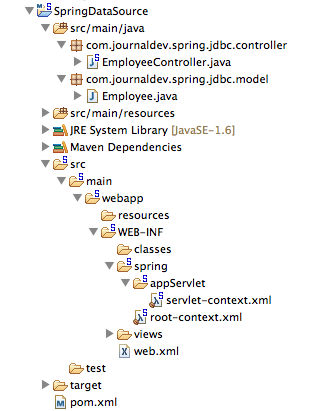
Crea un progetto Spring MVC in Spring Tool Suite in modo che il nostro codice scheletro dell’applicazione Spring sia pronto. Una volta completata l’implementazione, la struttura del nostro progetto avrà un aspetto simile all’immagine sottostante. 
Dipendenze Spring JDBC e Jackson
Dovremo aggiungere le dipendenze di Spring JDBC, Jackson e il driver del database MySQL nel file pom.xml. Il mio file pom.xml finale avrà un aspetto simile al seguente.
<?xml version="1.0" encoding="UTF-8"?>
<project xmlns="https://maven.apache.org/POM/4.0.0" xmlns:xsi="https://www.w3.org/2001/XMLSchema-instance"
	xsi:schemaLocation="https://maven.apache.org/POM/4.0.0 https://maven.apache.org/maven-v4_0_0.xsd">
	<modelVersion>4.0.0</modelVersion>
	<groupId>com.journaldev.spring</groupId>
	<artifactId>SpringDataSource</artifactId>
	<name>SpringDataSource</name>
	<packaging>war</packaging>
	<version>1.0.0-BUILD-SNAPSHOT</version>
	<properties>
		<java-version>1.6</java-version>
		<org.springframework-version>4.0.2.RELEASE</org.springframework-version>
		<org.aspectj-version>1.7.4</org.aspectj-version>
		<org.slf4j-version>1.7.5</org.slf4j-version>
		<jackson.databind-version>2.2.3</jackson.databind-version>
	</properties>
	<dependencies>
		<!-- Spring JDBC Support -->
		<dependency>
			<groupId>org.springframework</groupId>
			<artifactId>spring-jdbc</artifactId>
			<version>${org.springframework-version}</version>
		</dependency>

		<!-- MySQL Driver -->
		<dependency>
			<groupId>mysql</groupId>
			<artifactId>mysql-connector-java</artifactId>
			<version>5.0.5</version>
		</dependency>
		<!-- Jackson -->
		<dependency>
			<groupId>com.fasterxml.jackson.core</groupId>
			<artifactId>jackson-databind</artifactId>
			<version>${jackson.databind-version}</version>
		</dependency>
		<!-- Spring -->
		<dependency>
			<groupId>org.springframework</groupId>
			<artifactId>spring-context</artifactId>
			<version>${org.springframework-version}</version>
			<exclusions>
				<!-- Exclude Commons Logging in favor of SLF4j -->
				<exclusion>
					<groupId>commons-logging</groupId>
					<artifactId>commons-logging</artifactId>
				 </exclusion>
			</exclusions>
		</dependency>
		<dependency>
			<groupId>org.springframework</groupId>
			<artifactId>spring-webmvc</artifactId>
			<version>${org.springframework-version}</version>
		</dependency>

		<!-- AspectJ -->
		<dependency>
			<groupId>org.aspectj</groupId>
			<artifactId>aspectjrt</artifactId>
			<version>${org.aspectj-version}</version>
		</dependency>

		<!-- Logging -->
		<dependency>
			<groupId>org.slf4j</groupId>
			<artifactId>slf4j-api</artifactId>
			<version>${org.slf4j-version}</version>
		</dependency>
		<dependency>
			<groupId>org.slf4j</groupId>
			<artifactId>jcl-over-slf4j</artifactId>
			<version>${org.slf4j-version}</version>
			<scope>runtime</scope>
		</dependency>
		<dependency>
			<groupId>org.slf4j</groupId>
			<artifactId>slf4j-log4j12</artifactId>
			<version>${org.slf4j-version}</version>
			<scope>runtime</scope>
		</dependency>
		<dependency>
			<groupId>log4j</groupId>
			<artifactId>log4j</artifactId>
			<version>1.2.15</version>
			<exclusions>
				<exclusion>
					<groupId>javax.mail</groupId>
					<artifactId>mail</artifactId>
				</exclusion>
				<exclusion>
					<groupId>javax.jms</groupId>
					<artifactId>jms</artifactId>
				</exclusion>
				<exclusion>
					<groupId>com.sun.jdmk</groupId>
					<artifactId>jmxtools</artifactId>
				</exclusion>
				<exclusion>
					<groupId>com.sun.jmx</groupId>
					<artifactId>jmxri</artifactId>
				</exclusion>
			</exclusions>
			<scope>runtime</scope>
		</dependency>

		<!-- @Inject -->
		<dependency>
			<groupId>javax.inject</groupId>
			<artifactId>javax.inject</artifactId>
			<version>1</version>
		</dependency>

		<!-- Servlet -->
		<dependency>
			<groupId>javax.servlet</groupId>
			<artifactId>servlet-api</artifactId>
			<version>2.5</version>
			<scope>provided</scope>
		</dependency>
		<dependency>
			<groupId>javax.servlet.jsp</groupId>
			<artifactId>jsp-api</artifactId>
			<version>2.1</version>
			<scope>provided</scope>
		</dependency>
		<dependency>
			<groupId>javax.servlet</groupId>
			<artifactId>jstl</artifactId>
			<version>1.2</version>
		</dependency>

		<!-- Test -->
		<dependency>
			<groupId>junit</groupId>
			<artifactId>junit</artifactId>
			<version>4.7</version>
			<scope>test</scope>
		</dependency>
	</dependencies>
    <build>
        <plugins>
            <plugin>
                <artifactId>maven-eclipse-plugin</artifactId>
                <version>2.9</version>
                <configuration>
                    <additionalProjectnatures>
                        <projectnature>org.springframework.ide.eclipse.core.springnature</projectnature>
                    </additionalProjectnatures>
                    <additionalBuildcommands>
                        <buildcommand>org.springframework.ide.eclipse.core.springbuilder</buildcommand>
                    </additionalBuildcommands>
                    <downloadSources>true</downloadSources>
                    <downloadJavadocs>true</downloadJavadocs>
                </configuration>
            </plugin>
            <plugin>
                <groupId>org.apache.maven.plugins</groupId>
                <artifactId>maven-compiler-plugin</artifactId>
                <version>2.5.1</version>
                <configuration>
                    <source>1.6</source>
                    <target>1.6</target>
                    <compilerArgument>-Xlint:all</compilerArgument>
                    <showWarnings>true</showWarnings>
                    <showDeprecation>true</showDeprecation>
                </configuration>
            </plugin>
            <plugin>
                <groupId>org.codehaus.mojo</groupId>
                <artifactId>exec-maven-plugin</artifactId>
                <version>1.2.1</version>
                <configuration>
                    <mainClass>org.test.int1.Main</mainClass>
                </configuration>
            </plugin>
        </plugins>
    </build>
</project>
Se non sei familiare con Rest in Spring, leggi Esempio di servizio web Restful di Spring.
Classe di modello
Il nostro bean Employee, modellato sulla tabella Employee, ha un aspetto simile al seguente.
package com.journaldev.spring.jdbc.model;

import java.io.Serializable;

public class Employee implements Serializable{

	private static final long serialVersionUID = -7788619177798333712L;

	private int id;
	private String name;
	private String role;

	public int getId() {
		return id;
	}
	public void setId(int id) {
		this.id = id;
	}
	public String getName() {
		return name;
	}
	public void setName(String name) {
		this.name = name;
	}

	public String getRole() {
		return role;
	}
	public void setRole(String role) {
		this.role = role;
	}


}
Classe Spring Controller
La nostra semplice classe controller è così:
package com.journaldev.spring.jdbc.controller;

import java.util.ArrayList;
import java.util.List;
import java.util.Map;

import javax.sql.DataSource;

import org.slf4j.Logger;
import org.slf4j.LoggerFactory;
import org.springframework.beans.factory.annotation.Autowired;
import org.springframework.beans.factory.annotation.Qualifier;
import org.springframework.jdbc.core.JdbcTemplate;
import org.springframework.stereotype.Controller;
import org.springframework.web.bind.annotation.RequestMapping;
import org.springframework.web.bind.annotation.RequestMethod;
import org.springframework.web.bind.annotation.ResponseBody;

import com.journaldev.spring.jdbc.model.Employee;

/**
 * Handles requests for the Employee JDBC Service.
 */
@Controller
public class EmployeeController {

	private static final Logger logger = LoggerFactory.getLogger(EmployeeController.class);

	@Autowired
	@Qualifier("dbDataSource")
	private DataSource dataSource;

	public void setDataSource(DataSource dataSource) {
		this.dataSource = dataSource;
	}

	@RequestMapping(value = "/rest/emps", method = RequestMethod.GET)
	public @ResponseBody List getAllEmployees() {
		logger.info("Start getAllEmployees.");
		List empList = new ArrayList();
		//Codice JDBC - Inizio
		String query = "select id, name, role from Employee";
		JdbcTemplate jdbcTemplate = new JdbcTemplate(dataSource);

		List> empRows = jdbcTemplate.queryForList(query);

		for(Map empRow : empRows){
			Employee emp = new Employee();
			emp.setId(Integer.parseInt(String.valueOf(empRow.get("id"))));
			emp.setName(String.valueOf(empRow.get("name")));
			emp.setRole(String.valueOf(empRow.get("role")));
			empList.add(emp);
		}

		return empList;
	}

}
Punti importanti sulla classe Controller sono:
- Il DataSource verrà cablato tramite la configurazione del Spring Bean con il nome dbDataSource.
- Stiamo utilizzando JdbcTemplate per evitare errori comuni come la perdita di risorse e rimuovere il codice boiler plate JDBC.
- L’URI per recuperare l’elenco dei dipendenti sarà https://{host}:{port}/SpringDataSource/rest/emps
- Stiamo utilizzando @ResponseBody per inviare l’elenco degli oggetti Employee come risposta, Spring si occuperà di convertirlo in JSON.
Configurazione Spring Bean
Ci sono due modi per effettuare la ricerca JNDI e cablarlo al DataSource del Controller, il mio file di configurazione dei bean di Spring contiene entrambi ma uno di loro è commentato. È possibile passare tra questi e la risposta sarà la stessa.
- Utilizzando il tag namespace jee per eseguire la ricerca JNDI e configurarlo come Spring Bean. Dobbiamo anche includere il namespace jee e la definizione dello schema in questo caso.
- Creazione di un bean di tipo
org.springframework.jndi.JndiObjectFactoryBeanpassando il nome del contesto JNDI. jndiName è un parametro obbligatorio per questa configurazione.
Il mio file di configurazione del bean spring sembra così:
<?xml version="1.0" encoding="UTF-8"?>
<beans:beans xmlns="https://www.springframework.org/schema/mvc"
	xmlns:jee="https://www.springframework.org/schema/jee"
	xmlns:xsi="https://www.w3.org/2001/XMLSchema-instance" xmlns:beans="https://www.springframework.org/schema/beans"
	xmlns:context="https://www.springframework.org/schema/context"
	xsi:schemaLocation="https://www.springframework.org/schema/jee https://www.springframework.org/schema/jee/spring-jee.xsd
		https://www.springframework.org/schema/mvc https://www.springframework.org/schema/mvc/spring-mvc.xsd
		https://www.springframework.org/schema/beans https://www.springframework.org/schema/beans/spring-beans.xsd
		https://www.springframework.org/schema/context https://www.springframework.org/schema/context/spring-context.xsd">

	<!-- DispatcherServlet Context: defines this servlet's request-processing
		infrastructure -->

	<!-- Enables the Spring MVC @Controller programming model -->
	<annotation-driven />

	<!-- Handles HTTP GET requests for /resources/** by efficiently serving
		up static resources in the ${webappRoot}/resources directory -->
	<resources mapping="/resources/**" location="/resources/" />

	<!-- Resolves views selected for rendering by @Controllers to .jsp resources
		in the /WEB-INF/views directory -->
	<beans:bean
		class="org.springframework.web.servlet.view.InternalResourceViewResolver">
		<beans:property name="prefix" value="/WEB-INF/views/" />
		<beans:property name="suffix" value=".jsp" />
	</beans:bean>

	<!-- Configure to plugin JSON as request and response in method handler -->
	<beans:bean
		class="org.springframework.web.servlet.mvc.method.annotation.RequestMappingHandlerAdapter">
		<beans:property name="messageConverters">
			<beans:list>
				<beans:ref bean="jsonMessageConverter" />
			</beans:list>
		</beans:property>
	</beans:bean>

	<!-- Configure bean to convert JSON to POJO and vice versa -->
	<beans:bean id="jsonMessageConverter"
		class="org.springframework.http.converter.json.MappingJackson2HttpMessageConverter">
	</beans:bean>

	<!-- Create DataSource Bean -->

	<beans:bean id="dbDataSource" class="org.springframework.jndi.JndiObjectFactoryBean">
    	<beans:property name="jndiName" value="java:comp/env/jdbc/MyLocalDB"/>
	</beans:bean>

	 <!-- using JEE namespace for lookup -->
	 <!--
	 <jee:jndi-lookup id="dbDataSource" jndi-name="jdbc/MyLocalDB"
   			expected-type="javax.sql.DataSource" />
	  -->

	<context:component-scan base-package="com.journaldev.spring.jdbc.controller" />

</beans:beans>
Configurazione JNDI del datasource di Tomcat
Ora che abbiamo terminato il nostro progetto, l’ultima parte consiste nella configurazione JNDI nel container Tomcat per creare la risorsa JNDI.
<Resource name="jdbc/TestDB"
      global="jdbc/TestDB"
      auth="Container"
      type="javax.sql.DataSource"
      driverClassName="com.mysql.jdbc.Driver"
      url="jdbc:mysql://localhost:3306/TestDB"
      username="pankaj"
      password="pankaj123"

      maxActive="100"
      maxIdle="20"
      minIdle="5"
      maxWait="10000"/>
Aggiungi la configurazione sopra nella sezione GlobalNamingResources del file server.xml.
<ResourceLink name="jdbc/MyLocalDB"
                	global="jdbc/TestDB"
                    auth="Container"
                    type="javax.sql.DataSource" />
Dobbiamo anche creare il Resource Link per utilizzare la configurazione JNDI nella nostra applicazione, il modo migliore per aggiungerlo è nel file context.xml del server. Nota che il nome del ResourceLink deve corrispondere al nome del contesto JNDI che stiamo utilizzando nella nostra applicazione. Assicurati anche che il jar di MySQL sia presente nella directory lib di Tomcat, altrimenti Tomcat non sarà in grado di creare il pool di connessioni al database MySQL.
Esecuzione del progetto di esempio Spring DataSource JNDI
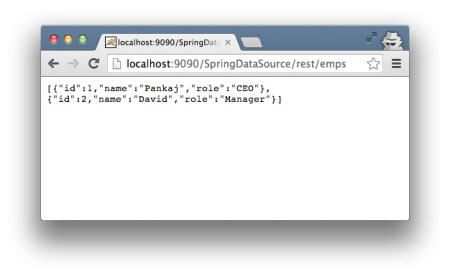
Il nostro progetto e la configurazione del server sono completati e siamo pronti per testarli. Esporta il progetto come file WAR e posizionalo nella directory di distribuzione di Tomcat. La risposta JSON per la chiamata REST è mostrata nell’immagine sottostante.  Questo è tutto per l’integrazione di Spring con il contesto JNDI del servlet container, scarica il progetto di esempio dal link sottostante e sperimenta per imparare di più.
Source:
https://www.digitalocean.com/community/tutorials/spring-datasource-jndi-with-tomcat-example


