


DNS servers comes in several types such as master, slave, forwarding and cache, to name a few examples, with cache-only DNS being the one that is easier to setup. Since DNS uses the UDP protocol, it improves the query time because it does not require an acknowledgement.

The cache-only DNS server is also known as resolver, which will query DNS records and fetch all the DNS details from other servers, and keep each query request in its cache for later use so that when we perform the same request in the future, it will serve from its cache, thus reducing the response time even more.
If you’re looking to setup DNS Caching-Only Server in CentOS/RHEL 6, follow this guide here:
Setting Up Caching-Only DNS Name Server in CentOS/RHEL 6
My Testing Environment
DNS server		:	dns.tecmintlocal.com (Red Hat Enterprise Linux 7.1)
Server IP Address	:	192.168.0.18
Client			:	node1.tecmintlocal.com (CentOS 7.1)
Client IP Address	:	192.168.0.29
Step 1: Installing Cache-Only DNS Server in RHEL/CentOS 7
1. The Cache-Only DNS server, can be installed via the bind package. If you don’t remember the package name, you can do a quick search for the package name using the command below.
# yum search bind

2. In the above result, you will see several packages. From those, we need to choose and install only bind and bind-utils packages using following yum command.
# yum install bind bind-utils -y

Step 2: Configure Cache-Only DNS in RHEL/CentOS 7
3. Once DNS packages are installed we can go ahead and configure DNS. Open and edit /etc/named.conf using your preferred text editor. Make the changes suggested below (or you can use your settings as per your requirements).
listen-on port 53 { 127.0.0.1; any; };
allow-query     { localhost; any; };
allow-query-cache       { localhost; any; };
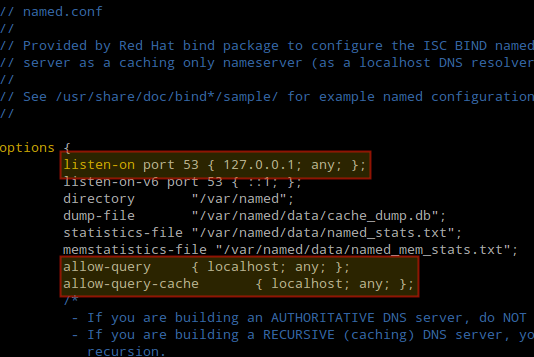
These directives instruct the DNS server to listen on UDP port 53, and to allow queries and caches responses from localhost and any other machine that reaches the server.
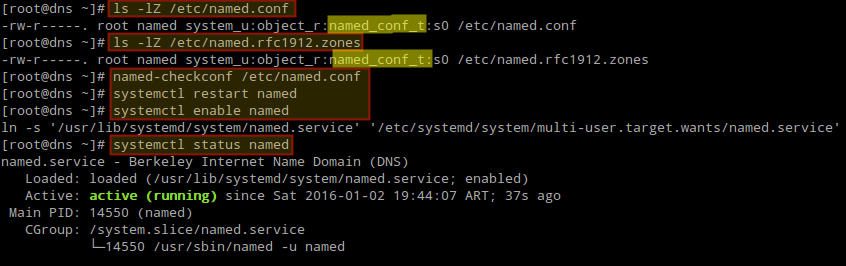
4. It is important to note that the ownership of this file must be set to root:named and also if SELinux is enabled, after editing the configuration file we need to make sure that its context is set to named_conf_t as shown in Fig. 4 (same thing for the auxiliary file /etc/named.rfc1912.zones):
# ls -lZ /etc/named.conf
# ls -lZ /etc/named.rfc1912.zones
Otherwise, configure the SELinux context before proceeding:
# semanage fcontext -a -t named_conf_t /etc/named.conf
# semanage fcontext -a -t named_conf_t /etc/named.rfc1912.zones
5. Additionally, we need to test the DNS configuration now for some syntax error before starting the bind service:
# named-checkconf /etc/named.conf
6. After the syntax verification results seems perfect, restart the named service to take new changes into effect and also make the service to auto start across system boots, and then check its status:
# systemctl restart named
# systemctl enable named
# systemctl status named
7. Next, open the port 53 on the firewall.
# firewall-cmd --add-port=53/udp
# firewall-cmd --add-port=53/udp --permanent

Step 3: Chroot Cache-Only DNS Server in RHEL and CentOS 7
8. If you wish to deploy the Cache-only DNS server within chroot environment, you need to have the package chroot installed on the system and no further configuration is needed as it by default hard-link to chroot.
# yum install bind-chroot -y
Once chroot package has been installed, you can restart named to take the new changes into effect:
# systemctl restart named
9. Next, create a symbolic link (also named /etc/named.conf) inside /var/named/chroot/etc/:
# ln -s /etc/named.conf /var/named/chroot/etc/named.conf
Step 4: Configure DNS on Client Machine
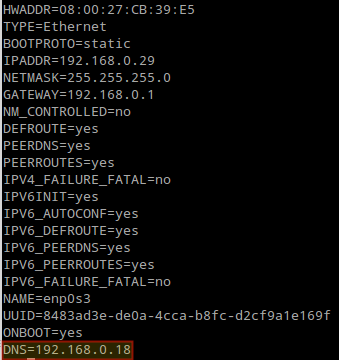
10. Add the DNS Cache servers IP 192.168.0.18 as resolver to the client machine. Edit /etc/sysconfig/network-scripts/ifcfg-enp0s3 as shown in the following figure:
DNS=192.168.0.18
And /etc/resolv.conf as follows:
nameserver 192.168.0.18
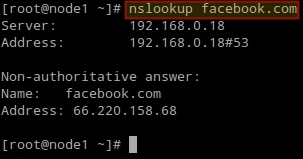
11. Finally it’s time to check our cache server. To do this, you can use dig utility or nslookup command.
Choose any website and query it twice (we will use facebook.com as an example). Note that with dig the second time the query is completed much faster because it is being served from the cache.
# dig facebook.com

You can also use nslookup to verify that the DNS server is working as expected.
# nslookup facebook.com
Summary
In this article we have explained how to set up a DNS Cache-only server in Red Hat Enterprise Linux 7 and CentOS 7, and tested it in a client machine. Feel free to let us know if you have any questions or suggestions using the form below.
Source:
https://www.tecmint.com/install-configure-cache-only-dns-server-in-rhel-centos-7/