


Troubleshooting is a common task for system administrators working with networks. Professional network equipment usually has features for monitoring and troubleshooting, such as port mirroring. Port mirroring can be also useful for analyzing network traffic in virtual environments, including virtual networks on Microsoft Hyper-V hosts and network communications between VMs. This blog post explains how to configure Microsoft Hyper-V port mirroring for analyzing network communications in a virtual environment.
Port Mirroring Key Concepts
Before explaining how to configure port mirroring, let’s explore the key concepts, the working principle, and existing Hyper-V configuration features.
What is port mirroring?
Port mirroring is the functionality that allows you to duplicate the network traffic of a source host’s network port to a network port (adapter) of a secondary host for further analysis of this traffic. A host can be a physical machine, virtual machine, network equipment with a network interface, etc. A source host is the host whose network traffic is monitored in this context. The source port is also called a mirrored port and the destination port is also called an observed port. Port mirroring is also referred to as Switched Port Analyzer (SPAN).
Types and benefits
Port mirroring can be local and remote, depending on the connection mode between ports. For local port mirroring, the source and destination network ports are connected to the same switch. Remote port mirroring is used when the source and destination ports are connected to different switches. VLAN tagging and GRE encapsulation can be used for remote port mirroring to transfer the network traffic to the monitored port and device.
The benefit of port mirroring is the ability to analyze and debug network communications without affecting the processing of working network devices. Administrators can analyze traffic to identify possible attacks over the network, detect the attack source and improve network security. There is no need to capture network traffic directly in a guest operating system of a working machine (that can be a production VM, for instance) when using port mirroring.
Note that port mirroring consumes additional network bandwidth to transfer mirrored traffic, and you may need to enable this feature on demand when you need to perform network analysis.
Port mirroring vs. port forwarding
Port mirroring differs from port forwarding because the network traffic, such as TCP packets or UDP datagrams, cannot be redirected in port mirroring. The traffic can be mirrored (duplicated), but the source and destination for the original traffic direction are not changed. A copy of the original traffic is sent to the destination location for analysis.
In port forwarding, the traffic (such as TCP packets or UDP datagrams) destination can be altered, and specific packets (or other protocol data units) can reach another IP address and port in IP networks. Port forwarding is used with network address translation (NAT) for communication between networks. No copy of the original traffic is created.
Port mirroring in Hyper-V
You can use the port mirroring functionality in Hyper-V to analyze traffic in the virtual networks to which VMs are connected via virtual switches. You need to define a destination VM and install traffic-capturing software such as Wireshark for traffic analysis. You can use other available intrusion detection systems (IDS) for this purpose.
The Hyper-V port mirroring feature is similar to hardware port mirroring but is implemented at the Hyper-V virtual switch level. Switch extension capabilities and port ACLs (access lists) are used on a Hyper-V virtual switch to set rules for forwarding and traffic sniffing.
Port mirroring works only within the boundaries of a single Hyper-V host. If virtual machines are located on different Hyper-V hosts (for example, in a failover cluster, after VM migration from one host to another), then Hyper-V port mirroring cannot be used. In this case, you need to configure an additional destination VM for network analysis on the second Hyper-V host to which the source VM was migrated.
Preparing for Port Mirroring Configuration
You should familiarize yourself with the requirements to configure Hyper-V port mirroring.
Prerequisites and setup conditions
Below are the requirements to configure port mirroring in a Hyper-V environment:
- Windows Server 2012 R2 (or newer) with Hyper-V and administrative access. Windows 10 or higher can be used as a client OS.
- A virtual switch on a Hyper-V host.
- At least two virtual machines to mirror (duplicate) traffic from the source VM to the destination VM.
Hardware and software checklist
Installing a traffic sniffer (traffic analyzer) or intrusion detection system on the destination VM is required. Examples of such tools are Wireshark, Microsoft Network Monitor, Ettercap, and SmartSniff.
Configuration Steps
We have two Windows VMs on a Hyper-V host:
- Wind0ws-VM – the source VM (192.168.101.215)
- Win-VM-Dest – the destination VM (192.168.101.212)
A Hyper-V host is configured on Windows Server 2019. Configuration for other supported Windows versions is identical.
Configuring a virtual switch
You can use an existing virtual switch or create a new virtual switch. If there is no virtual switch on the Hyper-V host, create a new virtual switch. To create a virtual switch, do the following:
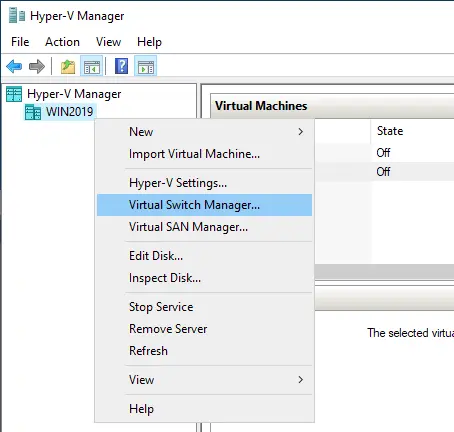
- Open Hyper-V Manager, right-click the Hyper-V host, and hit Virtual Switch Manager in the context menu.
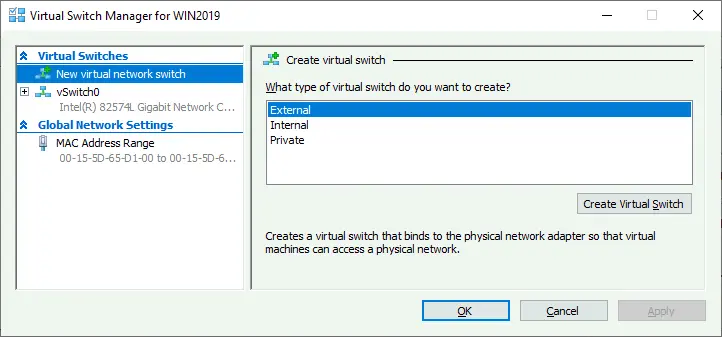
- Select a virtual switch type and hit Create Virtual Switch. For this purpose, we use vSwitch0, an external switch (bridged network). Hit OK to save settings and close the window.
Configuring the source VM
Once a virtual switch is ready, you can configure the source VM whose traffic you want to monitor.
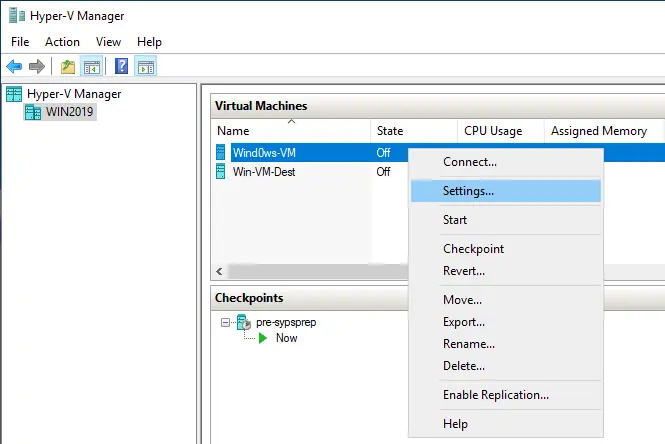
- To open the source VM settings in Hyper-V Manager, right-click the VM name and hit Settings in the context menu.
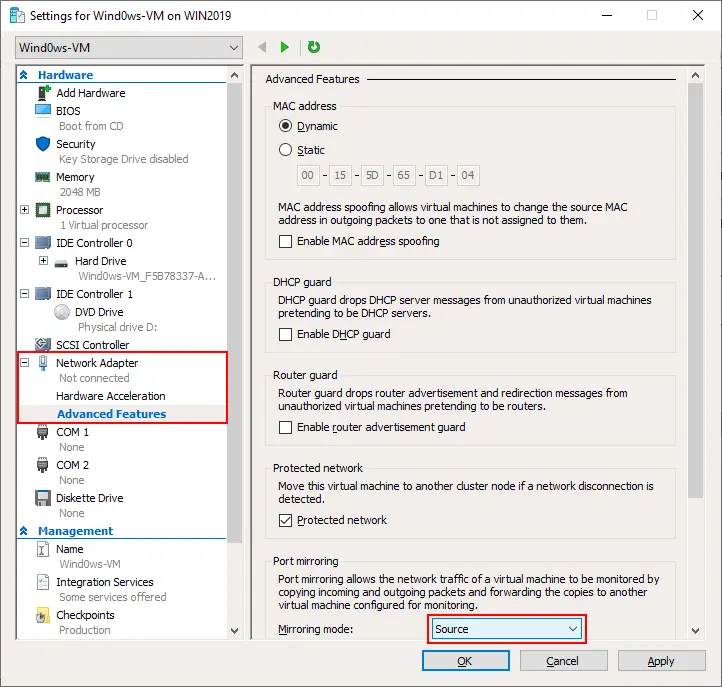
- In the VM settings window, navigate to Network Adapter > Advanced features.
- In the Port Mirroring section, select Source as the mirroring mode in the drop-down menu. This action enables Hyper-V port mirroring for the port of the connected virtual switch to which the current port of the VM is connected. Hit OK to save settings.
- Remember the virtual switch name to which the virtual network adapter of the source VM is connected. The advantage is that you can configure more than one source VM for analyzing the traffic of all VMs on the destination VM.
The next stage is configuring the destination virtual machine to which the network traffic will be mirrored (duplicated).
Configuring the destination VM
The recommended practice is to create an additional network adapter on the destination VM and disable all network services for this network adapter for more precise analysis. This approach allows you to get the full dump of the network traffic after disabling unneeded network services and protocols.
- Shut down the destination VM if the VM is running.
- To open the VM settings of the destination VM, right-click the VM name in Hyper-V Manager and hit Settings.
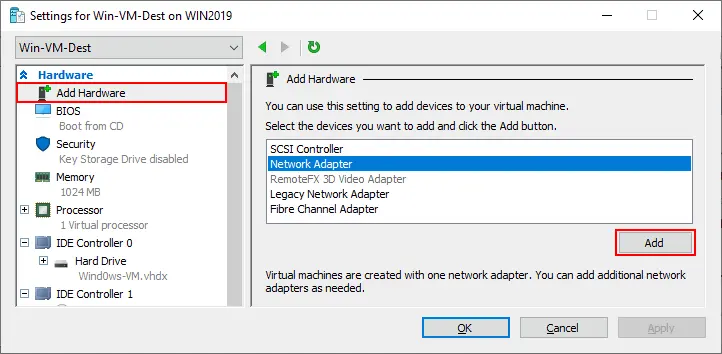
- Click Add hardware in the left pane of the VM settings window, select Network adapter, and hit Add.
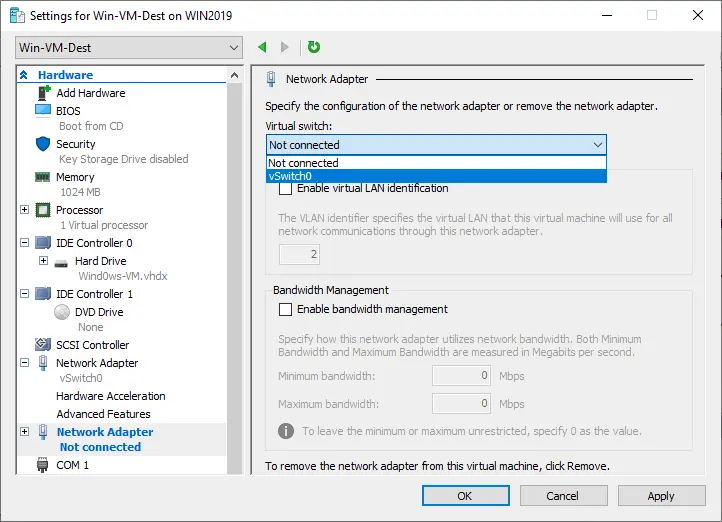
- Select the virtual switch to which the second virtual network adapter will be connected. This must be the same virtual switch as the one to which the first (source) VM is connected. In our case, this is vSwitch0. Hit OK to save settings and close the window.
- Open the VM settings of the destination VM once again.
- Select the second virtual network adapter created for port mirroring and traffic diagnostics (in the list of VM hardware in the left pane) and go to Network adapter > Advanced features.
- In the Port mirroring section, select Destination as the mirroring mode to receive the mirrored network traffic. Hit OK.

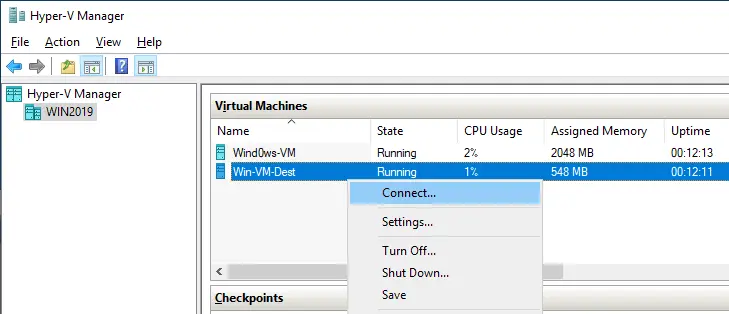
- Power on the VMs.
- Connect to the destination VM that has been created for receiving and analyzing traffic (with Hyper-V VMConnect or RDP).
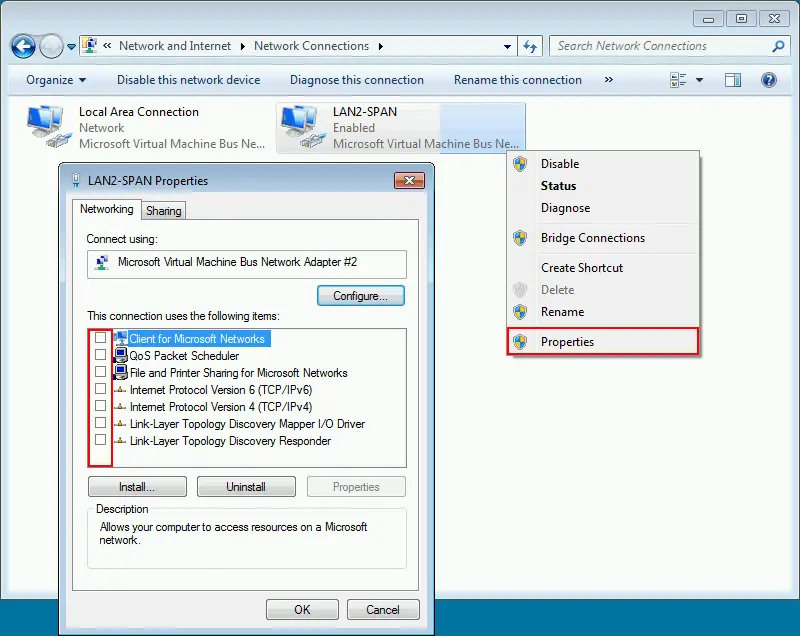
- Open Network and sharing center in the destination Windows VM. Click Change adapter settings.
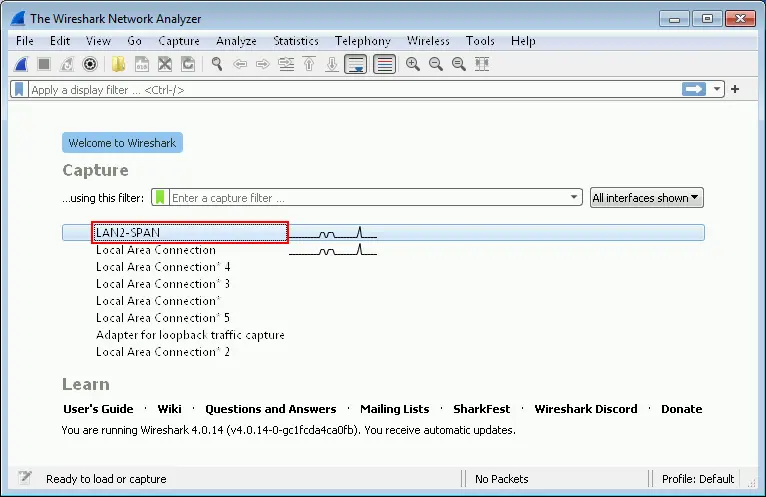
- Select the second network adapter created for traffic analysis (you can rename this adapter to LAN2-SPAN for more convenience).
- Right-click the network adapter and hit Properties.
Now, you can install and configure software for network traffic analysis, such as WireShark, on the destination VM.
Installing a traffic analyzer
- Download and install Wireshark on the destination VM. The installation process is straightforward in the GUI wizard – you can use the default settings.
- Run Wireshark on the destination VM.
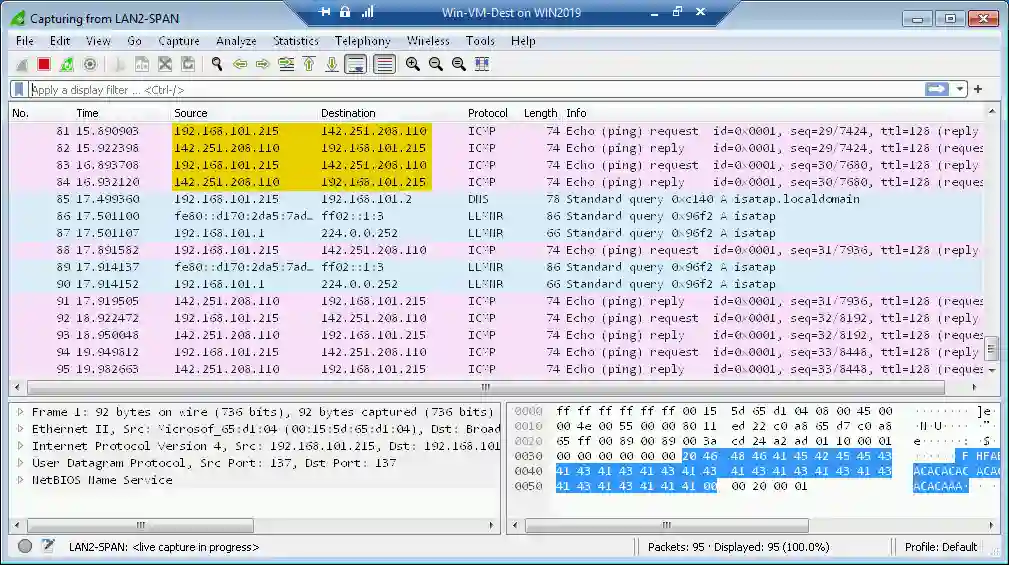
- Double-click the network adapter created especially for port mirroring and network traffic analyzing (LAN2-SPAN) in the Wireshark window.
- Now, you can see the network activity of the source VM (the IP address of the source VM is 192.168.101.215). Let’s ping google.com on the source VM.
- We can see the ICMP requests and replies to/from 142.251.208.110 which is the IP address of the google.com host at this moment.
- For more convenience, you can enable a filter, for example, select ICMP.
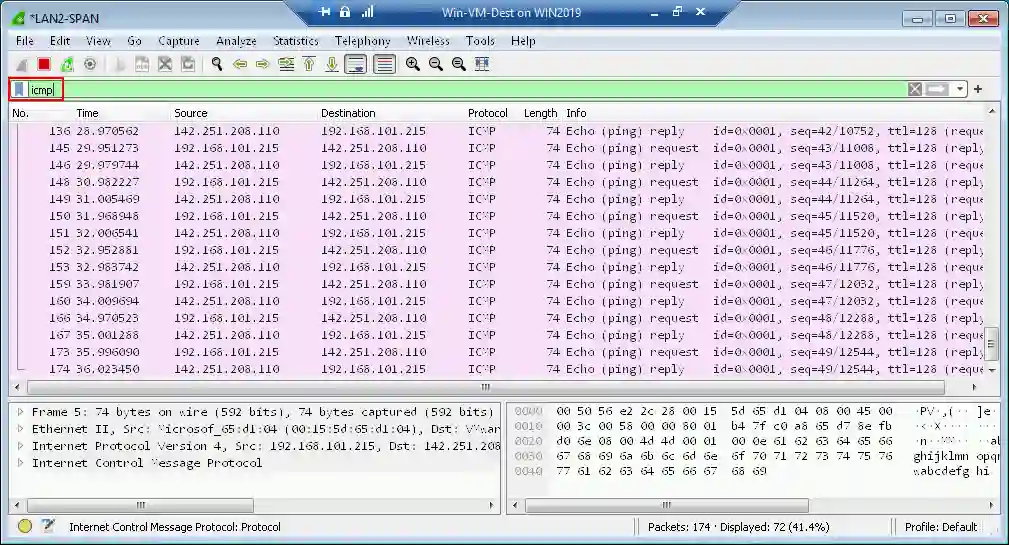
This is a basic example. You can monitor and analyze other network activities using other protocols.
PowerShell
The Windows Server operating system also allows you to configure and manage Hyper-V port mirroring in PowerShell.
To enable port mirroring on the source and destination VM, run the commands accordingly:
Set-VMNetworkAdapter -VMName Wind0ws-VM -PortMirroring Source
Set-VMNetworkAdapter -VMName Win-VM-Dest -PortMirroring Destination
To disable port mirroring for a VM:
Set-VMNetworkAdapter -VMName Wind0ws-VM -PortMirroring None
To check the port mirroring settings for VMs:
(Get-VMNetworkAdapter -VMName Wind0ws-VM).PortMirroringMode
(Get-VMNetworkAdapter -VMName Win-VM-Dest).PortMirroringMode
You can use the following commands to display help information:
Get-Help Set-VMNetworkAdapter
Get-Help Set-VMNetworkAdapter -full
Get-Help Set-VMNetworkAdapter -detailed
Get-Help Set-VMNetworkAdapter -examples
The following commands can be useful to configure port mirroring:
Add-VMNetworkAdapter – add a new virtual network adapter for a VM
Get-NetAdapter – display a list of network adapters for a VM
Rename-Netadapter – change the name for a virtual network adapter of a VM
Conclusion
Configuring Hyper-V port mirroring can be done conveniently in the graphical user interface of Hyper-V Manager or in PowerShell. Follow the requirements and remember the limitations, such as the location of the source of destination VMs on a single Hyper-V host. You may need to configure additional destination VMs with a traffic analysis tool on Hyper-V hosts in a failover cluster. Wireshark is a convenient and popular tool for analyzing traffic, but you can use other tools if needed.