


Introduction
In this tutorial, you will learn how to deploy TrilioVault for Kubernetes (or TVK) to your DOKS cluster, create backups, and recover from a backup if something goes wrong. You can back up your entire cluster, or optionally choose a namespace or label-based backups.
Advantages of using Trilio:
- Take full (or incremental) backups of your cluster and restore in case of data loss.
- Migrate from one cluster to another.
- Helm release backups are supported.
- Run pre and post-hooks for backup and restore operations.
- Web management console that allows you to inspect your backup/restore operations state in detail.
- Define retention policies for your backups.
- Application lifecycle (meaning, TVK itself) can be managed via a dedicated TrilioVault Operator`.
- Velero integration.
- You can backup and restore operator-based applications.
For more information, please refer to the TVK CRDs official documentation.
Table of Contents
- Prerequisites
- Step 1 – Installing TrilioVault for Kubernetes
- Step 2 – Creating a TrilioVault Target to Store Backups
- Step 3 – Getting to Know the TVK Web Management Console
- Step 4 – Namespaced Backup and Restore Example
- Step 5 – Backup and Restore Whole Cluster Example
- Step 6 – Scheduled Backups
- Step 7 – Backups Retention Policy
- Conclusion
Prerequisites
To complete this tutorial, you need the following:
- A DO Spaces Bucket and access keys. Save the access and secret keys in a safe place for later use.
- A Git client to clone the Starter Kit repository.
- Helm, for managing TrilioVault Operator releases and upgrades.
- Doctl for DigitalOcean API interaction.
- Kubectl for Kubernetes interaction.
For TrilioVault to work correctly and to back up your PVCs, DOKS needs to be configured to support the Container Storage Interface (or CSI for short). By default, it comes with the driver already installed and configured. You can check using the following command:
The output should look similar to the following snippet. Notice the provisioner is dobs.csi.digitalocean.com.
NAME                         PROVISIONER                 RECLAIMPOLICY   VOLUMEBINDINGMODE   ALLOWVOLUMEEXPANSION   AGE
do-block-storage (default)   dobs.csi.digitalocean.com   Delete          Immediate           true                   10d
The TrilioVault installation also needs volumeSnapshot Custom Resource Definition (CRD) for a successful installation. You can check using the following command:
The output should look similar to the following snippet. If VolumeSnapshot CRD is not installed, refer to Installing VolumeSnapshot CRDs.
volumesnapshotclasses.snapshot.storage.k8s.io         2022-02-01T06:01:14Z
volumesnapshotcontents.snapshot.storage.k8s.io        2022-02-01T06:01:14Z
volumesnapshots.snapshot.storage.k8s.io               2022-02-01T06:01:15Z
Also, make sure that the CRD supports both v1beta1 and v1 API versions. You can run the following command to check the API version:
At the end of the CRD YAML, you should see a storedVersions list, containing both v1beta1 and v1 values (if not installed, refer to Installing VolumeSnapshot CRDs):
...
- lastTransitionTime: "2022-01-20T07:58:06Z"
    message: approved in https://github.com/kubernetes-csi/external-snapshotter/pull/419
    reason: ApprovedAnnotation
    status: "True"
    type: KubernetesAPIApprovalPolicyConformant
  storedVersions:
  - v1beta1
  - v1
Step 1 – Installing TrilioVault for Kubernetes
In this step, you will learn how to deploy TrilioVault for DOKS and manage TVK installations via Helm. Backup data will be stored in the DO Spaces bucket created earlier in the Prerequisites section.
TrilioVault application can be installed in many ways:
- Via the TrilioVault Operator. You define a
TrilioVaultManagerCRD which tellsTrilioVaultoperator how to handle the installation, post-configuration steps, and future upgrades of the Trilio application components. - Via the triliovault-operator chart that’s fully managed by Helm,(covered in this tutorial).
Installing TrilioVault using Helm
The Starter Kit tutorial uses the Cluster installation type for the TVK application (applicationScope Helm value is set to “Cluster”). All examples from this tutorial rely on this type of installation to function properly.
First, clone the Starter Kit Git repository and change the directory to your local copy:
Next, add the TrilioVault Helm repository, and list the available charts:
The output looks similar to the following:
NAME                                            CHART VERSION   APP VERSION     DESCRIPTION
triliovault-operator/k8s-triliovault-operator   2.9.2           2.9.2           K8s-TrilioVault-Operator is an operator designe...
The chart of interest is triliovault-operator/k8s-triliovault-operator, which will install TrilioVault for Kubernetes on the cluster along with the TrilioVault-Manager. You can run helm show values triliovault-operator/k8s-triliovault-operator and export to a file to see all the available options.
Then, open and inspect the TrilioVault Helm values file provided in the Starter kit repository using an editor of your choice (preferably with YAML lint support).
Finally, install TrilioVault for Kubernetes using Helm:
The above command installs both TrilioVault Operator and TriloVault Manager (TVM) Custom Resource using the parameters provided in the triliovault-values.yaml. The TVK version is now managed by the tag field in the 05-setup-backup-restore/assets/manifests/triliovault-values.yaml file, so the helm command always have the latest version of TVK.
You can update the following fields in values.yaml:
installTVK.applicationScopefor TVK installation scoped e.g.ClusterorNamespacedinstallTVK.ingressConfig.hostfor TVK UI hostname e.g.tvk-doks.cominstallTVK.ComponentConfiguration.ingressController.service.typefor service type to access the TVK UI e.g.NodePortorLoadBalancer
Now, check your TVK deployment:
The output looks similar to the following snippet (STATUS column should display deployed):
NAME                    NAMESPACE       REVISION        UPDATED                                 STATUS          CHART                           APP VERSION
triliovault-manager-tvk tvk             1               2022-06-08 08:30:08.490304959 +0000 UTC deployed        k8s-triliovault-2.9.2           2.9.2
triliovault-operator    tvk             1               2022-06-08 11:32:55.755395 +0300 EEST   deployed        k8s-triliovault-operator-2.9.2  2.9.2
Next, verify that TrilioVault is up and running:
The output looks similar to the following snippet. All deployment pods must be in the Ready state.
NAME                                            READY   UP-TO-DATE   AVAILABLE   AGE
k8s-triliovault-admission-webhook               1/1     1            1           83s
k8s-triliovault-control-plane                   1/1     1            1           83s
k8s-triliovault-exporter                        1/1     1            1           83s
k8s-triliovault-ingress-nginx-controller        1/1     1            1           83s
k8s-triliovault-web                             1/1     1            1           83s
k8s-triliovault-web-backend                     1/1     1            1           83s
triliovault-operator-k8s-triliovault-operator   1/1     1            1           4m22s
If the output looks like this, you installed TVK successfully. Next, you will learn how to check license type and validity, as well as how to renew it.
TrilioVault Application Licensing
By default, when installing TVK via Helm, there is no Free Trial license installed automatically. You can always go to the Trilio website and generate a new license for your cluster that suits your needs (for example, you can pick the basic license type that lets you run TrilioVault indefinitely if your cluster capacity doesn’t exceed 10 nodes). A free trial license lets you run TVK for one month on unlimited cluster nodes.
- TrilioVault is free of charge for Kubernetes clusters with up to 100000 nodes for DigitalOcean users. They can follow the following steps to create a special license available for DO customers only.
- Starter Kit examples rely on a Cluster license type to function properly.
Creating and Checking TVK Application Licensing
Run the following command to create a new license for your cluster (it is managed via the License CRD):
The above command will create a job job.batch/tvk-license-digitalocean which will run a pod tvk-license-digitalocean-828rx to pull the license from Trilio License Server and install it on the DOKS cluster. After the job is complete, it will be deleted in 60 seconds.
If you are downloading a free license from Trilio’s website, apply it using this command:
Please run the following command to see if license is installed and in Active state on your cluster.
The output looks similar to the following. Notice the STATUS which should be Active, as well as the license type in the EDITION column and EXPIRATION TIME.
NAME             STATUS   MESSAGE                                   CURRENT NODE COUNT   GRACE PERIOD END TIME   EDITION     CAPACITY   EXPIRATION TIME        MAX NODES
test-license-1   Active   Cluster License Activated successfully.   1                                            FreeTrial   100000     2023-02-25T00:00:00Z   1
The license is managed via a special CRD called License object. You can inspect it by running the following command:
The output looks similar to the following. Notice the Message and Capacity fields, as well as the Edition.
The above output will also tell you when the license is going to expire in the Expiration Timestamp field, and the Scope (Cluster based in this case). You can opt for a cluster-wide license type or a namespace-based license.
Renewing TVK Application License
To renew the license, you will have to request a new one from the Trilio website by navigating to the licensing page to replace the old one. After completing the form, you should receive the License YAML manifest, which can be applied to your cluster using kubectl. The following commands assume that TVK is installed in the default tvk namespace (please replace the <> placeholders accordingly, where required):
Then, you can check the new license status as you already learned via:
In the next step, you will learn how to define the storage backend for TrilioVault to store backups called a target.
Step 2 – Creating a TrilioVault Target to Store Backups
TrilioVault needs to know first where to store your backups. TrilioVault refers to the storage backend by using the target term, and it’s managed via a special CRD named Target. The following target types are supported: S3 and NFS. For DigitalOcean and the purpose of the Starter Kit, it makes sense to rely on the S3 storage type because it’s cheap and scalable. To benefit from an enhanced level of protection, you can create multiple target types (for both S3 and NFS), so that your data is kept safe in multiple places, thus achieving backup redundancy.
A typical Target definition looks like:
In this configuration,
spec.type: Type of target for backup storage (S3 is an object store).spec.vendor: Third-party storage vendor hosting the target (for DigitalOcean Spaces you need to useOtherinstead ofAWS).spec.enableBrowsing: Enable browsing for the target.spec.objectStoreCredentials: Defines required credentials (viacredentialSecret) to access theS3storage, as well as other parameters such as bucket region and name.spec.thresholdCapacity: Maximum threshold capacity to store backup data.
To access S3 storage, each target needs to know bucket credentials. A Kubernetes Secret must be created as well:
Notice that the secret name is trilio-s3-target and it’s referenced by the spec.objectStoreCredentials.credentialSecret field of the Target CRD explained earlier. The secret can be in the same namespace where TrilioVault was installed (defaults to tvk), or in another namespace of your choice. Just make sure that you reference the namespace correctly. On the other hand, please make sure to protect the namespace where you store TrilioVault secrets via RBAC for security reasons.
Steps to create a Target for TrilioVault:
First, change the directory where the Starter Kit Git repository was cloned on your local machine:
Next, create the Kubernetes secret containing your target S3 bucket credentials (please replace the <> placeholders accordingly):
Then, open and inspect the Target manifest file provided in the Starter Kit repository using an editor of your choice (preferably with YAML lint support).
Now, please replace the <> placeholders accordingly for your DO Spaces Trilio bucket, like bucketName, region, url and credentialSecret.
Finally, save the manifest file and create the Target object using kubectl:
Next, TrilioVault will spawn a worker job named trilio-s3-target-validator responsible for validating your S3 bucket (like availability, permissions, etc.). If the job finishes successfully, the bucket is considered to be healthy or available and the trilio-s3-target-validator job resource is deleted afterward. If something bad happens, the S3 target validator job is left up and running so that you can inspect the logs and find the possible issue.
Now, please go ahead and check if the Target resource created earlier is healthy:
The output looks similar to the following. Notice the STATUS column value – should be Available, meaning it’s in a healthy state.
NAME               TYPE          THRESHOLD CAPACITY   VENDOR   STATUS      BROWSING ENABLED
trilio-s3-target   ObjectStore   10Gi                 Other    Available
If the output looks like this, then you configured the S3 target object successfully.
In case the target object fails to become healthy, you can inspect the logs from the trilio-s3-target-validator Pod to find the issue:
The output will be this exception:
...
INFO:root:2021-11-24 09:06:50.595166: waiting for mount operation to complete.
INFO:root:2021-11-24 09:06:52.595772: waiting for mount operation to complete.
ERROR:root:2021-11-24 09:06:54.598541: timeout exceeded, not able to mount within time.
ERROR:root:/triliodata is not a mountpoint. We can't proceed further.
Traceback (most recent call last):
  File "/opt/tvk/datastore-attacher/mount_utility/mount_by_target_crd/mount_datastores.py", line 56, in main
    utilities.mount_datastore(metadata, datastore.get(constants.DATASTORE_TYPE), base_path)
  File "/opt/tvk/datastore-attacher/mount_utility/utilities.py", line 377, in mount_datastore
    mount_s3_datastore(metadata_list, base_path)
  File "/opt/tvk/datastore-attacher/mount_utility/utilities.py", line 306, in mount_s3_datastore
    wait_until_mount(base_path)
  File "/opt/tvk/datastore-attacher/mount_utility/utilities.py", line 328, in wait_until_mount
    base_path))
Exception: /triliodata is not a mountpoint. We can't proceed further.
...
Next, you will discover the TVK web console which is a useful addition to help you manage backup and restore operations easily, among many others.
Step 3 – Getting to Know the TVK Web Management Console
While you can manage backup and restore operations from the CLI entirely via kubectl and CRDs, TVK provides a Web Management Console to accomplish the same operations via the GUI. The management console simplifies common tasks via point-and-click operations, provides better visualization and inspection of TVK cluster objects, as well as to create disaster recovery plans (or DRPs).
The Helm-based installation covered in Step 1 – Installing TrilioVault for Kubernetes already took care of installing the required components for the web management console.
Getting Access to the TVK Web Management Console
To be able to access the console and explore the features it offers, you need to port forward the ingress controller service for TVK.
First, you need to identify the ingress-nginx-controller service from the tvk namespace:
The output looks similar to the following. Search for the k8s-triliovault-ingress-nginx-controller line, and notice that it listens on port 80 in the PORT(S) column.
NAME                                                            TYPE        CLUSTER-IP       EXTERNAL-IP   PORT(S)                      AGE
k8s-triliovault-admission-webhook                               ClusterIP   10.245.202.17    <none>        443/TCP                      13m
k8s-triliovault-ingress-nginx-controller                        NodePort    10.245.192.140   <none>        80:32448/TCP,443:32588/TCP   13m
k8s-triliovault-ingress-nginx-controller-admission              ClusterIP   10.3.20.89       <none>        443/TCP                      13m
k8s-triliovault-web                                             ClusterIP   10.245.214.13    <none>        80/TCP                       13m
k8s-triliovault-web-backend                                     ClusterIP   10.245.10.221    <none>        80/TCP                       13m
triliovault-operator-k8s-triliovault-operator-webhook-service   ClusterIP   10.245.186.59    <none>        443/TCP                      16m
TVK is using an Nginx Ingress Controller to route traffic to the management web console services. Routing is host-based, and the hostname is tvk-doks.com as defined in the Helm values file from the Starter Kit:
Having the above information at hand, please go ahead and edit the /etc/hosts file, and add this entry:
127.0.0.1 tvk-doks.com
Next, create the port forward for the TVK ingress controller service:
Finally, export the kubeconfig file for your DOKS cluster. This step is required so that the web console can authenticate you.
If you only have one cluster, then run the following command:
After following these steps, you can access the console in your web browser by navigating to: http://tvk-doks.com:8080. When asked for the kubeconfig file, please select the one that you created in the last command from above.
Please keep the generated kubeconfig file safe because it contains sensitive data.
Exploring the TVK Web Console User Interface
The home page looks similar to:

Explore each section from the left, like:
-
Cluster Management: This shows the list of primary and other clusters having TVK instances, added to the primary OVH cluster using the Multi-Cluster Management feature.
-
Backup & Recovery: This is the main dashboard which gives you a general overview of the whole cluster, like Discovered namespaces, Applications, Backup plans list, Targets, Hooks, Policies, etc.
-
Monitoring: This has two options- TrilioVault Monitoring and Velero Monitoring if user has Velero configured on their OVH cluster.
-
Disaster Recovery: Allows you to manage and perform disaster recovery operations.
You can also see the S3 Target created earlier, by navigating to Backup & Recovery -> Targets -> <Namespace> tvk from the dropdown on the top.
Going further, you can browse the target and list the available backups by clicking on the Actions button from the right, and then selecting the Launch Browser option from the pop-up menu. For this to work, the target must have the enableBrowsing flag set to true.
For more information and available features, please consult the TVK Web Management Console User Interface official documentation.
Next, you will learn how to perform backup and restore operations for specific use cases.
Step 4 – Namespaced Backup and Restore Example
In this step, you will learn how to create a one-time backup for an entire namespace (ambassador in this case) from your DOKS cluster and restore it afterward, making sure that all the resources are recreated. TVK has a feature that allows you to perform backups at a higher level than just namespaces.
Creating the Ambassador Helm Release Backup
To perform backups for a single application at the namespace level (or Helm release), a BackupPlan followed by a Backup CRD is required. BackupPlan is a definition of ‘what’, ‘where’, ‘to’, and ‘how’ of the backup process, but it doesn’t perform the actual backup. The Backup CRD is responsible for triggering the actual backup process, as dictated by the BackupPlan spec.
In this configuration,
spec.backupConfig.target.name: Tells TVK what target name to use for storing backups.spec.backupConfig.target.namespace: Tells TVK in what namespace the target was created.spec.backupComponents: Defines a list of resources to back up.
A typical Backup CRD looks like below:
In this configuration,
spec.type: Specifies backup type.spec.backupPlan: Specifies the BackupPlan which this Backup should use.
Steps to initiate the Ambassador Helm release one-time backup:
First, make sure that the Ambassador Edge Stack is deployed in your cluster by following the steps from the Ambassador Ingress tutorial.
Next, change the directory to where the Starter Kit Git repository was cloned on your local machine:
Then, open and inspect the Ambassador BackupPlan and Backup manifest files provided in the Starter Kit repository using an editor of your choice (preferably with YAML lint support).
Finally, create the BackupPlan and Backup resources using kubectl.
Now, inspect the BackupPlan status (targeting the ambassador Helm release) using kubectl:
The output looks similar to the following. Notice the STATUS column value which should be set to Available.
NAME                                  TARGET             ...   STATUS
ambassador-helm-release-backup-plan   trilio-s3-target   ...   Available
Next, check the Backup object status using kubectl:
The output looks similar to the following. Notice the STATUS column value which should be set to InProgress, as well as the BACKUP TYPE set to Full.
NAME                                  BACKUPPLAN                            BACKUP TYPE   STATUS       ...
ambassador-helm-release-full-backup   ambassador-helm-release-backup-plan   Full          InProgress   ...
After all the ambassador Helm release components finish uploading to the S3 target, you should get these results:
# The output looks similar to (notice that the `STATUS` changed to `Available`, and `PERCENTAGE` is `100`)
NAME                                  BACKUPPLAN                            BACKUP TYPE   STATUS      ...   PERCENTAGE
ambassador-helm-release-full-backup   ambassador-helm-release-backup-plan   Full          Available   ...   100
If the output looks like this, you successfully backed up the ambassador Helm release. You can go ahead and see how TrilioVault stores Kubernetes metadata by listing the TrilioVault S3 Bucket contents. For example, you can use s3cmd:
The output looks similar to the following. Notice that the listing contains the JSON manifests and UIDs, representing Kubernetes objects.
2021-11-25 07:04           28  s3://trilio-starter-kit/6c68af15-5392-45bb-a70b-b26a93605bd9/
2021-11-25 07:04           28  s3://trilio-starter-kit/6c68af15-5392-45bb-a70b-b26a93605bd9/5ebfffb5-442a-455c-b0de-1db98e18b425/
2021-11-25 07:04          311  s3://trilio-starter-kit/6c68af15-5392-45bb-a70b-b26a93605bd9/5ebfffb5-442a-455c-b0de-1db98e18b425/backup-namespace.json.manifest.00000004
2021-11-25 07:04          302  s3://trilio-starter-kit/6c68af15-5392-45bb-a70b-b26a93605bd9/5ebfffb5-442a-455c-b0de-1db98e18b425/backup.json.manifest.00000004
2021-11-25 07:04          305  s3://trilio-starter-kit/6c68af15-5392-45bb-a70b-b26a93605bd9/5ebfffb5-442a-455c-b0de-1db98e18b425/backupplan.json.manifest.00000004
2021-11-25 07:04           28  s3://trilio-starter-kit/6c68af15-5392-45bb-a70b-b26a93605bd9/5ebfffb5-442a-455c-b0de-1db98e18b425/custom/
2021-11-25 07:04           28  s3://trilio-starter-kit/6c68af15-5392-45bb-a70b-b26a93605bd9/5ebfffb5-442a-455c-b0de-1db98e18b425/custom/metadata-snapshot/
2021-11-25 07:04          330  s3://trilio-starter-kit/6c68af15-5392-45bb-a70b-b26a93605bd9/5ebfffb5-442a-455c-b0de-1db98e18b425/custom/metadata-snapshot/metadata.json.manifest.00000002
...
In case the backup fails to become available, you can inspect the logs from the metamover Pod to find the issue:
Output looks similar to:
ambassador-helm-release-full-backup-metamover-mg9gl0--1-2d6wx 1/1 Running 0 4m32s
Now, fetch logs data:
The output looks similar to the following.
...
{"component":"meta-mover","file":"pkg/metamover/snapshot/parser/commons.go:1366","func":"github.com/trilioData/k8s-triliovault/pkg/metamover/snapshot/parser.(*Component).ParseForDataComponents","level":"info","msg":"Parsing data components of resource rbac.authorization.k8s.io/v1, Kind=ClusterRoleBinding: [edge-stack]","time":"2022-06-14T06:20:56Z"}
{"component":"meta-mover","file":"pkg/metamover/snapshot/parser/commons.go:1366","func":"github.com/trilioData/k8s-triliovault/pkg/metamover/snapshot/parser.(*Component).ParseForDataComponents","level":"info","msg":"Parsing data components of resource rbac.authorization.k8s.io/v1, Kind=RoleBinding: [edge-stack-agent-config]","time":"2022-06-14T06:20:56Z"}
...
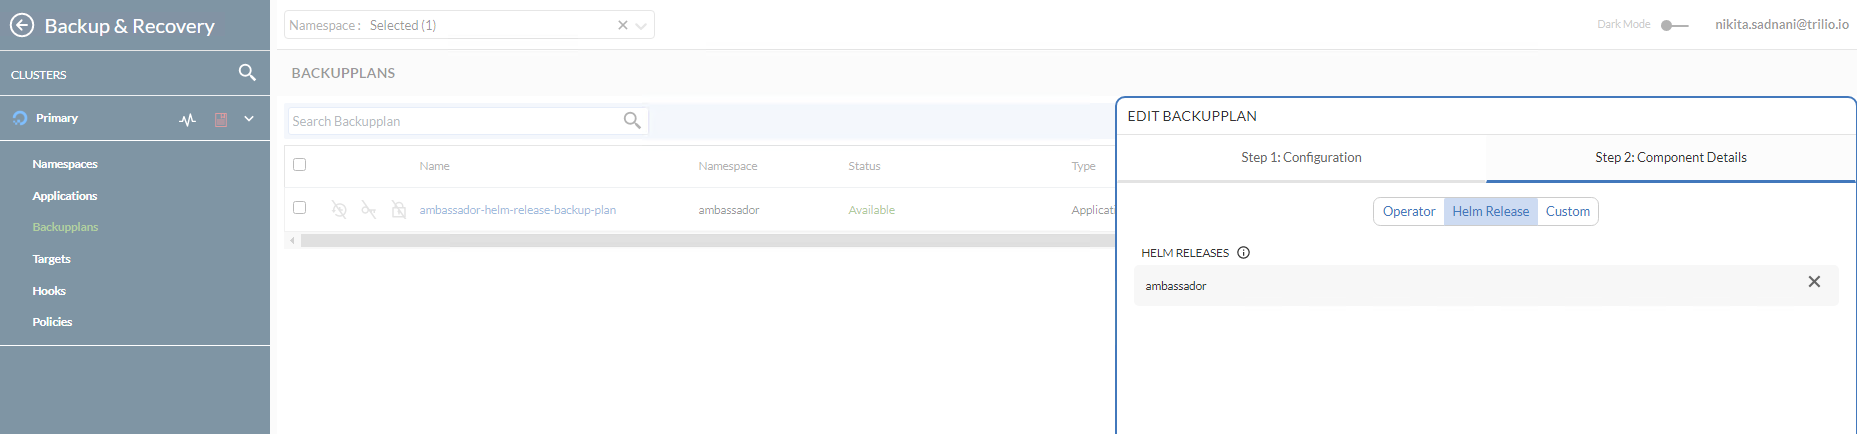
Finally, you can check that the backup is available in the web console as well by navigating to Resource Management -> Ambassador -> Backup Plans. Notice that it’s in the Available state and that the ambassador Helm release was backed up in the Component Details sub-view.
Deleting the Ambassador Helm Release and Resources
Now, go ahead and simulate a disaster by intentionally deleting the ambassador Helm release:
Next, check that the namespace resources were deleted (the listing should be empty):
Finally, verify that the echo and quote backend services endpoint is DOWN. Please refer to Creating the Ambassador Edge Stack Backend Services regarding the backend applications used in the Starter Kit tutorial. You can use curl to test (or you can use your web browser):
Restoring the Ambassador Helm Release Backup
Important
- If restoring the same namespace, ensure that the original application components have been removed. Especially the PVC of the application is deleted.
- If restoring to another cluster (migration scenario), ensure that TrilioVault for Kubernetes is running in the remote namespace/cluster as well. To restore into a new cluster (where the Backup CR does not exist),
source.typemust be set tolocation. Please refer to the Custom Resource Definition Restore Section to view a restore by location example. - When you delete the
ambassadornamespace, the load balancer resource associated with the ambassador service will be deleted as well. So, when you restore theambassadorservice, the LB will be recreated by DigitalOcean. The issue is that you will get a NEW IP address for your LB, so you will need to adjust theA recordsfor getting traffic into your domains hosted on the cluster.
To restore a specific Backup, you need to create a Restore CRD. Typical Restore CRD looks like below:
In this configuration,
spec.source.type: Specifies what backup type to restore from.spec.source.backup: Contains a reference to the backup object to restore from.spec.skipIfAlreadyExists: Specifies whether to skip restore of a resource if it already exists in the namespace restored.
Restore allows you to restore the last successful Backup for an application. It is used to restore a single namespaces or Helm release, protected by the Backup CRD. The Backup CRD is identified by its name ambassador-helm-release-full-backup.
First, inspect the Restore CRD example from the Starter Kit Git repository:
Then, create the Restore resource using kubectl:
Finally, inspect the Restore object status:
The output looks similar to the following. Notice the STATUS column set to Completed, as well as the PERCENTAGE COMPLETED set to 100.
NAME                              STATUS      DATA SIZE   START TIME             END TIME               PERCENTAGE COMPLETED   DURATION
ambassador-helm-release-restore   Completed   0           2021-11-25T15:06:52Z   2021-11-25T15:07:35Z   100                    43.524191306s
If the output looks like this, then the ambassador Helm release restoration process is completed successfully.
Verifying Applications Integrity after Restoration
Check that all the ambassador namespace resources are in place and running:
The output looks similar to:
NAME                                    READY   STATUS    RESTARTS   AGE
pod/ambassador-5bdc64f9f6-42wzr         1/1     Running   0          9m58s
pod/ambassador-5bdc64f9f6-nrkzd         1/1     Running   0          9m58s
pod/ambassador-agent-bcdd8ccc8-ktmcv    1/1     Running   0          9m58s
pod/ambassador-redis-64b7c668b9-69drs   1/1     Running   0          9m58s

NAME                       TYPE           CLUSTER-IP       EXTERNAL-IP     PORT(S)                      AGE
service/ambassador         LoadBalancer   10.245.173.90    157.245.23.93   80:30304/TCP,443:30577/TCP   9m59s
service/ambassador-admin   ClusterIP      10.245.217.211   <none>          8877/TCP,8005/TCP            9m59s
service/ambassador-redis   ClusterIP      10.245.77.142    <none>          6379/TCP                     9m59s

NAME                               READY   UP-TO-DATE   AVAILABLE   AGE
deployment.apps/ambassador         2/2     2            2           9m59s
deployment.apps/ambassador-agent   1/1     1            1           9m59s
deployment.apps/ambassador-redis   1/1     1            1           9m59s

NAME                                          DESIRED   CURRENT   READY   AGE
replicaset.apps/ambassador-5bdc64f9f6         2         2         2       9m59s
replicaset.apps/ambassador-agent-bcdd8ccc8    1         1         1       9m59s
replicaset.apps/ambassador-redis-64b7c668b9   1         1         1       9m59s
Get ambassador hosts:
The output looks similar to the following. STATE should be Ready, as well as the HOSTNAME column pointing to the fully qualified hostname.
NAME         HOSTNAME                   STATE   PHASE COMPLETED   PHASE PENDING   AGE
echo-host    echo.starter-kit.online    Ready                                     11m
quote-host   quote.starter-kit.online   Ready                                     11m
Get ambassador mappings:
The output looks similar to the following. Notice the echo-backend which is mapped to the echo.starter-kit.online host and /echo/ source prefix, same for quote-backend.
NAME                          SOURCE HOST                SOURCE PREFIX                               DEST SERVICE     STATE   REASON
ambassador-devportal                                     /documentation/                             127.0.0.1:8500
ambassador-devportal-api                                 /openapi/                                   127.0.0.1:8500
ambassador-devportal-assets                              /documentation/(assets|styles)/(.*)(.css)   127.0.0.1:8500
ambassador-devportal-demo                                /docs/                                      127.0.0.1:8500
echo-backend                  echo.starter-kit.online    /echo/                                      echo.backend
quote-backend                 quote.starter-kit.online   /quote/                                     quote.backend
Now, you need to update your DNS A records, because the DigitalOcean load balancer resource was recreated, and it has a new external IP assigned.
Finally, check if the backend applications respond to HTTP requests as well. Please refer to Creating the Ambassador Edge Stack Backend Services regarding the backend applications used in the Starter Kit tutorial.
The next step deals with whole cluster backup and restore.
Step 5 – Backup and Restore Whole Cluster Example
In this step, you will simulate a disaster recovery scenario. The whole DOKS cluster will be deleted and then the important applications restored from a previous backup.
Creating the DOKS Cluster Backup
The main idea here is to perform a DOKS cluster backup by including all important namespaces that hold your essential applications and configurations.
A typical ClusterBackupPlan manifest targeting multiple namespaces looks like this:
Notice that kube-system (or other DOKS cluster-related namespaces) is not included in the list. Usually, those are not required, unless there is a special case requiring some settings to be persisted at that level.
First, change the directory where the Starter Kit Git repository was cloned on your local machine:
Then, open and inspect the ClusterBackupPlan and ClusterBackup manifest files provided in the Starter Kit repository using an editor of your choice (preferably with YAML lint support).
Finally, create the ClusterBackupPlan and ClusterBackup resources using kubectl:
Now, inspect the ClusterBackupPlan status using kubectl:
The output looks similar to the following. Notice the STATUS column value which should be set to Available.
NAME                              TARGET             ...   STATUS
starter-kit-cluster-backup-plan   trilio-s3-target   ...   Available
Next, check the ClusterBackup status using kubectl:
The output looks similar to the following. Notice the STATUS column value which should be set to Available, as well as the PERCENTAGE COMPLETE set to 100.
NAME                        BACKUPPLAN                        BACKUP TYPE   STATUS      ...   PERCENTAGE COMPLETE
starter-kit-cluster-backup  starter-kit-cluster-backup-plan   Full          Available   ...   100
If the output looks like above then all your important application namespaces were backed up successfully.
It may take a while for the full cluster backup to finish, depending on how many namespaces and associated resources are involved in the process.
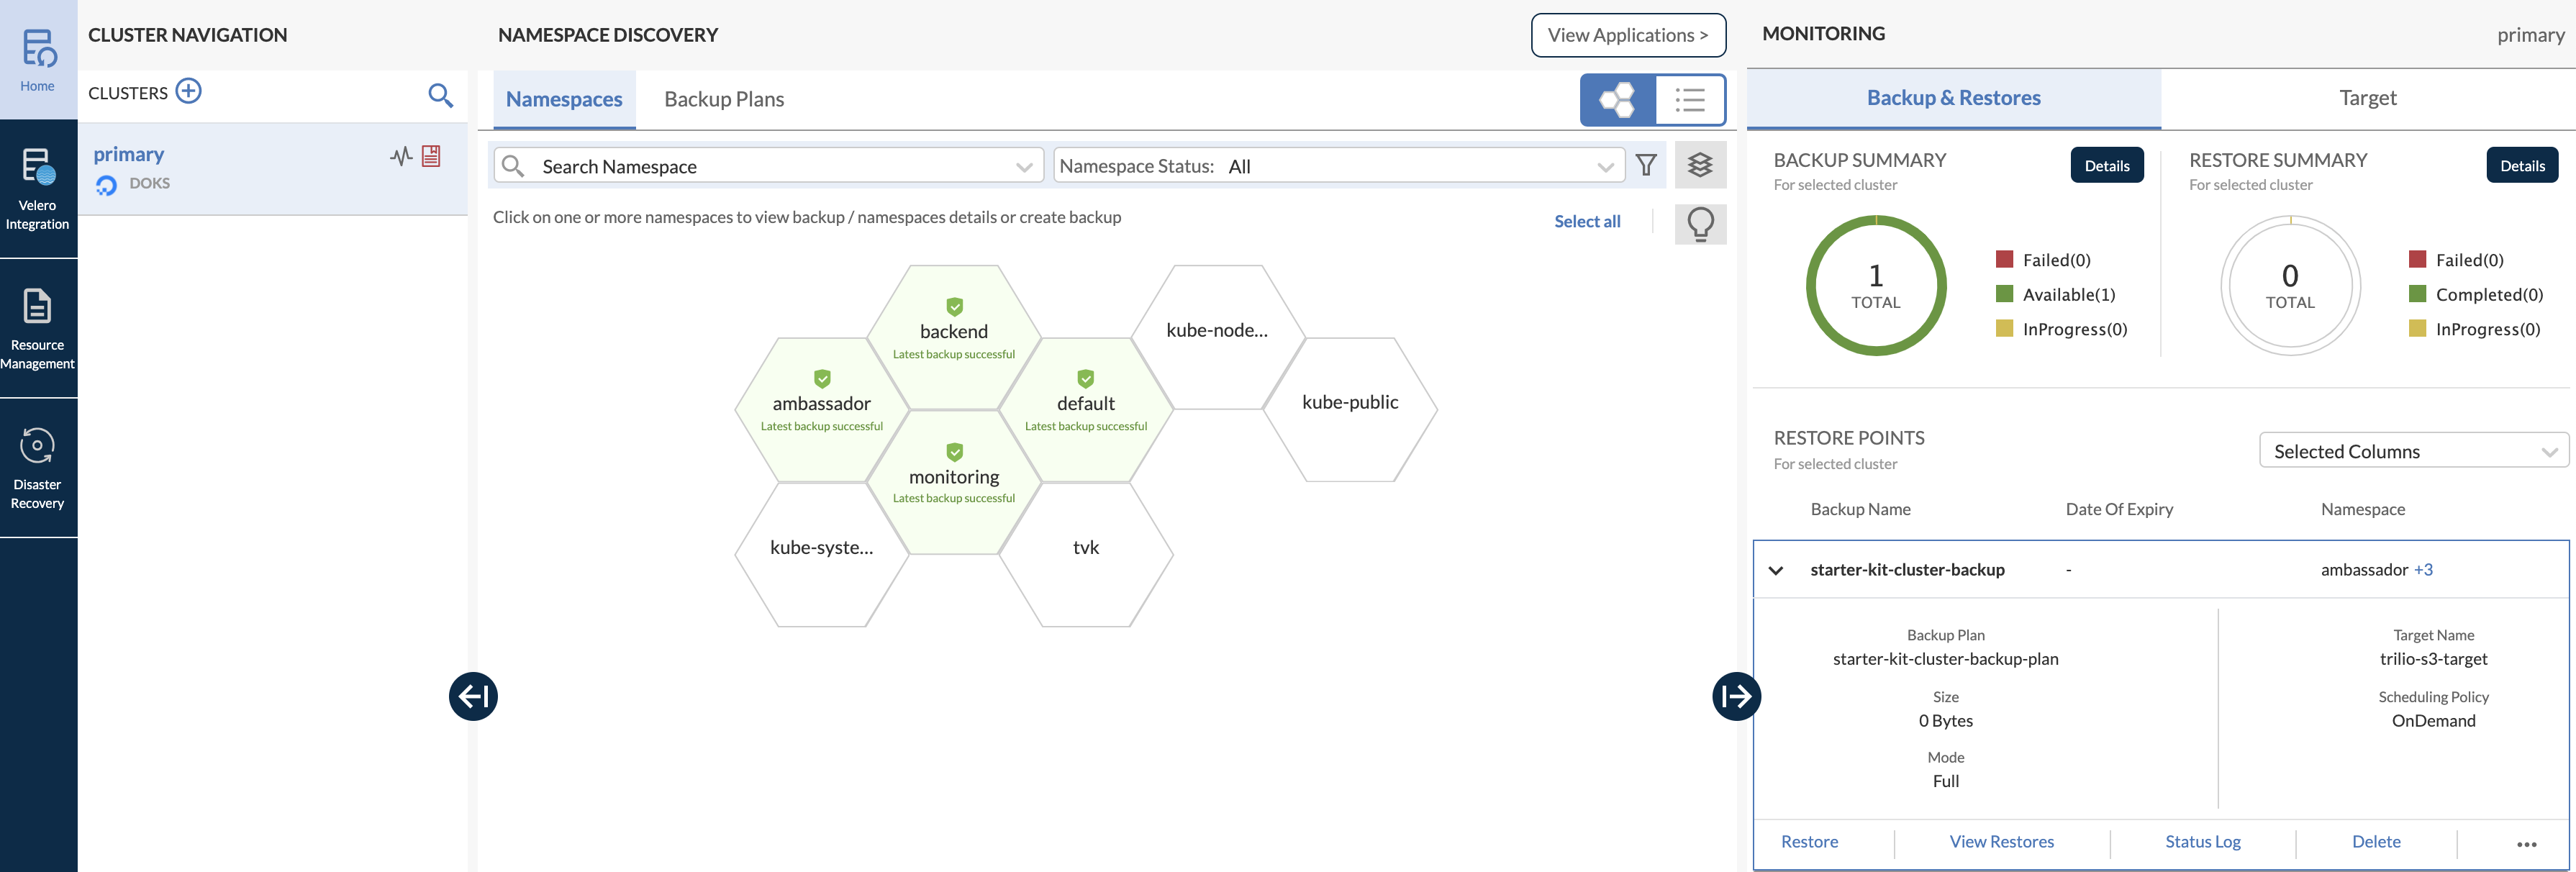
You can also open the web console main dashboard and inspect the multi-namespace backup (notice how all the important namespaces that were backed up are highlighted in green color, in a honeycomb structure):
Re-creating the DOKS Cluster and Restoring Applications
An important aspect to keep in mind is that whenever you destroy a DOKS cluster and then restore it, a new Load Balancer with a new external IP is created as well when TVK restores your ingress controller. So, please make sure to update your DigitalOcean DNS A records accordingly.
Now, delete the whole DOKS cluster (make sure to replace the <> placeholders accordingly):
Next, recreate the cluster as described in Set up DigitalOcean Kubernetes.
To perform the restore operation, you need to install the TVK application as described in Step 1 – Installing TrilioVault for Kubernetes. It is important to use the same Helm Chart version.
After the installation finishes successfully, configure the TVK target as described in Step 2 – Creating a TrilioVault Target to Store Backups, and point it to the same S3 bucket where your backup data is located. Also, please make sure that target browsing is enabled.
Next, verify and activate a new license as described in the TrilioVault Application Licensing section.
To get access to the web console user interface, please consult the Getting Access to the TVK Web Management Console section.
Then, navigate to Resource Management -> TVK Namespace -> Targets (in case of Starter Kit the TVK Namespace is tvk):
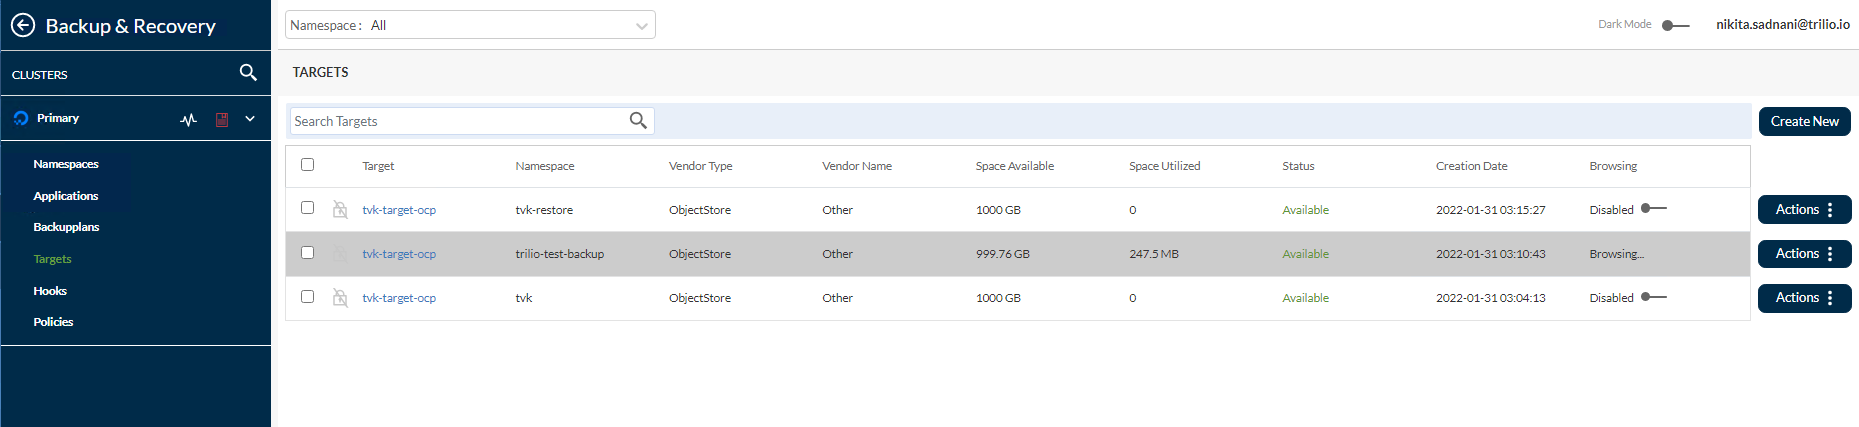
Going further, browse the target and list the available backups by clicking on the Actions button. Then, select Launch Browser option from the pop-up menu. For this to work, the target must have the enableBrowsing flag set to true.
Now, click on the starter-kit-cluster-backup-plan item from the list, and then click and expand the starter-kit-cluster-backup item from the right sub-window:
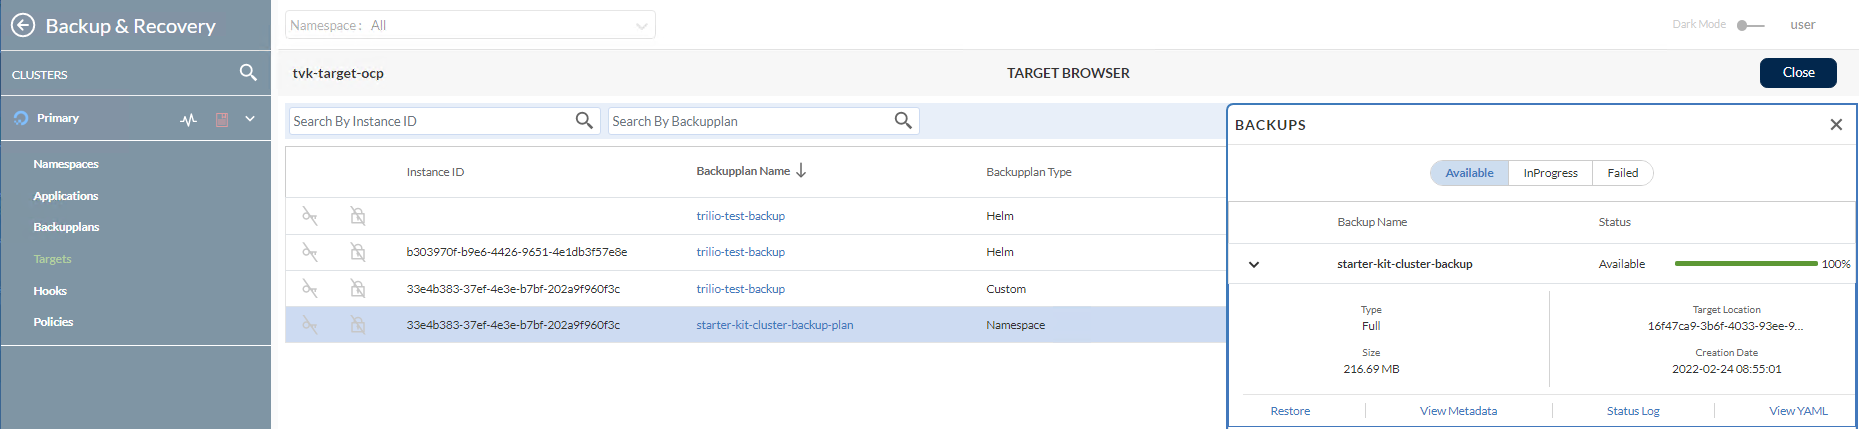
To start the restore process, click on the Restore button.

Checking DOKS Cluster Applications State
First, verify all cluster Kubernetes resources.
Then, make sure that your DNS A records are updated to point to your new load balancer external IP.
Finally, the backend applications should respond to HTTP requests as well. Please refer to Creating the Ambassador Edge Stack Backend Services regarding the backend applications used in the Starter Kit tutorial.
In the next step, you will learn how to perform scheduled (or automatic) backups for your DOKS cluster applications.
Step 6 – Scheduled Backups
Taking backups automatically based on a schedule is a really useful feature. It allows you to rewind time and restore the system to a previous working state if something goes wrong. This section provides an example of an automatic backup on a 5-minute schedule (the kube-system namespace was picked).
First, you need to create a Policy CRD of type Schedule that defines the backup schedule in cron format (same as Linux cron). Schedule policies can be used for either BackupPlan or ClusterBackupPlan CRDs. Typical schedule policy CRD looks like below (defines a 5 minute schedule):
Next, you can apply the scheduling policy to a ClusterBackupPlan CRD for example, as seen below:
You can notice that it’s a basic ClusterBackupPlan CRD, referencing the Policy CRD defined earlier via the spec.backupConfig.schedulePolicy field. You can have separate policies created for full or incremental backups, hence the fullBackupPolicy or incrementalBackupPolicy can be specified in the spec.
Now, please create the schedule Policy using the sample manifest provided by the Starter Kit tutorial.
Change the directory to where the Starter Kit Git repository was cloned on your local machine.
Check that the policy resource was created:
The output looks similar to the following. Notice the POLICY type set to Schedule.
NAME                          POLICY     DEFAULT
scheduled-backup-every-5min   Schedule   false
Finally, create the resources for the kube-system namespace scheduled backups:
Check the scheduled backup plan status for kube-system:
The output looks similar to the following. Notice the FULL BACKUP POLICY value set to the previously created scheduled-backup-every-5min policy resource, as well as the STATUS which should be Available.
NAME                                       TARGET             ...   FULL BACKUP POLICY            STATUS
kube-system-ns-backup-plan-5min-schedule   trilio-s3-target   ...   scheduled-backup-every-5min   Available
Check the scheduled backup status for kube-system:
The output looks similar to the following. Notice the BACKUPPLAN value set to the previously created backup plan resource, as well as the STATUS which should be Available.
NAME                                   BACKUPPLAN                                 BACKUP TYPE   STATUS      ...
kube-system-ns-full-backup-scheduled   kube-system-ns-backup-plan-5min-schedule   Full          Available   ...
Now, you can check that backups are performed on a regular interval (5 minutes), by querying the cluster backup resource and inspecting the START TIME column (kubectl get clusterbackup -n tvk). It should reflect the 5-minute delta, as highlighted in the picture below:

In the next step, you will learn how to set up a retention policy for your backups.
Step 7 – Backups Retention Policy
The retention policy allows you to define the number of backups to retain and the cadence to delete backups as per compliance requirements. The retention policy CRD provides a simple YAML specification to define the number of backups to retain in terms of days, weeks, months, years, latest, etc.
Using Retention Policies
Retention policies can be used for either BackupPlan or ClusterBackupPlan CRDs. A typical Policy manifest for the Retention type looks like:
The above retention policy translates to:
- Every week, keep one backup each Wednesday.
- Every month, keep one backup in the 15th day.
- Every year, keep one backup every March.
- Overall, there should be 2 most recent backups available.
The basic flow for creating a retention policy resource goes the same way as for scheduled backups. You need a BackupPlan or a ClusterBackupPlan CRD defined to reference the retention policy, and then have a Backup or ClusterBackup object to trigger the process.
A typical ClusterBackupPlan example configuration that has a retention set looks like:
Notice that it uses a retentionPolicy field to reference the policy in question. Of course, you can have a backup plan that has both types of policies set, so that it can perform scheduled backups, as well as to deal with retention strategies.
Using Cleanup Policies
You need a way to garbage collect all those objects that are no longer in use. For this, you need to introduce the Cleanup Policy CRD:
The above cleanup policy must be defined in the TVK install namespace. Then, a cron job is created automatically for you that runs every 30 minutes and deletes failed backups based on the value specified for backupdays within the spec field.
Conclusion
In this tutorial, you learned how to perform one-time as well as scheduled backups, and to restore everything.
All the basic tasks and operations explained in this tutorial, are meant to give you a basic introduction and understanding of what TrilioVault for Kubernetes is capable of.
Learn More
- Backup and Restore DOKS Data using Velero
- DigitalOcean Managed Kubernetes Backups with SnapShooter
- Restore Volumes from Snapshots in Kubernetes Clusters
The next step is to Create Kubernetes Secrets using Vault or Sealed Secrets.