במדריך זה, אנו נבחין בעומק את התכונות שמספק לנו Android TextInputLayout. Android TextInputLayout הוא רכיב עיצוב הכולל ספריית תמיכה בעיצוב החומר.
Android TextInputLayout
Android TexInputLayout מרחיב את LinearLayout. השימוש העיקרי של TextInputLayout הוא לשמש כמעטר ל-EditText (או לירושתו) ולאפשר הנפשת הזמן של רמזים צפים. כלל כללי: TextInputLayout אמור להכיל את TextInputEditText במקום EditText הרגיל. למה? TextInputEditText הוא מחלקה משנה של EditText ומיועדת לשימוש כילד של TextInputLayout. בנוסף, שימוש ב-EditText במקום יוסיף אזהרה: EditText הנוסף אינו TextInputEditText. יש לעבור לשימוש במחלקה זו במקום. TextInputLayout מציע הרבה יותר מאשר תצוגת תוויות רמז צפות.
תכונות של Android TextInputLayout
כמה מהתכונות שנכסה במדריך זה הן:
- הפעלת/כיבוי רמזים צפים
- הפעלת/כיבוי הנפשת נפילת רמז
- תצוגת הודעות שגיאה
- הצגת מונה תווים
- התראה למשתמש כאשר מספר התווים חורג מהגבול שלו
- התאמת הופעת הטקסט לתמיכה ברמז צפה, תווית שגיאה, וסופר תווים
- מתג להצגת ויזואלית של נראות הסיסמה
נבחן כל אחת מהתכונות הללו ונטמיע אותן בפרויקט של Android Studio.
דוגמה על מבנה פרויקט של TextInputLayout ב-Android
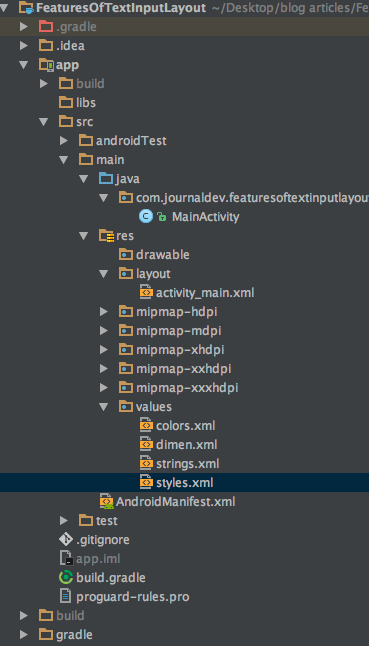 זו אפליקציה עם פעילות יחידה. כל הפעולות יתבצעו בתוך פריסה, פעולות וקבצי
 styles.xml ו-colors.xml. תחילה, הוסף את התלות בספריית התמיכה בעיצוב בתוך קובץ build.gradle כפי שמוצג למטה.
compile 'com.android.support:design:25.3.1'
הפעלה/ניטרול של רמזים צפים
רמזים צפים מופעלים כבררת המחדל ב-TextInputLayout. כדי להשבית אותם, עלינו להוסיף את המאפיין הבא בתוך התג : app:hintEnabled="false". הקוד XML למטה הוא מתוך קובץ ה-activity_main.xml וכולל שלוש שדות EditText.
<?xml version="1.0" encoding="utf-8"?>
<ScrollView xmlns:android="https://schemas.android.com/apk/res/android"
    xmlns:app="https://schemas.android.com/apk/res-auto"
    xmlns:tools="https://schemas.android.com/tools"
    android:layout_width="match_parent"
    android:layout_height="wrap_content"
    tools:context="com.journaldev.featuresoftextinputlayout.MainActivity">

    <LinearLayout
        android:layout_width="match_parent"
        android:layout_height="wrap_content"
        android:orientation="vertical">


        <android.support.design.widget.TextInputEditText
            android:layout_width="match_parent"
            android:layout_height="wrap_content"
            android:layout_margin="@dimen/activity_horizontal_margin"
            android:hint="TextInputEditText" />


        <android.support.design.widget.TextInputLayout
            android:layout_width="match_parent"
            android:layout_height="match_parent"
            android:layout_margin="@dimen/activity_horizontal_margin">

            <android.support.design.widget.TextInputEditText
                android:layout_width="match_parent"
                android:layout_height="wrap_content"
                android:hint="Floating Hint Enabled Default" />

        </android.support.design.widget.TextInputLayout>


        <android.support.design.widget.TextInputLayout
            android:layout_width="match_parent"
            android:layout_height="wrap_content"
            android:layout_margin="@dimen/activity_horizontal_margin"
            app:hintEnabled="false">

            <android.support.design.widget.TextInputEditText
                android:layout_width="match_parent"
                android:layout_height="wrap_content"
                android:hint="Floating Hint Disabled" />

        </android.support.design.widget.TextInputLayout>

</LinearLayout>
</ScrollView>
השדה EditText השלישי מנטרל את הרמז הצף. בואו נראה את הפלט שהקוד לעיל נותן לנו: 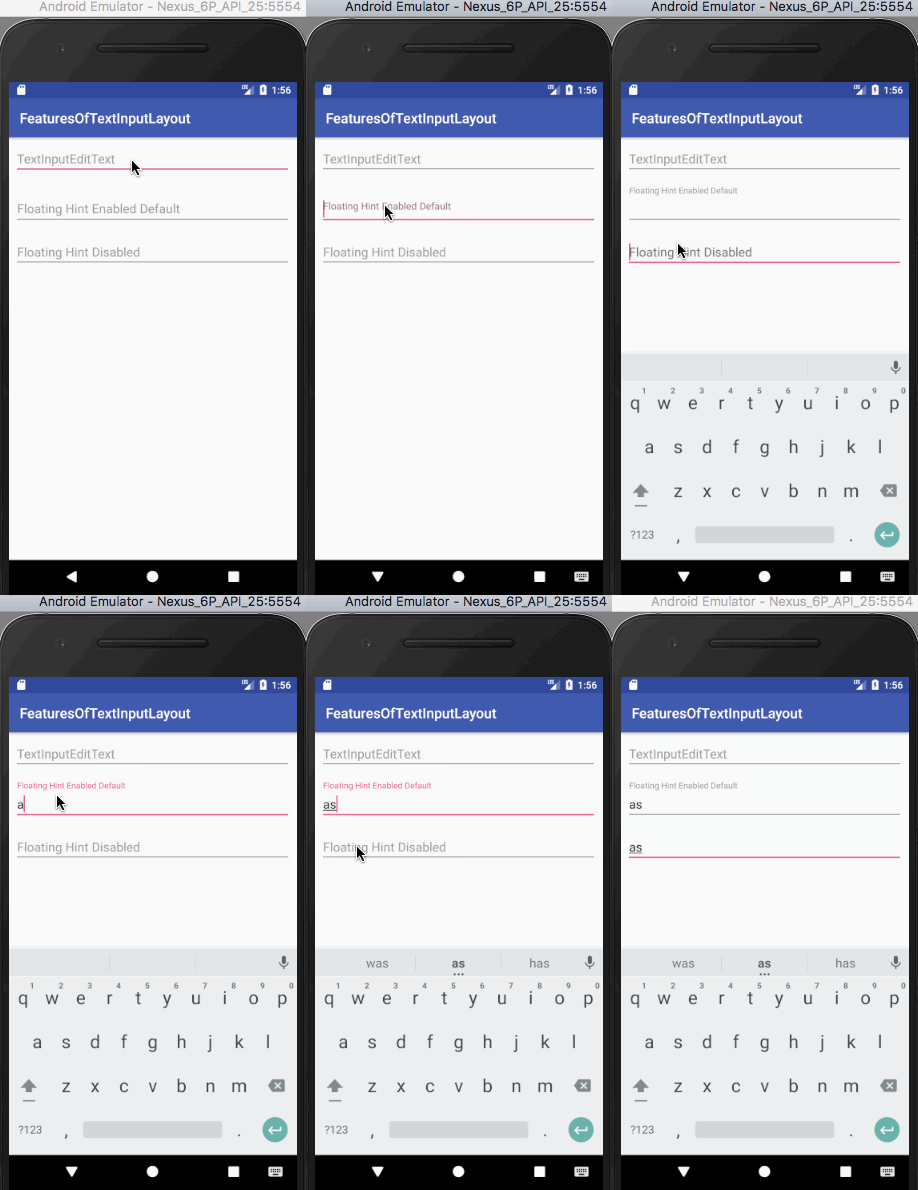
הפעלת/נטרול האנימציה של הרמז הצף
כמו בתכונה הקודמת, האנימציה של הרמז הצף מופעלת כברירת מחדל. כדי לנטרל אותה, עלינו להוסיף את התכונה הבאה בתוך תגית ה- TextInputLayout. app:hintAnimationEnabled="false" הקוד xml למטה הוא מתוך העיצוב activity_main.xml וכולל שדות EditText לכל אחת מהמקרים.
<?xml version="1.0" encoding="utf-8"?>
<ScrollView xmlns:android="https://schemas.android.com/apk/res/android"
    xmlns:app="https://schemas.android.com/apk/res-auto"
    xmlns:tools="https://schemas.android.com/tools"
    android:layout_width="match_parent"
    android:layout_height="wrap_content"
    tools:context="com.journaldev.featuresoftextinputlayout.MainActivity">

    <LinearLayout
        android:layout_width="match_parent"
        android:layout_height="wrap_content"
        android:orientation="vertical">

        <android.support.design.widget.TextInputLayout
            android:layout_width="match_parent"
            android:layout_height="match_parent"
            android:layout_margin="@dimen/activity_horizontal_margin">

            <android.support.design.widget.TextInputEditText
                android:layout_width="match_parent"
                android:layout_height="wrap_content"
                android:hint="Floating Hint Enabled Default" />

        </android.support.design.widget.TextInputLayout>


        <android.support.design.widget.TextInputLayout
            android:layout_width="match_parent"
            android:layout_height="wrap_content"
            android:layout_margin="@dimen/activity_horizontal_margin"
            app:hintAnimationEnabled="false">

            <android.support.design.widget.TextInputEditText
                android:layout_width="match_parent"
                android:layout_height="wrap_content"
                android:hint="Hint Animation Disabled" />

        </android.support.design.widget.TextInputLayout>

</LinearLayout>
</ScrollView>
הפלט של הקוד לעיל מוצג למטה. 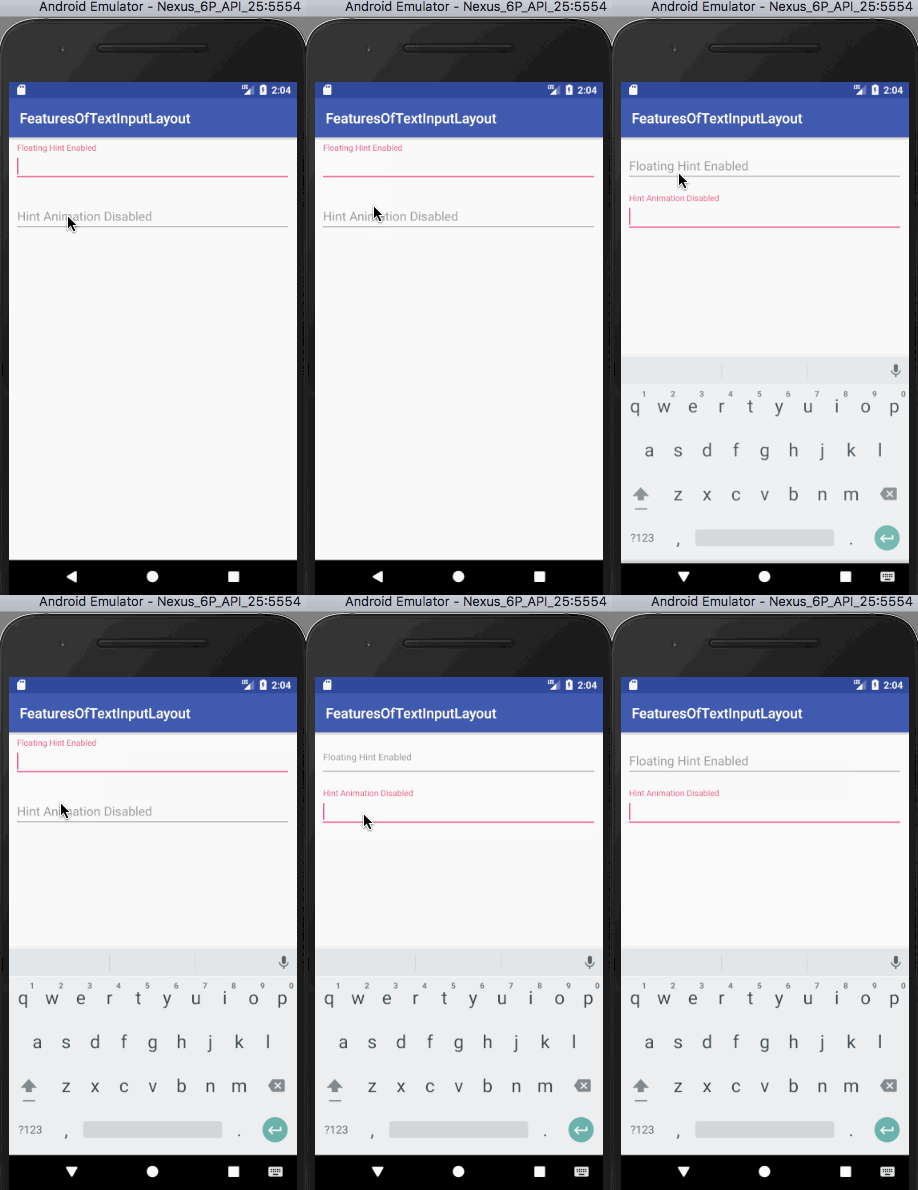 שימו לב כי השדה EditText השני לא מנגן באנימציה של הרמז הצף כאשר יש פוקוס עליו.
עיצוב תצוגת הרמז
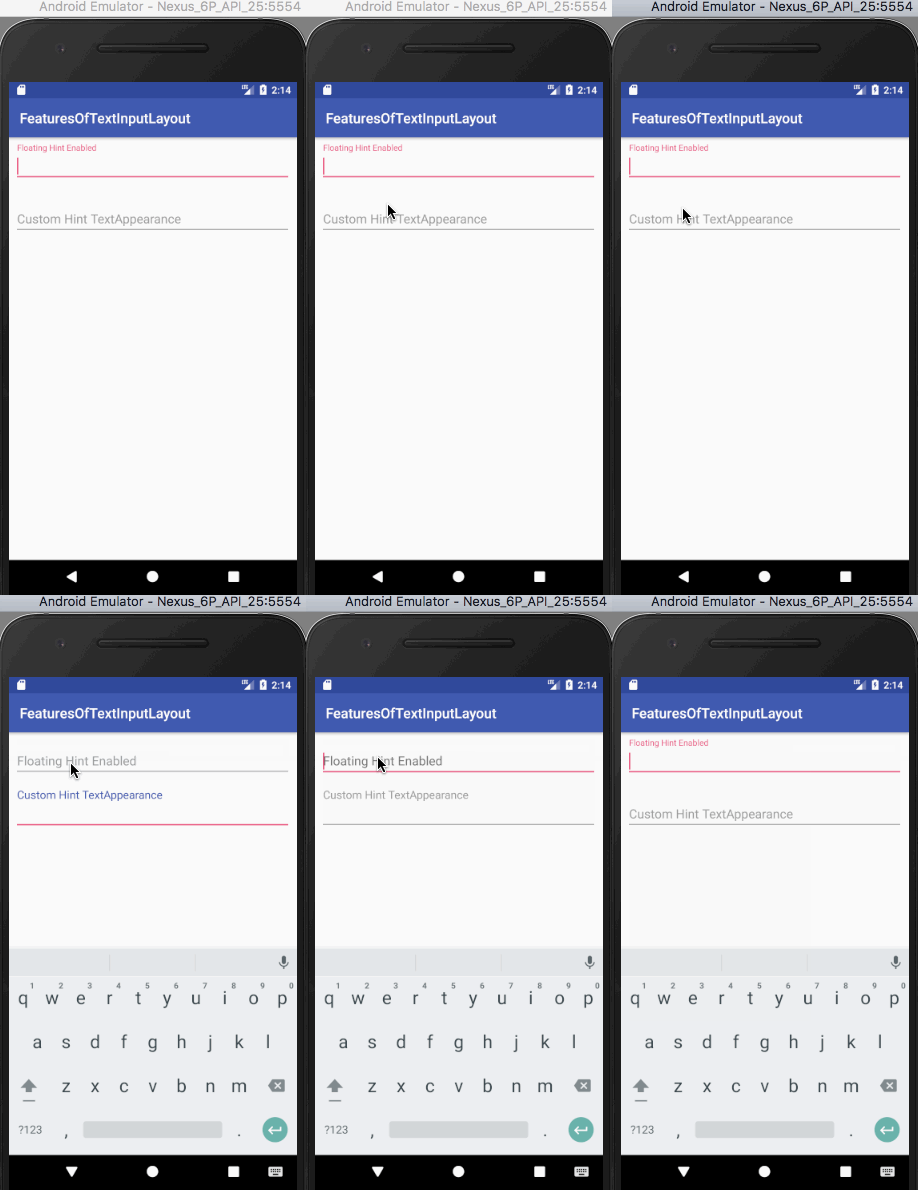
כדי להשתמש בצבע ובגודל מותאמים אישית לרמזים, משתמשים בתכונה הבאה: `app:hintTextAppearance="@style/HintText"`. סגנון HintText כתוב בתוך `styles.xml`, כפי שמוצג למטה
<style name="HintText" parent="TextAppearance.Design.Hint">
        <item name="android:textSize">16sp</item>
        <item name="android:textColor">@color/colorPrimary</item>
    </style>
. קטע הקוד XML למטה הוא מקובץ ה-`activity_main.xml` וכולל שדות EditText לכל אחת מהמקרים (עם/בלעדי hintTextAppearance)
<?xml version="1.0" encoding="utf-8"?>
<ScrollView xmlns:android="https://schemas.android.com/apk/res/android"
    xmlns:app="https://schemas.android.com/apk/res-auto"
    xmlns:tools="https://schemas.android.com/tools"
    android:layout_width="match_parent"
    android:layout_height="wrap_content"
    tools:context="com.journaldev.featuresoftextinputlayout.MainActivity">

    <LinearLayout
        android:layout_width="match_parent"
        android:layout_height="wrap_content"
        android:orientation="vertical">

        <android.support.design.widget.TextInputLayout
            android:layout_width="match_parent"
            android:layout_height="match_parent"
            android:layout_margin="@dimen/activity_horizontal_margin">

            <android.support.design.widget.TextInputEditText
                android:layout_width="match_parent"
                android:layout_height="wrap_content"
                android:hint="Floating Hint Enabled" />

        </android.support.design.widget.TextInputLayout>


        <android.support.design.widget.TextInputLayout
            android:layout_width="match_parent"
            android:layout_height="match_parent"
            android:layout_margin="@dimen/activity_horizontal_margin"
            app:hintTextAppearance="@style/HintText">

            <android.support.design.widget.TextInputEditText
                android:layout_width="match_parent"
                android:layout_height="wrap_content"
                android:hint="Custom Hint TextAppearance" />

        </android.support.design.widget.TextInputLayout>

</LinearLayout>
</ScrollView>
מונה תווים
מונה תווים הוא תכונה בשימוש בהרבה אפליקציות (זכורים את המגבלת התווים בטוויטר?). הגדר `app:counterEnabled` כ-true ו `app:counterMaxLength` עם המספר המרבי של תווים שתרצה ב-TextInputLayout. מונה תווים מוצג כברירת מחד בתחתית ה-EditText (בצד ימין למטה) ובזמן כתיבת המדריך, אין דרך לשנות את המיקום, עדיין. עיצוב המונה דומה לעיצוב הטקסט הרמוז. התכונה `app:counterTextAppearance` בשימוש הפעם. הוספנו את הסגנון הבא בקובץ `styles.xml` שבפרויקט שלנו
<style name="CounterText" parent="TextAppearance.Design.Counter">
        <item name="android:textSize">16sp</item>
        <item name="android:textColor">@color/my_pink</item>
    </style>
. קטע הקוד XML למטה הוא מקובץ ה-`activity_main.xml` וכולל שדות EditText עם מונה תווים ברירת מחד ומותאם אישית.
<?xml version="1.0" encoding="utf-8"?>
<ScrollView xmlns:android="https://schemas.android.com/apk/res/android"
    xmlns:app="https://schemas.android.com/apk/res-auto"
    xmlns:tools="https://schemas.android.com/tools"
    android:layout_width="match_parent"
    android:layout_height="wrap_content"
    tools:context="com.journaldev.featuresoftextinputlayout.MainActivity">

    <LinearLayout
        android:layout_width="match_parent"
        android:layout_height="wrap_content"
        android:orientation="vertical">

        <android.support.design.widget.TextInputLayout
            android:layout_width="match_parent"
            android:layout_height="wrap_content"
            android:layout_margin="@dimen/activity_horizontal_margin"
            app:counterEnabled="true"
            app:counterMaxLength="5"
            app:hintTextAppearance="@style/HintText">

            <android.support.design.widget.TextInputEditText
                android:layout_width="match_parent"
                android:layout_height="wrap_content"
                android:hint="Character Counter Limit 10" />

        </android.support.design.widget.TextInputLayout>


        <android.support.design.widget.TextInputLayout
            android:layout_width="match_parent"
            android:layout_height="wrap_content"
            android:layout_margin="@dimen/activity_horizontal_margin"
            app:counterEnabled="true"
            app:counterMaxLength="5"
            app:counterTextAppearance="@style/CounterText"
            app:hintTextAppearance="@style/HintText">

            <android.support.design.widget.TextInputEditText
                android:layout_width="match_parent"
                android:layout_height="wrap_content"
                android:hint="Character Counter Custom TextAppearance" />

        </android.support.design.widget.TextInputLayout>

</LinearLayout>
</ScrollView>
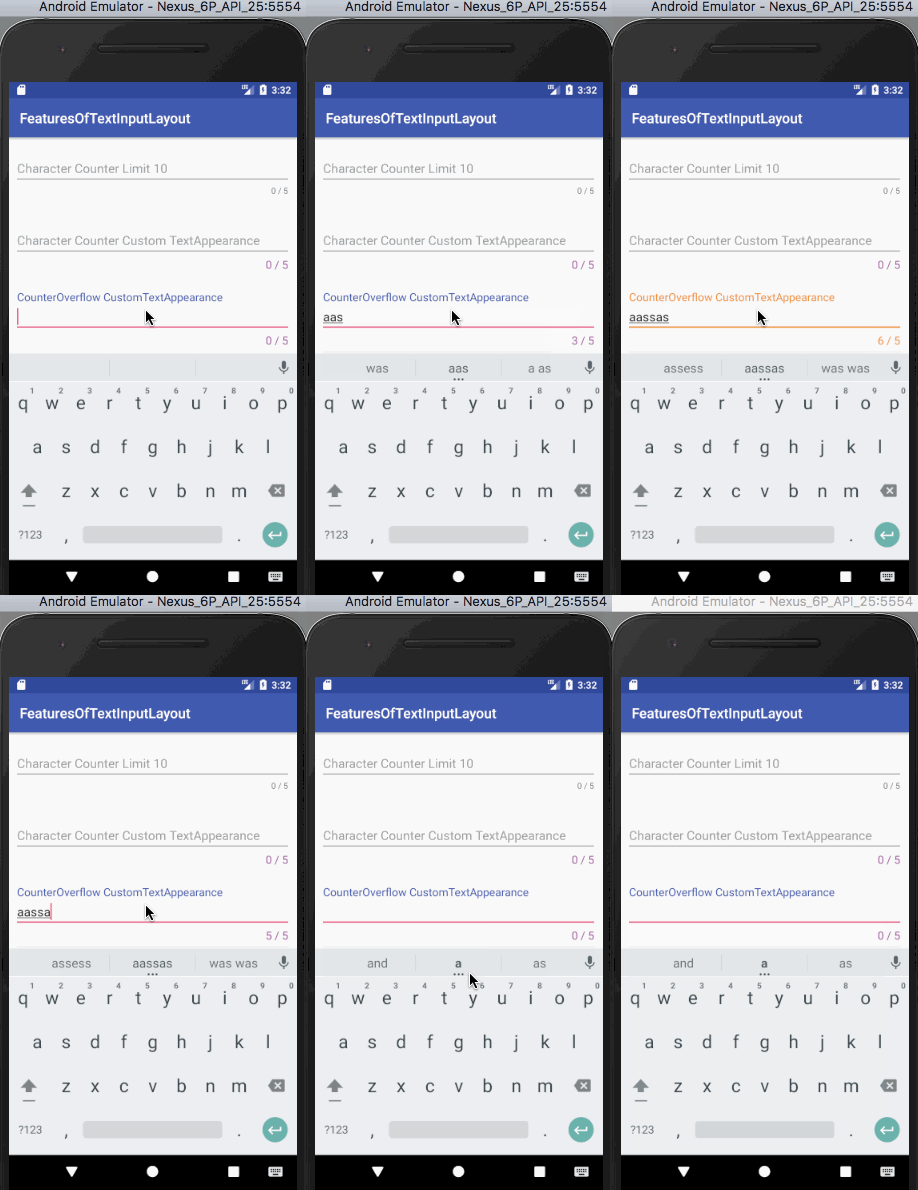
הפלט של הקוד למעלה נתון למטה. 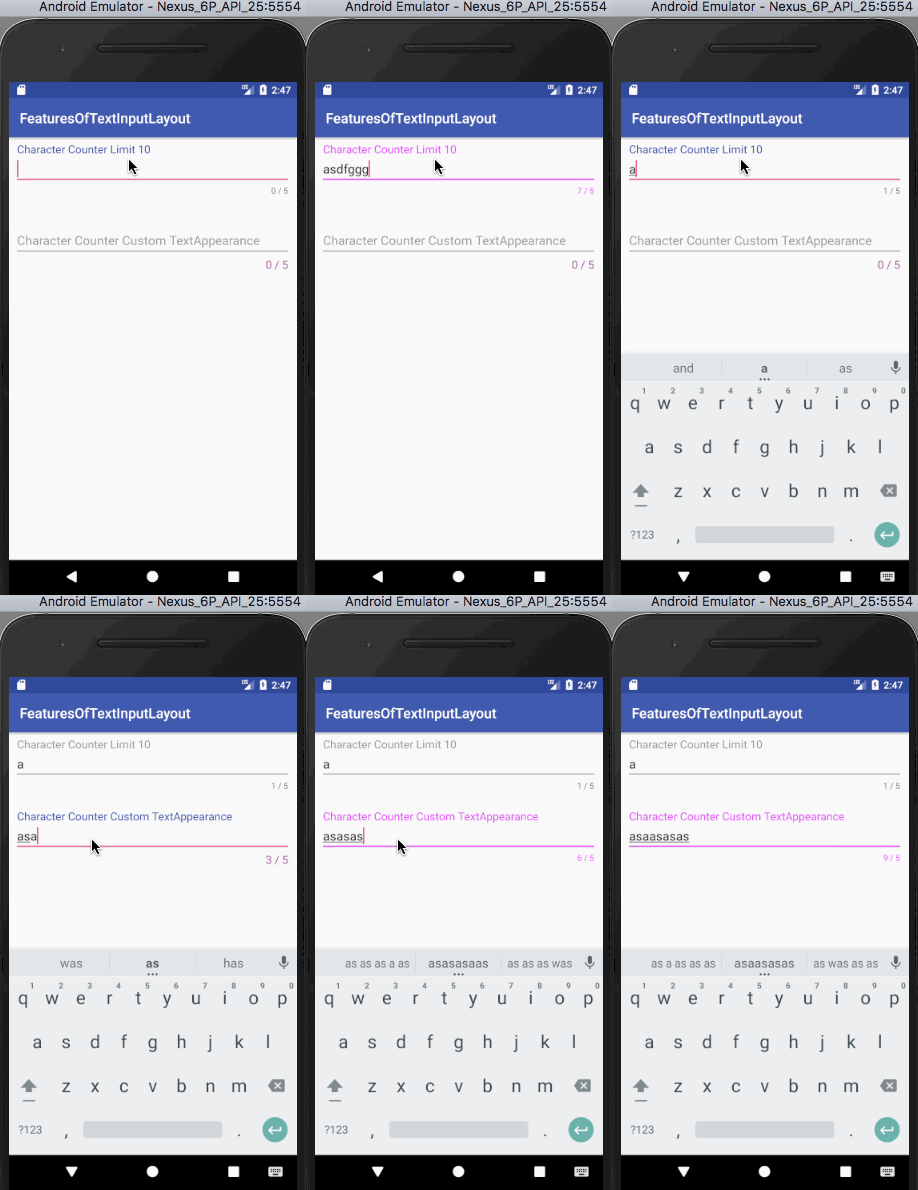 בואו נצפה בקרבה בפלט למעלה.
- שדה הטקסט הראשון משנה את הצבע של המונה צבע הטקסט, צבע הרמז צבע הטקסט וצבע האינדיקטור כאשר מספר התווים חורג על המגבלה.
- שדה הטקסט השני עושה אותו דבר אך גם, הוא משנה את המונה צבע הטקסט מותאם אישית ו גודל הטקסט מותאם אישית כאשר המגבלה נחרצת.
כדי לציין את הסגנון שאנו צריכים כאשר מונה התווים חורג על המגבלה שלו, עלינו להשתמש במאפיין counterFlow שנראה אותו בקרוב.
התעלמות ממונה תווים
כפי שראינו למעלה כאשר מספר התווים חורג על המגבלה שהוגדרה, הטקסט של המונה משתמש בתכונות המוגדרות ב counterFlow. אם התכונות לא היו קיימות, הוא יישאר עם התכונות המוגדרות כברירת מחדל כמו שראינו בפלט למעלה. עלינו להשתמש בפרמטר הבא app:counterOverflowTextAppearance הסגנון עבור CounterOverflow קיים בתוך הקובץ styles.xml :
 <style name="CounterOverFlow" parent="TextAppearance.Design.Counter.Overflow">
        <item name="android:textSize">16sp</item>
        <item name="android:textColor">@color/my_orange</item>
    </style>
הוסיפו את קטע הקוד הבא לתוך פריט העיצוב הקודם activity_main.xml:
<android.support.design.widget.TextInputLayout
            android:layout_width="match_parent"
            android:layout_height="wrap_content"
            android:layout_margin="@dimen/activity_horizontal_margin"
            app:counterEnabled="true"
            app:counterMaxLength="5"
            app:counterOverflowTextAppearance="@style/CounterOverFlow"
            app:counterTextAppearance="@style/CounterText"
            app:hintTextAppearance="@style/HintText">

            <android.support.design.widget.TextInputEditText
                android:layout_width="match_parent"
                android:layout_height="wrap_content"
                android:hint="CounterOverflow CustomTextAppearance" />

        </android.support.design.widget.TextInputLayout>
תווית שגיאה
הגדרת המאפיין app:errorEnabled לערך true מאפשרת לנו להציג טקסט שגיאה בתנאי מתחת לשדה הטקסט שלנו. כדי לעצב את הטקסט שגיאה, נשתמש במאפיין app:errorTextAppearance ונוסיף את הקוד הבא בתוך קובץ ה-styles.xml.
<style name="ErrorText" parent="TextAppearance.Design.Error">
        <item name="android:textSize">16sp</item>
        <item name="android:textColor">@color/my_black</item>
    </style>
הקוד XML הבא הוא מתוך פריסת ה-activity_main.xml וכולל שדות EditText עבור תווית שגיאה ברירת מחדל ואחת מותאמת אישית.
<?xml version="1.0" encoding="utf-8"?>
<ScrollView xmlns:android="https://schemas.android.com/apk/res/android"
    xmlns:app="https://schemas.android.com/apk/res-auto"
    xmlns:tools="https://schemas.android.com/tools"
    android:layout_width="match_parent"
    android:layout_height="wrap_content"
    tools:context="com.journaldev.featuresoftextinputlayout.MainActivity">

    <LinearLayout
        android:layout_width="match_parent"
        android:layout_height="wrap_content"
        android:orientation="vertical">

        <android.support.design.widget.TextInputLayout
            android:id="@+id/errorInputLayout"
            android:layout_width="match_parent"
            android:layout_height="wrap_content"
            android:layout_margin="@dimen/activity_horizontal_margin"
            app:counterEnabled="true"
            app:counterMaxLength="5"
            app:counterOverflowTextAppearance="@style/CounterOverFlow"
            app:counterTextAppearance="@style/CounterText"
            app:errorEnabled="true"
            app:hintTextAppearance="@style/HintText">

            <android.support.design.widget.TextInputEditText
                android:id="@+id/errorEditText"
                android:layout_width="match_parent"
                android:layout_height="wrap_content"
                android:hint="Default Error Label" />

        </android.support.design.widget.TextInputLayout>


        <android.support.design.widget.TextInputLayout
            android:id="@+id/customErrorInputLayout"
            android:layout_width="match_parent"
            android:layout_height="wrap_content"
            android:layout_margin="@dimen/activity_horizontal_margin"
            app:counterEnabled="true"
            app:counterMaxLength="5"
            app:counterOverflowTextAppearance="@style/CounterOverFlow"
            app:counterTextAppearance="@style/CounterText"
            app:errorEnabled="true"
            app:errorTextAppearance="@style/ErrorText"
            app:hintTextAppearance="@style/HintText">

            <android.support.design.widget.TextInputEditText
                android:id="@+id/customErrorEditText"
                android:layout_width="match_parent"
                android:layout_height="wrap_content"
                android:hint="Custom Error Label" />

        </android.support.design.widget.TextInputLayout>

</LinearLayout>
</ScrollView>
כדי להציג את הטקסט שגיאה, עלינו לקרוא לשיטה setError(String) על מופע של TextInputLayout בתוך ה-MainActivity.java שלנו כפי שמוצג למטה.
package com.journaldev.featuresoftextinputlayout;

import android.support.design.widget.TextInputEditText;
import android.support.design.widget.TextInputLayout;
import android.support.v7.app.AppCompatActivity;
import android.os.Bundle;
import android.text.Editable;
import android.text.TextWatcher;

public class MainActivity extends AppCompatActivity {


    TextInputLayout errorInputLayout, customErrorInputLayout;
    TextInputEditText errorEditText, customErrorEditText;

    @Override
    protected void onCreate(Bundle savedInstanceState) {
        super.onCreate(savedInstanceState);
        setContentView(R.layout.activity_main);

        errorEditText = (TextInputEditText) findViewById(R.id.errorEditText);
        errorInputLayout = (TextInputLayout) findViewById(R.id.errorInputLayout);

        customErrorEditText = (TextInputEditText) findViewById(R.id.customErrorEditText);
        customErrorInputLayout = (TextInputLayout) findViewById(R.id.customErrorInputLayout);

        errorEditText.addTextChangedListener(new TextWatcher() {
            @Override
            public void beforeTextChanged(CharSequence s, int start, int count, int after) {

            }

            @Override
            public void onTextChanged(CharSequence s, int start, int before, int count) {

            }

            @Override
            public void afterTextChanged(Editable s) {

                if (s.length() > errorInputLayout.getCounterMaxLength())
                    errorInputLayout.setError("Max character length is " + errorInputLayout.getCounterMaxLength());
                else
                    errorInputLayout.setError(null);

            }
        });

        customErrorEditText.addTextChangedListener(new TextWatcher() {
            @Override
            public void beforeTextChanged(CharSequence s, int start, int count, int after) {

            }

            @Override
            public void onTextChanged(CharSequence s, int start, int before, int count) {

            }

            @Override
            public void afterTextChanged(Editable s) {

                if (s.length() > customErrorInputLayout.getCounterMaxLength())
                    customErrorInputLayout.setError("Max character length is " + customErrorInputLayout.getCounterMaxLength());
                else
                    customErrorInputLayout.setError(null);

            }
        });


    }
}
בקוד שנמצא למעלה, אנו מוסיפים TextChangedListener (המיישם TextWatcher) בכל מופע של TextInputEditText. אנו מציגים את התווית שגיאה כאשר מספר התווים הנוכחי חורג מהמגבלת המקסימלית של המונה. כדי לנקות את תווית השגיאה, אנו מגדירים את הערך בתוך setError() כ-null. הפלט שהקוד למעלה מחזיר לנו הוא: 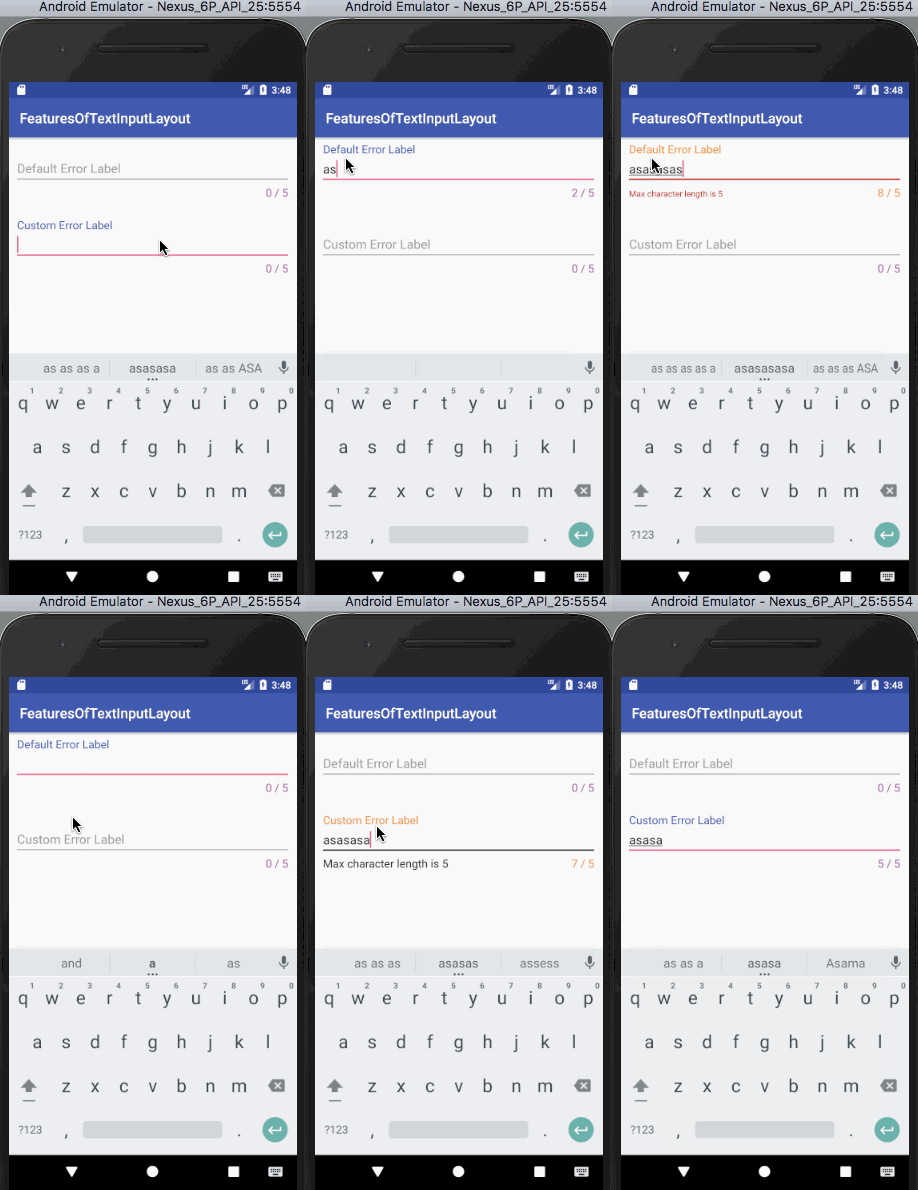 הערה: מחוון שדה הטקסט משתמש באותו צבע כמו תווית השגיאה. הוא מחליף את הצבע המוגדר על ידי counterOverflow ולכן יש לו עדיפות גבוהה ביותר.
מתג נראות סיסמה
הגדרת app:passwordToggleEnabled ל-true מאפשרת לך להציג/להסתיר את הסיסמה. כדי לשנות את צבע האייקון, השתמש ב-app:passwordToggleTint. הקוד xml למטה הוא מתוך תצורת activity_main.xml ומכיל שדות EditText עבור מתג נראות סיסמה (אייקון ברירת מחדל ועם צבע מסוים)
<?xml version="1.0" encoding="utf-8"?>
<ScrollView xmlns:android="https://schemas.android.com/apk/res/android"
    xmlns:app="https://schemas.android.com/apk/res-auto"
    xmlns:tools="https://schemas.android.com/tools"
    android:layout_width="match_parent"
    android:layout_height="wrap_content"
    tools:context="com.journaldev.featuresoftextinputlayout.MainActivity">

    <LinearLayout
        android:layout_width="match_parent"
        android:layout_height="wrap_content"
        android:orientation="vertical">

        <android.support.design.widget.TextInputLayout
            android:layout_width="match_parent"
            android:layout_height="wrap_content"
            android:layout_margin="@dimen/activity_horizontal_margin"
            app:counterEnabled="true"
            app:counterMaxLength="5"
            app:counterOverflowTextAppearance="@style/CounterOverFlow"
            app:counterTextAppearance="@style/CounterText"
            app:hintTextAppearance="@style/HintText"
            app:passwordToggleEnabled="true">

            <android.support.design.widget.TextInputEditText
                android:layout_width="match_parent"
                android:layout_height="wrap_content"
                android:hint="Password Visibility Toggle"
                android:inputType="textPassword" />

        </android.support.design.widget.TextInputLayout>


        <android.support.design.widget.TextInputLayout
            android:layout_width="match_parent"
            android:layout_height="wrap_content"
            android:layout_margin="@dimen/activity_horizontal_margin"
            app:counterEnabled="true"
            app:counterMaxLength="5"
            app:counterOverflowTextAppearance="@style/CounterOverFlow"
            app:counterTextAppearance="@style/CounterText"
            app:hintTextAppearance="@style/HintText"
            app:passwordToggleEnabled="true"
            app:passwordToggleTint="@color/my_orange">

            <android.support.design.widget.TextInputEditText
                android:layout_width="match_parent"
                android:layout_height="wrap_content"
                android:hint="Password Visibility Toggle Tint"
                android:inputType="textPassword" />

        </android.support.design.widget.TextInputLayout>
</LinearLayout>
</ScrollView>
הפלט שמוצג על ידי הקוד למעלה הוא: 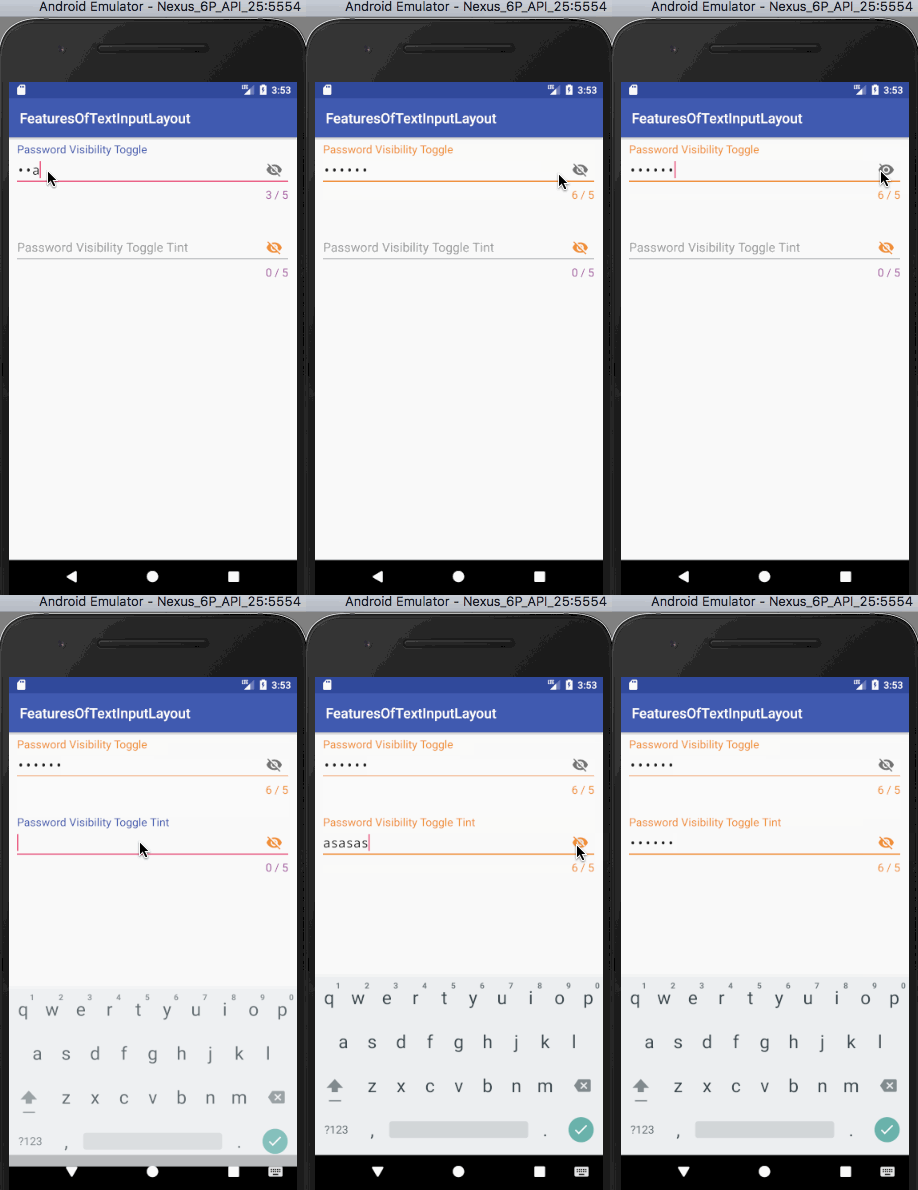 הערה: אנו יכולים להשתמש בסמלים מותאמים אישית מתוך השלט נראות הסיסמה באמצעות
 app:passwordToggleDrawable. זה מסיים את המדריך. כיסינו את כל התכונות העיקריות המופיעות ב- TextInputLayout. ניתן להוריד את פרויקט הדוגמה ל- TextInputLayout של Android מהקישור למטה. הוא כולל כל אחת מקטעי הקוד למעלה.
Source:
https://www.digitalocean.com/community/tutorials/android-textinputlayout-example


