


אביב הוא אחד מסגנונות Java EE הנפלאים. כבר ראינו איך להשתמש ב- Spring MVC ליצירת אפליקציות אינטרנט בשפת Java. היום נלמד ליצור שירותי רשת Restful בעזרת Spring MVC ולבדוק אותם בעזרת לקוח Rest. בסוף, נתעקוב גם אחר כיצד לקרוא ל- API של Spring RestTemplate כדי לפענח שירות רשת Restful של Spring. 
Spring REST
נשתמש בגרסה האחרונה של Spring 4.0.0.RELEASE ונביא את אינטגרציית Spring Jackson JSON כדי לשלוח תגובת JSON בקריאת REST. המדר פותח ב-Spring STS IDE כדי ליצור בקלות קוד מסגרת של Spring MVC ולהרחיבו למימוש של תיקרובינה RESTful. ניצור פרויקט חדש של Spring MVC ב-STS, והפרויקט הסופי ייראה כמו בדימוי התמונה למטה. נתעקש על כל אחד מהרכיבים בנפרד. 
קבצי הגדרת REST של Spring בפורמט XML
הקובץ pom.xml שלנו ייראה כך:
<?xml version="1.0" encoding="UTF-8"?>
<project xmlns="https://maven.apache.org/POM/4.0.0" xmlns:xsi="https://www.w3.org/2001/XMLSchema-instance"
	xsi:schemaLocation="https://maven.apache.org/POM/4.0.0 https://maven.apache.org/maven-v4_0_0.xsd">
	<modelVersion>4.0.0</modelVersion>
	<groupId>com.journaldev</groupId>
	<artifactId>SpringRestExample</artifactId>
	<name>SpringRestExample</name>
	<packaging>war</packaging>
	<version>1.0.0-BUILD-SNAPSHOT</version>
	<properties>
		<java-version>1.6</java-version>
		<org.springframework-version>4.0.0.RELEASE</org.springframework-version>
		<org.aspectj-version>1.7.4</org.aspectj-version>
		<org.slf4j-version>1.7.5</org.slf4j-version>
		<jackson.databind-version>2.2.3</jackson.databind-version>
	</properties>
	<dependencies>
		<!-- Jackson -->
		<dependency>
			<groupId>com.fasterxml.jackson.core</groupId>
			<artifactId>jackson-databind</artifactId>
			<version>${jackson.databind-version}</version>
		</dependency>
		<!-- Spring -->
		<dependency>
			<groupId>org.springframework</groupId>
			<artifactId>spring-context</artifactId>
			<version>${org.springframework-version}</version>
			<exclusions>
				<!-- Exclude Commons Logging in favor of SLF4j -->
				<exclusion>
					<groupId>commons-logging</groupId>
					<artifactId>commons-logging</artifactId>
				</exclusion>
			</exclusions>
		</dependency>
		<dependency>
			<groupId>org.springframework</groupId>
			<artifactId>spring-webmvc</artifactId>
			<version>${org.springframework-version}</version>
		</dependency>

		<!-- AspectJ -->
		<dependency>
			<groupId>org.aspectj</groupId>
			<artifactId>aspectjrt</artifactId>
			<version>${org.aspectj-version}</version>
		</dependency>

		<!-- Logging -->
		<dependency>
			<groupId>org.slf4j</groupId>
			<artifactId>slf4j-api</artifactId>
			<version>${org.slf4j-version}</version>
		</dependency>
		<dependency>
			<groupId>org.slf4j</groupId>
			<artifactId>jcl-over-slf4j</artifactId>
			<version>${org.slf4j-version}</version>
			<scope>runtime</scope>
		</dependency>
		<dependency>
			<groupId>org.slf4j</groupId>
			<artifactId>slf4j-log4j12</artifactId>
			<version>${org.slf4j-version}</version>
			<scope>runtime</scope>
		</dependency>
		<dependency>
			<groupId>log4j</groupId>
			<artifactId>log4j</artifactId>
			<version>1.2.15</version>
			<exclusions>
				<exclusion>
					<groupId>javax.mail</groupId>
					<artifactId>mail</artifactId>
				</exclusion>
				<exclusion>
					<groupId>javax.jms</groupId>
					<artifactId>jms</artifactId>
				</exclusion>
				<exclusion>
					<groupId>com.sun.jdmk</groupId>
					<artifactId>jmxtools</artifactId>
				</exclusion>
				<exclusion>
					<groupId>com.sun.jmx</groupId>
					<artifactId>jmxri</artifactId>
				</exclusion>
			</exclusions>
			<scope>runtime</scope>
		</dependency>

		<!-- @Inject -->
		<dependency>
			<groupId>javax.inject</groupId>
			<artifactId>javax.inject</artifactId>
			<version>1</version>
		</dependency>

		<!-- Servlet -->
		<dependency>
			<groupId>javax.servlet</groupId>
			<artifactId>servlet-api</artifactId>
			<version>2.5</version>
			<scope>provided</scope>
		</dependency>
		<dependency>
			<groupId>javax.servlet.jsp</groupId>
			<artifactId>jsp-api</artifactId>
			<version>2.1</version>
			<scope>provided</scope>
		</dependency>
		<dependency>
			<groupId>javax.servlet</groupId>
			<artifactId>jstl</artifactId>
			<version>1.2</version>
		</dependency>

		<!-- Test -->
		<dependency>
			<groupId>junit</groupId>
			<artifactId>junit</artifactId>
			<version>4.7</version>
			<scope>test</scope>
		</dependency>
	</dependencies>
	<build>
		<plugins>
			<plugin>
				<artifactId>maven-eclipse-plugin</artifactId>
				<version>2.9</version>
				<configuration>
					<additionalProjectnatures>
						<projectnature>org.springframework.ide.eclipse.core.springnature</projectnature>
					</additionalProjectnatures>
					<additionalBuildcommands>
						<buildcommand>org.springframework.ide.eclipse.core.springbuilder</buildcommand>
					</additionalBuildcommands>
					<downloadSources>true</downloadSources>
					<downloadJavadocs>true</downloadJavadocs>
				</configuration>
			</plugin>
			<plugin>
				<groupId>org.apache.maven.plugins</groupId>
				<artifactId>maven-compiler-plugin</artifactId>
				<version>2.5.1</version>
				<configuration>
					<source>1.6</source>
					<target>1.6</target>
					<compilerArgument>-Xlint:all</compilerArgument>
					<showWarnings>true</showWarnings>
					<showDeprecation>true</showDeprecation>
				</configuration>
			</plugin>
			<plugin>
				<groupId>org.codehaus.mojo</groupId>
				<artifactId>exec-maven-plugin</artifactId>
				<version>1.2.1</version>
				<configuration>
					<mainClass>org.test.int1.Main</mainClass>
				</configuration>
			</plugin>
		</plugins>

	</build>
</project>
כלי ה-STS יצר לנו את קובץ ה-pom.xml. אני מעדכן את Spring Framework, AspectJ, SLF4J וגרסת Jackson לגרסה האחרונה לפי היום הנוכחי. רוב החלק הוא משותף ונוצר באופן אוטומטי, והנקודה החשובה לציין היא שהוספתי ספריות Jackson JSON בתלותים, מכיוון שנשתמש בהן להמרת אובייקטים ל-JSON ולהפך.
<?xml version="1.0" encoding="UTF-8"?>
<web-app version="2.5" xmlns="https://java.sun.com/xml/ns/javaee"
	xmlns:xsi="https://www.w3.org/2001/XMLSchema-instance"
	xsi:schemaLocation="https://java.sun.com/xml/ns/javaee https://java.sun.com/xml/ns/javaee/web-app_2_5.xsd">

	<!-- The definition of the Root Spring Container shared by all Servlets and Filters -->
	<context-param>
		<param-name>contextConfigLocation</param-name>
		<param-value>/WEB-INF/spring/root-context.xml</param-value>
	</context-param>

	<!-- Creates the Spring Container shared by all Servlets and Filters -->
	<listener>
		<listener-class>org.springframework.web.context.ContextLoaderListener</listener-class>
	</listener>

	<!-- Processes application requests -->
	<servlet>
		<servlet-name>appServlet</servlet-name>
		<servlet-class>org.springframework.web.servlet.DispatcherServlet</servlet-class>
		<init-param>
			<param-name>contextConfigLocation</param-name>
			<param-value>/WEB-INF/spring/appServlet/servlet-context.xml</param-value>
		</init-param>
		<load-on-startup>1</load-on-startup>
	</servlet>

	<servlet-mapping>
		<servlet-name>appServlet</servlet-name>
		<url-pattern>/</url-pattern>
	</servlet-mapping>

</web-app>
עץ זה נוצר אוטומטית ולא שיניתי דבר בזה. אם תרצה לשנות קבצי תצורת ההקשר ומיקומם, תוכל לעשות זאת בקובץ web.xml.
<?xml version="1.0" encoding="UTF-8"?>
<beans xmlns="https://www.springframework.org/schema/beans"
	xmlns:xsi="https://www.w3.org/2001/XMLSchema-instance"
	xsi:schemaLocation="https://www.springframework.org/schema/beans https://www.springframework.org/schema/beans/spring-beans.xsd">

	<!-- Root Context: defines shared resources visible to all other web components -->

</beans>
קובץ זה מכיל את המשאבים המשותפים שיהיו גלויים לכל הרכיבים ברשת, נפתח שירות מנוחה ולכן לא שיניתי כאן דבר.
<?xml version="1.0" encoding="UTF-8"?>
<beans:beans xmlns="https://www.springframework.org/schema/mvc"
	xmlns:xsi="https://www.w3.org/2001/XMLSchema-instance"
	xmlns:beans="https://www.springframework.org/schema/beans"
	xmlns:context="https://www.springframework.org/schema/context"
	xsi:schemaLocation="https://www.springframework.org/schema/mvc https://www.springframework.org/schema/mvc/spring-mvc.xsd
		https://www.springframework.org/schema/beans https://www.springframework.org/schema/beans/spring-beans.xsd
		https://www.springframework.org/schema/context https://www.springframework.org/schema/context/spring-context.xsd">

	<!-- DispatcherServlet Context: defines this servlet's request-processing infrastructure -->

	<!-- Enables the Spring MVC @Controller programming model -->
	<annotation-driven />

	<!-- Handles HTTP GET requests for /resources/** by efficiently serving up static resources in the ${webappRoot}/resources directory -->
	<resources mapping="/resources/**" location="/resources/" />

	<!-- Resolves views selected for rendering by @Controllers to .jsp resources in the /WEB-INF/views directory -->
	<beans:bean class="org.springframework.web.servlet.view.InternalResourceViewResolver">
		<beans:property name="prefix" value="/WEB-INF/views/" />
		<beans:property name="suffix" value=".jsp" />
	</beans:bean>

	<!-- Configure to plugin JSON as request and response in method handler -->
	<beans:bean class="org.springframework.web.servlet.mvc.method.annotation.RequestMappingHandlerAdapter">
		<beans:property name="messageConverters">
			<beans:list>
				<beans:ref bean="jsonMessageConverter"/>
			</beans:list>
		</beans:property>
	</beans:bean>

	<!-- Configure bean to convert JSON to POJO and vice versa -->
	<beans:bean id="jsonMessageConverter" class="org.springframework.http.converter.json.MappingJackson2HttpMessageConverter">
	</beans:bean>

	<context:component-scan base-package="com.journaldev.spring.controller" />

</beans:beans>
רוב החלק הוא נוצר אוטומטית וכולל הגדרות תבנית. אך נקודות חשובות לשים לב אליהן הן annotation-driven אשר תומכת בהגדרת הערות, והכנסת MappingJackson2HttpMessageConverter ל- RequestMappingHandlerAdapter messageConverters כך ש-Jackson API יפעיל וימיר JSON לבונות Java ולהיפך. על ידי הגדרה זו, נשתמש ב-JSON בגוף הבקשה ונקבל נתונים בתצורת JSON בתגובה.
מחלקות דגם Spring REST
בוא נכתוב כיתת POJO פשוטה שתשמש כקלט ופלט לשיטות השירות הרשתי שלנו.
package com.journaldev.spring.model;

import java.io.Serializable;
import java.util.Date;

import com.fasterxml.jackson.databind.annotation.JsonSerialize;
import com.fasterxml.jackson.databind.ser.std.DateSerializer;

public class Employee implements Serializable{

	private static final long serialVersionUID = -7788619177798333712L;

	private int id;
	private String name;
	private Date createdDate;

	public int getId() {
		return id;
	}
	public void setId(int id) {
		this.id = id;
	}
	public String getName() {
		return name;
	}
	public void setName(String name) {
		this.name = name;
	}

	@JsonSerialize(using=DateSerializer.class)
	public Date getCreatedDate() {
		return createdDate;
	}
	public void setCreatedDate(Date createdDate) {
		this.createdDate = createdDate;
	}


}
הנקודה היחידה לשים לב אליה היא שלשימוש בהערה @JsonSerialize לשימוש במחלקת DateSerializer להמרת תאריכים מסוג Java לתבנית JSON ולהיפך.
נקודות קצה שירות RESTful של Spring
יהיו לנו נקודות קצה של שירותי RESTful הבאות.
| Sl. No | URI | HTTP Method | Details |
|---|---|---|---|
| 1 | /rest/emp/dummy | GET | Health Check service, to insert a dummy data in the Employees data storage |
| 2 | /rest/emp/{id} | GET | To get the Employee object based on the id |
| 3 | /rest/emps | GET | To get the list of all the Employees in the data store |
| 4 | /rest/emp/create | POST | To create the Employee object and store it |
| 5 | /rest/emp/delete/{id} | PUT | To delete the Employee object from the data storage based on the id |
יש לנו כיתה המגדירה את כל נתיבי ה-URI הללו כאטריבוטים קבועים של מחרוזות.
package com.journaldev.spring.controller;

public class EmpRestURIConstants {

	public static final String DUMMY_EMP = "/rest/emp/dummy";
	public static final String GET_EMP = "/rest/emp/{id}";
	public static final String GET_ALL_EMP = "/rest/emps";
	public static final String CREATE_EMP = "/rest/emp/create";
	public static final String DELETE_EMP = "/rest/emp/delete/{id}";
}
כיתת בקרת שירות RESTful של Spring
כיתת ה- EmployeeController שלנו תפרסם את כל נקודות הקצה של שירות האינטרנט המוזכרות לעיל. בואו נסתכל על קוד הכיתה ואז נלמד על כל אחת מהשיטות בפרט.
package com.journaldev.spring.controller;

import java.util.ArrayList;
import java.util.Date;
import java.util.HashMap;
import java.util.List;
import java.util.Map;
import java.util.Set;

import org.slf4j.Logger;
import org.slf4j.LoggerFactory;
import org.springframework.stereotype.Controller;
import org.springframework.web.bind.annotation.PathVariable;
import org.springframework.web.bind.annotation.RequestBody;
import org.springframework.web.bind.annotation.RequestMapping;
import org.springframework.web.bind.annotation.RequestMethod;
import org.springframework.web.bind.annotation.ResponseBody;

import com.journaldev.spring.model.Employee;

/**
 * Handles requests for the Employee service.
 */
@Controller
public class EmployeeController {

	private static final Logger logger = LoggerFactory.getLogger(EmployeeController.class);

	//מפה לאחסון עובדים, למיטב ידינו צריך להשתמש במסד נתונים
	Map empData = new HashMap();

	@RequestMapping(value = EmpRestURIConstants.DUMMY_EMP, method = RequestMethod.GET)
	public @ResponseBody Employee getDummyEmployee() {
		logger.info("Start getDummyEmployee");
		Employee emp = new Employee();
		emp.setId(9999);
		emp.setName("Dummy");
		emp.setCreatedDate(new Date());
		empData.put(9999, emp);
		return emp;
	}

	@RequestMapping(value = EmpRestURIConstants.GET_EMP, method = RequestMethod.GET)
	public @ResponseBody Employee getEmployee(@PathVariable("id") int empId) {
		logger.info("Start getEmployee. ID="+empId);

		return empData.get(empId);
	}

	@RequestMapping(value = EmpRestURIConstants.GET_ALL_EMP, method = RequestMethod.GET)
	public @ResponseBody List getAllEmployees() {
		logger.info("Start getAllEmployees.");
		List emps = new ArrayList();
		Set empIdKeys = empData.keySet();
		for(Integer i : empIdKeys){
			emps.add(empData.get(i));
		}
		return emps;
	}

	@RequestMapping(value = EmpRestURIConstants.CREATE_EMP, method = RequestMethod.POST)
	public @ResponseBody Employee createEmployee(@RequestBody Employee emp) {
		logger.info("Start createEmployee.");
		emp.setCreatedDate(new Date());
		empData.put(emp.getId(), emp);
		return emp;
	}

	@RequestMapping(value = EmpRestURIConstants.DELETE_EMP, method = RequestMethod.PUT)
	public @ResponseBody Employee deleteEmployee(@PathVariable("id") int empId) {
		logger.info("Start deleteEmployee.");
		Employee emp = empData.get(empId);
		empData.remove(empId);
		return emp;
	}

}
עבור פשטות, אני אוחזר את כל נתוני העובד ב־HashMap empData. האנוטציה @RequestMapping משמשת למפה את URI בקשה לשיטת הטיפול. ניתן גם לציין את השיטה ה-HTTP שיש להשתמש בה על ידי אפליקציית הלקוח לקרוא לשיטת ה־REST. האנוטציה @ResponseBody משמשת למפה את אובייקט התגובה בגוף התגובה. לאחר שאובייקט התגובה מוחזר על ידי שיטת הטיפול, MappingJackson2HttpMessageConverter מתערער וממיר אותו לתגובת JSON. האנוטציה @PathVariable היא הדרך הפשוטה לחלץ את הנתונים מ-URI של ה־REST ולמפות אותם לארגומנט של השיטה. האנוטציה @RequestBody משמשת למפה את נתוני JSON של גוף הבקשה לאובייקט Employee, שוב על ידי הממיר MappingJackson2HttpMessageConverter. יתר הקוד הוא פשוט וברור לעצמו, האפליקציה שלנו מוכנה להתקנה ולבדיקה. פשוט ייצא כקובץ WAR ויעתיק לתיקיית האפליקציה web בתיקיית האפליקציה של ה־servlet container. אם יש לך את השרת מוגדר ב־STS, פשוט תפעיל אותו על השרת כדי להתקין אותו. אני משתמש ב־WizTools RestClient לקריאות ה־REST, אך תוכל גם להשתמש בתוסף ה־Chrome Postman. למטה יש תמונות מציונים שונים של קריאות ה־APIs של האפליקציה שלנו והפלט שלהן. בדיקת בריאות – קריאת REST לעובד דמי  יצירת קריאה REST POST לעובד: וודא שסוג תוכן הבקשה הוא "application/json", אחרת יתקבל קוד שגיאה HTTP 415.
  קריאת REST לעובד
  קריאת REST למחיקת עובד
 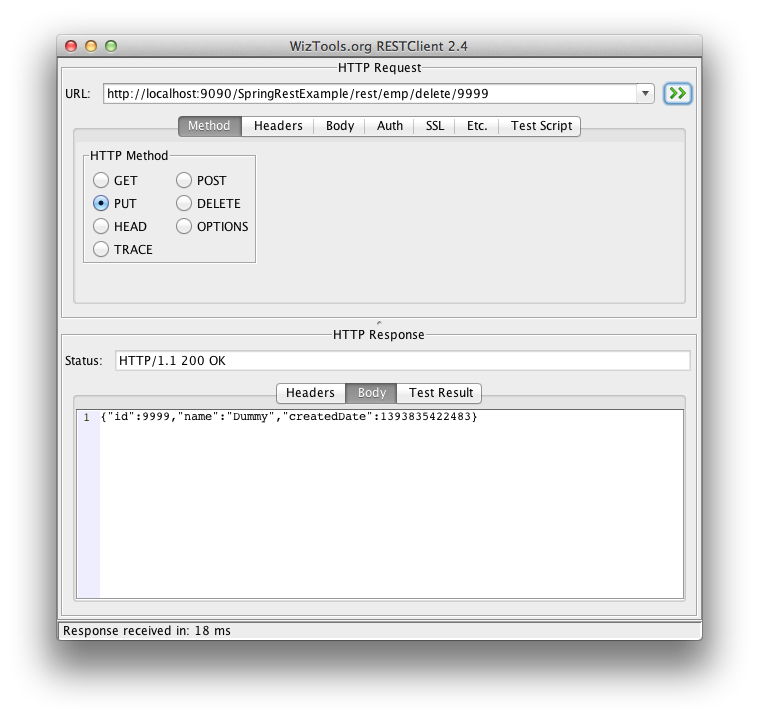 קריאה REST לקבלת כל העובדים
תוכנית לקוח Spring Rest
לקוחות REST הם טובים לבדיקת שירותי האינטרנט שלנו אך ברוב הפעמים, אנו צריכים לקרוא לשירותי REST דרך התוכנית שלנו. אנו יכולים להשתמש ב־RestTemplate של Spring כדי לקרוא לשיטות אלו בקלות. להלן תוכנית פשוטה שמקראת את שיטות ה־REST של האפליקציה שלנו באמצעות ממשק ה־RestTemplate API.
package com.journaldev.spring;

import java.util.LinkedHashMap;
import java.util.List;

import org.springframework.web.client.RestTemplate;

import com.journaldev.spring.controller.EmpRestURIConstants;
import com.journaldev.spring.model.Employee;

public class TestSpringRestExample {

	public static final String SERVER_URI = "https://localhost:9090/SpringRestExample";

	public static void main(String args[]){

		testGetDummyEmployee();
		System.out.println("*****");
		testCreateEmployee();
		System.out.println("*****");
		testGetEmployee();
		System.out.println("*****");
		testGetAllEmployee();
	}

	private static void testGetAllEmployee() {
		RestTemplate restTemplate = new RestTemplate();
		// לא נוכל לקבל את List מכיוון שממיר ה־JSON לא מכיר את סוג ה־
		// אובייקט ברשימה ולכן ממיר אותו לסוג האובייקט המוגדר כברירת מחדל LinkedHashMap
		List emps = restTemplate.getForObject(SERVER_URI+EmpRestURIConstants.GET_ALL_EMP, List.class);
		System.out.println(emps.size());
		for(LinkedHashMap map : emps){
			System.out.println("ID="+map.get("id")+",Name="+map.get("name")+",CreatedDate="+map.get("createdDate"));;
		}
	}

	private static void testCreateEmployee() {
		RestTemplate restTemplate = new RestTemplate();
		Employee emp = new Employee();
		emp.setId(1);emp.setName("Pankaj Kumar");
		Employee response = restTemplate.postForObject(SERVER_URI+EmpRestURIConstants.CREATE_EMP, emp, Employee.class);
		printEmpData(response);
	}

	private static void testGetEmployee() {
		RestTemplate restTemplate = new RestTemplate();
		Employee emp = restTemplate.getForObject(SERVER_URI+"/rest/emp/1", Employee.class);
		printEmpData(emp);
	}

	private static void testGetDummyEmployee() {
		RestTemplate restTemplate = new RestTemplate();
		Employee emp = restTemplate.getForObject(SERVER_URI+EmpRestURIConstants.DUMMY_EMP, Employee.class);
		printEmpData(emp);
	}

	public static void printEmpData(Employee emp){
		System.out.println("ID="+emp.getId()+",Name="+emp.getName()+",CreatedDate="+emp.getCreatedDate());
	}
}
רוב התוכנית פשוטה להבנה, אך כאשר אנו קוראים לשיטת REST שמחזירה אוסף, אנו צריכים להשתמש ב־LinkedHashMap מאחר והממיר מ־JSON לא מכיר את אובייקט העובד וממיר אותו לאוסף של LinkedHashMap. אנו יכולים לכתוב שיטת עזר להמרה מ־LinkedHashMap לאובייקט Java Bean שלנו. כאשר אנו מריצים את התוכנית לעיל, אנו מקבלים את הפלט הבא בקונסולה.
ID=9999,Name=Dummy,CreatedDate=Tue Mar 04 21:02:41 PST 2014
*****
ID=1,Name=Pankaj Kumar,CreatedDate=Tue Mar 04 21:02:41 PST 2014
*****
ID=1,Name=Pankaj Kumar,CreatedDate=Tue Mar 04 21:02:41 PST 2014
*****
2
ID=1,Name=Pankaj Kumar,CreatedDate=1393995761654
ID=9999,Name=Dummy,CreatedDate=1393995761381
נקודה נוספת היא שאין לשיטות ההצבה של RestTemplate אפשרות להגדיר אובייקט תגובה מכיוון ששיטת ה־PUT צריכה לשמור משהו בשרת וקוד התגובה הפשוט HTTP 200 צריך להיות מספיק.
הורדת פרויקט Spring Restful Webservice
זהו כל מה שיש לנו עבור המדריך של אפליקציית האינטרנט השקטה של Spring. הורידו את הפרויקט הדוגמי מהקישור למעלה ושחקו איתו כדי ללמוד עוד. עדכון: בשל כמה בקשות לספק דוגמה דומה עם XML כמו גם תמיכה בשני XML ו-JSON, הרחבתי את האפליקציה הזו בדוגמה של Spring REST XML JSON כדי לתמוך בשני בקשות ותגובה ב-XML ו-JSON. אני ממליץ בחום עליכם לעבור דרך זאת כדי לראות את יופיו של מסגרת הקפיץ וכמה קל להשיג את זה.
תוכלו להוריד את הפרויקט המלא מהמאגר ה-GitHub שלנו.