העלאת קבצים היא משימה נפוצה בכל יישום אינטרנט. כבר ראינו איך להעלות קבצים ב־Servlet וב־העלאת קבצים ב־Struts2. היום נלמד על העלאת קבצים ב־Spring, ובפרט על העלאת קבצים ב־Spring MVC לקבצים יחידים ומרובים.
העלאת קבצים ב־Spring MVC
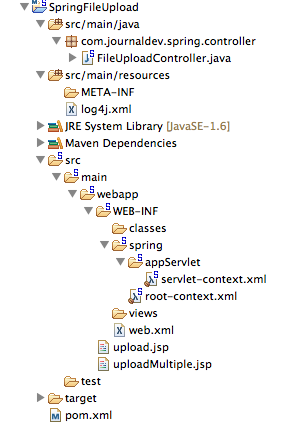
הגישה הבסיסית של Spring MVC ספקת תמיכה בהעלאת קבצים על ידי שילוב של API של Apache Commons FileUpload. התהליך להעלות קבצים הוא פשוט מאוד ודורש הגדרות פשוטות. ניצור פרויקט פשוט בעזרת STS שיראה כמו בתמונה למטה. Spring MVC פרויקט רגיל, כמו שניתן לראות בתמונה.  רוב הקוד הוא קוד בילד שנוצר על ידי הכלי של STS, ונתמקד בהתאמות שנדרשות לשימוש באינטגרציה של העלאת קבצים של Spring.
התלויות Maven עבור Apache Commons FileUpload
לפני הכל, עלינו להוסיף תלות ב־Apache Commons FileUpload בקובץ pom.xml שלנו, כך שקבצי jar הדרושים יהיו חלק מיישום האינטרנט. להלן קטע ההתלות מקובץ ה־pom.xml שלי.
<!-- Apache Commons FileUpload -->
<dependency>
	<groupId>commons-fileupload</groupId>
	<artifactId>commons-fileupload</artifactId>
	<version>1.3.1</version>
</dependency>

<!-- Apache Commons IO -->
<dependency>
	<groupId>commons-io</groupId>
	<artifactId>commons-io</artifactId>
	<version>2.4</version>
</dependency>
תצוגות טופס העלאת קובץ ב־Spring
ניצור שני דפי JSP כדי לאפשר העלאת קובץ יחיד ומרובה ביישום האינטרנט של Spring. קוד תצוגה של upload.jsp:
<%@ taglib uri="https://java.sun.com/jsp/jstl/core" prefix="c" %>
<%@ page session="false" %>
<html>
<head>
<title>Upload File Request Page</title>
</head>
<body>
	<form method="POST" action="uploadFile" enctype="multipart/form-data">
		File to upload: <input type="file" name="file"><br />
		Name: <input type="text" name="name"><br /> <br />
		<input type="submit" value="Upload"> Press here to upload the file!
	</form>
</body>
</html>
קוד תצוגה של uploadMultiple.jsp:
<%@ taglib uri="https://java.sun.com/jsp/jstl/core" prefix="c" %>
<%@ page session="false" %>
<html>
<head>
<title>Upload Multiple File Request Page</title>
</head>
<body>
	<form method="POST" action="uploadMultipleFile" enctype="multipart/form-data">
		File1 to upload: <input type="file" name="file"><br />
		Name1: <input type="text" name="name"><br /> <br />
		File2 to upload: <input type="file" name="file"><br />
		Name2: <input type="text" name="name"><br /> <br />
		<input type="submit" value="Upload"> Press here to upload the file!
	</form>
</body>
</html>
שים לב שקבצים אלה הם קבצי HTML פשוטים, אני לא משתמש בתגי JSP או Spring כדי להימנע ממורכבות. הנקודה החשובה לציין היא שטופס עליו enctype צריך להיות multipart/form-data, כך שיישום האינטרנט של Spring יודע שהבקשה מכילה נתוני קובץ שיש לעבד. גם שים לב שעבור קבצים מרובים, שדה הטופס "file" ו־"name" הם זהים בשדות הקלט, כך שהנתונים יישלחו בצורת מערך. ניקח את המערך הקלט ונפרס את נתוני הקובץ ונאחסן אותם בשם הקובץ הנתון.
הגדרת Multipart של Spring MVC
כדי להשתמש ב־Apache Commons FileUpload לטיפול בבקשות מרובות חלקים, כל מה שצריך לעשות הוא להגדיר את הקובץ multipartResolver עם המחלקה org.springframework.web.multipart.commons.CommonsMultipartResolver. קובץ התצורה הסופי שלנו נראה כך. קוד servlet-context.xml:
<?xml version="1.0" encoding="UTF-8"?>
<beans:beans xmlns="https://www.springframework.org/schema/mvc"
	xmlns:xsi="https://www.w3.org/2001/XMLSchema-instance" xmlns:beans="https://www.springframework.org/schema/beans"
	xmlns:context="https://www.springframework.org/schema/context"
	xsi:schemaLocation="https://www.springframework.org/schema/mvc https://www.springframework.org/schema/mvc/spring-mvc.xsd
		https://www.springframework.org/schema/beans https://www.springframework.org/schema/beans/spring-beans.xsd
		https://www.springframework.org/schema/context https://www.springframework.org/schema/context/spring-context.xsd">

	<!-- DispatcherServlet Context: defines this servlet's request-processing
		infrastructure -->

	<!-- Enables the Spring MVC @Controller programming model -->
	<annotation-driven />

	<!-- Handles HTTP GET requests for /resources/** by efficiently serving
		up static resources in the ${webappRoot}/resources directory -->
	<resources mapping="/**" location="/" />

	<!-- Resolves views selected for rendering by @Controllers to .jsp resources
		in the /WEB-INF/views directory -->
	<beans:bean
		class="org.springframework.web.servlet.view.InternalResourceViewResolver">
		<beans:property name="prefix" value="/WEB-INF/views/" />
		<beans:property name="suffix" value=".jsp" />
	</beans:bean>

	<beans:bean id="multipartResolver"
		class="org.springframework.web.multipart.commons.CommonsMultipartResolver">

		 <!-- setting maximum upload size -->
		<beans:property name="maxUploadSize" value="100000" />

	</beans:bean>

	<context:component-scan base-package="com.journaldev.spring.controller" />

</beans:beans>
שים לב שאני מגדיר את מגבלת גודל ההעלאה המרבית על ידי מתן ערך למאפיין maxUploadSize עבור קובץ multipartResolver. אם תבדוק את קוד המקור של מחלקת DispatcherServlet, תראה שמשתנה MultipartResolver בשם multipartResolver מוגדר ומאתחל במתודה שלמטה.
private void initMultipartResolver(ApplicationContext context)
  {
    try
    {
      this.multipartResolver = ((MultipartResolver)context.getBean("multipartResolver", MultipartResolver.class));
      if (this.logger.isDebugEnabled()) {
        this.logger.debug("Using MultipartResolver [" + this.multipartResolver + "]");
      }
    }
    catch (NoSuchBeanDefinitionException ex)
    {
      this.multipartResolver = null;
      if (this.logger.isDebugEnabled())
        this.logger.debug("Unable to locate MultipartResolver with name 'multipartResolver': no multipart request handling provided");
    }
  }
עם ההגדרה הזו, כל בקשה עם enctype כ־multipart/form-data תתוודע על ידי multipartResolver לפני העברתה למחלקת הבקר.
מחלקת בקרת העלאת קבצים של Spring
קוד מחלקת הבקרה הוא פשוט מאוד, אנו צריכים להגדיר את שיטות הטיפול עבור כתובות ה־uploadFile ו־uploadMultipleFile. קובץ FileUploadController.java:
package com.journaldev.spring.controller;

import java.io.BufferedOutputStream;
import java.io.File;
import java.io.FileOutputStream;

import org.slf4j.Logger;
import org.slf4j.LoggerFactory;
import org.springframework.stereotype.Controller;
import org.springframework.web.bind.annotation.RequestMapping;
import org.springframework.web.bind.annotation.RequestMethod;
import org.springframework.web.bind.annotation.RequestParam;
import org.springframework.web.bind.annotation.ResponseBody;
import org.springframework.web.multipart.MultipartFile;

/**
 * Handles requests for the application file upload requests
 */
@Controller
public class FileUploadController {

	private static final Logger logger = LoggerFactory
			.getLogger(FileUploadController.class);

	/**
	 * Upload single file using Spring Controller
	 */
	@RequestMapping(value = "/uploadFile", method = RequestMethod.POST)
	public @ResponseBody
	String uploadFileHandler(@RequestParam("name") String name,
			@RequestParam("file") MultipartFile file) {

		if (!file.isEmpty()) {
			try {
				byte[] bytes = file.getBytes();

				// יוצר את התיקיה לאחסון הקובץ
				String rootPath = System.getProperty("catalina.home");
				File dir = new File(rootPath + File.separator + "tmpFiles");
				if (!dir.exists())
					dir.mkdirs();

				// יוצר את הקובץ בשרת
				File serverFile = new File(dir.getAbsolutePath()
						+ File.separator + name);
				BufferedOutputStream stream = new BufferedOutputStream(
						new FileOutputStream(serverFile));
				stream.write(bytes);
				stream.close();

				logger.info("Server File Location="
						+ serverFile.getAbsolutePath());

				return "You successfully uploaded file=" + name;
			} catch (Exception e) {
				return "You failed to upload " + name + " => " + e.getMessage();
			}
		} else {
			return "You failed to upload " + name
					+ " because the file was empty.";
		}
	}

	/**
	 * Upload multiple file using Spring Controller
	 */
	@RequestMapping(value = "/uploadMultipleFile", method = RequestMethod.POST)
	public @ResponseBody
	String uploadMultipleFileHandler(@RequestParam("name") String[] names,
			@RequestParam("file") MultipartFile[] files) {

		if (files.length != names.length)
			return "Mandatory information missing";

		String message = "";
		for (int i = 0; i < files.length; i++) {
			MultipartFile file = files[i];
			String name = names[i];
			try {
				byte[] bytes = file.getBytes();

				// יוצר את התיקיה לאחסון הקובץ
				String rootPath = System.getProperty("catalina.home");
				File dir = new File(rootPath + File.separator + "tmpFiles");
				if (!dir.exists())
					dir.mkdirs();

				// יוצר את הקובץ בשרת
				File serverFile = new File(dir.getAbsolutePath()
						+ File.separator + name);
				BufferedOutputStream stream = new BufferedOutputStream(
						new FileOutputStream(serverFile));
				stream.write(bytes);
				stream.close();

				logger.info("Server File Location="
						+ serverFile.getAbsolutePath());

				message = message + "You successfully uploaded file=" + name
						+ "
";
			} catch (Exception e) {
				return "You failed to upload " + name + " => " + e.getMessage();
			}
		}
		return message;
	}
}
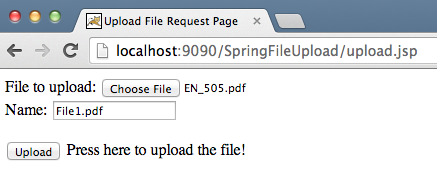
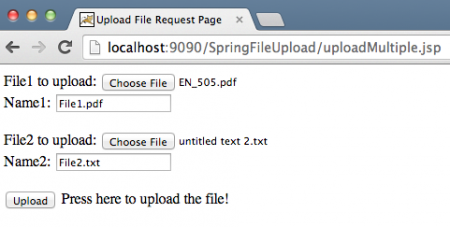
שים לב לשימוש באננוטציות של Spring שהופכות את חיי התכנית שלנו לקלים יותר והקוד נראה קריא יותר. בשיטה uploadFileHandler משתמשים לטיפול בהעלאת קובץ יחיד, בעוד שבשיטה uploadMultipleFileHandler משתמשים לטיפול בהעלאת מספר קבצים. למעשה, יכולנו להשתמש בשיטה אחת לטיפול בשתי התרחישים. כעת יש לייצא את היישום כקובץ WAR ולהתקין אותו בתוך תיק Tomcat servlet. כאשר אנו מפעילים את היישום שלנו, התמונות למטה מציגות לנו את הבקשות והתגובות.
דוגמא להעלאת קובץ ב-Spring MVC


 ניתן לבדוק את יומני השרת כדי לדעת את המיקום שבו הקבצים נשמרו. הורד את הפרויקט מהקישור למעלה ושחק עם זה כדי ללמוד עוד.


