ברוכים הבאים למדריך לדוגמה של Spring IoC. מסגרת Spring מבוססת על עקרון ההפוכה של השליטה. הבקעת תלות היא הטכניקה להחיל IoC ביישומים.
Spring IoC
 היום נציג את תכונות מנהל ה IoC של Spring. נעבור גם על ידי Spring Bean. להלן התוכן של המדריך לשם ניווט מהיר אל סעיפים שונים של מדריך ה- Spring IoC.
מעצבת ההפעלה של Spring IoC
Spring IoC הוא המנגנון להשגת חיבור פרוח בין תלות בין אובייקטים. על מנת להשיג חיבור פרוח וקשר דינמי של האובייקטים בזמן ריצה, תלות בין אובייקטים נכנסות על ידי אובייקטים אסמבלר אחרים. מכליל IoC של Spring הוא התוכנית ש־מזריעה תלות לתוך אובייקט והופכת אותו למוכן לשימוש. כבר ראינו כיצד ניתן להשתמש ב־הזרקת תלות של Spring כדי ליישם IoC ביישומונים שלנו. קבוצת המחזיקים בתכנית IoC של Spring הם חלק מחבילות org.springframework.beans ו־org.springframework.context. קונטיינר IoC של Spring מספק לנו דרכים שונות להפריד בין תלות בין אובייקטים. BeanFactory הוא ממשק השורש של קונטיינר IoC של Spring. ApplicationContext הוא ממשק הילד של ממשק BeanFactory המספק יכולות של Spring AOP, i18n וכו'. כמה ממשקי הילד השימושיים של ApplicationContext הם ConfigurableApplicationContext ו־WebApplicationContext. ספריית Spring מספקת מספר ממשקי ApplicationContext יעילים שניתן להשתמש בהם כדי לקבל את ההקשר של Spring ולאחר מכן את ה־Spring Bean. כמה ממשקי הילד השימושיים של ApplicationContext שאנו יכולים להשתמש בהם הם:
- AnnotationConfigApplicationContext: אם אנו משתמשים ב־Spring ביישומוני Java עצמאיים ומשתמשים בהערות לתצורה, אז נוכל להשתמש בזה כדי לאתחל את הקונטיינר ולקבל את אובייקטי ה־Bean.
- ClassPathXmlApplicationContext: אם יש לנו קובץ XML שמגדיר את הפרטים של ה־spring bean באפליקציה המקומית, אז ניתן להשתמש במחלקה זו כדי לטעון את הקובץ ולקבל את אובייקט ה-container.
- FileSystemXmlApplicationContext: זהה ל־ClassPathXmlApplicationContext רק שקובץ ה־XML יכול להיטען מכל מקום במערכת הקבצים.
- AnnotationConfigWebApplicationContext ו־XmlWebApplicationContext מיועדות לאפליקציות אינטרנט.
כללית, כאשר אתה עובד על אפליקציה של Spring MVC והקובץ המקומי שלך מוגדר להשתמש ב־Spring Framework, גוף ה־Spring IoC מתאים יתחיל בעת הפעלת האפליקציה וכאשר נדרש Bean, התלות יתבצעו אוטומטית. אולם, באפליקציה מקומית, יש צורך להפעיל את ה-container במקום מסוים באפליקציה ולאחר מכן להשתמש בו כדי לקבל את ה־spring beans.
Spring Bean
Spring Bean הוא דבר רגיל, כל אובייקט ב־Spring Framework שנטען דרך Container של Spring נקרא Spring Bean. כל קלאס Java POJO רגיל יכול להיות Spring Bean אם הוא מוגדר להתאמתה דרך ה-container על ידי ספק מידע מטה של הקונפיגורציה.
Spring Bean Scopes
יש חמישה תחומים שמוגדרים עבור Spring Beans.
- singleton – יווצר רק מופע אחד של ה-Bean עבור כל מיכל. זהו הטווח ברירת המחדל עבור ה- Spring Beans. בעוד שמשתמשים בטווח זה, ודא שיש ל-Bean משתנים של מופע משותף, אחרת ייתכן שיבוא לידי בעיות סטיית נתונים.
- prototype – יווצר מופע חדש בכל פעם שה-Bean נדרש.
- request – זה דומה לטווח ה-prototype, אך הוא מיועד לשימוש ביישומי אינטרנט. מופע חדש של ה-Bean יווצר לכל בקשת HTTP.
- session – מופע חדש יווצר עבור כל סשן HTTP על ידי המיכל.
- global-session – משמש ליצירת Beans גלובליים של סשן עבור יישומי Portlet.
סביבת ה-Spring היא ניתנת להרחבה ואנו יכולים ליצור טווחים משלנו גם. עם זאת, ברוב המקרים אנו מרוצים עם הטווחים שסופקים על ידי המסגרת.
הגדרת Bean של Spring
סביבת ה-Spring מספקת שלושה דרכים להגדיר Beans לשימוש ביישום.
- הגדרת תצורה על סמך הערות – על ידי שימוש בהערות @Service או @Component. פרטי הטווח ניתנים לספק בעזרת הערה @Scope.
- הגדרת XML בהתבסס על XML – על ידי יצירת קובץ XML של תצורת Spring כדי להגדיר את החומרות. אם אתה משתמש במסגרת Spring MVC, ניתן לטעון את התצורה המבוססת על XML אוטומטית על ידי כתיבת קוד חומרת בקובץ web.xml.
- הגדרת תצורה בהתבסס על Java – החל מגרסה 3.0 של Spring, ניתן להגדיר חומרות של Spring בעזרת תוכניות Java. כמה הערות חשובות שמשמשות להגדרת בהתבסס על Java הן @Configuration, @ComponentScan ו־@Bean.
דוגמת פרויקט לדוגמת Spring IoC ו־Spring Bean
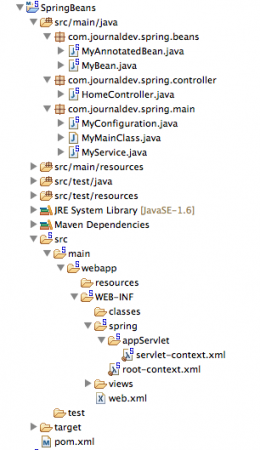
עבור לנבחרת השונות של מיכל ה- Spring IoC ולתצורת ה- Spring Bean עם פרויקט פשוט של Spring. לדוגמא שלי, אני יוצר פרויקט Spring MVC ב- Spring Tool Suite. אם אתה חדש ל- Spring Tool Suite ול- Spring MVC, אני ממליץ לקרוא את מדריך ל- Spring MVC עם Spring Tool Suite. מבנה הפרויקט הסופי נראה כמו בתמונה למטה.  בואו נסתכל על רכיבים שונים של מיכל ה- Spring IoC והפרויקט Spring Bean לפי סדר.
תצורת Spring Bean על בסיס XML
MyBean הוא פשוט POJO קובץ Java.
package com.journaldev.spring.beans;

public class MyBean {

	private String name;

	public String getName() {
		return name;
	}
	public void setName(String name) {
		this.name = name;
	}

}
קובץ תצורה XML של Spring
קוד servlet-context.xml:
<?xml version="1.0" encoding="UTF-8"?>
<beans:beans xmlns="https://www.springframework.org/schema/mvc"
	xmlns:xsi="https://www.w3.org/2001/XMLSchema-instance"
	xmlns:beans="https://www.springframework.org/schema/beans"
	xmlns:context="https://www.springframework.org/schema/context"
	xsi:schemaLocation="https://www.springframework.org/schema/mvc https://www.springframework.org/schema/mvc/spring-mvc.xsd
		https://www.springframework.org/schema/beans https://www.springframework.org/schema/beans/spring-beans.xsd
		https://www.springframework.org/schema/context https://www.springframework.org/schema/context/spring-context.xsd">

	<!-- DispatcherServlet Context: defines this servlet's request-processing infrastructure -->

	<!-- Enables the Spring MVC @Controller programming model -->
	<annotation-driven />

	<!-- Handles HTTP GET requests for /resources/** by efficiently serving up static resources in the ${webappRoot}/resources directory -->
	<resources mapping="/resources/**" location="/resources/" />

	<!-- Resolves views selected for rendering by @Controllers to .jsp resources in the /WEB-INF/views directory -->
	<beans:bean class="org.springframework.web.servlet.view.InternalResourceViewResolver">
		<beans:property name="prefix" value="/WEB-INF/views/" />
		<beans:property name="suffix" value=".jsp" />
	</beans:bean>

	<context:component-scan base-package="com.journaldev.spring" />

	<beans:bean name="myBean" class="com.journaldev.spring.beans.MyBean" scope="singleton" ></beans:bean>

</beans:beans>
שים לב ש- MyBean מוגדר באמצעות אלמנט bean עם טווח של singleton.
תצורת Spring Bean על בסיס אנוטציות
package com.journaldev.spring.beans;

import org.springframework.context.annotation.Scope;
import org.springframework.stereotype.Service;
import org.springframework.web.context.WebApplicationContext;

@Service
@Scope(WebApplicationContext.SCOPE_REQUEST)
public class MyAnnotatedBean {

	private int empId;

	public int getEmpId() {
		return empId;
	}

	public void setEmpId(int empId) {
		this.empId = empId;
	}

}
MyAnnotatedBean מוגדר באמצעות @Service והתיק נקבע ל-Request.
מחלקת בקרת Spring IoC
מחלקת HomeController תתמודד עם בקשות ה-HTTP עבור דף הבית של היישום. נכניס את ה- Spring beans שלנו למחלקת בקר זו דרך תוך כדי השימוש ב-container WebApplicationContext.
package com.journaldev.spring.controller;

import java.text.DateFormat;
import java.util.Date;
import java.util.Locale;

import org.springframework.beans.factory.annotation.Autowired;
import org.springframework.context.annotation.Scope;
import org.springframework.stereotype.Controller;
import org.springframework.ui.Model;
import org.springframework.web.bind.annotation.RequestMapping;
import org.springframework.web.bind.annotation.RequestMethod;

import com.journaldev.spring.beans.MyAnnotatedBean;
import com.journaldev.spring.beans.MyBean;

@Controller
@Scope("request")
public class HomeController {

	private MyBean myBean;

	private MyAnnotatedBean myAnnotatedBean;

	@Autowired
	public void setMyBean(MyBean myBean) {
		this.myBean = myBean;
	}

	@Autowired
	public void setMyAnnotatedBean(MyAnnotatedBean obj) {
		this.myAnnotatedBean = obj;
	}

	/**
	 * Simply selects the home view to render by returning its name.
	 */
	@RequestMapping(value = "/", method = RequestMethod.GET)
	public String home(Locale locale, Model model) {
		System.out.println("MyBean hashcode="+myBean.hashCode());
		System.out.println("MyAnnotatedBean hashcode="+myAnnotatedBean.hashCode());

		Date date = new Date();
		DateFormat dateFormat = DateFormat.getDateTimeInstance(DateFormat.LONG, DateFormat.LONG, locale);

		String formattedDate = dateFormat.format(date);

		model.addAttribute("serverTime", formattedDate );

		return "home";
	}

}
תיאור התפריט
עלינו להגדיר את היישום שלנו עבור מסגרת ה- Spring כך שהמטא-נתונים של ההגדרה ייטענו וההקשר יתאמת.
<?xml version="1.0" encoding="UTF-8"?>
<web-app version="2.5" xmlns="https://java.sun.com/xml/ns/javaee"
	xmlns:xsi="https://www.w3.org/2001/XMLSchema-instance"
	xsi:schemaLocation="https://java.sun.com/xml/ns/javaee https://java.sun.com/xml/ns/javaee/web-app_2_5.xsd">

	<!-- The definition of the Root Spring Container shared by all Servlets and Filters -->
	<context-param>
		<param-name>contextConfigLocation</param-name>
		<param-value>/WEB-INF/spring/root-context.xml</param-value>
	</context-param>

	<!-- Creates the Spring Container shared by all Servlets and Filters -->
	<listener>
		<listener-class>org.springframework.web.context.ContextLoaderListener</listener-class>
	</listener>

	<!-- Processes application requests -->
	<servlet>
		<servlet-name>appServlet</servlet-name>
		<servlet-class>org.springframework.web.servlet.DispatcherServlet</servlet-class>
		<init-param>
			<param-name>contextConfigLocation</param-name>
			<param-value>/WEB-INF/spring/appServlet/servlet-context.xml</param-value>
		</init-param>
		<load-on-startup>1</load-on-startup>
	</servlet>

	<servlet-mapping>
		<servlet-name>appServlet</servlet-name>
		<url-pattern>/</url-pattern>
	</servlet-mapping>

</web-app>
כמעט כל ההגדרה לעיל היא קוד שמופיע באופן אוטומטי על ידי כלי ה-ST.
הרץ את יישום דוגמת בון ה- Spring IoC
עכשיו, כאשר תפעיל את היישום אתר הבית ייטען ובקונסולה יודפסו הלוגים הבאים כאשר תרענן את העמוד פעמים רבות.
MyBean hashcode=118267258
MyAnnotatedBean hashcode=1703899856
MyBean hashcode=118267258
MyAnnotatedBean hashcode=1115599742
MyBean hashcode=118267258
MyAnnotatedBean hashcode=516457106
שים לב ש-MyBean מוגדר להיות singleton, כך שהמיכל תמיד מחזיר את אותו המופע והקוד של ה- hash תמיד זהה. באופן דומה, עבור כל בקשה, נוצר מופע חדש של MyAnnotatedBean עם hashcode שונה.
הגדרת ה-Bean של Spring במבוססת Java
ליישומים עצמאיים, אנו יכולים להשתמש בתצורה מבוססת אננוטציות וגם בתצורה מבוססת XML. הדרישה היחידה היא לאתחל את ההקשר במקום מסוים בתוכנית לפני שנשתמש בו.
package com.journaldev.spring.main;

import java.util.Date;

public class MyService {

	public void log(String msg){
		System.out.println(new Date()+"::"+msg);
	}
}
MyService הוא מחלקת Java פשוטה עם כמה שיטות.
package com.journaldev.spring.main;

import org.springframework.context.annotation.Bean;
import org.springframework.context.annotation.ComponentScan;
import org.springframework.context.annotation.Configuration;

@Configuration
@ComponentScan(value="com.journaldev.spring.main")
public class MyConfiguration {

	@Bean
	public MyService getService(){
		return new MyService();
	}
}
המחלקה המבוססת על אננוטציות שתשמש לאתחול של המיכל של Spring.
package com.journaldev.spring.main;

import org.springframework.context.annotation.AnnotationConfigApplicationContext;

public class MyMainClass {

	public static void main(String[] args) {

		AnnotationConfigApplicationContext ctx = new AnnotationConfigApplicationContext(
				MyConfiguration.class);
		MyService service = ctx.getBean(MyService.class);

		service.log("Hi");

		MyService newService = ctx.getBean(MyService.class);
		System.out.println("service hashcode="+service.hashCode());
		System.out.println("newService hashcode="+newService.hashCode());
		ctx.close();
	}

}
A simple test program where we are initializing the AnnotationConfigApplicationContext context and then using getBean() method to get the instance of MyService. Notice that I am calling getBean method two times and printing the hashcode. Since there is no scope defined for MyService, it should be a singleton and hence hashcode should be the same for both the instances. When we run the above application, we get following console output confirming our understanding.
Sat Dec 28 22:49:18 PST 2013::Hi
service hashcode=678984726
newService hashcode=678984726
אם אתה מחפש תצורה מבוססת XML, פשוט צור קובץ הגדרת XML של Spring ואז אתחל את ההקשר עם קטע הקוד הבא.
ClassPathXmlApplicationContext context = new ClassPathXmlApplicationContext(
                "applicationContext.xml");
        MyService app = context.getBean(MyService.class);
זהו הכול לדוגמת ההסבר על IoC של Spring, תקנות Scope של Bean ופרטי הגדרה. ניתן להוריד את פרויקט הדוגמה של IoC של Spring ושל Bean מהקישור למטה ולשחק עם זה למטרת הבנה טובה יותר.
הפניה: דף Spring.IO עבור IOC
Source:
https://www.digitalocean.com/community/tutorials/spring-ioc-bean-example-tutorial


