במדריך זה, נספק סקירה על תכנון אנדרואיד. נחקור גם כמה מהשלטים הספציפיים לעיצוב המסך הזמינים למיון תוכן המסך, יחד עם – `Android LinearLayout` ו- `Android RelativeLayout`.
עיצוב אנדרואיד
היבנה הבסיסית של ממשק המשתמש היא אובייקט View שנוצר ממחלקת ה-View ותופס אזור מלבן על המסך. ה-Views הם מחלקת הבסיס עבור רכיבי ממשק משתמש כמו TextView, Button, EditText וכו'. ה-ViewGroup הוא מחלקה משנה של View. ניתן לקבץ יחד יותר מ-View ל-ViewGroup. ViewGroup מספק עיצוב אנדרואיד שבו ניתן לסדר את המראה והסדר של ה-Views. דוגמאות ל-ViewGroup הן LinearLayout, FrameLayout, RelativeLayout וכו'.
סוגי עיצוב אנדרואיד
אנדרואיד מספקת את ה-ViewGroups או העיצובים הבאים:
LinearLayout: הוא ViewGroup שמיישר את כל הילדים בכיוון אחד, אנכית או אופקיתRelativeLayout: הוא ViewGroup שמציג תצוגות ילד במיקומים יחסייםAbsoluteLayout: מאפשר לנו לציין את המיקום הדיוק של צפיות הילד והווידג'טיםTableLayout: הוא צפייה שמקבצת את צפיות הילד שלה לשורות ועמודותFrameLayout: הוא מכונה על המסך שמשמשת להצגת צפייה יחידהScrollView: הוא סוג מיוחד של FrameLayout בכך שהוא מאפשר למשתמשים לגלול דרך רשימת צפיות שתופסות יותר משטח מאשר התצוגה הפיזית. צפיית ScrollView יכולה להכיל רק צפיית ילד אחת או ViewGroup, שבדרך כלל היא LinearLayoutListView: הוא קבוצת צפיות שמציגה רשימת פריטים שניתנים לגלילהGridView: הוא ViewGroup שמציג פריטים ברשת גלילה תלת-ממדית. הפריטים ברשת מגיעים מ-ListAdapter המקושר לצפייה זו
במדריך זה נתמקד בשני פריסות Android הכי נפוצות:
- LinearLayout
- RelativeLayout
מאפייני פריסה של Android
- android:id: זהו המזהה שמציין את התצוגה בצורה ייחודית
- android:layout_width: זהו הרוחב של הפריסה
- android:layout_height: זהו הגובה של הפריסה
- android:layout_margin: זהו המרווח הנוסף מחוץ לתצוגה. לדוגמה אם תגיעו ל־
android:marginLeft=20dp, אז התצוגה תיערך לאחר 20dp מהשמאל - android:layout_padding: זה דומה ל־android:layout_margin רק שהוא מציין את המרווח הנוסף בתוך התצוגה
- android:layout_gravity: זה מציין איך תצוגות הילד ממוקמות
- android:layout_weight: זה מציין כמה מהמרווח הנוסף בתוך הפריסה צריך להיות מוקצה לתצוגה
- android:layout_x: זה מציין את קואורדינטת ה־X של הפריסה
- android:layout_y: זה מציין את קואורדינטת ה־Y של הפריסה
android:layout_width=wrap_content אומר לתצוגה לגודל את עצמה לממדים הנדרשים על ידי התוכן שלה. android:layout_width=match_parent אומר לתצוגה להיות כגדולה כמו התצוגה ההורה שלה.
זיהוי התצוגה
התחביר למזהה, בתוך תג XML הוא:
- הסמל @ בתחילת המחרוזת מציין שפענוח XML צריך לפענח ולהרחיב את שאר מחרוזת המזהה ולזהות אותה כמשאב ID
- הסמל + משמעותו שזהו שם משאב חדש שיש ליצור ולהוסיף אותו למשאבים שלנו
Android LinearLayout
LinearLayout של Android מארגן אלמנטים לאורך קו יחיד. אנו יכולים לציין האם הקו הוא אנכי או אופקי באמצעות android:orientation. האוריינטציה היא אופקית כברירת מחדל. LinearLayout אנכי יכיל רק ילד אחד לכל שורה (כך שזהו עמוד של אלמנטים יחידים), ו-LinearLayout אופקי יכיל רק שורה יחידה של אלמנטים במסך. התכונה android:layout_weight מתארת את חשיבות האלמנט. אלמנט עם משקל גדול יכבה יותר מקום במסך. הנה דוגמה ל-Layout XML שמשתמש ב-LinearLayout: layout_linear.xml
<LinearLayout xmlns:android="https://schemas.android.com/apk/res/android"
    android:orientation="vertical"
    android:layout_width="fill_parent"
    android:layout_height="fill_parent"
    android:layout_margin="@dimen/activity_horizontal_margin">
    <Button
        android:id="@+id/backbutton"
        android:text="Back"
        android:layout_width="wrap_content"
        android:layout_height="wrap_content" />
    <TextView
        android:text="Row 2"
        android:layout_width="wrap_content"
        android:textSize="18sp"
        android:layout_margin="10dp"
        android:layout_height="wrap_content" />
    <TextView
        android:text="Row 3"
        android:textSize="18sp"
        android:layout_margin="10dp"
        android:layout_width="wrap_content"
        android:layout_height="wrap_content" />
    <TextView
        android:text="Row 4"
        android:textSize="18sp"
        android:layout_margin="10dp"
        android:layout_width="wrap_content"
        android:layout_height="wrap_content" />
    <TextView
        android:text="Row 5"
        android:textSize="18sp"
        android:layout_margin="10dp"
        android:layout_width="wrap_content"
        android:layout_height="wrap_content" />

    <LinearLayout
        android:orientation="horizontal"
        android:layout_width="match_parent"
        android:layout_height="wrap_content">
        <Button
            android:id="@+id/next_button"
            android:text="next"
            android:layout_width="wrap_content"
            android:layout_height="wrap_content" />
        <TextView
            android:text="Row 6b"
            android:textSize="18sp"
            android:layout_margin="10dp"
            android:layout_gravity="center"
            android:layout_width="wrap_content"
            android:layout_height="wrap_content" />
        <TextView
            android:text="Row 6c"
            android:textSize="18sp"
            android:layout_margin="10dp"
            android:layout_gravity="center"
            android:layout_width="wrap_content"
            android:layout_height="wrap_content" />
        <TextView
            android:text="Row 6d"
            android:textSize="18sp"
            android:layout_margin="10dp"
            android:layout_gravity="center"
            android:layout_width="wrap_content"
            android:layout_height="wrap_content" />

    </LinearLayout>

</LinearLayout>
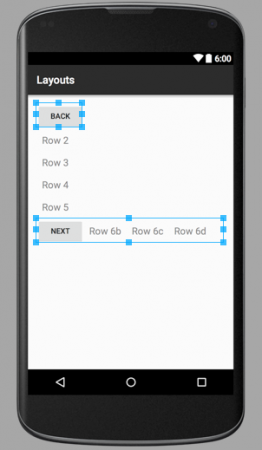
בתצוגה זו יש לנו LinearLayout הורה LinearLayout שיש לו אוריינטציה אנכית ומכיל כפתורים, טקסטים וליניאריות מקוננת (שיש לה אוריינטציה אופקית) כיוון. הערה: תצוגות מקוננות אינן חייבות להיות מסוג אחד. אנו יכולים, לדוגמה, לקבל LinearLayout כאחד מהילדים בתוך RelativeLayout ולהפך.
Android RelativeLayout
אנדרואיד RelativeLayout ממקם אלמנטים על פי היחסים שלהם זה לזה, ועם תוך יחס לספק הורה. זהו אחד הפריסות המורכבות ביותר ונדרשות מספר תכונות כדי להשיג באמת את הפריסה שאנו רוצים. כלומר, באמצעות RelativeLayout אנו יכולים למקם תצוגה לשמאלה של, לימינה של, מתחת ל- או מעל ל- אחיותיה. ניתן גם למקם תצוגה ביחס לספק שלה כמו ממורכזת באופן אופקי, באופן אנכי או שניהם, או ממורכזת לפי כל אחד מהצדדים של ה-RelativeLayout. אם לא צוינו אף אחת מהתכונות הללו על תצוגת ילד אז התצוגה נמצאת ברירת מחדל בתחילת הצד השמאלי למעלה.
תכונות Android RelativeLayout
הנה התכונות העיקריות המשמשות ב-RelativeLayout. הן משוכללות בשלושה קטגוריות שונות:
יחסים לספק
- android:layout_alignParentBottom : ממקם את התחתית של האלמנט בתחתית הספק
- android:layout_alignParentLeft : ממקם את השמאל של האלמנט בצד שמאל של הספק
- android:layout_alignParentRight : ממקם את היבואת מצד ימין של הרכיב בצד ימין של המכניס
- android:layout_alignParentTop : ממקם את הרכיב בחלק העליון של המכניס
- android:layout_centerHorizontal : ממקם את הרכיב במרכז אופקית בתוך המכניס האב
- android:layout_centerInParent : ממקם את הרכיב במרכז המכניס האב גם אופקית וגם אנכית
- android:layout_centerVertical : ממקם את הרכיב במרכז אנכית בתוך המכניס האב
ביחס לאחרים
- android:layout_above : ממקם את הרכיב מעל לרכיב המסויים
- android:layout_below : ממקם את הרכיב מתחת לרכיב המסויים
- android:layout_toLeftOf : ממקם את הרכיב משמאל לרכיב המסויים
- android:layout_toRightOf : ממקם את הרכיב מימין לרכיב המסויים
“@id/XXXXX” משמש להתייחסות לרכיב לפי המזהה שלו. דבר חשוב לזכור הוא שהתייחסות לרכיב לפני שהוא הוזן תגרום לשגיאה, ולכן @+id/ יש להשתמש במקרים כאלה
יישור עם רכיבים אחרים
- android:layout_alignBaseline : מיישר את קו הבסיס של הרכיב החדש עם קו הבסיס של הרכיב המסויים
- android:layout_alignBottom : מיישר את החלק התחתון של הרכיב החדש עם החלק התחתון של הרכיב המסויים
- android:layout_alignLeft : מיישר את קצה השמאלי של הרכיב החדש עם קצה השמאלי של הרכיב המסויים
- android:layout_alignRight : מיישר את הקצה הימני של הרכיב החדש עם הקצה הימני של הרכיב המסוים
- android:layout_alignTop : משם את החלק העליון של הרכיב החדש בהתאם לחלק העליון של הרכיב המסוים
ה-XML layout הבא משתמש ב־RelativeLayout: layout_relative.xml
<RelativeLayout
    android:layout_width="fill_parent"
    android:layout_height="fill_parent"
    xmlns:android="https://schemas.android.com/apk/res/android">
    <Button
        android:id="@+id/backbutton"
        android:text="Back"
        android:layout_width="wrap_content"
        android:layout_height="wrap_content" />
    <TextView
        android:id="@+id/firstName"
        android:text="First Name"
        android:textSize="18sp"
        android:layout_width="wrap_content"
        android:layout_height="wrap_content"
        android:layout_below="@id/backbutton" />
    <TextView
        android:id="@+id/editFirstName"
        android:text="JournalDev"
        android:textSize="18sp"
        android:layout_width="wrap_content"
        android:layout_marginLeft="10dp"
        android:layout_height="wrap_content"
        android:layout_toRightOf="@id/firstName"
        android:layout_below="@id/backbutton"/>
    <TextView
        android:id="@+id/editLastName"
        android:text="Layout Tutorial Example"
        android:textSize="18sp"
        android:layout_width="wrap_content"
        android:layout_height="wrap_content"
        android:layout_alignTop="@+id/lastName"
        android:layout_toRightOf="@+id/lastName"
        android:layout_toEndOf="@+id/lastName" />
    <TextView
        android:id="@+id/lastName"
        android:text="Last Name"
        android:textSize="18sp"
        android:layout_width="wrap_content"
        android:layout_height="wrap_content"
        android:layout_marginTop="48dp"
        android:layout_below="@+id/firstName"
        android:layout_alignParentLeft="true"
        android:layout_alignParentStart="true"
        android:layout_marginRight="10dp"
        android:layout_marginLeft="40dp"
        android:layout_marginStart="40dp" />

    <Button
        android:id="@+id/next"
        android:text="Next"
        android:layout_width="wrap_content"
        android:layout_height="wrap_content"
        android:layout_below="@+id/editLastName"
        android:layout_alignLeft="@+id/editLastName"
        android:layout_alignStart="@+id/editLastName"
        android:layout_marginTop="37dp" />
</RelativeLayout>
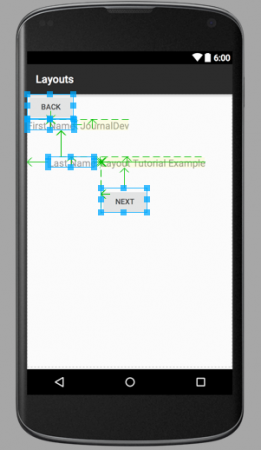
כפי שניתן לראות, אנו יכולים לסדר מחדש את הרכיבים בהתאם למיקומם היחסי. ה-XML layout הבא מייצג תצורת פריסה מותאמת אישית הכוללת פריסות ליניאריות מקוננות ופריסות יחסיות. layout_mixed.xml
<RelativeLayout
    android:layout_width="fill_parent"
    android:layout_height="fill_parent"
    xmlns:android="https://schemas.android.com/apk/res/android">

    <TextView
        android:id="@+id/parent_rl"
        android:text="Parent RelativeLayout"
        android:textSize="18sp"
        android:layout_width="wrap_content"
        android:layout_height="wrap_content" />

    <LinearLayout
        android:orientation="horizontal"
        android:layout_width="match_parent"
        android:layout_height="wrap_content"
        android:id="@+id/linearLayout"
        android:layout_below="@id/parent_rl"
        android:layout_alignParentRight="true"
        android:layout_alignParentEnd="true">

        <TextView
            android:text="Nested Horizontal"
            android:textSize="18sp"
            android:layout_margin="10dp"
            android:layout_width="wrap_content"
            android:layout_height="wrap_content" />

        <TextView
            android:text="LL"
            android:textSize="18sp"
            android:layout_margin="10dp"
            android:layout_width="wrap_content"
            android:layout_height="wrap_content" />


        <LinearLayout
            android:orientation="vertical"
            android:layout_width="wrap_content"
            android:layout_height="wrap_content">

            <TextView
                android:text="Double Nested"
                android:textSize="18sp"
                android:layout_margin="10dp"
                android:layout_gravity="center"
                android:layout_width="wrap_content"
                android:layout_height="wrap_content" />
            <TextView
                android:text="Vertical"
                android:textSize="18sp"
                android:layout_margin="10dp"
                android:layout_gravity="center"
                android:layout_width="wrap_content"
                android:layout_height="wrap_content" />
            <TextView
                android:text="LL"
                android:textSize="18sp"
                android:layout_margin="10dp"
                android:layout_gravity="center"
                android:layout_width="wrap_content"
                android:layout_height="wrap_content" />

        </LinearLayout>


    </LinearLayout>

    <RelativeLayout
        android:layout_width="match_parent"
        android:layout_height="match_parent"
        android:layout_below="@id/linearLayout">

    <TextView
        android:layout_width="wrap_content"
        android:layout_height="wrap_content"
        android:textAppearance="?android:attr/textAppearanceMedium"
        android:text="Nested Relative Layout"
        android:id="@+id/textView"
        android:layout_alignParentTop="true"
        android:layout_centerHorizontal="true" />

        <Button
            android:id="@+id/back_button_pressed"
            android:text="back"
            android:layout_width="wrap_content"
            android:layout_height="wrap_content"
            android:layout_below="@+id/textView"
            android:layout_centerHorizontal="true"
            android:layout_marginTop="66dp" />

    </RelativeLayout>


</RelativeLayout>
מבנה פרויקט פריסה ב-Android
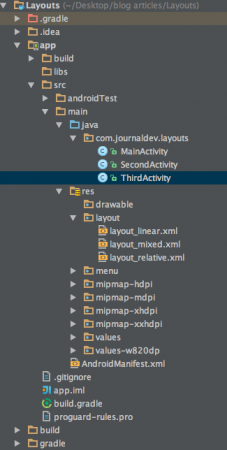
 הפרויקט מכיל שלוש פעילויות והפריסות התואמות שנדבך עליהן למעלה.
קוד פריסה ב-Android
היישום מתחיל ב-MainActivity אשר טוען את תוכן ה־layout_linear.xml באמצעות הקוד הבא:
package com.journaldev.layouts;

import android.content.Intent;
import android.support.v7.app.AppCompatActivity;
import android.os.Bundle;
import android.view.Menu;
import android.view.MenuItem;
import android.view.View;
import android.widget.Button;

public class MainActivity extends AppCompatActivity {


    Button back,next;
    @Override
    protected void onCreate(Bundle savedInstanceState) {
        super.onCreate(savedInstanceState);
        setContentView(R.layout.layout_linear);
        back=(Button)findViewById(R.id.back_button);
        next=(Button)findViewById(R.id.next_button);

        next.setOnClickListener(new View.OnClickListener() {
            @Override
            public void onClick(View v) {
                Intent intent=new Intent(MainActivity.this,SecondActivity.class);
                intent.setFlags(Intent.FLAG_ACTIVITY_CLEAR_TOP);
                startActivity(intent);
            }
        });
        back.setOnClickListener(new View.OnClickListener() {
            @Override
            public void onClick(View v) {
                finish();
            }
        });

    }

}
הַSecondActivity וְהַThirdActivity טוענים את תצורות ה-layout_relative.xml וְהַ-layout_mixed.xml בהתאמה כפי שמוצג למטה:
package com.journaldev.layouts;

import android.app.Activity;
import android.content.Intent;
import android.os.Bundle;
import android.view.View;
import android.widget.Button;

public class SecondActivity extends Activity {
    Button back,next;
    @Override
    protected void onCreate(Bundle savedInstanceState) {
        super.onCreate(savedInstanceState);
        setContentView(R.layout.layout_relative);
        back=(Button)findViewById(R.id.backbutton);
        next=(Button)findViewById(R.id.next);

        next.setOnClickListener(new View.OnClickListener() {
            @Override
            public void onClick(View v) {
                Intent intent=new Intent(SecondActivity.this,ThirdActivity.class);
                intent.setFlags(Intent.FLAG_ACTIVITY_CLEAR_TOP);
                startActivity(intent);
            }
        });
        back.setOnClickListener(new View.OnClickListener() {
            @Override
            public void onClick(View v) {
                Intent intent=new Intent(SecondActivity.this,MainActivity.class);
                intent.setFlags(Intent.FLAG_ACTIVITY_CLEAR_TOP);
                startActivity(intent);
            }
        });

    }
}
package com.journaldev.layouts;

import android.app.Activity;
import android.content.Intent;
import android.os.Bundle;
import android.view.View;
import android.widget.Button;

public class ThirdActivity extends Activity {
    Button back;
    @Override
    protected void onCreate(Bundle savedInstanceState) {
        super.onCreate(savedInstanceState);
        setContentView(R.layout.layout_mixed);
        back=(Button)findViewById(R.id.back_button_pressed);

        back.setOnClickListener(new View.OnClickListener() {
            @Override
            public void onClick(View v) {
                Intent intent=new Intent(ThirdActivity.this,SecondActivity.class);
                intent.setFlags(Intent.FLAG_ACTIVITY_CLEAR_TOP);
                startActivity(intent);
            }
        });

    }
}
התמונות המצורפות של שלוש קבצי עימות מרוכזים למטה: layout_linear.xml  כפי שאתה יכול לראות, LinearLayout העומד בראש מכיל 6 אלמנטים ילדים בעמוד אנכי בודד, שבתוכו יש אלמנט LinearLayout מקונן שמכיל 4 רכיבים באוריינטציה אופקית. layout_relative.xml
  החצים שמצביעות בתמונה מעלה מתארות איך האחים מוצבים יחסית לכל ואיך הם מוצבים יחסית לקונטיינר. layout_mixed.xml
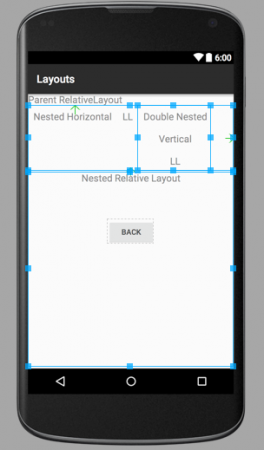
  פריסה יחסית זו כוללת LinearLayout אנכי בתוך LinearLayout אופקי מקונן יחד עם RelativeLayout ילד. שים לב: רכיבים ששייכים לתכניות שונות אינם אחים ולכן אינם יכולים להוצב יחסית לכל וכל. זהו הקיץ של תכנות ה-Android. נכסה את התכנים האחרים של פריסות Android בשיעורים הבאים. ניתן להוריד את פרויקט הפריסה של Android הסופי מהקישור למטה.
הורד דוגמת פרויקט LinearLayout RelativeLayout של Android
התייחסות: מסמך ה- API
Source:
https://www.digitalocean.com/community/tutorials/android-layout-linearlayout-relativelayout


