היום נלמד על כפתור הפעולה הצפה ב-Android. אנו נדבר על FloatingActionButton, שהוא רכיב חדש שנכלל בהנחיות עיצוב החומר ועל SnackBar, המהווה תחליף בעיצוב החומר ל-Toast.
כפתור פעולה צפה ב-Android
כפתור פעולה צפה ב-Android משמש להדגשת הפונקציה החשובה ביותר במסך. זהו אמצעי מגניב ומסגנן למשימה זו.
סקירה על כפתור פעולה צפה ב-Android
כדי להשתמש בווידגטים של עיצוב החומר בפרויקט שלנו, אנו צריכים להדביק את התלות הבאה בקובץ ה-build.gradle שלנו כפי שמוצג למטה.
compile 'com.android.support:design:23.1.1'
את ווידגט FloatingActionButton מוגדר בתצורת xml כך:
<android.support.design.widget.FloatingActionButton
      android:id="@+id/fab"
      android:layout_width="wrap_content"
      android:layout_height="wrap_content"
      android:src="@android:drawable/ic_dialog_email"
      android:layout_gravity="bottom|end"
      app:elevation="6dp"
      app:pressedTranslationZ="12dp"/>
כמה הבחנות שנעשו מהתצורה של xml לעיל הן:
- FloatingActionButton מרחיב את מחלקת ImageView. זה ברור מהמאפיין
android:srcשהוא מוגדר. - בשימוש בתצורת ה-XML שמופיעה לעיל, המאפיין elevation משמש ליצירת צל על הכפתור, והמאפיין pressedTranslationZ גורם לצל להתרחב בעת לחיצה.
A FloatingActionButton is placed within a CoordinatorLayout. A CoordinatorLayout helps facilitate interactions between views contained within it, which will be useful later to describe how to animate the button depending on scroll changes. SnackBar is a more enhanced widget when compared to a Toast. A SnackBar is invoked as follows:
Snackbar.make(view, "Replace with your own action", Snackbar.LENGTH_LONG)
                        .setAction("Action", null).show();
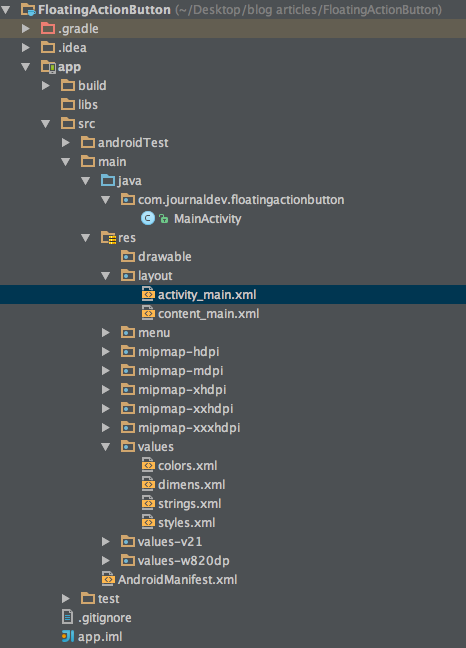
דיברנו באורך על SnackBar במדריך אחר. הערה חשובה: אם אתה עוקב אחרי המדריכים של Android היטב, כנראה ששימת לבת שבעדכון הכלים לבניה 23.1.1 ארכיטקטורת הפרויקט של פרויקט חדש השתנתה והווידג'טים הנזכרים לעיל נמצאים כבר בצורה ברירת המחדל בפרויקט חדש של Android Studio. לכן, במקום לממש את הווידג'טים הנזכרים לעיל, בוא נעשה סיור מהיר במבנה הפרויקט החדש.
דוגמת פרויקט Android Floating Action Button – מבנה הפרויקט
 כפי שאתה יכול לראות, קובץ תצורת XML חדש בשם
 content_main.xml נוסף. זהה לקובץ activity_main.xml הקודם.
דוגמת פרויקט Android Floating Action Button
הקובץ החדש activity_main.xml ניתן למטה:
<?xml version="1.0" encoding="utf-8"?>
<android.support.design.widget.CoordinatorLayout xmlns:android="https://schemas.android.com/apk/res/android"
    xmlns:app="https://schemas.android.com/apk/res-auto"
    xmlns:tools="https://schemas.android.com/tools"
    android:layout_width="match_parent"
    android:layout_height="match_parent"
    android:fitsSystemWindows="true"
    tools:context="com.journaldev.floatingactionbutton.MainActivity">

    <android.support.design.widget.AppBarLayout
        android:layout_width="match_parent"
        android:layout_height="wrap_content"
        android:theme="@style/AppTheme.AppBarOverlay">

        <android.support.v7.widget.Toolbar
            android:id="@+id/toolbar"
            android:layout_width="match_parent"
            android:layout_height="?attr/actionBarSize"
            android:background="?attr/colorPrimary"
            app:popupTheme="@style/AppTheme.PopupOverlay" />

    </android.support.design.widget.AppBarLayout>

    <include layout="@layout/content_main" />

    <android.support.design.widget.FloatingActionButton
        android:id="@+id/fab"
        android:layout_width="wrap_content"
        android:layout_height="wrap_content"
        android:layout_gravity="bottom|end"
        android:layout_margin="@dimen/fab_margin"
        android:src="@android:drawable/ic_dialog_email" />

</android.support.design.widget.CoordinatorLayout>
A toolbar is added by default as a replacement of an ActionBar. It’s added inside an AppBarLayout which is a direct child of CoordinatorLayout The AppBarLayout is used to achieve various scrolling behaviours such as collapse, flex space, and quick return. The MainActivity.java is defined as given below:
package com.journaldev.floatingactionbutton;

import android.os.Bundle;
import android.support.design.widget.FloatingActionButton;
import android.support.design.widget.Snackbar;
import android.support.v7.app.AppCompatActivity;
import android.support.v7.widget.Toolbar;
import android.view.View;
import android.view.Menu;
import android.view.MenuItem;

public class MainActivity extends AppCompatActivity {

    @Override
    protected void onCreate(Bundle savedInstanceState) {
        super.onCreate(savedInstanceState);
        setContentView(R.layout.activity_main);
        Toolbar toolbar = (Toolbar) findViewById(R.id.toolbar);
        setSupportActionBar(toolbar);

        FloatingActionButton fab = (FloatingActionButton) findViewById(R.id.fab);
        fab.setOnClickListener(new View.OnClickListener() {
            @Override
            public void onClick(View view) {
                Snackbar.make(view, "Replace with your own action", Snackbar.LENGTH_LONG)
                        .setAction("Action", null).show();
            }
        });
    }

    @Override
    public boolean onCreateOptionsMenu(Menu menu) {
        // נפח את התפריט; זה מוסיף פריטים לסרגל הפעולה אם הוא קיים.
        getMenuInflater().inflate(R.menu.menu_main, menu);
        return true;
    }

    @Override
    public boolean onOptionsItemSelected(MenuItem item) {
        // טפל בלחיצות על פריטי סרגל הפעולה כאן. סרגל הפעולה יטפל
        // בלחיצות על כפתור הבית/למעלה באופן אוטומטי, כל עוד
        // אתה מציין פעילות ההורה ב-AndroidManifest.xml שלך.
        int id = item.getItemId();

        //noinspection SimplifiableIfStatement
        if (id == R.id.action_settings) {
            return true;
        }

        return super.onOptionsItemSelected(item);
    }
}
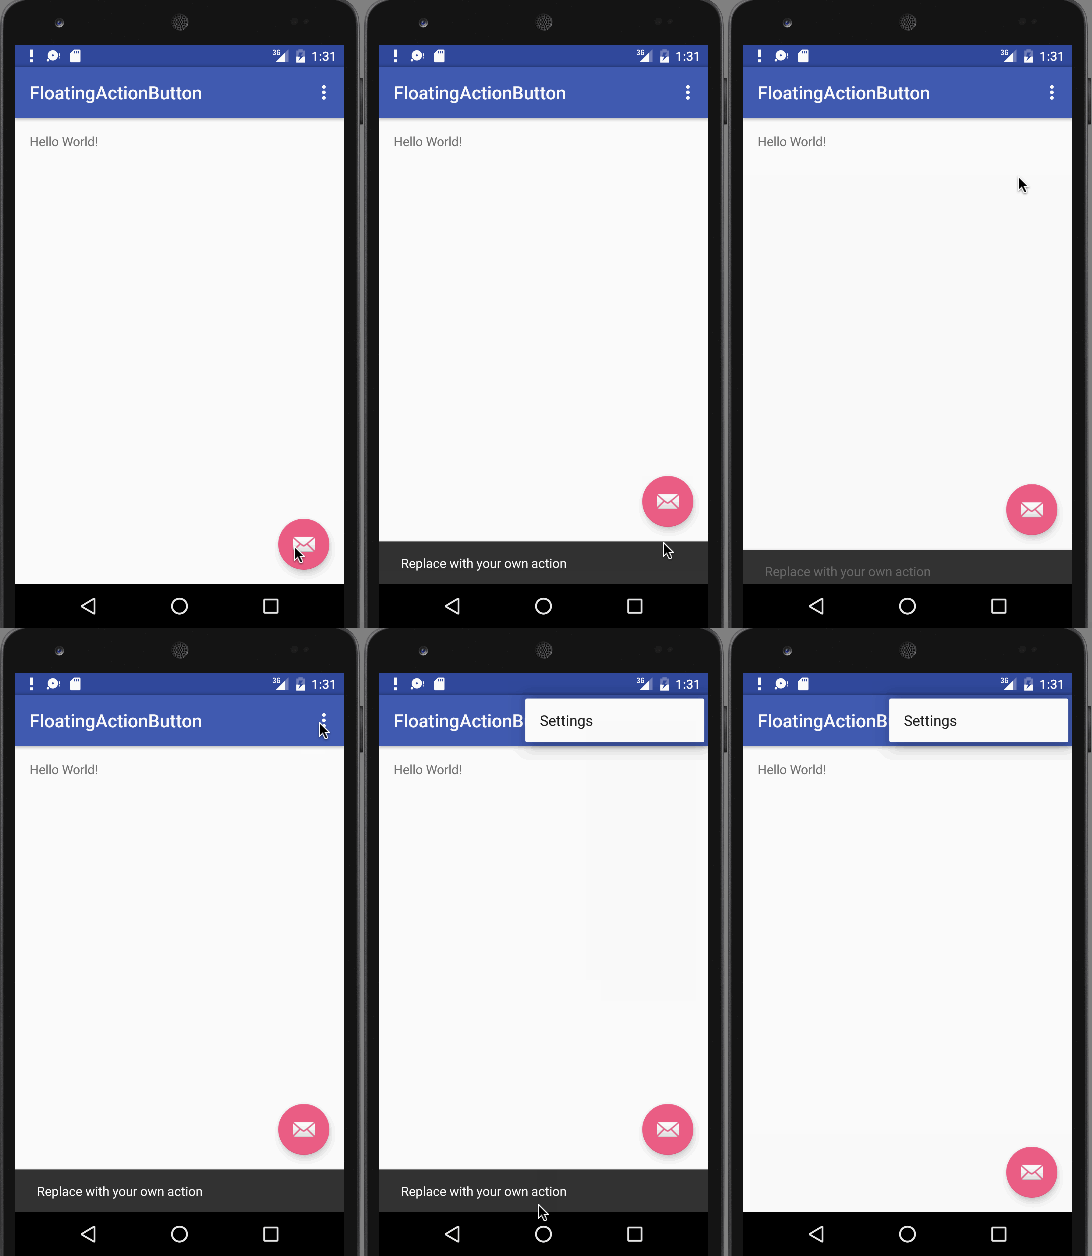
A new attribute is added to the application tag inside the AndroidManifest.xml named android:supportsRtl="true". This enables right to left layouts in the application. Running this default application produces an output like below:  As you can see, on clicking the floating action button, a SnackBar is displayed. This brings an end to this tutorial. You can create a new project in Android Studio and run it to see these features. Note: Make sure that you’re using the latest build tools. Reference: Android Reference Doc
Source:
https://www.digitalocean.com/community/tutorials/android-floating-action-button-example-tutorial


