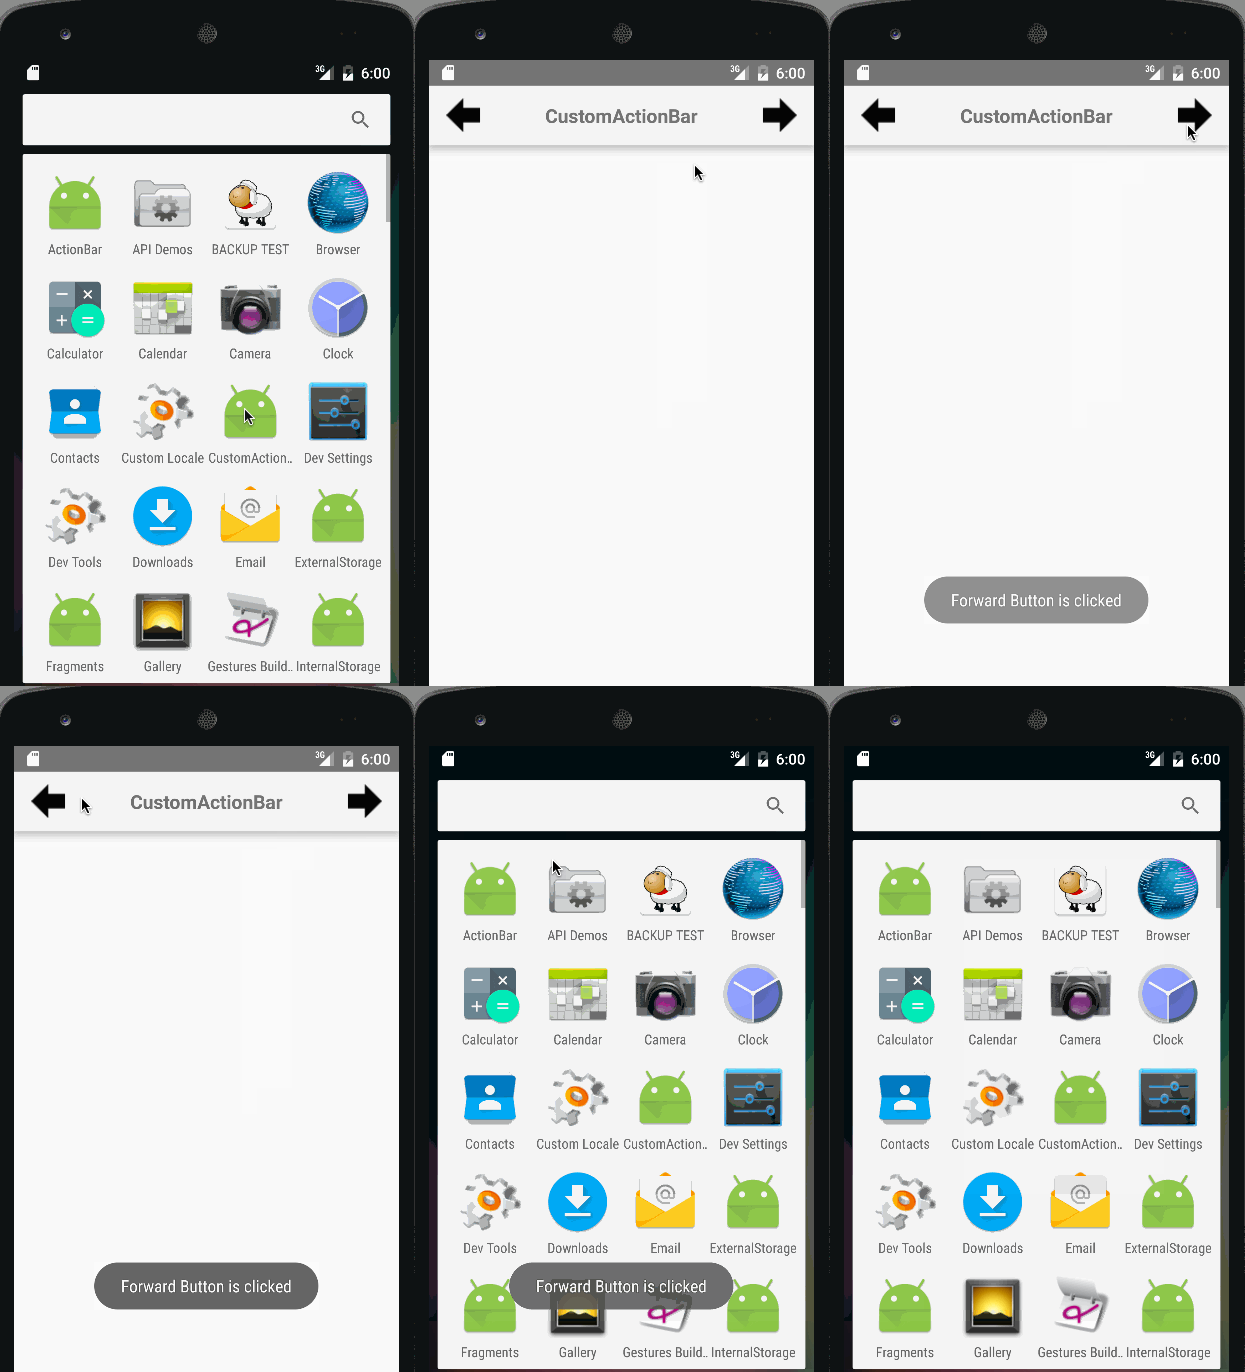
במדריך זה ניצור אפליקציה שמכילה ActionBar מותאמת אישית עם פריסה מותאמת אישית.אנו מניחים שיש לך הבנה בסיסית של רכיב ה-ActionBar המובא ב-מדריך זה.
ActionBar מותאמת אישית של Android
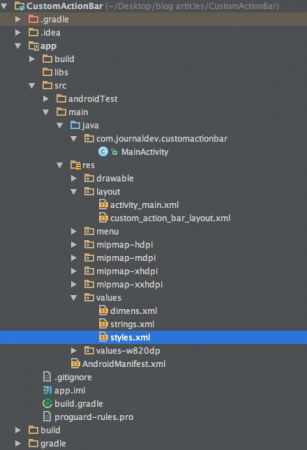
כדי להתאים אישית את ActionBar ראשית עלינו להגדיר את הערכת הנושא ב־קובץ הערכים styles.xml ולהגדיר את הערכת הנושא עבור מחלקת הפעילות הרלוונטית ב־AndroidManifest.xml. הנה הפריסה ה-XML עבור זה: styles.xml
<resources>

<style name="AppTheme" parent="Theme.AppCompat.Light.NoActionBar">
        <!-- Customize your theme here. -->
    </style>

    <style name="CustomTheme" parent="Theme.AppCompat.Light">

        <item name="contentInsetStart">0dp</item>
        <item name="contentInsetEnd">0dp</item>
    </style>

</resources>
מהקטע לעיל אם נשתמש בסגנון AppTheme עבור הפעילות שלנו, זה יזרוק חריגת null pointer exception מאחר והוא מגדיר באופן מפורש את הנושא NoActionBar. לכן נשתמש בסגנון CustomTheme בפרויקט זה. הערכים contentInsetStart ו־contentInsetEnd הם ערכי הריפוד. שימו לב שנעשה שימוש ב־AppCompatActivity מאחר והוא מספק תאימות מרבית עם גרסאות אנדרואיד קודמות לגרסה 3.0.
פריסה מותאמת אישית של ActionBar
להלן פריסת התצוגה שתוגדר ל-ActionBar מתוך MainActivity שלנו. custom_action_bar_layout.xml
<?xml version="1.0" encoding="utf-8"?>
<TableLayout xmlns:android="https://schemas.android.com/apk/res/android"
    android:layout_width="match_parent"
    android:layout_height="wrap_content"
    android:orientation="horizontal"
    >

    <TableRow>

        <ImageButton
            android:layout_width="wrap_content"
            android:layout_height="wrap_content"
            android:src="@drawable/back"
            android:layout_gravity="center_vertical"
            android:background="@android:color/transparent"
            android:id="@+id/action_bar_back"
            android:layout_alignParentTop="true"
            android:layout_centerHorizontal="true" />


        <TextView
            android:layout_width="wrap_content"
            android:layout_height="wrap_content"
            android:text="@string/app_name"
            android:gravity="center_horizontal"
            android:textAppearance="?android:attr/textAppearanceMedium"
            android:textStyle="bold"
            android:padding="10dp"
            android:layout_alignParentTop="true"
            android:layout_weight="1"
            />

        <ImageButton
            android:layout_width="wrap_content"
            android:layout_height="wrap_content"
            android:src="@drawable/forward"
            android:id="@+id/action_bar_forward"
            android:layout_gravity="center_vertical"
            android:background="@android:color/transparent"
            android:layout_alignParentTop="true"
            android:layout_centerHorizontal="true" />


    </TableRow>

</TableLayout>
פריסת התצוגה כוללת שני ImageButtons המייצגים כפתורי תמונה לצעד קדימה ואחורה ו-TextView במרכז.
מבנה פרויקט Android Custom Action Bar
קוד ל-Custom Action Bar של Android
הקובץ activity_main.xml הוא RelativeLayout ריק מאחר והדגש שלנו כאן הוא על ה-ActionBar. MainActivity.java נתון למטה.
package com.journaldev.customactionbar;

import android.support.v7.app.ActionBar;
import android.support.v7.app.AppCompatActivity;
import android.os.Bundle;
import android.view.Menu;
import android.view.MenuItem;
import android.view.View;
import android.widget.ImageButton;
import android.widget.Toast;

public class MainActivity extends AppCompatActivity {

    @Override
    protected void onCreate(Bundle savedInstanceState) {
        super.onCreate(savedInstanceState);
        setContentView(R.layout.activity_main);

        getSupportActionBar().setDisplayOptions(ActionBar.DISPLAY_SHOW_CUSTOM);
        getSupportActionBar().setDisplayShowCustomEnabled(true);
        getSupportActionBar().setCustomView(R.layout.custom_action_bar_layout);
        View view =getSupportActionBar().getCustomView();

        ImageButton imageButton= (ImageButton)view.findViewById(R.id.action_bar_back);

        imageButton.setOnClickListener(new View.OnClickListener() {
            @Override
            public void onClick(View v) {
                finish();
            }
        });

        ImageButton imageButton2= (ImageButton)view.findViewById(R.id.action_bar_forward);

        imageButton2.setOnClickListener(new View.OnClickListener() {
            @Override
            public void onClick(View v) {
                Toast.makeText(getApplicationContext(),"Forward Button is clicked",Toast.LENGTH_LONG).show();
            }
        });
    }


}
בקוד לעיל אנו משתמשים בספריות תמיכה. לכן אנו משתמשים ב-getSupportActionBar() במקום getActionBar(). כדי להוסיף פריסה מותאמת אישית ל-ActionBar, אנו קוראים לשיטות הבאות על getSupportActionBar() :
- getSupportActionBar().setDisplayOptions(ActionBar.DISPLAY_SHOW_CUSTOM);
- getSupportActionBar().setDisplayShowCustomEnabled(true);
setCustomView() נקרא כדי להתרחב עם customView את ActionBar כמו שמוצג לעיל. כדי להגדיר את ה- onClickListeners עבור כפתורי ה- ActionBar, עלינו לקבל תחילה את ה- CustomView באמצעות getCustomView(). במדריך זה תכננו את כפתור החזרה כך שיסגור את הפעילות באמצעות finish(); ואת הכפתור הקדימה כך שיציג Toast. שים לב: הוסף את השורה הבאה בתוך התגית AndroidManifest.xml בתוך תגית היישום.
android:theme="@style/CustomTheme"
הנה היישום האנדרואיד שלנו עם ערכת עיצוב ופריסה מותאמים אישית.  שים לב: יש מרווח קבוע בכל צד שאינו ניתן לשנות. עבור זה נצטרך להחליף את ה- ActionBar עם כלי עבודה. נדון בכך במדריך מאוחר יותר. זה מסיים את מדריך ה- ActionBar מותאם אישית ל- Android. ניתן להוריד את פרויקט ה- Android CustomActionBar הסופי מהקישור למטה.
הורד פרויקט Android Custom Action Bar
הפנייה: מסמך Android
Source:
https://www.digitalocean.com/community/tutorials/android-custom-action-bar-example-tutorial


