


Tutorial de JUnit5
En este tutorial de JUnit, presentaremos los conceptos básicos de JUnit5 y sus nuevas características mediante ejemplos. En el mundo de Java, JUnit es uno de los marcos populares utilizados para implementar pruebas unitarias en código Java. JUnit ayuda principalmente a los desarrolladores a probar su código en la MVJ por sí mismos.
Arquitectura de JUnit5
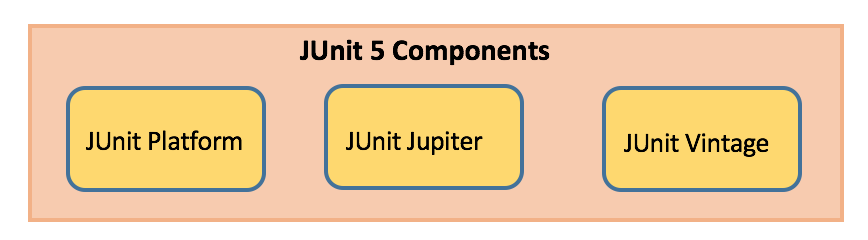
Plataforma JUnit
- Lanza marcos de pruebas en la MVJ
- Tiene la API TestEngine utilizada para construir un marco de pruebas que se ejecuta en la plataforma JUnit
Jupiter de JUnit
- Combinación de un nuevo modelo de programación para escribir pruebas y un modelo de extensión para extensiones
- Adición de nuevas anotaciones como
@BeforeEach,@AfterEach,@AfterAll,@BeforeAll, etc.
JUnit Vintage
- Proporciona soporte para ejecutar pruebas de versiones anteriores de JUnit 3 y 4 en esta nueva plataforma
Dependencias de Maven de JUnit
Para implementar casos de prueba basados en JUnit5 en un proyecto, añade la siguiente dependencia al archivo pom.xml del proyecto:
- Biblioteca JUnit 5
<dependency>
     <groupId>org.junit.jupiter</groupId>
     <artifactId>junit-jupiter-engine</artifactId>
     <version>5.1.1</version>
     <scope>test</scope>
</dependency>
<dependency>
     <groupId>org.junit.platform</groupId>
     <artifactId>junit-platform-runner</artifactId>
     <version> 1.1.1</version>
     <scope>test</scope>
</dependency>
- Proveedor surefire de maven JUnit5 para ejecutar las pruebas unitarias donde el IDE no tiene soporte para JUnit5 (si el IDE tiene soporte, entonces este punto no es necesario)
<plugin>
     <artifactId>maven-surefire-plugin</artifactId>
     <version>2.19.1</version>
     <dependencies>
          <dependency>
               <groupId>org.junit.platform</groupId>
               <artifactId>junit-platform-surefire-provider</artifactId>
               <version>1.0.2</version>
          </dependency>
     </dependencies>
</plugin>
Nuevas características de JUnit5
Requiere Java 8 o superior en tiempo de ejecución. Pero aún se puede probar código que fue compilado usando versiones anteriores de Java. Se introdujeron varias nuevas características en él.
Anotaciones de JUnit
A continuación se enumeran algunas anotaciones comúnmente utilizadas proporcionadas en ella:
| Annotation | Description |
|---|---|
| @Test | Denotes a test method |
| @DisplayName | Declares a custom display name for the test class or test method |
| @BeforeEach | Denotes that the annotated method should be executed before each test method |
| @AfterEach | Denotes that the annotated method should be executed after each test method |
| @BeforeAll | Denotes that the annotated method should be executed before all test methods |
| @AfterAll | Denotes that the annotated method should be executed after all test methods |
| @Disable | Used to disable a test class or test method |
| @Nested | Denotes that the annotated class is a nested, non-static test class |
| @Tag | Declare tags for filtering tests |
| @ExtendWith | Register custom extensions |
package com.journaldev;

import org.junit.jupiter.api.AfterAll;
import org.junit.jupiter.api.AfterEach;
import org.junit.jupiter.api.BeforeAll;
import org.junit.jupiter.api.BeforeEach;
import org.junit.jupiter.api.Disabled;
import org.junit.jupiter.api.DisplayName;
import org.junit.jupiter.api.Test;

public class JUnit5Sample1Test {

  @BeforeAll
  static void beforeAll() {
    System.out.println("**--- Executed once before all test methods in this class ---**");
  }

  @BeforeEach
  void beforeEach() {
    System.out.println("**--- Executed before each test method in this class ---**");
  }

  @Test
  void testMethod1() {
    System.out.println("**--- Test method1 executed ---**");
  }

  @DisplayName("Test method2 with condition")
  @Test
  void testMethod2() {
    System.out.println("**--- Test method2 executed ---**");
  }

  @Test
  @Disabled("implementation pending")
  void testMethod3() {
	  System.out.println("**--- Test method3 executed ---**");
  }

  @AfterEach
  void afterEach() {
    System.out.println("**--- Executed after each test method in this class ---**");
  }

  @AfterAll
  static void afterAll() {
    System.out.println("**--- Executed once after all test methods in this class ---**");
  }


}
Podemos ejecutar la clase de prueba de JUnit anterior en Eclipse -> Ejecutar como -> Prueba de JUnit. 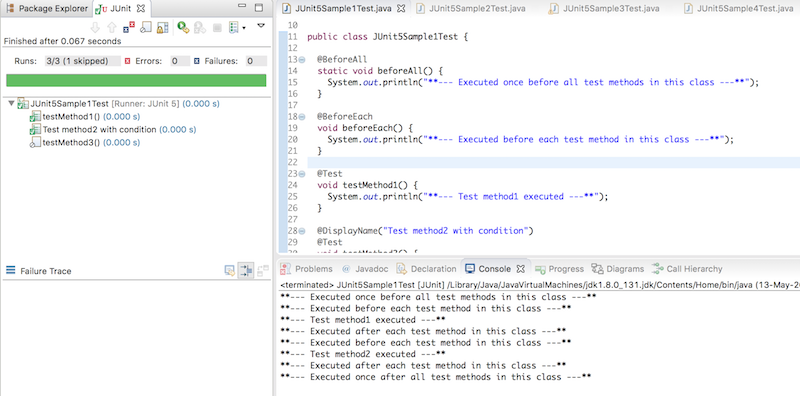
Afirmaciones de JUnit
Cada método de prueba debe ser evaluado contra una condición verdadera utilizando afirmaciones para que la prueba pueda continuar ejecutándose. Las afirmaciones de JUnit Jupiter se mantienen en la clase org.junit.jupiter.api.Assertions. Todos los métodos son estáticos.
| Assertion | Description |
|---|---|
| assertEquals(expected, actual) | Fails when expected does not equal actual |
| assertFalse(expression) | Fails when expression is not false |
| assertNull(actual) | Fails when actual is not null |
| assertNotNull(actual) | Fails when actual is null |
| assertAll() | Group many assertions and every assertion is executed even if one or more of them fails |
| assertTrue(expression) | Fails if expression is not true |
| assertThrows() | Class to be tested is expected to throw an exception |
@Test
void testAssertEqual() {
	 assertEquals("ABC", "ABC");
	 assertEquals(20, 20, "optional assertion message");
	 assertEquals(2 + 2, 4);
}

@Test
void testAssertFalse() {
	 assertFalse("FirstName".length() == 10);
	 assertFalse(10 > 20, "assertion message");
}

@Test
void testAssertNull() {
     String str1 = null;
	 String str2 = "abc";
	 assertNull(str1);
	 assertNotNull(str2);
}

@Test
void testAssertAll() {
	 String str1 = "abc";
	 String str2 = "pqr";
	 String str3 = "xyz";
	 assertAll("numbers",
	      () -> assertEquals(str1,"abc"),
		  () -> assertEquals(str2,"pqr"),
		  () -> assertEquals(str3,"xyz")
	 );
	 //descomenta el código siguiente y comprende la ejecución de cada afirmación
     /*assertAll("numbers",
		  () -> assertEquals(str1,"abc"),
		  () -> assertEquals(str2,"pqr1"),
		  () -> assertEquals(str3,"xyz1")
	 );*/
}

@Test
void testAssertTrue() {
	 assertTrue("FirstName".startsWith("F"));
	 assertTrue(10  {
	      throw new IllegalArgumentException("Illegal Argument Exception occured");
	 });
	 assertEquals("Illegal Argument Exception occured", exception.getMessage());
}
Importaciones de JUnit5
Sus clases de prueba necesitan la instrucción de importación org.junit.jupiter.api.Test y no org.junit.Test. Además, los métodos de prueba no necesitan ser públicos ni de paquete local.
import org.junit.jupiter.api.Test;
Asunciones de JUnit5
Las asunciones son métodos estáticos en la clase org.junit.jupiter.api.Assumptions. Solo ejecutarán una prueba cuando se cumpla la condición especificada; de lo contrario, la prueba se abortará. La prueba abortada no causará fallos en la compilación. Cuando una asunción falla, se lanza org.opentest4j.TestAbortedException y se omitirá la prueba.
| Assumptions | Description |
|---|---|
| assumeTrue | Execute the body of lamda when the positive condition hold else test will be skipped |
| assumeFalse | Execute the body of lamda when the negative condition hold else test will be skipped |
| assumingThat | Portion of the test method will execute if an assumption holds true and everything after the lambda will execute irrespective of the assumption in assumingThat() holds |
@Test
void testAssumeTrue() {
     boolean b = 'A' == 'A';
     assumeTrue(b);
     assertEquals("Hello", "Hello");
}

@Test
@DisplayName("test executes only on Saturday")
public void testAssumeTrueSaturday() {
     LocalDateTime dt = LocalDateTime.now();
     assumeTrue(dt.getDayOfWeek().getValue() == 6);
     System.out.println("further code will execute only if above assumption holds true");
}

@Test
void testAssumeFalse() {
     boolean b = 'A' != 'A';
     assumeFalse(b);
     assertEquals("Hello", "Hello");
}

@Test
void testAssumeFalseEnvProp() {
     System.setProperty("env", "prod");
     assumeFalse("dev".equals(System.getProperty("env")));
     System.out.println("further code will execute only if above assumption hold");
}

@Test
void testAssumingThat() {
     System.setProperty("env", "test");
     assumingThat("test".equals(System.getProperty("env")),
          () -> {
               assertEquals(10, 10);
               System.out.println("perform below assertions only on the test env");
               });

     assertEquals(20, 20);
     System.out.println("perform below assertions on all env");
}
Clases de Prueba Anidadas en JUnit
Las pruebas anidadas permiten crear clases anidadas y ejecutar todos sus métodos de prueba. Las clases internas deben ser no estáticas. Simplemente anota las clases internas con @Nested y se ejecutarán todos los métodos de prueba dentro de ellas.
@BeforeAll
static void beforeAll() {
     System.out.println("**--- JUnit5Sample4Test :: beforeAll :: Executed once before all test methods ---**");
}

@BeforeEach
void beforeEach() {
	 System.out.println("**--- JUnit5Sample4Test :: beforeEach :: Executed before each test method ---**");
}

@AfterEach
void afterEach() {
	 System.out.println("**--- JUnit5Sample4Test :: afterEach :: Executed after each test method ---**");
}

@AfterAll
static void afterAll() {
	 System.out.println("**--- JUnit5Sample4Test :: afterAll :: Executed after all test method ---**");
}

     @Nested
     class InnerClass {

          @BeforeEach
          void beforeEach() {
               System.out.println("**--- InnerClass :: beforeEach :: Executed before each test method ---**");
          }

          @AfterEach
          void afterEach() {
        	   System.out.println("**--- InnerClass :: afterEach :: Executed after each test method ---**");
          }

          @Test
          void testMethod1() {
        	   System.out.println("**--- InnerClass :: testMethod1 :: Executed test method1 ---**");
          }

          @Nested
          class InnerMostClass {

               @BeforeEach
               void beforeEach() {
                    System.out.println("**--- InnerMostClass :: beforeEach :: Executed before each test method ---**");
               }

               @AfterEach
               void afterEach() {
            	    System.out.println("**--- InnerMostClass :: afterEach :: Executed after each test method ---**");
               }

               @Test
               void testMethod2() {
            	    System.out.println("**--- InnerMostClass :: testMethod2 :: Executed test method2 ---**");
               }
        }
    }
Excepciones en Pruebas JUnit
Existen situaciones en las que se espera que los métodos arrojen una excepción bajo una condición específica. assertThrows fallará la prueba si el método dado no arroja la excepción especificada.
Throwable exception = assertThrows(IllegalArgumentException.class, () -> {
     throw new IllegalArgumentException("Illegal Argument Exception occured");
});
assertEquals("Illegal Argument Exception occured", exception.getMessage());
Ejecución de Pruebas JUnit
Las pruebas unitarias pueden ejecutarse de muchas maneras, dos de las formas son las siguientes:
- Usar Eclipse IDE Oxygen.3a (4.7.3a) Release y abrir el archivo de prueba a ejecutar. Hacer clic derecho en el archivo y elegir la opción Ejecutar como seguido por Prueba JUnit
- Usar el comando mvn test en el símbolo del sistema de Windows
Resumen
Hemos explorado JUnit5 y sus nuevas características con algunos ejemplos. También vimos cómo podemos usar anotaciones JUnit, aserciones, suposiciones, excepciones y escribir clases de prueba anidadas.
Puedes descargar el proyecto de ejemplo completo desde nuestro Repositorio de GitHub.
Source:
https://www.digitalocean.com/community/tutorials/junit5-tutorial