Im diesem Tutorial werden wir uns ausführlich mit den Funktionen befassen, die uns das Android TextInputLayout bietet. Android TextInputLayout ist ein Designkomponente, die mit der Material Design Support Library geliefert wird.
Android TextInputLayout
Android TextInputLayout erweitert LinearLayout. Die Hauptverwendung eines TextInputLayout besteht darin, als Wrapper für EditText (oder dessen Nachfolger) zu fungieren und schwebende Hinweisanimationen zu ermöglichen. Daumenregel: TextInputLayout sollte TextInputEditText statt des normalen EditText umschließen. Grund? TextInputEditText ist eine Unterklasse von EditText und ist dafür konzipiert, als Kind von TextInputLayout verwendet zu werden. Darüber hinaus würde uns die Verwendung eines EditText eine Warnung auslösen: EditText hinzugefügt ist kein TextInputEditText. Bitte wechseln Sie stattdessen zu dieser Klasse. TextInputLayout hat viel mehr zu bieten als nur schwebende Hinweislabels anzuzeigen.
Android TextInputLayout-Funktionen
Einige der Funktionen, die wir in diesem Tutorial behandeln werden, sind:
- Aktivieren/Deaktivieren schwebender Hinweise
- Aktivieren/Deaktivieren der schwebenden Hinweisanimation
- Anzeigen von Fehlermeldungen
- Anzeigen des Zeichenzählers
- Benachrichtigen Sie den Benutzer, wenn die Zeichenanzahl ihr Limit überschreitet
- Anpassung des Textaussehens für schwebenden Hinweis, Fehlerbeschriftung, Zeichenzähler
- Sichtbarkeit des Passwortes umschalten
Wir werden uns jede dieser Funktionen ansehen und sie in einem Android-Studio-Projekt implementieren.
Beispielprojektstruktur von Android TextInputLayout
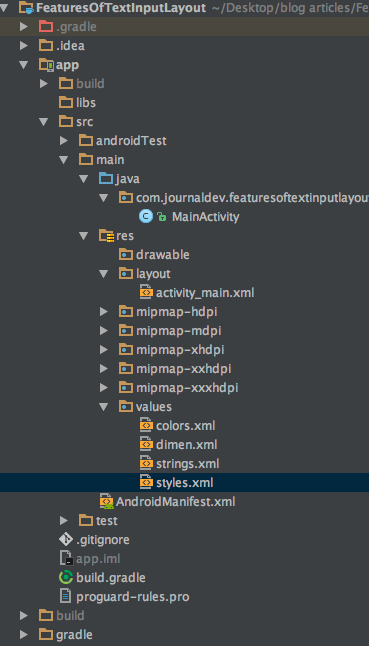 Dies ist eine Einzelaktivitätsanwendung. Wir werden alles innerhalb der Layout-, Aktivitäts- und
 styles.xml– und colors.xml-Dateien tun. Fügen Sie zunächst die Abhängigkeit für die Design-Support-Bibliothek in der build.gradle-Datei wie unten gezeigt hinzu.
compile 'com.android.support:design:25.3.1'
Aktivieren/Deaktivieren von schwebenden Hinweisen
Schwebende Hinweise sind standardmäßig in einem TextInputLayout aktiviert. Um sie zu deaktivieren, müssen wir das folgende Attribut innerhalb des Tags hinzufügen: app:hintEnabled="false". Der folgende XML-Code stammt aus dem Layout activity_main.xml und enthält drei EditText-Felder.
<?xml version="1.0" encoding="utf-8"?>
<ScrollView xmlns:android="https://schemas.android.com/apk/res/android"
    xmlns:app="https://schemas.android.com/apk/res-auto"
    xmlns:tools="https://schemas.android.com/tools"
    android:layout_width="match_parent"
    android:layout_height="wrap_content"
    tools:context="com.journaldev.featuresoftextinputlayout.MainActivity">

    <LinearLayout
        android:layout_width="match_parent"
        android:layout_height="wrap_content"
        android:orientation="vertical">


        <android.support.design.widget.TextInputEditText
            android:layout_width="match_parent"
            android:layout_height="wrap_content"
            android:layout_margin="@dimen/activity_horizontal_margin"
            android:hint="TextInputEditText" />


        <android.support.design.widget.TextInputLayout
            android:layout_width="match_parent"
            android:layout_height="match_parent"
            android:layout_margin="@dimen/activity_horizontal_margin">

            <android.support.design.widget.TextInputEditText
                android:layout_width="match_parent"
                android:layout_height="wrap_content"
                android:hint="Floating Hint Enabled Default" />

        </android.support.design.widget.TextInputLayout>


        <android.support.design.widget.TextInputLayout
            android:layout_width="match_parent"
            android:layout_height="wrap_content"
            android:layout_margin="@dimen/activity_horizontal_margin"
            app:hintEnabled="false">

            <android.support.design.widget.TextInputEditText
                android:layout_width="match_parent"
                android:layout_height="wrap_content"
                android:hint="Floating Hint Disabled" />

        </android.support.design.widget.TextInputLayout>

</LinearLayout>
</ScrollView>
Das dritte EditText-Feld hat den schwebenden Hinweis deaktiviert. Schauen wir uns das Ergebnis des obigen Codes an: 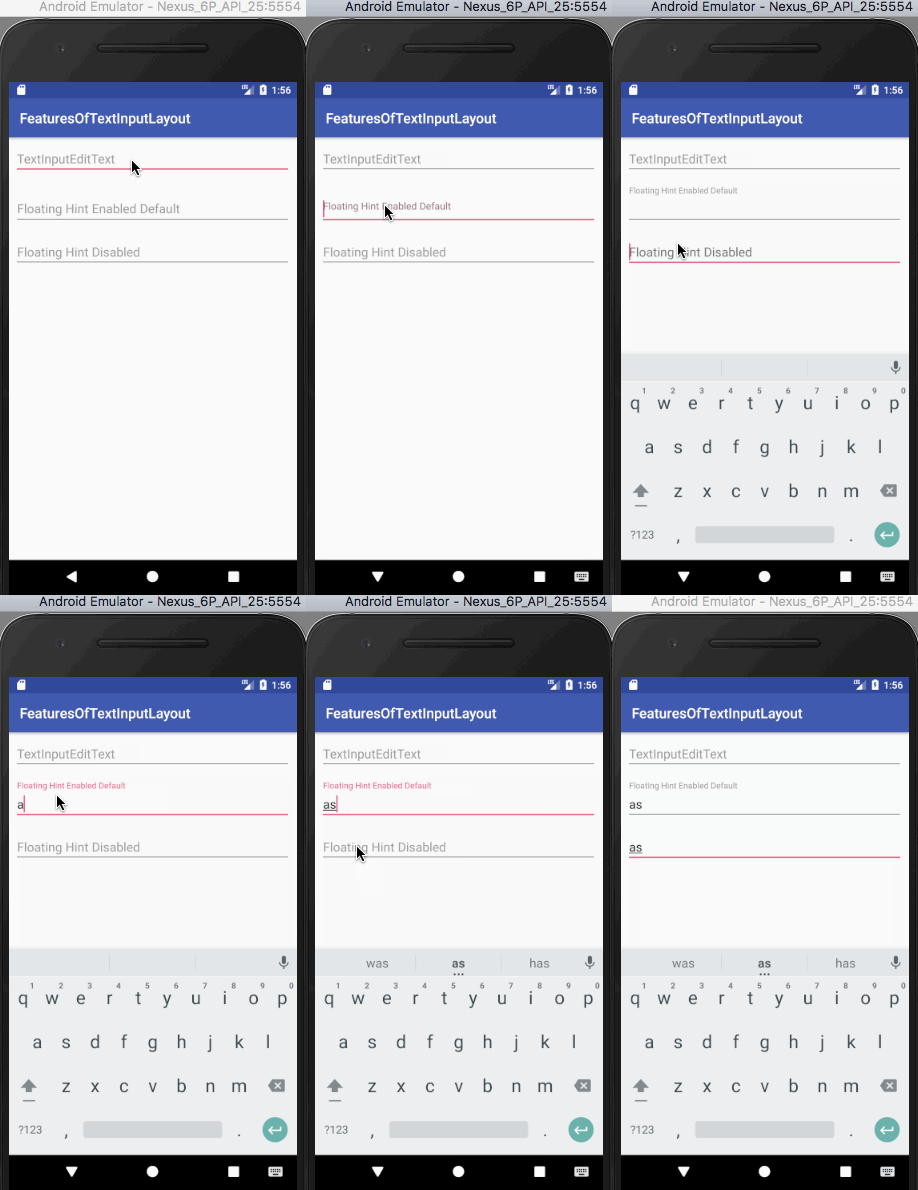
Aktivieren/Deaktivieren der Animation des schwebenden Hinweises
Ähnlich wie bei der vorherigen Funktion ist die Animation des schwebenden Hinweises standardmäßig aktiviert. Um sie zu deaktivieren, müssen wir das folgende Attribut innerhalb des TextInputLayout-Tags hinzufügen. app:hintAnimationEnabled="false" Der untenstehende XML-Code stammt aus dem Layout activity_main.xml und enthält EditText-Felder für beide Fälle.
<?xml version="1.0" encoding="utf-8"?>
<ScrollView xmlns:android="https://schemas.android.com/apk/res/android"
    xmlns:app="https://schemas.android.com/apk/res-auto"
    xmlns:tools="https://schemas.android.com/tools"
    android:layout_width="match_parent"
    android:layout_height="wrap_content"
    tools:context="com.journaldev.featuresoftextinputlayout.MainActivity">

    <LinearLayout
        android:layout_width="match_parent"
        android:layout_height="wrap_content"
        android:orientation="vertical">

        <android.support.design.widget.TextInputLayout
            android:layout_width="match_parent"
            android:layout_height="match_parent"
            android:layout_margin="@dimen/activity_horizontal_margin">

            <android.support.design.widget.TextInputEditText
                android:layout_width="match_parent"
                android:layout_height="wrap_content"
                android:hint="Floating Hint Enabled Default" />

        </android.support.design.widget.TextInputLayout>


        <android.support.design.widget.TextInputLayout
            android:layout_width="match_parent"
            android:layout_height="wrap_content"
            android:layout_margin="@dimen/activity_horizontal_margin"
            app:hintAnimationEnabled="false">

            <android.support.design.widget.TextInputEditText
                android:layout_width="match_parent"
                android:layout_height="wrap_content"
                android:hint="Hint Animation Disabled" />

        </android.support.design.widget.TextInputLayout>

</LinearLayout>
</ScrollView>
Das Ergebnis des obigen Codes wird unten angezeigt. 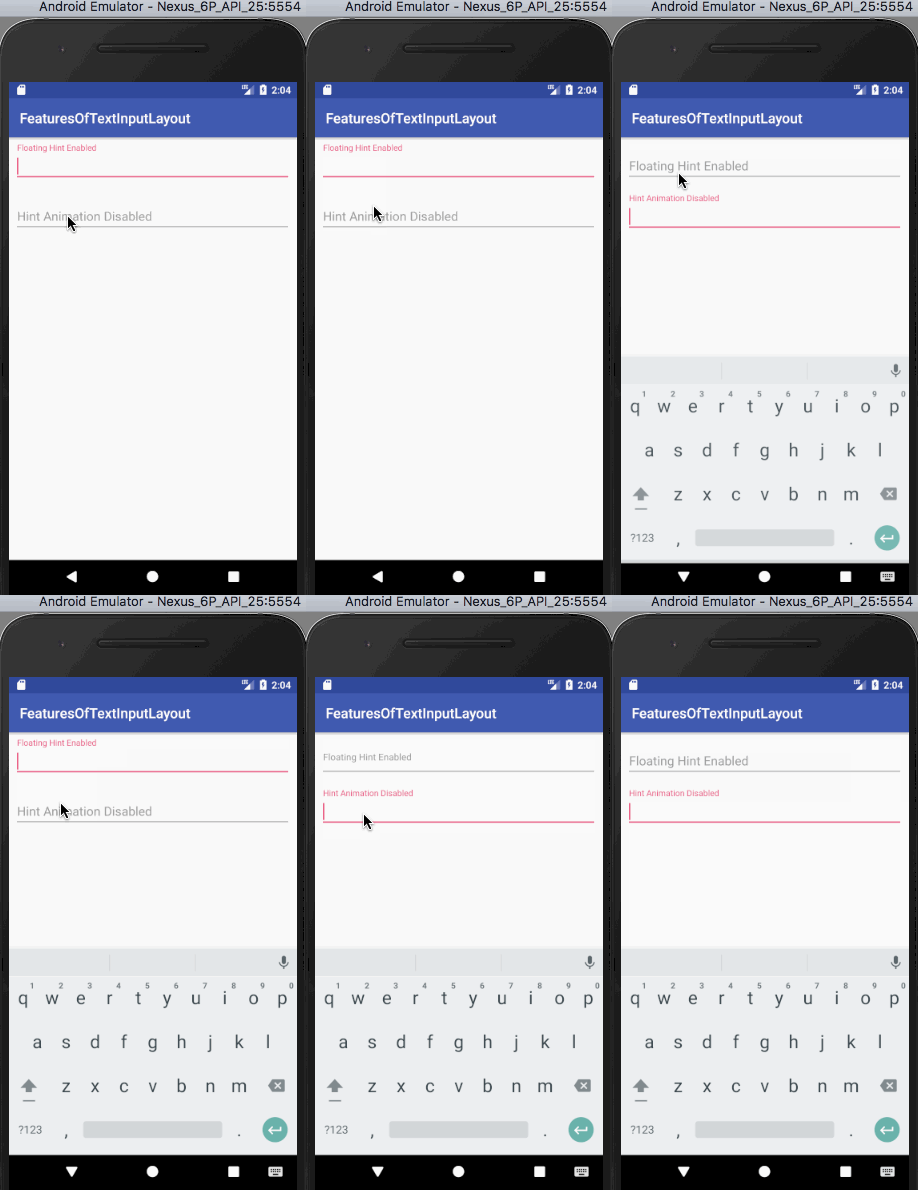 Es ist erwähnenswert, dass das zweite EditText-Feld den schwebenden Hinweis nicht animiert, wenn es im Fokus ist.
Styling des Hinweis-Texts
Um eine benutzerdefinierte textColor und textSize für die Hinweise zu verwenden, wird das folgende Attribut verwendet: app:hintTextAppearance="@style/HintText" Der HintText-Stil ist innerhalb der styles.xml wie unten gezeigt geschrieben
<style name="HintText" parent="TextAppearance.Design.Hint">
        <item name="android:textSize">16sp</item>
        <item name="android:textColor">@color/colorPrimary</item>
    </style>
Der untenstehende XML-Code stammt aus dem Layout activity_main.xml und enthält EditText-Felder für beide Fälle (mit/ohne hintTextAppearance).
<?xml version="1.0" encoding="utf-8"?>
<ScrollView xmlns:android="https://schemas.android.com/apk/res/android"
    xmlns:app="https://schemas.android.com/apk/res-auto"
    xmlns:tools="https://schemas.android.com/tools"
    android:layout_width="match_parent"
    android:layout_height="wrap_content"
    tools:context="com.journaldev.featuresoftextinputlayout.MainActivity">

    <LinearLayout
        android:layout_width="match_parent"
        android:layout_height="wrap_content"
        android:orientation="vertical">

        <android.support.design.widget.TextInputLayout
            android:layout_width="match_parent"
            android:layout_height="match_parent"
            android:layout_margin="@dimen/activity_horizontal_margin">

            <android.support.design.widget.TextInputEditText
                android:layout_width="match_parent"
                android:layout_height="wrap_content"
                android:hint="Floating Hint Enabled" />

        </android.support.design.widget.TextInputLayout>


        <android.support.design.widget.TextInputLayout
            android:layout_width="match_parent"
            android:layout_height="match_parent"
            android:layout_margin="@dimen/activity_horizontal_margin"
            app:hintTextAppearance="@style/HintText">

            <android.support.design.widget.TextInputEditText
                android:layout_width="match_parent"
                android:layout_height="wrap_content"
                android:hint="Custom Hint TextAppearance" />

        </android.support.design.widget.TextInputLayout>

</LinearLayout>
</ScrollView>
Die Ausgabe des obigen Codes wird unten angezeigt. 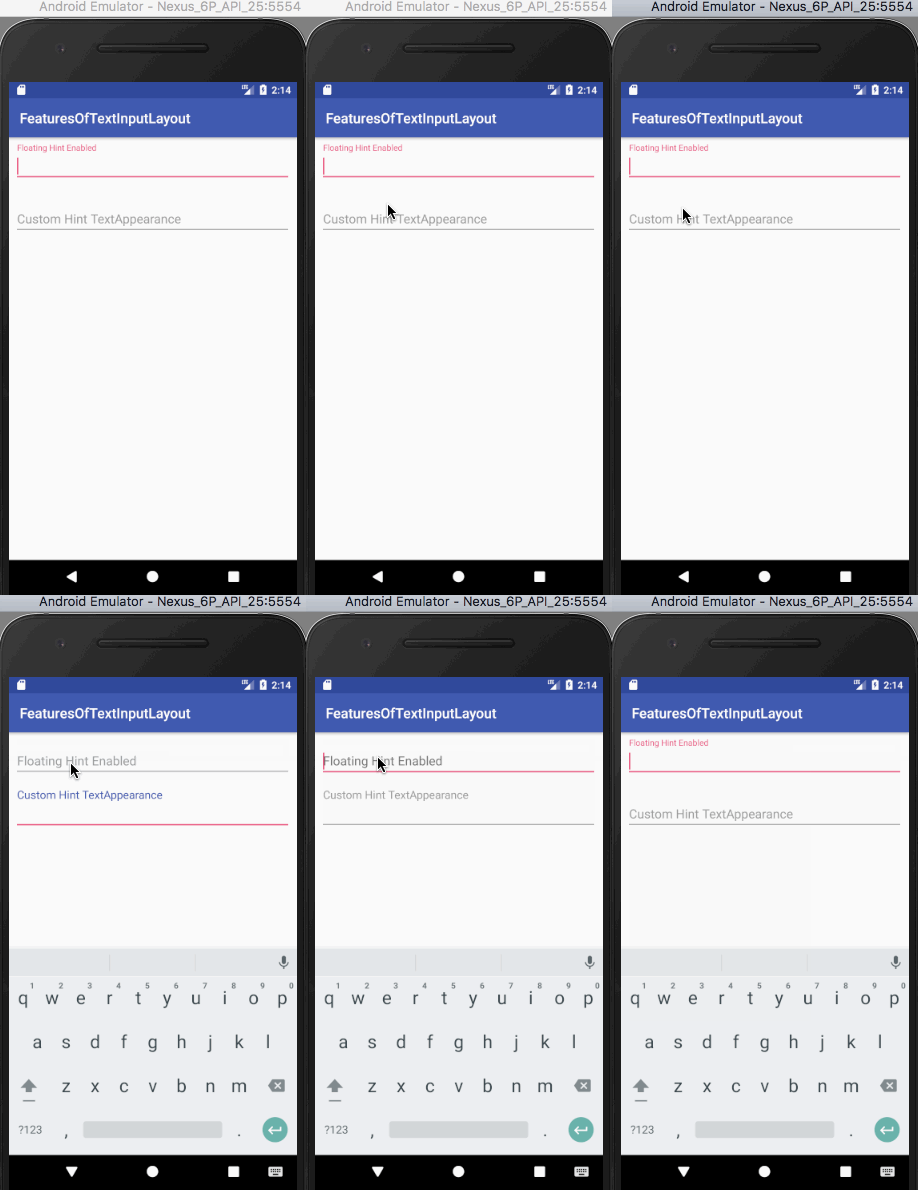
Zeichenzähler
Der Zeichenzähler ist eine Funktion, die von vielen Anwendungen verwendet wird (erinnern Sie sich an das Twitter-Zeichenlimit?). Legen Sie app:counterEnabled auf true und app:counterMaxLength mit der maximalen Anzahl von Zeichen fest, die Sie im TextInputLayout haben möchten. Der Zeichenzähler wird standardmäßig unter dem EditText angezeigt (unten rechts) und während des Schreibens dieses Tutorials gibt es noch keinen Weg, um die Position zu ändern. Das Styling des Zählers ähnelt dem Styling des Hinweistextes. app:counterTextAppearance ist das Attribut, das dieses Mal verwendet wird. Wir haben den folgenden Stil in der styles.xml-Datei unseres Projekts hinzugefügt.
<style name="CounterText" parent="TextAppearance.Design.Counter">
        <item name="android:textSize">16sp</item>
        <item name="android:textColor">@color/my_pink</item>
    </style>
Der untenstehende XML-Code stammt aus dem Layout activity_main.xml und enthält EditText-Felder mit einem standardmäßigen Zeichenzähler und einem benutzerdefinierten.
<?xml version="1.0" encoding="utf-8"?>
<ScrollView xmlns:android="https://schemas.android.com/apk/res/android"
    xmlns:app="https://schemas.android.com/apk/res-auto"
    xmlns:tools="https://schemas.android.com/tools"
    android:layout_width="match_parent"
    android:layout_height="wrap_content"
    tools:context="com.journaldev.featuresoftextinputlayout.MainActivity">

    <LinearLayout
        android:layout_width="match_parent"
        android:layout_height="wrap_content"
        android:orientation="vertical">

        <android.support.design.widget.TextInputLayout
            android:layout_width="match_parent"
            android:layout_height="wrap_content"
            android:layout_margin="@dimen/activity_horizontal_margin"
            app:counterEnabled="true"
            app:counterMaxLength="5"
            app:hintTextAppearance="@style/HintText">

            <android.support.design.widget.TextInputEditText
                android:layout_width="match_parent"
                android:layout_height="wrap_content"
                android:hint="Character Counter Limit 10" />

        </android.support.design.widget.TextInputLayout>


        <android.support.design.widget.TextInputLayout
            android:layout_width="match_parent"
            android:layout_height="wrap_content"
            android:layout_margin="@dimen/activity_horizontal_margin"
            app:counterEnabled="true"
            app:counterMaxLength="5"
            app:counterTextAppearance="@style/CounterText"
            app:hintTextAppearance="@style/HintText">

            <android.support.design.widget.TextInputEditText
                android:layout_width="match_parent"
                android:layout_height="wrap_content"
                android:hint="Character Counter Custom TextAppearance" />

        </android.support.design.widget.TextInputLayout>

</LinearLayout>
</ScrollView>
Die Ausgabe des obigen Codes lautet wie folgt. 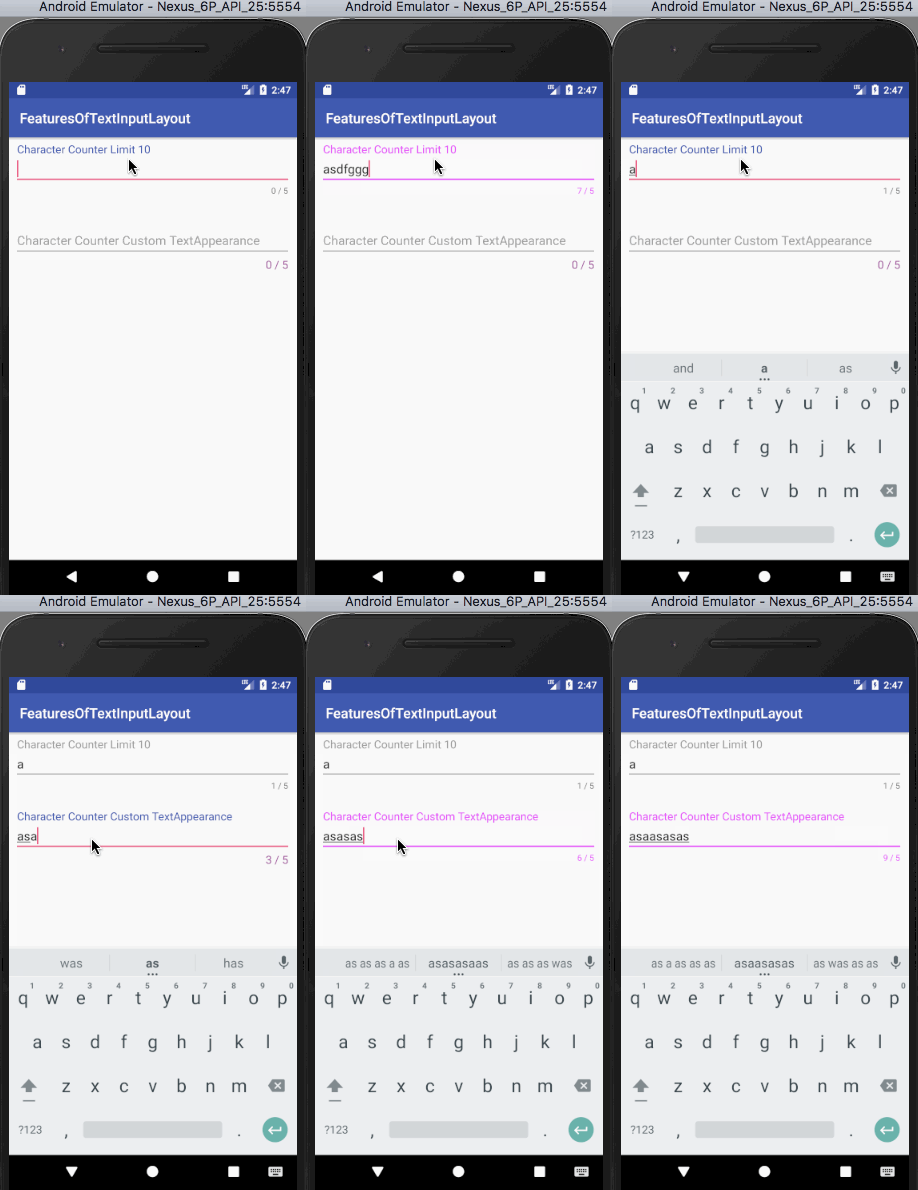 Schauen wir uns die obige Ausgabe genauer an.
- Das erste EditText-Feld ändert seine Zählertextfarbe , Hinweistextfarbe und die Farbe des Indikators, wenn die Zeichenanzahl überschritten wird.
- Das zweite EditText-Feld macht dasselbe, ändert jedoch auch die Zählertextfarbe benutzerdefiniert und die Schriftgröße , wenn das Limit überschritten wird.
Um den Stil anzugeben, den wir benötigen, wenn der Zeichenzähler sein Limit überschreitet, müssen wir das Attribut counterFlow verwenden, das wir als Nächstes sehen werden.
Character Counter Overflow
Wie wir oben gesehen haben, verwendet der Zählertext die in counterFlow definierten Attribute, wenn die Zeichenanzahl das definierte Limit überschreitet. Wenn die Attribute nicht vorhanden waren, bleibt er bei den Standardattributen, wie wir in der obigen Ausgabe gesehen haben. Wir müssen den folgenden Parameter verwenden: app:counterOverflowTextAppearance Der Stil für CounterOverflow befindet sich in der styles.xml:
 <style name="CounterOverFlow" parent="TextAppearance.Design.Counter.Overflow">
        <item name="android:textSize">16sp</item>
        <item name="android:textColor">@color/my_orange</item>
    </style>
Fügen Sie den folgenden Codeausschnitt zum vorherigen Layout activity_main.xml hinzu.
<android.support.design.widget.TextInputLayout
            android:layout_width="match_parent"
            android:layout_height="wrap_content"
            android:layout_margin="@dimen/activity_horizontal_margin"
            app:counterEnabled="true"
            app:counterMaxLength="5"
            app:counterOverflowTextAppearance="@style/CounterOverFlow"
            app:counterTextAppearance="@style/CounterText"
            app:hintTextAppearance="@style/HintText">

            <android.support.design.widget.TextInputEditText
                android:layout_width="match_parent"
                android:layout_height="wrap_content"
                android:hint="CounterOverflow CustomTextAppearance" />

        </android.support.design.widget.TextInputLayout>
Lassen Sie uns die Anwendung erneut ausführen. 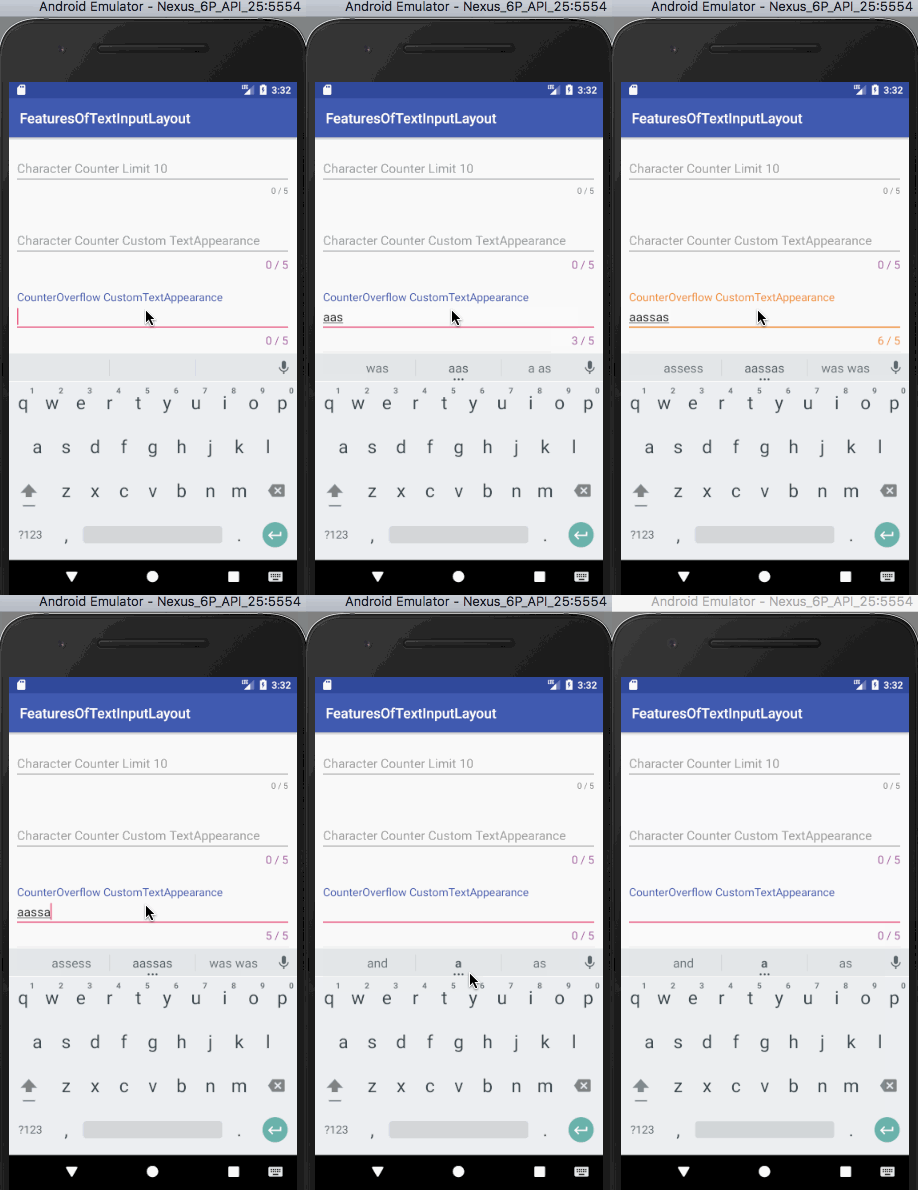
Fehlerbeschriftung
Einstellen von app:errorEnabled auf true ermöglicht es uns, einen Fehlertext unterhalb unseres EditText-Felds anzuzeigen. Um den Fehlertext zu gestalten, verwenden wir das Attribut app:errorTextAppearance und fügen den folgenden Code in unsere Datei styles.xml ein.
<style name="ErrorText" parent="TextAppearance.Design.Error">
        <item name="android:textSize">16sp</item>
        <item name="android:textColor">@color/my_black</item>
    </style>
Der folgende XML-Code stammt aus dem Layout activity_main.xml und enthält EditText-Felder für eine Standardfehlerbeschriftung und eine benutzerdefinierte.
<?xml version="1.0" encoding="utf-8"?>
<ScrollView xmlns:android="https://schemas.android.com/apk/res/android"
    xmlns:app="https://schemas.android.com/apk/res-auto"
    xmlns:tools="https://schemas.android.com/tools"
    android:layout_width="match_parent"
    android:layout_height="wrap_content"
    tools:context="com.journaldev.featuresoftextinputlayout.MainActivity">

    <LinearLayout
        android:layout_width="match_parent"
        android:layout_height="wrap_content"
        android:orientation="vertical">

        <android.support.design.widget.TextInputLayout
            android:id="@+id/errorInputLayout"
            android:layout_width="match_parent"
            android:layout_height="wrap_content"
            android:layout_margin="@dimen/activity_horizontal_margin"
            app:counterEnabled="true"
            app:counterMaxLength="5"
            app:counterOverflowTextAppearance="@style/CounterOverFlow"
            app:counterTextAppearance="@style/CounterText"
            app:errorEnabled="true"
            app:hintTextAppearance="@style/HintText">

            <android.support.design.widget.TextInputEditText
                android:id="@+id/errorEditText"
                android:layout_width="match_parent"
                android:layout_height="wrap_content"
                android:hint="Default Error Label" />

        </android.support.design.widget.TextInputLayout>


        <android.support.design.widget.TextInputLayout
            android:id="@+id/customErrorInputLayout"
            android:layout_width="match_parent"
            android:layout_height="wrap_content"
            android:layout_margin="@dimen/activity_horizontal_margin"
            app:counterEnabled="true"
            app:counterMaxLength="5"
            app:counterOverflowTextAppearance="@style/CounterOverFlow"
            app:counterTextAppearance="@style/CounterText"
            app:errorEnabled="true"
            app:errorTextAppearance="@style/ErrorText"
            app:hintTextAppearance="@style/HintText">

            <android.support.design.widget.TextInputEditText
                android:id="@+id/customErrorEditText"
                android:layout_width="match_parent"
                android:layout_height="wrap_content"
                android:hint="Custom Error Label" />

        </android.support.design.widget.TextInputLayout>

</LinearLayout>
</ScrollView>
Um den Fehlertext anzuzeigen, müssen wir die Methode setError(String) für eine Instanz von TextInputLayout in unserer Klasse MainActivity.java aufrufen, wie unten dargestellt.
package com.journaldev.featuresoftextinputlayout;

import android.support.design.widget.TextInputEditText;
import android.support.design.widget.TextInputLayout;
import android.support.v7.app.AppCompatActivity;
import android.os.Bundle;
import android.text.Editable;
import android.text.TextWatcher;

public class MainActivity extends AppCompatActivity {


    TextInputLayout errorInputLayout, customErrorInputLayout;
    TextInputEditText errorEditText, customErrorEditText;

    @Override
    protected void onCreate(Bundle savedInstanceState) {
        super.onCreate(savedInstanceState);
        setContentView(R.layout.activity_main);

        errorEditText = (TextInputEditText) findViewById(R.id.errorEditText);
        errorInputLayout = (TextInputLayout) findViewById(R.id.errorInputLayout);

        customErrorEditText = (TextInputEditText) findViewById(R.id.customErrorEditText);
        customErrorInputLayout = (TextInputLayout) findViewById(R.id.customErrorInputLayout);

        errorEditText.addTextChangedListener(new TextWatcher() {
            @Override
            public void beforeTextChanged(CharSequence s, int start, int count, int after) {

            }

            @Override
            public void onTextChanged(CharSequence s, int start, int before, int count) {

            }

            @Override
            public void afterTextChanged(Editable s) {

                if (s.length() > errorInputLayout.getCounterMaxLength())
                    errorInputLayout.setError("Max character length is " + errorInputLayout.getCounterMaxLength());
                else
                    errorInputLayout.setError(null);

            }
        });

        customErrorEditText.addTextChangedListener(new TextWatcher() {
            @Override
            public void beforeTextChanged(CharSequence s, int start, int count, int after) {

            }

            @Override
            public void onTextChanged(CharSequence s, int start, int before, int count) {

            }

            @Override
            public void afterTextChanged(Editable s) {

                if (s.length() > customErrorInputLayout.getCounterMaxLength())
                    customErrorInputLayout.setError("Max character length is " + customErrorInputLayout.getCounterMaxLength());
                else
                    customErrorInputLayout.setError(null);

            }
        });


    }
}
Im obigen Code fügen wir einen TextChangedListener (der TextWatcher implementiert) zu jeder Instanz von TextInputEditText hinzu. Wir zeigen das Fehlerlabel an, wenn die aktuelle Zeichenanzahl das maximale Limit überschreitet. Um das Fehlerlabel zu löschen, setzen wir den Wert innerhalb von setError() auf null. Der Output, den der obige Code liefert, ist: 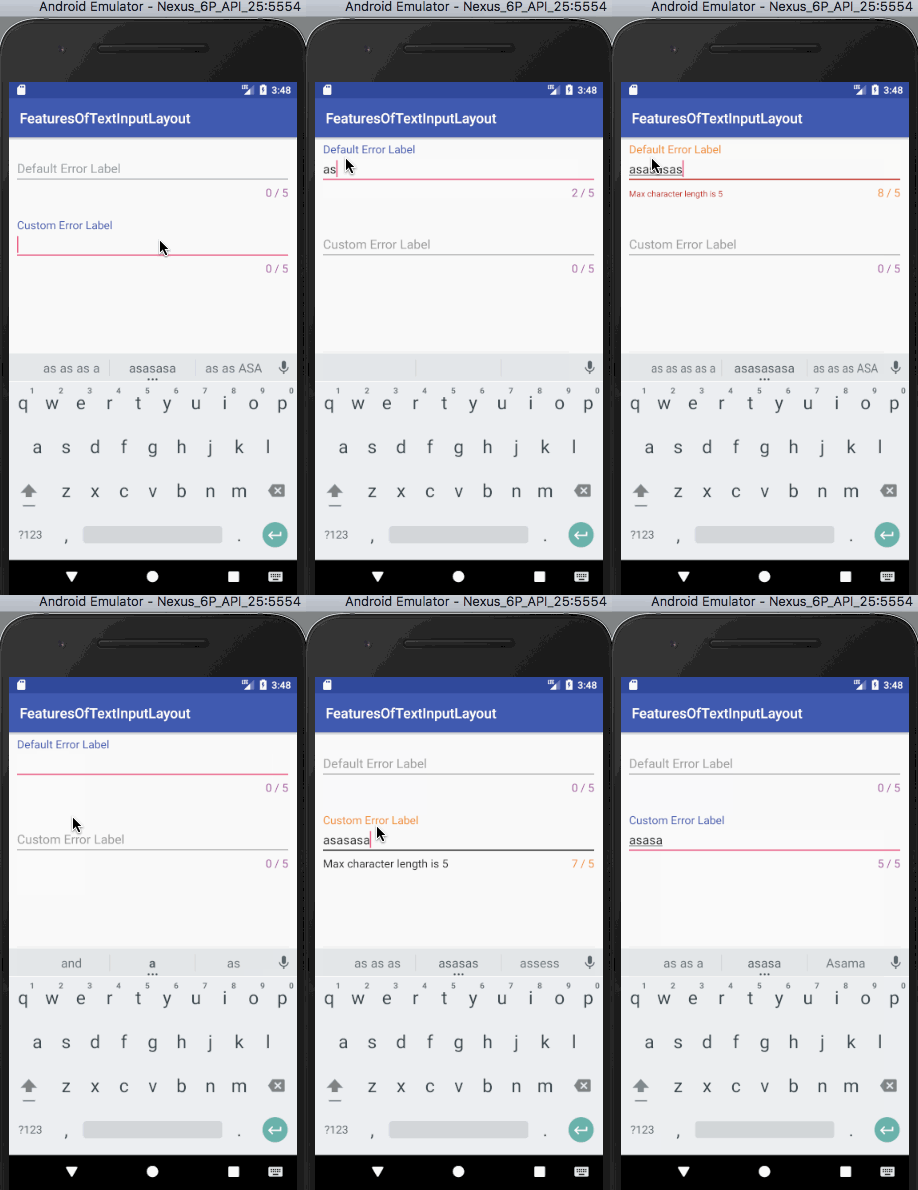 Hinweis: Der Indikator des Textfelds verwendet die gleiche Farbe wie das Fehlerlabel. Er überschreibt die von counterOverflow gesetzte Farbe und hat daher die höchste Priorität.
Passwort-Sichtbarkeit umschalten
Das Setzen von app:passwordToggleEnabled auf true ermöglicht es Ihnen, das Passwort ein- und auszublenden. Um die Farbe des Symbols zu ändern, verwenden Sie app:passwordToggleTint. Der folgende XML-Code stammt aus dem Layout activity_main.xml und enthält EditText-Felder für eine Passwort-Sichtbarkeitsumschaltung (Standard-Symbol und mit einer Tönung).
<?xml version="1.0" encoding="utf-8"?>
<ScrollView xmlns:android="https://schemas.android.com/apk/res/android"
    xmlns:app="https://schemas.android.com/apk/res-auto"
    xmlns:tools="https://schemas.android.com/tools"
    android:layout_width="match_parent"
    android:layout_height="wrap_content"
    tools:context="com.journaldev.featuresoftextinputlayout.MainActivity">

    <LinearLayout
        android:layout_width="match_parent"
        android:layout_height="wrap_content"
        android:orientation="vertical">

        <android.support.design.widget.TextInputLayout
            android:layout_width="match_parent"
            android:layout_height="wrap_content"
            android:layout_margin="@dimen/activity_horizontal_margin"
            app:counterEnabled="true"
            app:counterMaxLength="5"
            app:counterOverflowTextAppearance="@style/CounterOverFlow"
            app:counterTextAppearance="@style/CounterText"
            app:hintTextAppearance="@style/HintText"
            app:passwordToggleEnabled="true">

            <android.support.design.widget.TextInputEditText
                android:layout_width="match_parent"
                android:layout_height="wrap_content"
                android:hint="Password Visibility Toggle"
                android:inputType="textPassword" />

        </android.support.design.widget.TextInputLayout>


        <android.support.design.widget.TextInputLayout
            android:layout_width="match_parent"
            android:layout_height="wrap_content"
            android:layout_margin="@dimen/activity_horizontal_margin"
            app:counterEnabled="true"
            app:counterMaxLength="5"
            app:counterOverflowTextAppearance="@style/CounterOverFlow"
            app:counterTextAppearance="@style/CounterText"
            app:hintTextAppearance="@style/HintText"
            app:passwordToggleEnabled="true"
            app:passwordToggleTint="@color/my_orange">

            <android.support.design.widget.TextInputEditText
                android:layout_width="match_parent"
                android:layout_height="wrap_content"
                android:hint="Password Visibility Toggle Tint"
                android:inputType="textPassword" />

        </android.support.design.widget.TextInputLayout>
</LinearLayout>
</ScrollView>
Der oben gezeigte Code gibt folgende Ausgabe aus: 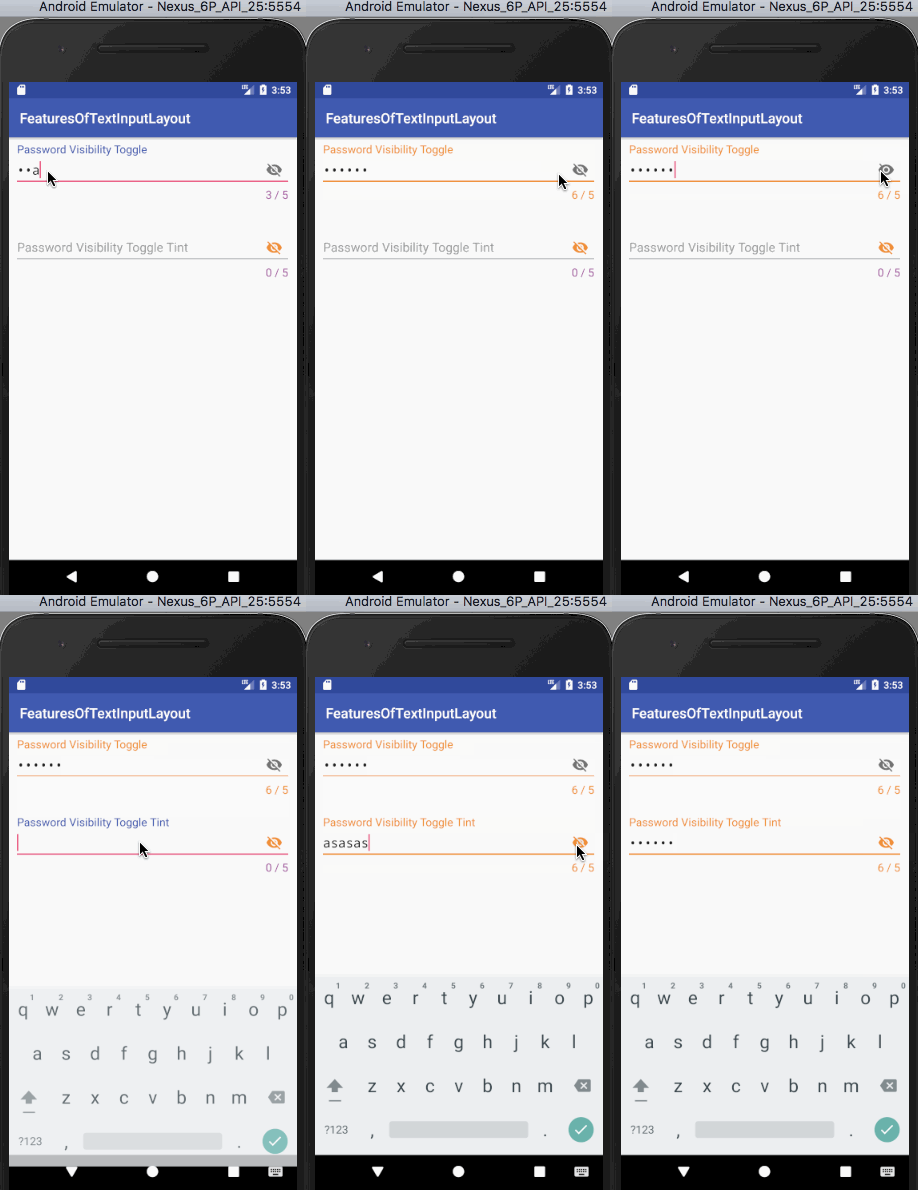 Hinweis: Wir können unsere eigenen benutzerdefinierten Symbole für die Passwort-Sichtbarkeitsumschaltung verwenden, indem wir
 app:passwordToggleDrawable verwenden. Damit endet dieses Tutorial. Wir haben alle wichtigen Funktionen von TextInputLayout behandelt. Sie können das Android TextInputLayout Beispielprojekt über den unten stehenden Link herunterladen. Es enthält jeden der obigen Code-Schnipsel.
Android TextInputLayout-Projekt herunterladen
Referenz: Android Offizielle Dokumentation
Source:
https://www.digitalocean.com/community/tutorials/android-textinputlayout-example


