At the end of this tutorial, we’ll have a HR management application that includes:
Login page: Allows users to log in as either a manager or an employee. Managers have access to the Time Off and Requests pages, while employees only have access to the Time Off page.
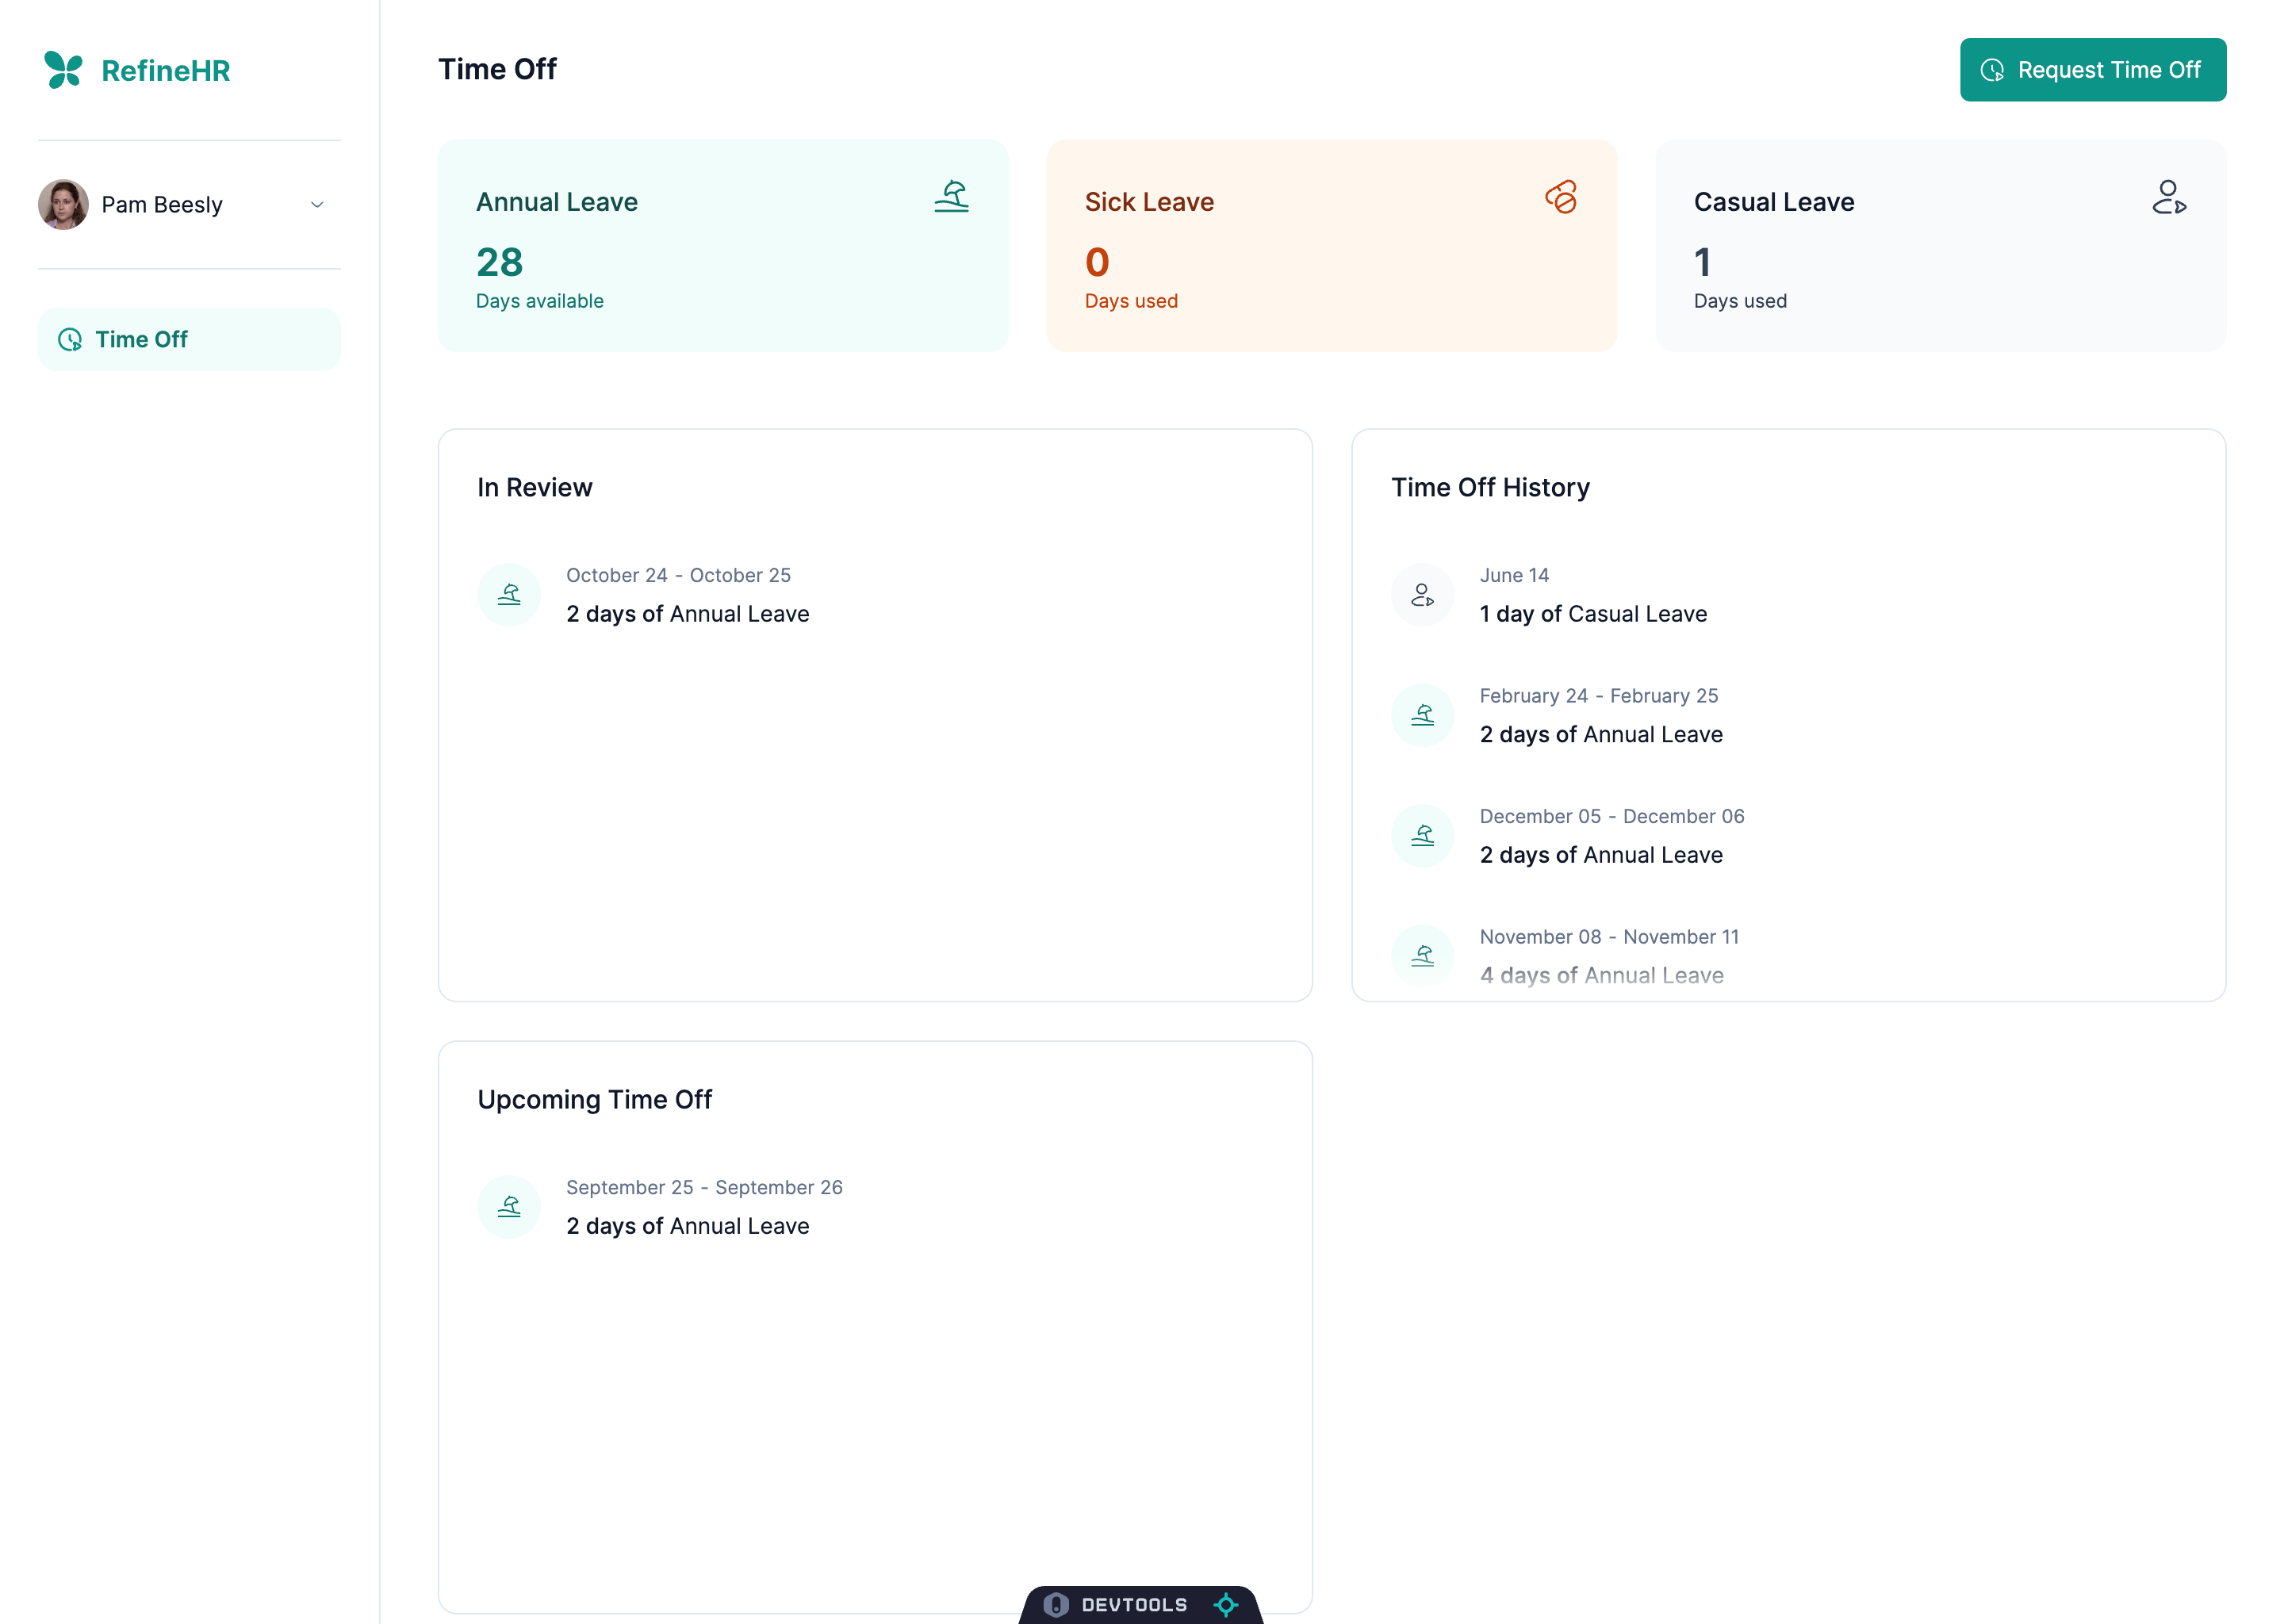
Time Off pages: Allows employees to request, view, and cancel their time off. Also managers can assign new time offs.
Requests page: Accessible only to HR managers for approving or rejecting time off requests.
Note: You can get the complete source code of the app we’ll build in this tutorial from this GitHub repository
While doing these, we’ll use the:
Rest API: To fetch and update the data. Refine has built-in data provider packages and REST APIs, but you can also build your own to suit your specific requirements. In this guide, we’re going to use NestJs CRUD as our backend service and the @refinedev/nestjsx-crud package as our data provider.
Material UI: We will use it for UI components and fully customize it according to our own design. Refine has built-in support for Material UI, but you can use any UI library you like.
Once we’ve build the app, we’ll put it online using DigitalOcean’s App Platform which makes it easy to set up, launch, and grow apps and static websites. You can deploy code by simply pointing to a GitHub repository and let the App Platform do the heavy lifting of managing the infrastructure, app runtimes, and dependencies.
Refine is an open source React meta-framework for building complex B2B web applications, mainly data management focused use cases like internal tools, admin panels, and dashboards. It’s designed by providing a set of hooks and components to improve the development process with a better workflow for the developer.
It provides feature-complete, production-ready features for enterprise-level apps to simplify paid tasks like state and data management, authentication, and access control. This enables developers to remain focused on the core of their application in a way that is abstracted from many overwhelming implementation details.
We’ll use the npm create refine-app command to interactively initialize the project.
npm create refine-app@latest
Select the following options when prompted:
✔ Choose a project template · Vite
✔ What would you like to name your project?: · hr-app
✔ Choose your backend service to connect: · nestjsx-crud
✔ Do you want to use a UI Framework?: · Material UI
✔ Do you want to add example pages?: · No
✔ Do you need any Authentication logic?: · None
✔ Choose a package manager: · npm
Once the setup is complete, navigate to the project folder and start your app with:
npm run dev
Open http://localhost:5173 in your browser to see the app.
Now that we have our project set up, let’s make some changes to the project structure and remove the unnecessary files.
First, install the 3rd party dependencies:
@mui/x-date-pickers, @mui/x-date-pickers-pro: These are date picker components for Material UI. We will use them to select the date range for the time off requests.
react-hot-toast: A minimalistic toast library for React. We will use it to show success and error messages.
react-infinite-scroll-component: A React component to make infinite scroll easy. We will use it to load more time off requests as the user scrolls down the page to view more requests.
dayjs: A lightweight date library for parsing, validating, manipulating, and formatting dates.
vite-tsconfig-paths: A Vite plugin that allows you to use TypeScript path aliases in your Vite project.
After installing dependencies, update vite.config.ts and tsconfig.json to use the vite-tsconfig-paths plugin. This enables TypeScript path aliases in Vite projects, allowing imports with the @ alias.
Next, let’s remove the unnecessary files and folders:
src/contexts: This folder contains single file which is ColorModeContext. It’s handles dark/light mode for the app. We won’t be using it in this tutorial.
src/components: This folder contains the <Header /> component. We will use a custom header component in this tutorial.
rm-rf src/contexts src/components
After removing the files and folders, App.tsx gives an error which we will fix in the next steps.
Throughout the tutorial, we’ll cover coding the core pages and components. So, get the necessary files and folders from the GitHub repository. With these files, we will have a basic structure for our HR Management application.
Initializing Day.js: For date and time manipulation.
resources: An array specifying the data entities (employee and manager) that Refine will fetch. We use parent and child resources to organize data and manage permissions. Each resource has a scope defining the user role, which controls access to different parts of the app.
queryClient: A custom query client for full control and customization of the data fetching.
syncWithLocation: Enables syncing the app state(filters, sorters, pagination etc.) with the URL.
warnWhenUnsavedChanges: Shows a warning when the user tries to navigate away from a page with unsaved changes.
<Layout />: A custom layout component that wraps the app content. It contains the header, sidebar, and main content area. We will explain this component in the next steps.
Now, we are ready to start building the HR Management application.
Take a closer look at the theme-provider. We’ve heavily customized the Material UI theme to match the HR Management app’s design, creating two themes one for managers and one for employees to differentiate them with different colors.
Also, we’ve added Inter as a custom font for the app. To install you need to add the following line to the index.html file:
<head><metacharset="utf-8"/><linkrel="icon"href="/favicon.ico"/><^><link<^/><^>
href="https://fonts.googleapis.com/css2?family=Inter:ital,opsz,wght@0,14..32,100..900;1,14..32,100..900&display=swap"
rel="stylesheet" /> <^><metaname="viewport"content="width=device-width, initial-scale=1"/><metaname="theme-color"content="#000000"/><metaname="description"content="refine | Build your React-based CRUD applications, without constraints."/><metadata-rh="true"property="og:image"content="https://refine.dev/img/refine_social.png"/><metadata-rh="true"name="twitter:image"content="https://refine.dev/img/refine_social.png"/><title>
Refine - Build your React-based CRUD applications, without constraints.
</title></head>
In the previous step we added a custom layout component to the app. Normally, we could use the default layout of the UI framework but we want to show how you can make customization.
The layout component contains the header, sidebar, and main content area. It uses <ThemedLayoutV2 /> as a base and customized it to match the HR Management app’s design.
The sidebar contains the app logo and navigation links. On the mobile devices It’s a collapsible sidebar that opens when the user clicks the menu icon. Navigation links prepared with useMenu hook from Refine and rendered based on the user’s role with help of <CanAccess /> component.
Mounted on the sidebar, shows the logged in user’s avatar and name. When clicked, it opens a popover with user details and a logout button. Users can switch between different roles by selecting from the dropdown. This component allows testing by switching between users with different roles.
It renders nothing on desktop devices. On mobile devices, it shows the app logo and a menu icon to open the sidebar. The header is sticky and always visible at the top of the page.
It shows the page title and navigation buttons.Page title automatically generated with useResource hook, which fetches the resource name from the Refine context. It allow us the share the same styling and layout across the app.
In this step, we will implement the authentication and authorization logic for our HR Management application. This will serve as a great example of access control in enterprise applications.
When users log in as a manager, they will be able to see the Time Off and Requests pages. If they log in as an employee, they will only see the Time Off page. Managers can approve or decline time off requests on the Requests page.
Employees can request time off and view their history on the Time Off page. To implement this, we will authProvider and accessControlProvider features of Refine.
Authentication
In Refine, authentication is handled by the authProvider. It allows you to define the authentication logic for your app. In the previous step, we already copied the authProvider from the GitHub repository and give it to the <Refine /> component as a prop. We will use following hooks and components to control behaviour of our app based on user is logged in or not.
useLogin: A hook that provides a mutate function to log in the user.
useLogout: A hook that provides a mutate function to log out the user.
useIsAuthenticated: A hook that returns a boolean indicating whether the user is authenticated.
<Authenticated />: A component that renders its children only if the user is authenticated.
Authorization
In Refine, authorization is handled by the accessControlProvider. It allows you to define user roles and permissions, and control access to different parts of the app based on the user’s role. In the previous step, we already copied the accessControlProvider from the GitHub repository and give it to the <Refine /> component as a prop. Let’s take a closer look at the accessControlProvider to see how it works.
src/providers/access-control/index.ts
import type {AccessControlBindings}from"@refinedev/core";import{Role}from"@/types";exportconstaccessControlProvider:AccessControlBindings={options:{queryOptions:{keepPreviousData:true,},buttons:{hideIfUnauthorized:true,},},can:async({ params, action })=>{const user =JSON.parse(localStorage.getItem("user")||"{}");if(!user)return{can:false};const scope = params?.resource?.meta?.scope;// if the resource does not have a scope, it is not accessibleif(!scope)return{can:false};if(user.role===Role.MANAGER){return{can:true,};}if(action ==="manager"){return{can: user.role===Role.MANAGER,};}if(action ==="employee"){return{can: user.role===Role.EMPLOYEE,};}// users can only access resources if their role matches the resource scopereturn{can: user.role=== scope,};},};
In our app, we have two roles: MANAGER and EMPLOYEE.
Managers have access to the Requests page, while employees only have access to the Time Off page. The accessControlProvider checks the user’s role and the resource scope to determine if the user can access the resource. If the user’s role matches the resource scope, they can access the resource. Otherwise, they are denied access. We will use useCan hook and <CanAccess /> component to control behaviour of our app based on user’s role.
In the previous step, we added the authProvider to the <Refine /> component. The authProvider is responsible for handling authentication.
First, we need to get images. We will use these images as background images for the login page. Create a new folder called images in the public folder and get the images from the GitHub repository.
After getting the images, let’s create a new file called index.tsx in the src/pages/login folder and add the following code:
To simplify the authentication process, we’ve created a mockUsers object with two arrays: managers and employees. Each array contains predefined user objects. When a user selects an email from the dropdown and clicks the Sign in button, the login function is called with the selected email. The login function is a mutation function provided by the useLogin hook from Refine. It’s calls authProvider.login with the selected email.
Next, let’s import the <PageLogin /> component and update the App.tsx file with highlighted changes.
In the updated App.tsx file, we’ve added the <Authenticated /> component from Refine. This component is used to protect routes that require authentication. It takes a key prop to uniquely identify the component, a fallback prop to render when the user is not authenticated, and a redirectOnFail prop to redirect the user to the specified route when authentication fails. Under the hood it calls authProvider.check method to check if the user is authenticated.
<Authenticated /> component wraps to path="*" route to check the user’s authentication status. This route is a catch-all route that renders the <ErrorComponent /> when the user is authenticated. It allows us to show a 404 page when the user tries to access a non-existent route.
Now, when you run the app and navigate to http://localhost:5173/login, you should see the login page with the dropdown to select the user.
Right now, “/” page is doing nothing. In the next steps we will implement the Time Off and Requests pages.
In this step, we’ll build the Time Off page. Employees can request time off and see their time off history. Managers can also view their history, but instead of requesting time off, they can assign it to themselves directly. We’ll make this work using Refine’s accessControlProvider, the <CanAccess /> component, and the useCan hook.
<PageEmployeeTimeOffsList />
Before we start building the time off page, we need to create couple of components to show time off history, upcoming time off requests and, statistics of used time offs. At the end of this step, we will use these components to build the time off page.
Building <TimeOffList /> component to show time off history
Create a new folder called time-offs in the src/components folder. Inside the time-offs folder, create a new file called list.tsx and add the following code:
The type prop determines which kind of time-off list to display:
inReview: Shows time-off requests that are pending approval.
upcoming: Displays upcoming time-offs that have been approved but not yet occurred.
history: Lists time-offs that have been approved and have already taken place.
Inside the component, we will create filters and sorters based on the type prop. We will use these filters and sorters to fetch the time off data from the API.
<DateField />: Formats and displays dates in a user-friendly way.
value: The date to display.
format: Specifies the date format (e.g., “January 05”).
5. Creating Filters and Sorters based on type
Filters:
constfilters:Record<Props["type"],CrudFilters>={history:[{field:"status",operator:"eq",value:TimeOffStatus.APPROVED,},{field:"endsAt",operator:"lt",value: today,},],// ... other types};
Defines criteria for fetching time-offs based on status and dates.
history: Fetches approved time-offs that have already ended.
upcoming: Fetches approved time-offs that are upcoming.
Sorters:
constsorters:Record<Props["type"],CrudSort[]>={history:[{field:"startsAt",order:"desc"}],// ... other types};
Determines the order of fetched data.
history: Sorts by start date in descending order.
Building <TimeOffLeaveCards /> component to display statistics of used time offs
Create a new file called leave-cards.tsx in the src/components/time-offs folder and add the following code:
src/components/time-offs/leave-cards.tsx
import{ useGetIdentity, useList }from"@refinedev/core";import{Box,Grid,Skeleton,Typography}from"@mui/material";import{AnnualLeaveIcon,CasualLeaveIcon,SickLeaveIcon}from"@/icons";import{
type Employee,TimeOffStatus,TimeOffType,
type TimeOff,}from"@/types";
type Props={
employeeId?: number;};exportconstTimeOffLeaveCards=(props:Props)=>{const{data: employee,isLoading: isLoadingEmployee }=
useGetIdentity<Employee>({queryOptions:{enabled:!props.employeeId,},});
const {data: timeOffsSick,isLoading: isLoadingTimeOffsSick } =
useList<TimeOff>({resource:"time-offs",// we only need total number of sick leaves, so we can set pageSize to 1 to reduce the loadpagination:{pageSize:1},filters:[{field:"status",operator:"eq",value:TimeOffStatus.APPROVED,},{field:"timeOffType",operator:"eq",value:TimeOffType.SICK,},{field:"employeeId",operator:"eq",value: employee?.id,},],queryOptions:{enabled:!!employee?.id,},});
const {data: timeOffsCasual,isLoading: isLoadingTimeOffsCasual } =
useList<TimeOff>({resource:"time-offs",// we only need total number of sick leaves, so we can set pageSize to 1 to reduce the loadpagination:{pageSize:1},filters:[{field:"status",operator:"eq",value:TimeOffStatus.APPROVED,},{field:"timeOffType",operator:"eq",value:TimeOffType.CASUAL,},{field:"employeeId",operator:"eq",value: employee?.id,},],queryOptions:{enabled:!!employee?.id,},});
const loading =
isLoadingEmployee || isLoadingTimeOffsSick || isLoadingTimeOffsCasual;
return (
<Gridcontainerspacing="24px"><Griditemxs={12}sm={4}><Cardloading={loading}type="annual"value={employee?.availableAnnualLeaveDays ||0}/></Grid><Griditemxs={12}sm={4}><Cardloading={loading}type="sick"value={timeOffsSick?.total ||0}/></Grid><Griditemxs={12}sm={4}><Cardloading={loading}type="casual"value={timeOffsCasual?.total ||0}/></Grid></Grid>
);
};
const variantMap = {annual:{label:"Annual Leave",description:"Days available",bgColor:"primary.50",titleColor:"primary.900",descriptionColor:"primary.700",iconColor:"primary.700",icon:<AnnualLeaveIcon/>,},sick:{label:"Sick Leave",description:"Days used",bgColor:"#FFF7ED",titleColor:"#7C2D12",descriptionColor:"#C2410C",iconColor:"#C2410C",icon:<SickLeaveIcon/>,},casual:{label:"Casual Leave",description:"Days used",bgColor:"grey.50",titleColor:"grey.900",descriptionColor:"grey.700",iconColor:"grey.700",icon:<CasualLeaveIcon/>,},};
const Card = (props: {type:"annual"|"sick"|"casual";value: number;
loading?: boolean;}) => {return(<Boxsx={{backgroundColor: variantMap[props.type].bgColor,padding:"24px",borderRadius:"12px",}}><Boxsx={{display:"flex",alignItems:"center",justifyContent:"space-between",}}><Typographyvariant="h6"sx={{color: variantMap[props.type].titleColor,fontSize:"16px",fontWeight:500,lineHeight:"24px",}}>{variantMap[props.type].label}</Typography><Boxsx={{color: variantMap[props.type].iconColor,}}>{variantMap[props.type].icon}</Box></Box><Boxsx={{marginTop:"8px",display:"flex",flexDirection:"column"}}>{props.loading?(<Boxsx={{width:"40%",height:"32px",display:"flex",alignItems:"center",justifyContent:"center",}}><Skeletonvariant="rounded"sx={{width:"100%",height:"20px",}}/></Box>):(<Typographyvariant="caption"sx={{color: variantMap[props.type].descriptionColor,fontSize:"24px",lineHeight:"32px",fontWeight:600,}}>{props.value}</Typography>)}<Typographyvariant="body1"sx={{color: variantMap[props.type].descriptionColor,fontSize:"12px",lineHeight:"16px",}}>{variantMap[props.type].description}</Typography></Box></Box>);};
<TimeOffLeaveCards />
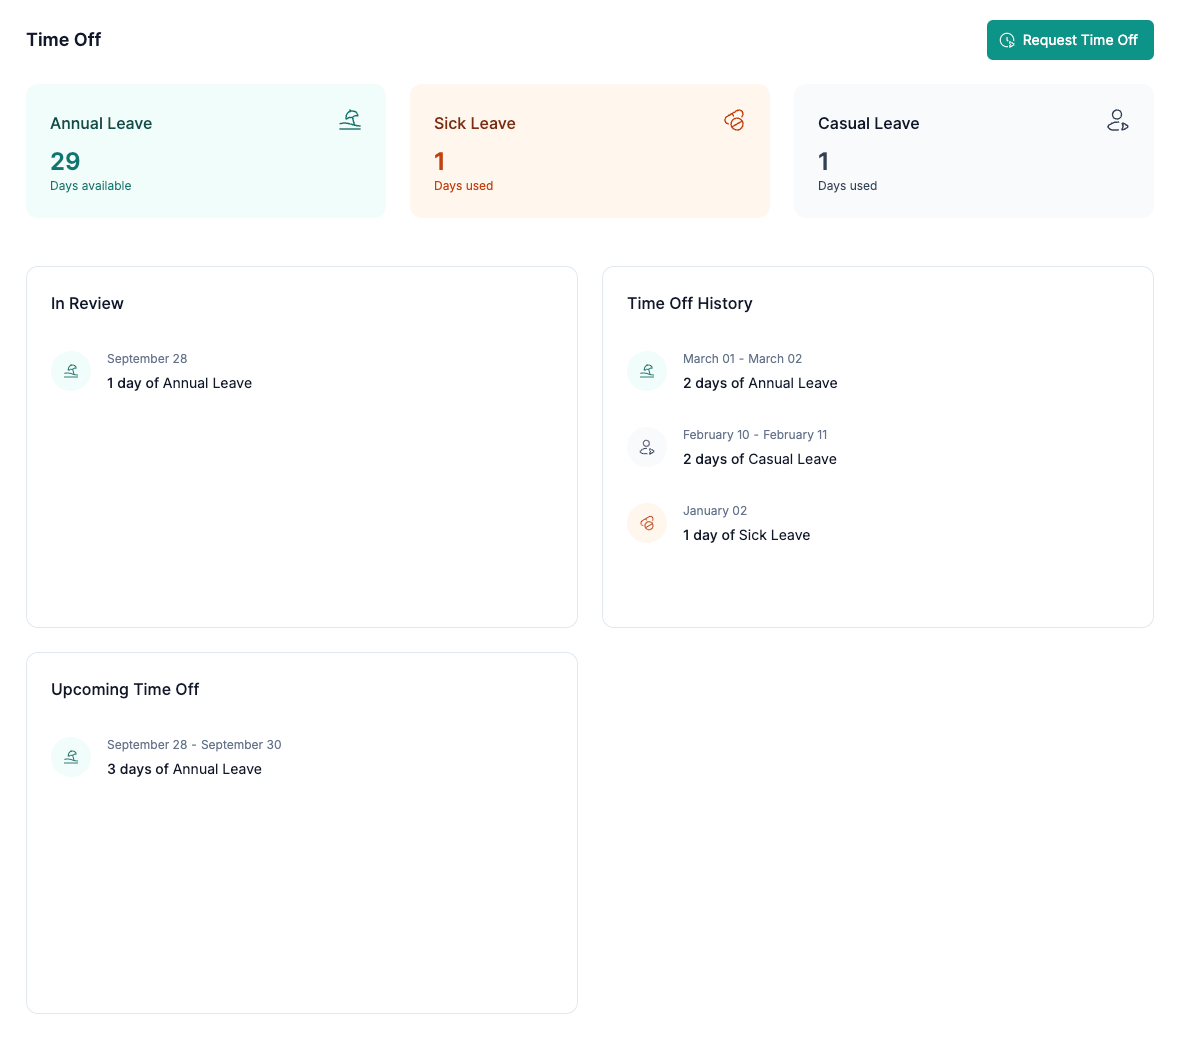
The <TimeOffLeaveCards /> component displays statistics about an employee’s time off. It shows three cards for Annual Leave, Sick Leave, and Casual Leave, indicating how many days are available or used.
Let’s break down the key parts of the component:
1. Fetching Data
Employee Data: Uses useGetIdentity to get the current employee’s information, like available annual leave days.
Time Off Counts: Uses useList to fetch the total number of sick and casual leave days used by the employee. It sets pageSize to 1 because we only need the total count, not all the details.
2. Displaying the Cards
The component renders three card components, one for each leave type.
Each card shows:
The type of leave (e.g., Annual Leave).
The number of days available or used.
An icon representing the leave type.
3. Handling Loading States
If data is still loading, it shows a skeleton placeholder instead of the actual numbers.
The loading prop is passed to the cards to manage this state.
4. The Card Component
Receives type, value, and loading as props.
Uses a variantMap to get the correct labels, colors, and icons based on the leave type.
Displays the leave information with appropriate styling.
Building <PageEmployeeTimeOffsList />
Now that we have the components for listing time offs and showing leave cards, let’s create the new file in the src/pages/employee/time-offs/ folder called list.tsx and add the following code:
src/pages/time-off.tsx
import{CanAccess, useCan }from"@refinedev/core";import{CreateButton}from"@refinedev/mui";import{Box,Grid}from"@mui/material";import{PageHeader}from"@/components/layout/page-header";import{TimeOffList}from"@/components/time-offs/list";import{TimeOffLeaveCards}from"@/components/time-offs/leave-cards";import{TimeOffIcon}from"@/icons";import{ThemeProvider}from"@/providers/theme-provider";import{Role}from"@/types";exportconstPageEmployeeTimeOffsList=()=>{const{data: useCanData }=useCan({action:"manager",params:{resource:{name:"time-offs",meta:{scope:"manager",},},},});const isManager = useCanData?.can;return(<ThemeProviderrole={isManager ?Role.MANAGER:Role.EMPLOYEE}><Box><PageHeadertitle="Time Off"rightSlot={<CreateButtonsize="large"variant="contained"startIcon={<TimeOffIcon/>}><CanAccessaction="manager"fallback="Request Time Off">
Assign Time Off
</CanAccess></CreateButton>}/><TimeOffLeaveCards/><Gridcontainerspacing="24px"sx={{marginTop:"24px",}}><Griditemxs={12}md={6}><Boxsx={{display:"flex",flexDirection:"column",gap:"24px",}}><TimeOffListtype="inReview"/><TimeOffListtype="upcoming"/></Box></Grid><Griditemxs={12}md={6}><TimeOffListtype="history"/></Grid></Grid></Box></ThemeProvider>);};
<PageEmployeeTimeOffsList /> is the main component for the time off page, we will use this component to display the time off lists and leave cards when users navigate to the /employee/time-offs route.
<PageEmployeeTimeOffsList />
Let’s break down the key parts of the component:
1. Checking User Roles
Uses the useCan hook to determine if the current user is a manager.
Sets isManager to true if the user has manager permissions.
2. Applying Theme Based on Role
Wraps the content inside a <ThemeProvider />.
The theme changes based on whether the user is a manager or an employee.
3. Page Header with Conditional Button
Renders a <PageHeader /> with the title “Time Off”.
Includes a <CreateButton /> that changes based on the user’s role:
If the user is a manager, the button says “Assign Time Off”.
If the user is not a manager, it says “Request Time Off”.
This is handled using the <CanAccess /> component, which checks permissions.
4. Displaying Leave Statistics
Includes the <TimeOffLeaveCards /> component to show leave balances and usage.
This provides a summary of annual, sick, and casual leave.
5. Listing Time Off Requests
Uses a <Grid /> layout to organize the content.
On the left side (md={6}), it displays:
TimeOffList with type="inReview": Shows pending time-off requests.
TimeOffList with type="upcoming": Shows upcoming approved time offs.
On the right side (md={6}), it displays:
TimeOffList with type="history": Shows past time offs that have already occurred.
Adding the “/employee/time-offs” Route
We are ready to render the <PageEmployeeTimeOffsList /> component on the /employee/time-offs route. Let’s update the App.tsx file to include this route:
We added a new resource for time-offs as a child of the employeeresource. This indicates that time-offs are related to employees and are accessible by employees.
name: 'time-offs': This is the identifier for the resource, used internally by Refine.
list: '/employee/time-offs': Specifies the route that displays the list view of the resource.
meta: An object containing additional metadata about the resource.
parent: 'employee': Groups this resource under the employee scope, which can be used for organizing resources in the UI (like in a sidebar menu) or for access control.
scope: Role.EMPLOYEE: Indicates that this resource is accessible to users with the EMPLOYEE role. We this in the accessControlProvider to manage permissions.
label: 'Time Off': The display name for the resource in the UI.
icon: <TimeOffIcon />: Associates the TimeOffIcon with this resource for visual identification.
2. Redirecting to the “time-offs” resource when users navigate to the / route
We use the <NavigateToResource /> component to redirect users to the time-offs resource when they navigate to the / route. This ensures that users see the time-off list by default.
3. Redirecting to the “time-offs” resource when users are authenticated
We organize employee pages using nested routes. First, we create a main route with path='employee' that wraps content in an employee-specific theme and layout. Inside this route, we add path='time-offs', which displays the PageEmployeeTimeOffsList component. This structure groups all employee features under one path and keeps the styling consistent.
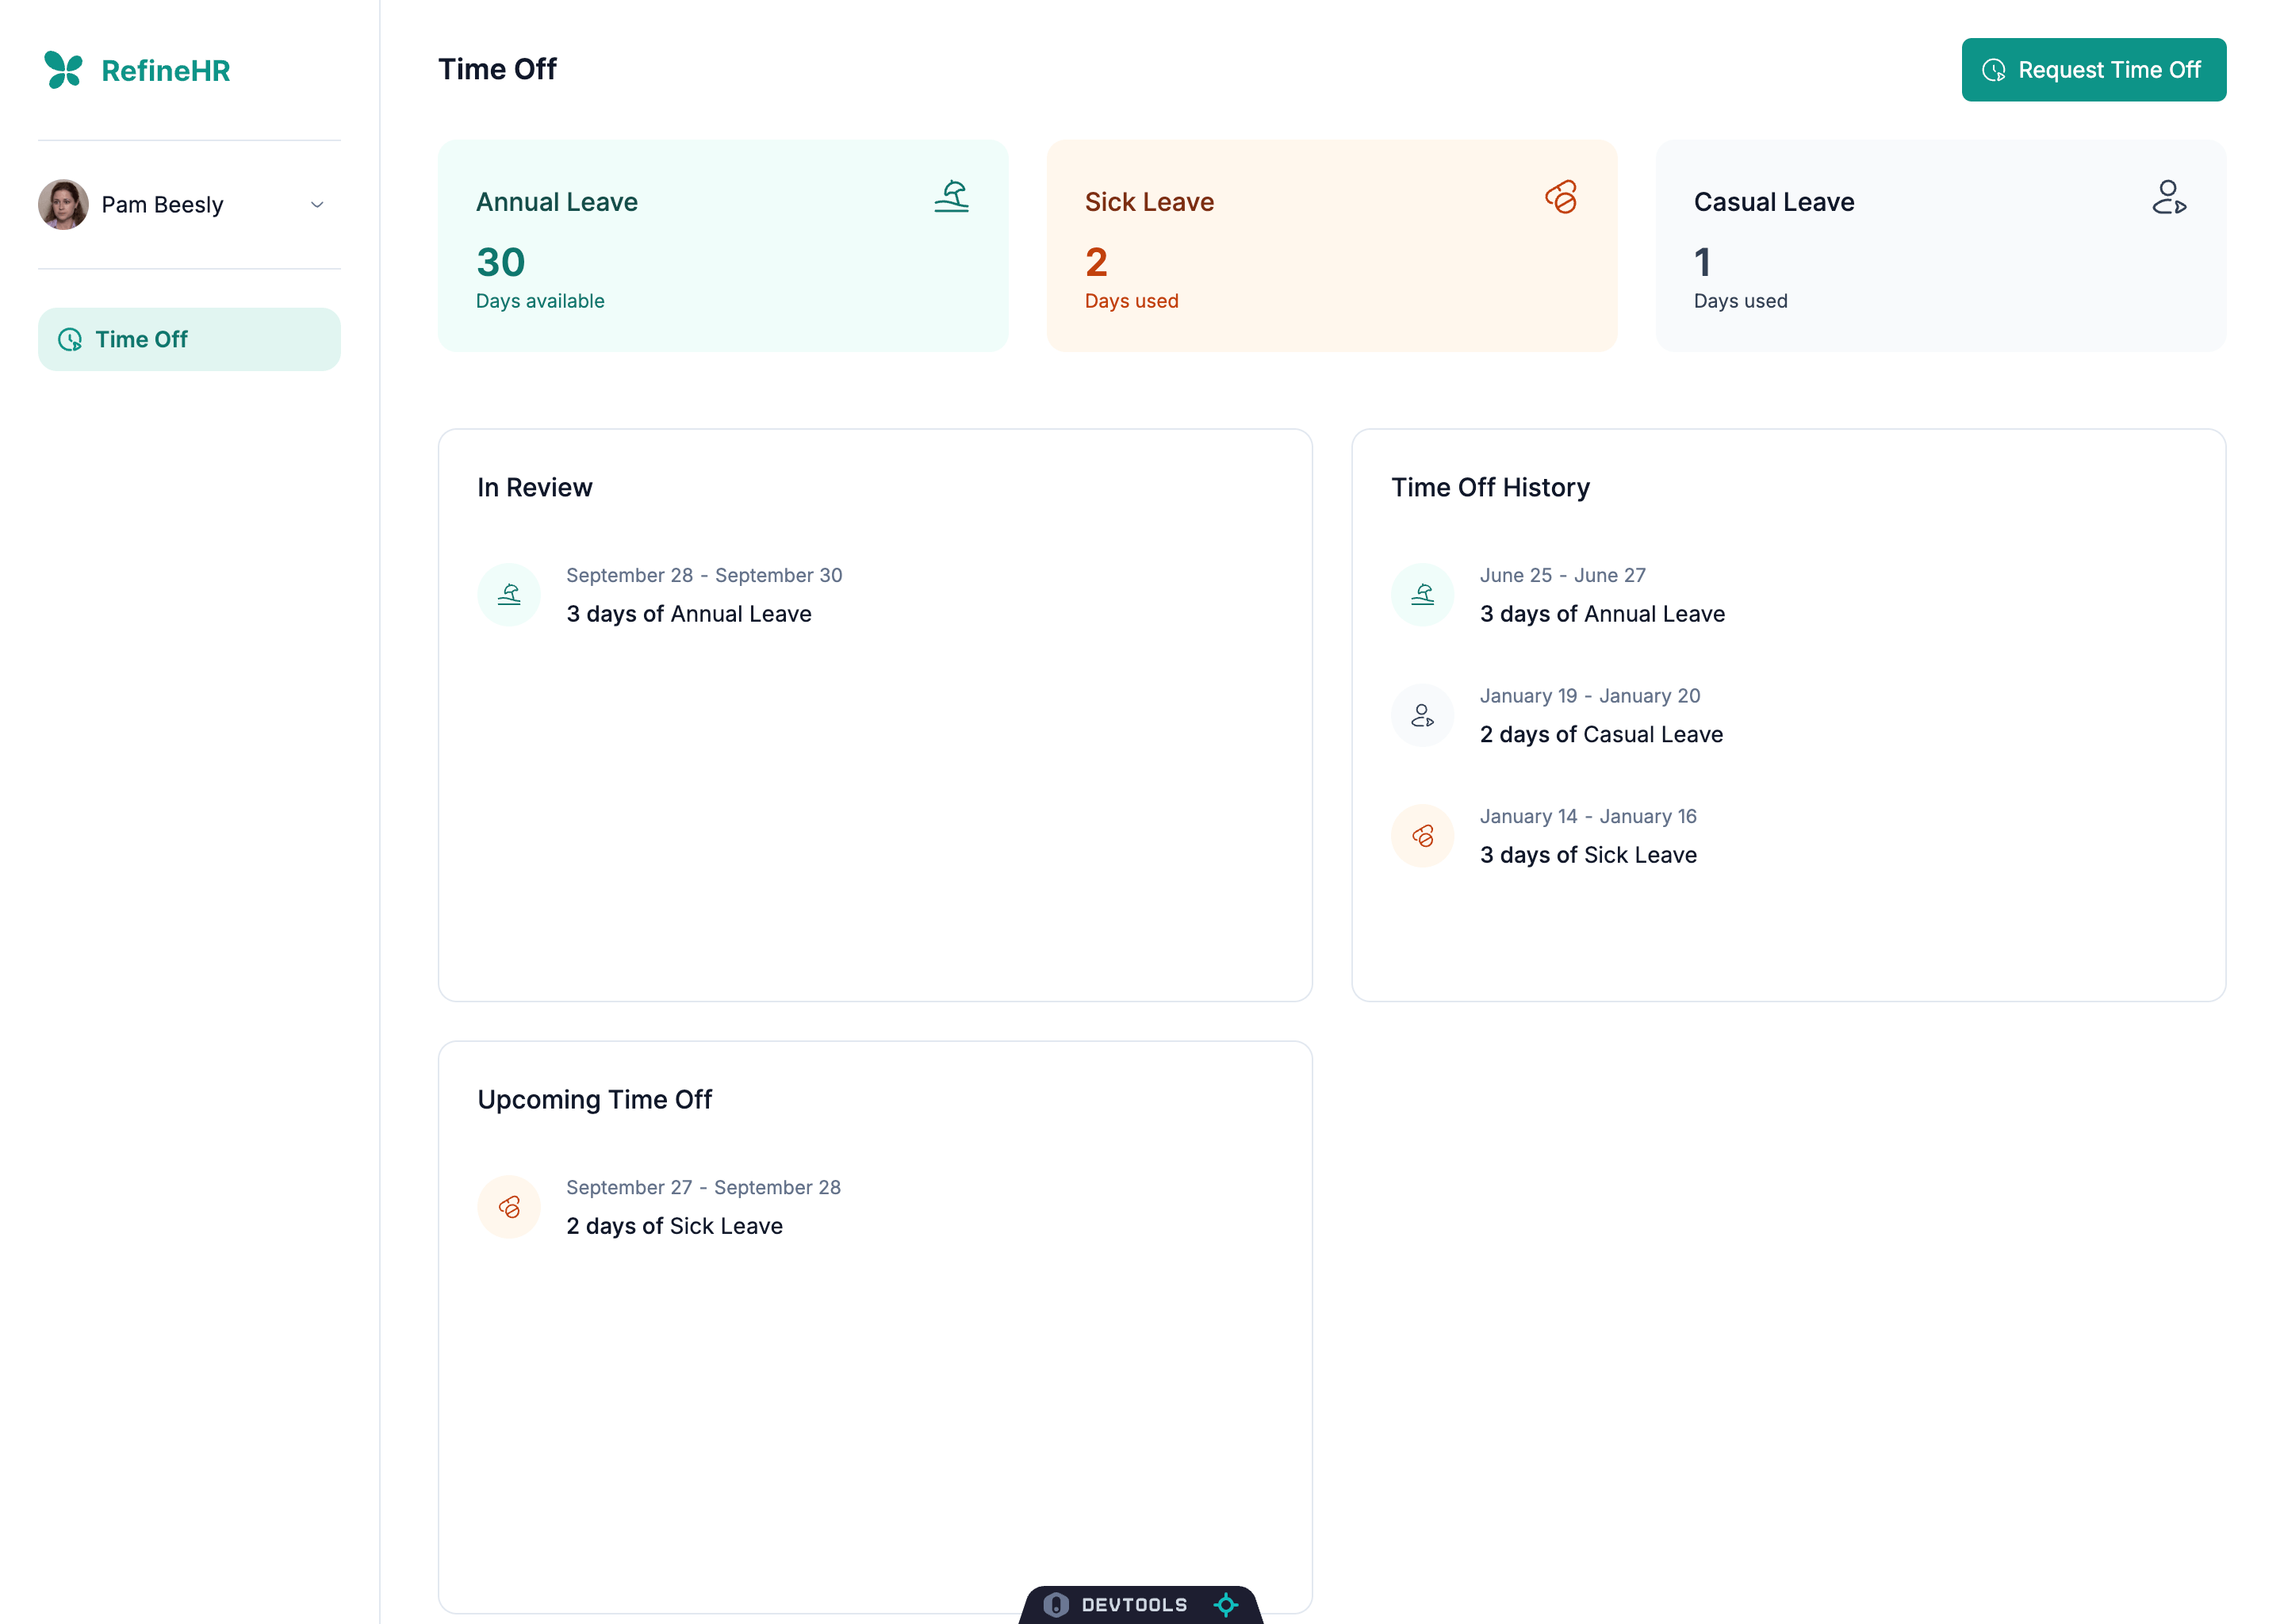
After adding these changes, you can navigate to the /employee/time-offs route to see the time offs list page in action.
/employee/time-offs
Right now, the time offs list page is functional, but it lacks the ability to create new time off requests. Let’s add the ability to create new time off requests.
We will create a new page for requesting or assigning time off. This page will include a form where users can specify the type of time off, start and end dates, and any additional notes.
Before we start, we need to create new components to use in the form:
Building <TimeOffFormSummary /> Component
Create a new file called form-summary.tsx in the src/components/time-offs/ folder and add the following code:
src/components/time-offs/form-summary.tsx
import{Box,Divider,Typography}from"@mui/material";
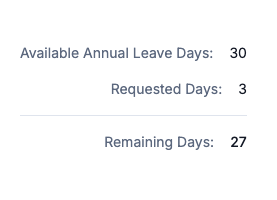
type Props={availableAnnualDays: number;requestedDays: number;};exportconstTimeOffFormSummary=(props:Props)=>{const remainingDays = props.availableAnnualDays- props.requestedDays;return(<Boxsx={{display:"flex",flexDirection:"column",alignItems:"flex-end",gap:"16px",whiteSpace:"nowrap",}}><Boxsx={{display:"flex",gap:"16px",}}><Typographyvariant="body2"color="text.secondary">
Available Annual Leave Days:
</Typography><Typographyvariant="body2">{props.availableAnnualDays}</Typography></Box><Boxsx={{display:"flex",gap:"16px",}}><Typographyvariant="body2"color="text.secondary">
Requested Days:
</Typography><Typographyvariant="body2">{props.requestedDays}</Typography></Box><Dividersx={{width:"100%",}}/><Boxsx={{display:"flex",gap:"16px",height:"40px",}}><Typographyvariant="body2"color="text.secondary">
Remaining Days:
</Typography><Typographyvariant="body2"fontWeight={500}>{remainingDays}</Typography></Box></Box>);};
<TimeOffFormSummary />
The <TimeOffFormSummary /> component displays a summary of the time off request. It shows the available annual leave days, the number of days requested, and the remaining days. We will use this component in the time off form to provide users with a clear overview of their request.
Building <PageEmployeeTimeOffsCreate /> Component
Create a new file called create.tsx in the src/pages/employee/time-offs/ folder and add the following code:
src/pages/time-offs/create.tsx
import{ useCan, useGetIdentity, type HttpError}from"@refinedev/core";import{ useForm }from"@refinedev/react-hook-form";import{Controller}from"react-hook-form";import type {DateRange}from"@mui/x-date-pickers-pro/models";import{Box,Button,MenuItem,Select,Typography}from"@mui/material";importdayjsfrom"dayjs";import{PageHeader}from"@/components/layout/page-header";import{InputText}from"@/components/input/text";import{LoadingOverlay}from"@/components/loading-overlay";import{InputDateStartsEnds}from"@/components/input/date-starts-ends";import{TimeOffFormSummary}from"@/components/time-offs/form-summary";import{ThemeProvider}from"@/providers/theme-provider";import{
type Employee,
type TimeOff,TimeOffType,TimeOffStatus,Role,}from"@/types";import{CheckRectangleIcon}from"@/icons";
type FormValues=Omit<TimeOff,"id"|"notes">&{notes: string;dates:DateRange<dayjs.Dayjs>;
};
export const PageEmployeeTimeOffsCreate = () => {const{data: useCanData }=useCan({action:"manager",params:{resource:{name:"time-offs",meta:{scope:"manager",},},},});const isManager = useCanData?.can;const{data: employee }=
useGetIdentity<Employee>();
const {refineCore:{ formLoading, onFinish },...formMethods
} = useForm<TimeOff, HttpError, FormValues>({defaultValues:{timeOffType:TimeOffType.ANNUAL,notes:"",dates:[null,null],},refineCoreProps:{successNotification:()=>{return{message: isManager
?"Time off assigned":"Your time off request is submitted for review.",type:"success",};},},});
const { control, handleSubmit, formState, watch } = formMethods;
const onFinishHandler = async (values: FormValues) => {constpayload:FormValues={...values,startsAt:dayjs(values.dates[0]).format("YYYY-MM-DD"),endsAt:dayjs(values.dates[1]).format("YYYY-MM-DD"),...(isManager &&{status:TimeOffStatus.APPROVED,}),};awaitonFinish(payload);};
const timeOffType = watch("timeOffType");
const selectedDays = watch("dates");
const startsAt = selectedDays[0];
const endsAt = selectedDays[1];
const availableAnnualDays = employee?.availableAnnualLeaveDays ?? 0;
const requestedDays =
startsAt && endsAt ? endsAt.diff(startsAt, "day") + 1 : 0;
return (
<ThemeProviderrole={isManager ?Role.MANAGER:Role.EMPLOYEE}><LoadingOverlayloading={formLoading}><Box><PageHeadertitle={isManager ?"Assign Time Off":"Request Time Off"}showListButtonshowDivider/><Boxcomponent="form"onSubmit={handleSubmit(onFinishHandler)}sx={{display:"flex",flexDirection:"column",gap:"24px",marginTop:"24px",}}><Box><Typographyvariant="body2"sx={{mb:"8px",}}>
Time Off Type
</Typography>
<Controller
name="timeOffType"
control={control}
render={({ field })=>(<Select{...field}size="small"sx={{minWidth:"240px",height:"40px","& .MuiSelect-select":{paddingBlock:"10px",},}}><MenuItemvalue={TimeOffType.ANNUAL}>Annual Leave</MenuItem><MenuItemvalue={TimeOffType.CASUAL}>Casual Leave</MenuItem><MenuItemvalue={TimeOffType.SICK}>Sick Leave</MenuItem></Select>)}
/>
</Box><Box><Typographyvariant="body2"sx={{mb:"16px",}}>
Requested Dates
</Typography>
<Controller
name="dates"
control={control}
rules={{validate:(value)=>{if(!value[0]||!value[1]){return"Please select both start and end dates";}returntrue;},}}
render={({ field })=>{return(<Box
sx={{display:"grid",gridTemplateColumns:()=>{return{sm:"1fr",lg:"628px 1fr",};},gap:"40px",}}><InputDateStartsEnds{...field}error={formState.errors.dates?.message}availableAnnualDays={availableAnnualDays}requestedDays={requestedDays}/>{timeOffType ===TimeOffType.ANNUAL&&(<Box
sx={{display:"flex",maxWidth:"628px",alignItems:()=>{return{lg:"flex-end",};},justifyContent:()=>{return{xs:"flex-end",lg:"flex-start",};},}}><TimeOffFormSummaryavailableAnnualDays={availableAnnualDays}requestedDays={requestedDays}/></Box>
)}
</Box>
);
}}
/>
</Box><Boxsx={{maxWidth:"628px",}}><Controllername="notes"control={control}render={({ field, fieldState })=>{return(<InputText{...field}label="Notes"error={fieldState.error?.message}placeholder="Place enter your notes"multilinerows={3}/>);}}/></Box><Buttonvariant="contained"size="large"type="submit"startIcon={isManager ?<CheckRectangleIcon/>:undefined}>{isManager ?"Assign":"Send Request"}</Button></Box></Box></LoadingOverlay></ThemeProvider>
);
};
<PageEmployeeTimeOffsCreate />
The <PageEmployeeTimeOffsCreate /> component displays a form for creating new time-off requests in an HR management app. Both employees and managers can use it to request or assign time off. The form includes options to select the type of time off, pick start and end dates, add notes, and it shows a summary of the requested time off.
With the useCan hook, we check if the current user has manager permissions. This determines whether the user can assign time off or only request it. We will handle the form submission differently on onFinishHandler based on the user’s role.
2. Form State and Submission
const{refineCore:{ formLoading, onFinish },...formMethods
}= useForm<TimeOff,HttpError,FormValues>({defaultValues:{timeOffType:TimeOffType.ANNUAL,notes:"",dates:[null,null],},refineCoreProps:{successNotification:()=>{return{message: isManager
?"Time off assigned":"Your time off request is submitted for review.",type:"success",};},},});const{ control, handleSubmit, formState, watch }= formMethods;constonFinishHandler=async(values:FormValues)=>{constpayload:FormValues={...values,startsAt:dayjs(values.dates[0]).format("YYYY-MM-DD"),endsAt:dayjs(values.dates[1]).format("YYYY-MM-DD"),...(isManager &&{status:TimeOffStatus.APPROVED,}),};awaitonFinish(payload);};
useForm initializes the form with default values and sets success notifications based on the user’s role. The onFinishHandler function processes the form data before submitting it. For managers, the status is set to APPROVED immediately, while employees’ requests are submitted for review.
In our design, the primary color changes based on the user’s role. We use the <ThemeProvider /> to apply the correct theme accordingly. The submit button’s text and icon also change depending on whether the user is a manager or an employee.
4. Adding the “/employee/time-offs/create” Route
We need to add the new route for the create time off page. Let’s update the App.tsx file to include this route:
After adding these changes, you can navigate to the /employee/time-offs/create route or click the “Assign Time Off” button on the time offs list page to access the create time off form.
In this step, we will create a new page to manage time off requests. This page will allow managers to review and approve or reject time off requests submitted by employees.
We will create a new page for managing time off requests. This page will include a list of time off requests, showing details like the employee’s name, the type of time off, the requested dates, and the current status.
Before we start, we need to create new components to use in the list:
Building <RequestsList /> Component
Create a new file called list.tsx in the src/components/requests/ folder and add the following code:
The <RequestsList /> component displays a list of time off requests with infinite scrolling. It includes a loading indicator, skeleton placeholders, and a message when there is no data. This component is designed to handle large datasets efficiently and provide a smooth user experience.
Building <RequestsListItem /> Component
Create a new file called list-item.tsx in the src/components/requests/ folder and add the following code:
The <RequestsListItem /> component displays a single time off request in the list. It includes the employee’s avatar, name, description, and a button to view the request details. This component is reusable and can be used to render each item in the time off requests list.
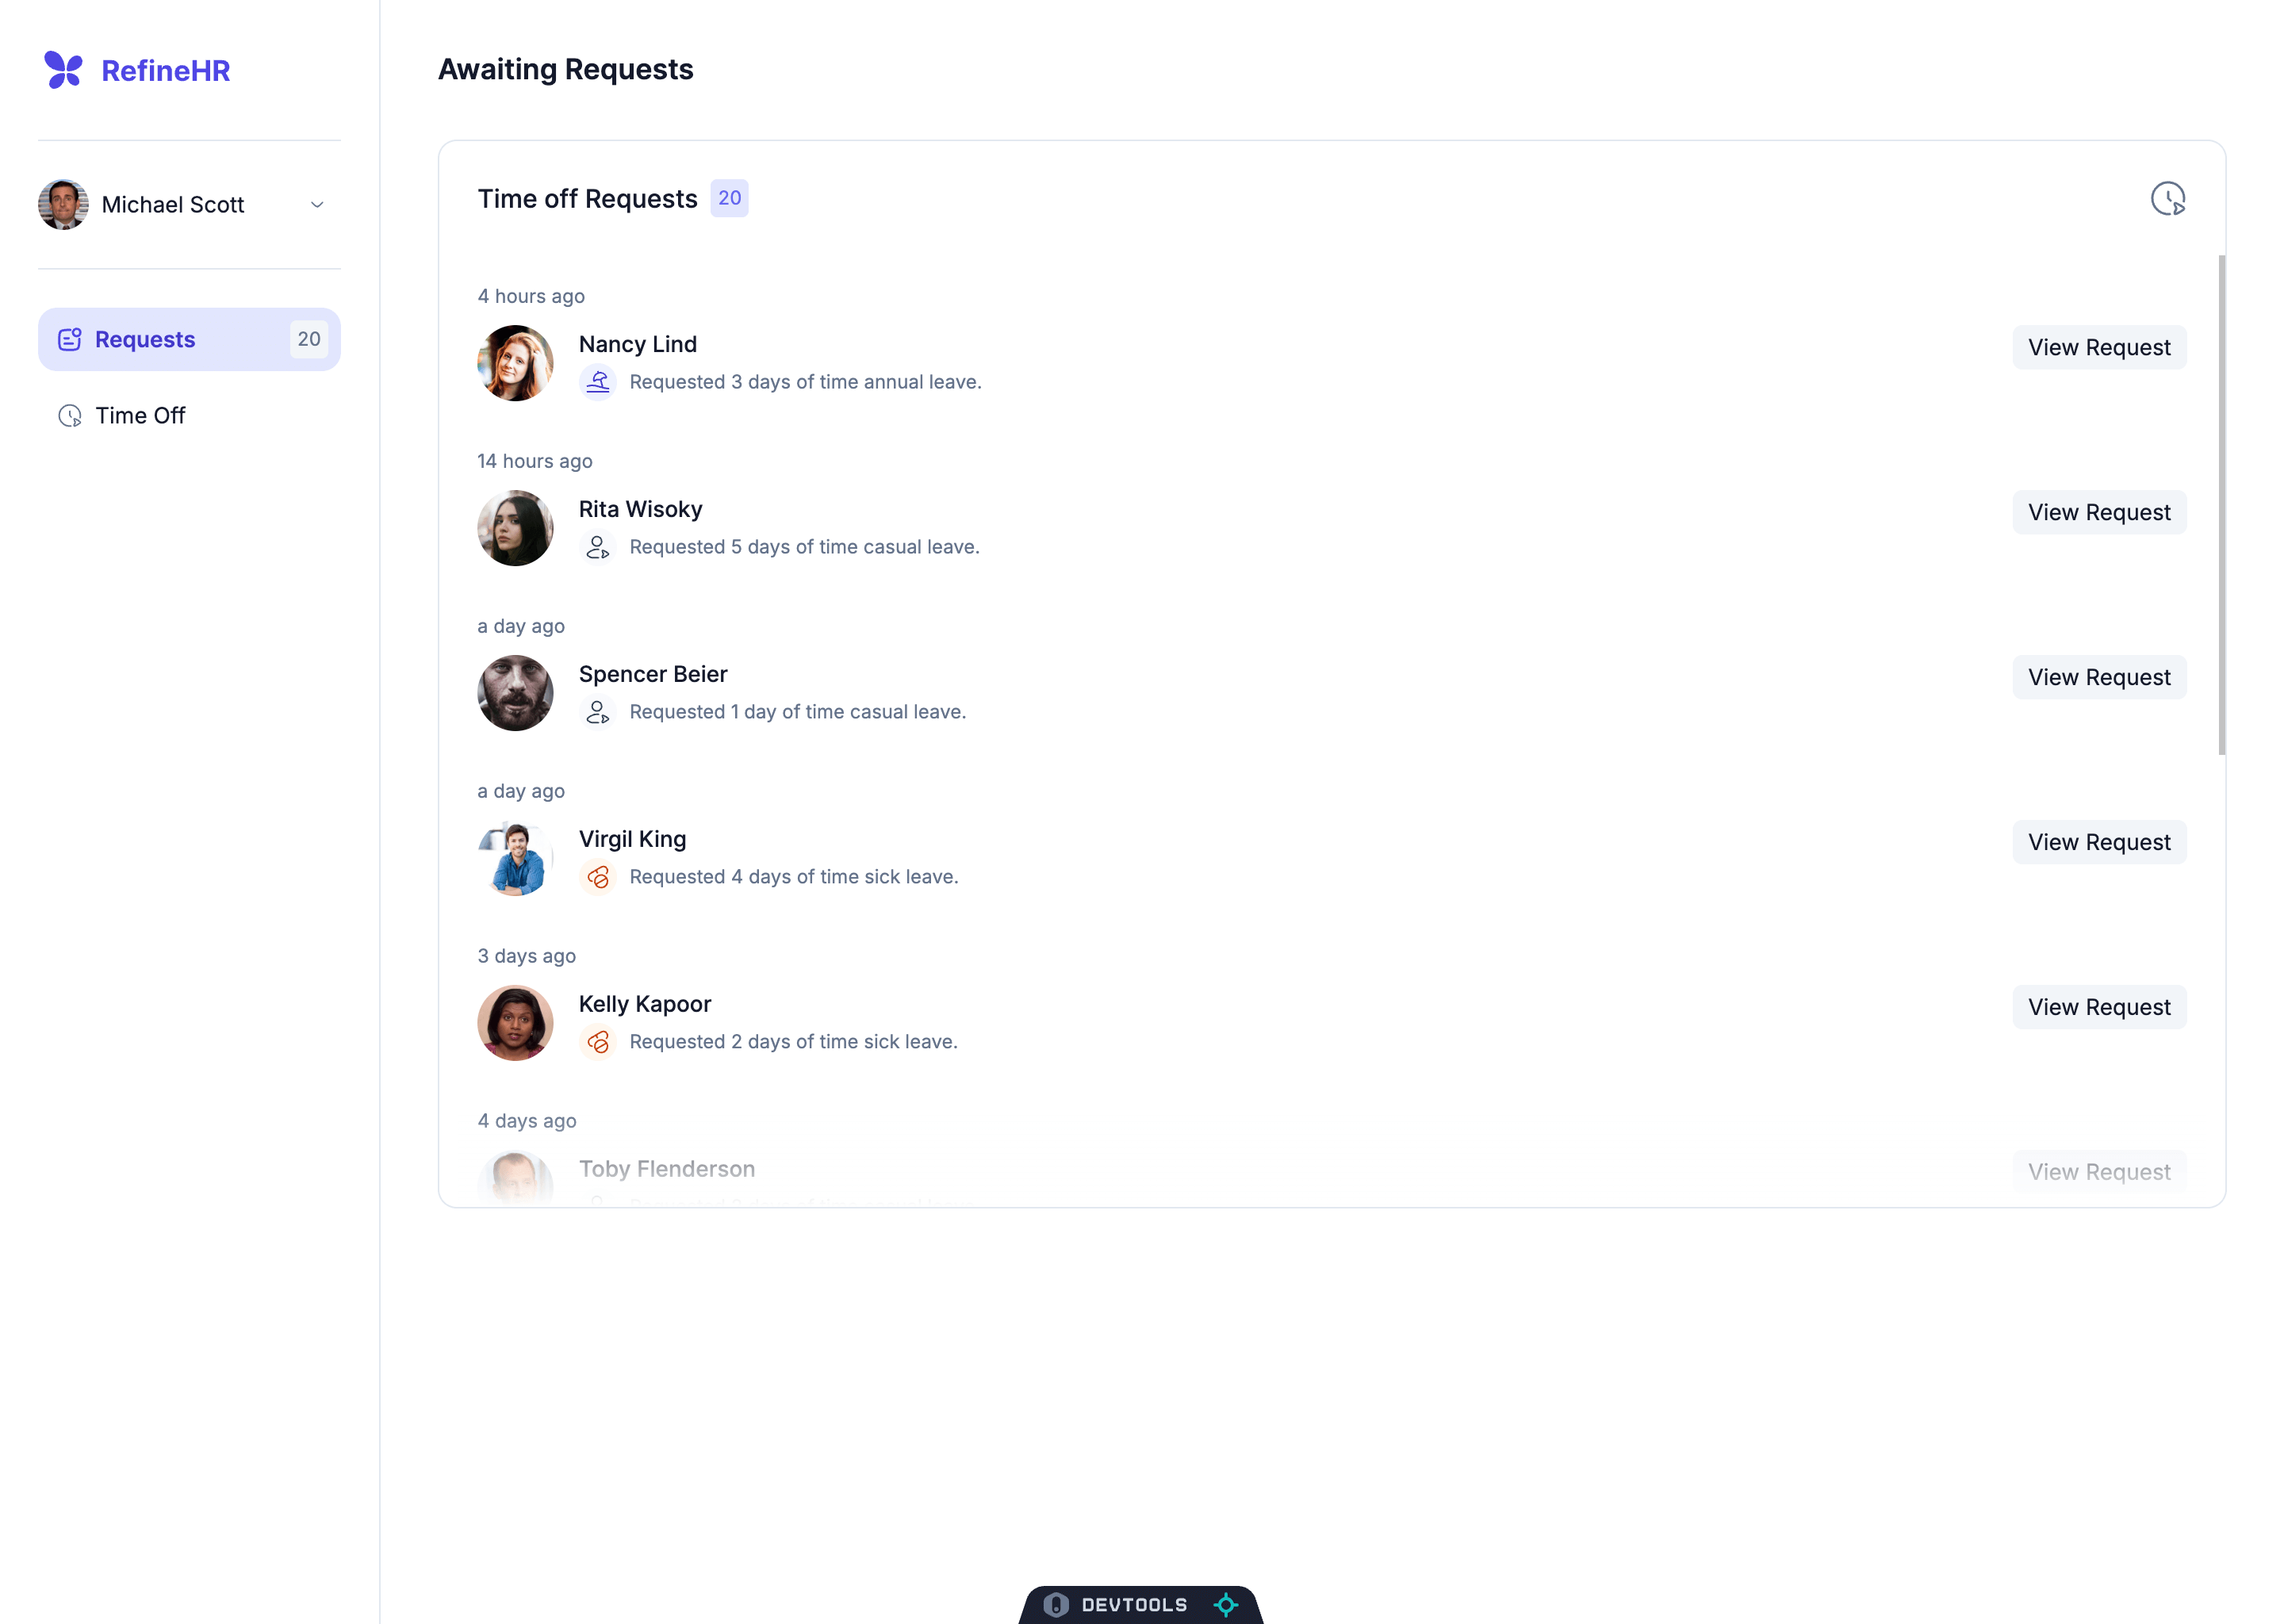
Building <PageManagerRequestsList /> Component
Create a new file called list.tsx in the src/pages/manager/requests/ folder and add the following code:
import type {PropsWithChildren}from"react";import{ useGo, useInfiniteList }from"@refinedev/core";import{Box,Typography}from"@mui/material";importdayjsfrom"dayjs";import{Frame}from"@/components/frame";import{PageHeader}from"@/components/layout/page-header";import{RequestsListItem}from"@/components/requests/list-item";import{RequestsList}from"@/components/requests/list";import{ indigo }from"@/providers/theme-provider/colors";import{TimeOffIcon,RequestTypeIcon,NoTimeOffIcon}from"@/icons";import{TimeOffStatus, type Employee, type TimeOff}from"@/types";exportconstPageManagerRequestsList=({ children }:PropsWithChildren)=>{return(<><Box><PageHeadertitle="Awaiting Requests"/><TimeOffsList/></Box>{children}</>);};constTimeOffsList=()=>{const go =useGo();const{data: timeOffsData,isLoading: timeOffsLoading,fetchNextPage: timeOffsFetchNextPage,hasNextPage: timeOffsHasNextPage,}= useInfiniteList<TimeOff&{employee:Employee;}>({resource:"time-offs",filters:[{field:"status",operator:"eq",value:TimeOffStatus.PENDING},],sorters:[{field:"createdAt",order:"desc"}],meta:{join:["employee"],},});const timeOffs = timeOffsData?.pages.flatMap((page)=> page.data)||[];const totalCount = timeOffsData?.pages[0].total;return(<Frametitle="Time off Requests"titleSuffix={!!totalCount &&
totalCount >0&&(<Boxsx={{padding:"4px",display:"flex",alignItems:"center",justifyContent:"center",minWidth:"24px",height:"24px",borderRadius:"4px",backgroundColor: indigo[100],}}><Typographyvariant="caption"sx={{color: indigo[500],fontSize:"12px",lineHeight:"16px",}}>{totalCount}</Typography></Box>)}icon={<TimeOffIconwidth={24}height={24}/>}sx={{flex:1,paddingBottom:"0px",}}sxChildren={{padding:0,}}><RequestsListloading={timeOffsLoading}dataLength={timeOffs.length}hasMore={timeOffsHasNextPage ||false}next={timeOffsFetchNextPage}scrollableTarget="scrollableDiv-timeOffs"noDataText="No time off requests right now."noDataIcon={<NoTimeOffIcon/>}>{timeOffs.map((timeOff)=>{const date =dayjs(timeOff.createdAt).fromNow();const fullName =`${timeOff.employee.firstName}${timeOff.employee.lastName}`;const avatarURL = timeOff.employee.avatarUrl;const requestedDay =dayjs(timeOff.endsAt).diff(dayjs(timeOff.startsAt),"day")+1;const description =`Requested ${requestedDay}${
requestedDay >1?"days":"day"} of time ${timeOff.timeOffType.toLowerCase()} leave.`;return(<RequestsListItem
key={timeOff.id}
date={date}
avatarURL={avatarURL}
title={fullName}
showTimeSince
descriptionIcon={<RequestTypeIcontype={timeOff.timeOffType}/>}
description={description}
onClick={()=>{go({type:"replace",to:{resource:"requests",id: timeOff.id,action:"edit",},});}}/>);})}</RequestsList></Frame>);};
The <PageManagerRequestsList /> component displays pending time-off requests that managers need to approve. It shows details like the employee’s name, leave type, requested dates, and how long ago the request was made. Managers can click on a request to see more details. It uses <RequestsList /> and <RequestsListItem /> to render the list.
This component also accepts children as a prop. Next, we’ll implement a modal route using <Outlet /> to display request details, rendering the /manager/requests/:id route inside the component.
Adding the “/manager/requests” Route
We need to add the new route for the time off requests management page. Let’s update the App.tsx file to include this route:
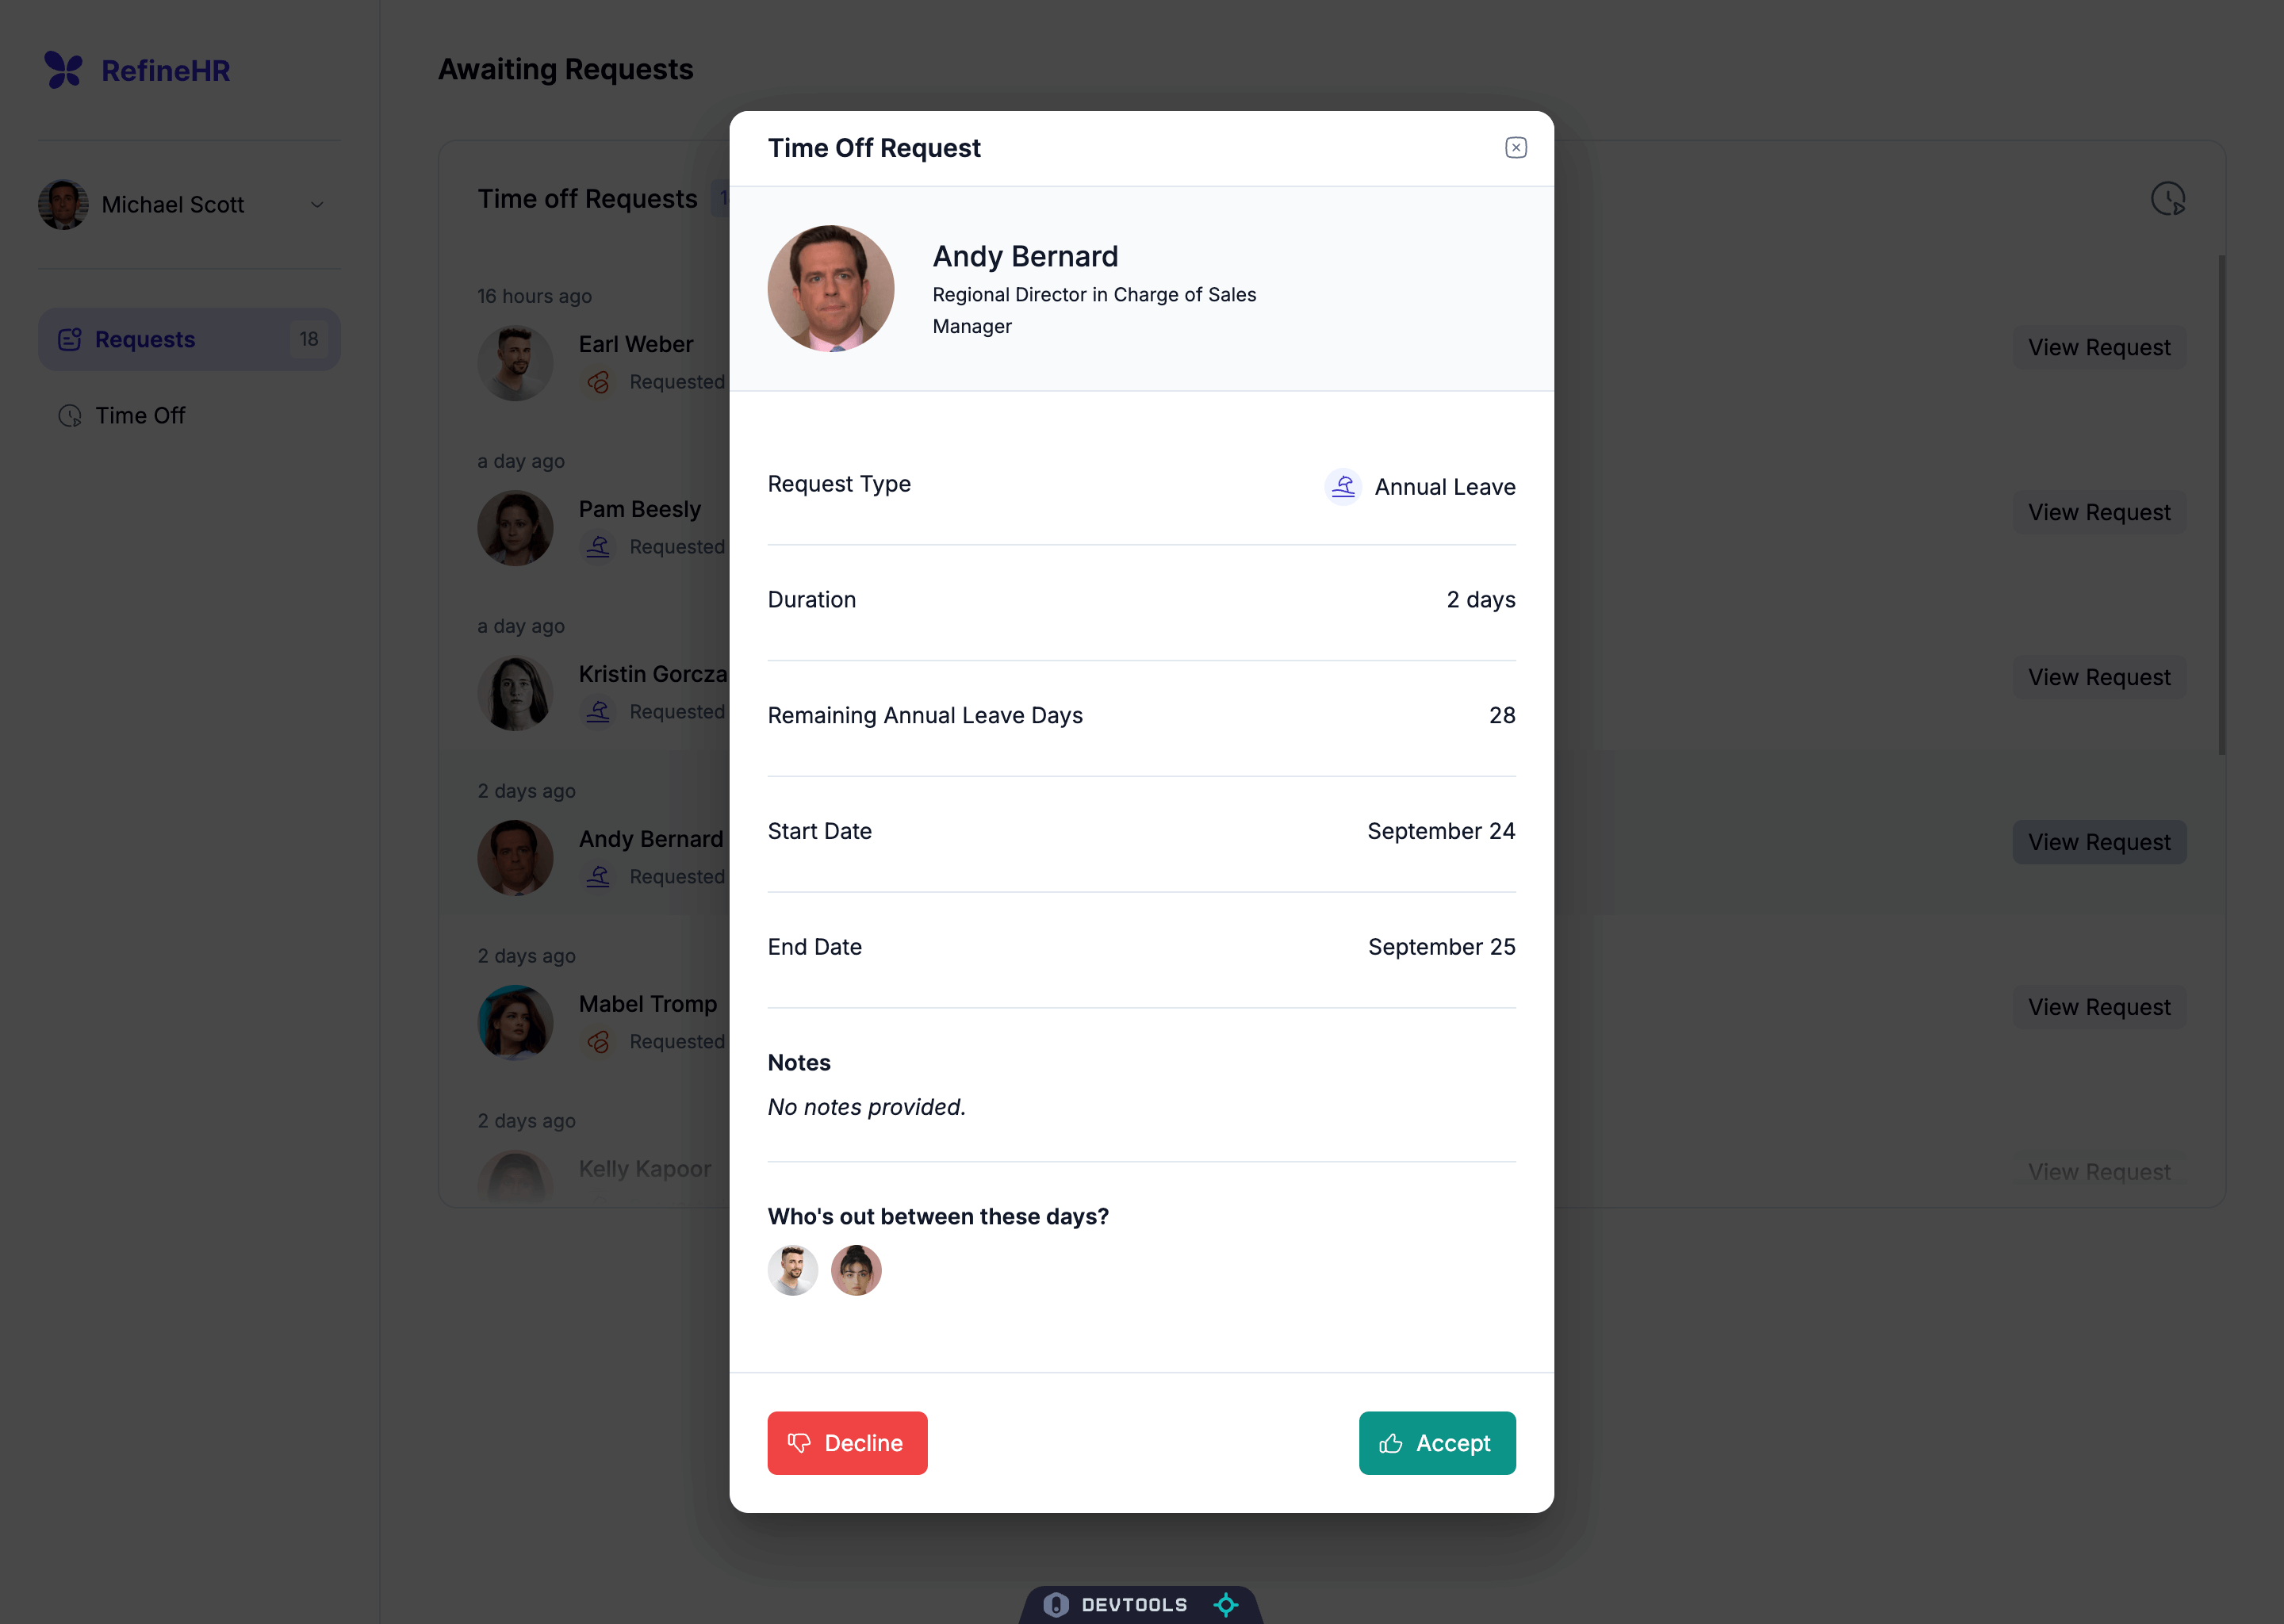
In this step, we will create a new page to display the details of a time off request. This page will show the employee’s name, the type of time off, the requested dates, and the current status. Managers can approve or reject the request from this page.
Building <TimeOffRequestModal /> Component
First, create a file called use-get-employee-time-off-usage in the src/hooks/ folder and add the following code:
We will use the useGetEmployeeTimeOffUsage hook to calculate the total number of days an employee has taken for each type of time off. This information will be displayed in the time off request details page.
After that, create a new file called time-off-request-modal.tsx in the src/components/requests/ folder and add the following code:
Let’s break down the <TimeOffRequestModal /> component:
1. Fetching Employee Time-Off Usage
The useGetEmployeeTimeOffUsage hook is used to fetch the employee’s time-off usage. This hook calculates the remaining annual leave days and the previously used sick and casual leave days based on the employee’s time-off history.
The useList hook with the above filters fetches all approved time-offs that overlap with the current time-off request. This list is used to display the employees who are out between the requested dates.
3. Handling Time-Off Request Approval/Rejection
The handleSubmit function is called when the manager approves or rejects the time-off request.
Refine automatically invalidates the resource cache after resource it’s mutated (time-offs in this case).
Since the employee’s time-off usage is calculated based on the time-off history, we also invalidate the employees resource cache to update the employee’s time-off usage.
Adding the “/manager/requests/:id” Route
In this step, we’ll create a new route to display the time-off request details page, where managers can approve or reject requests.
Let’s create a new file called edit.tsx in the src/pages/manager/requests/time-offs/ folder and add the following code:
src/pages/manager/requests/time-offs/edit.tsx
import{ useGo, useShow }from"@refinedev/core";import{TimeOffRequestModal}from"@/components/requests/time-off-request-modal";import type {Employee,TimeOff}from"@/types";exportconstPageManagerRequestsTimeOffsEdit=()=>{const go =useGo();const{query: timeOffRequestQuery }= useShow<TimeOff&{employee:Employee}>({meta:{join:["employee"],},});const loading = timeOffRequestQuery.isLoading;return(<TimeOffRequestModal
open
loading={loading}
timeOff={timeOffRequestQuery?.data?.data}
onClose={()=>go({to:{resource:"requests",action:"list",},})}
onSuccess={()=>{go({to:{resource:"requests",action:"list",},});}}/>);};
Now we need to add the new route to render the time-off request details page. Let’s update the App.tsx file to include this route:
The code above sets up a nested route structure where a modal is displayed when navigating to a specific child route. The <PageManagerRequestsTimeOffsEdit /> component is a modal and rendered as a child of the <PageManagerRequestsList /> component. This structure allows us to display the modal on top of the list page while keeping the list page visible in the background.
When you navigate to the /manager/requests/:id/edit route or click on a time-off request in the list, the time-off request details page will be displayed as a modal on top of the list page.
Authorization is a critical component in enterprise-level applications, playing a key role in both security and operational efficiency. It ensures that only authorized users can access specific resources, safeguarding sensitive data and functionalities. Refine’s authorization system provides the necessary infrastructure to protect your resources and ensure that users interact with your application in a secure and controlled manner. In this step, we will implement authorization and access control for the time-off requests management feature. We will restrict access to the /manager/requests and /manager/requests/:id/edit routes to managers only with help of <CanAccess /> component.
Right now, when you log in as an employee, you can’t see Requests page link in the sidebar but you can still access the /manager/requests route by typing the URL in the browser. We will add a guard to prevent unauthorized access to these routes.
Let’s update the App.tsx file to include the authorization checks:
In the code above, we added the <CanAccess /> component to the “/manager” route. This component checks if the user has the “manager” role before rendering the child routes. If the user doesn’t have the “manager” role, they will be redirected to the time-off list page for employees.
Now, when you log in as an employee and try to access the /manager/requests route, you will be redirected to the time-off list page for employees.
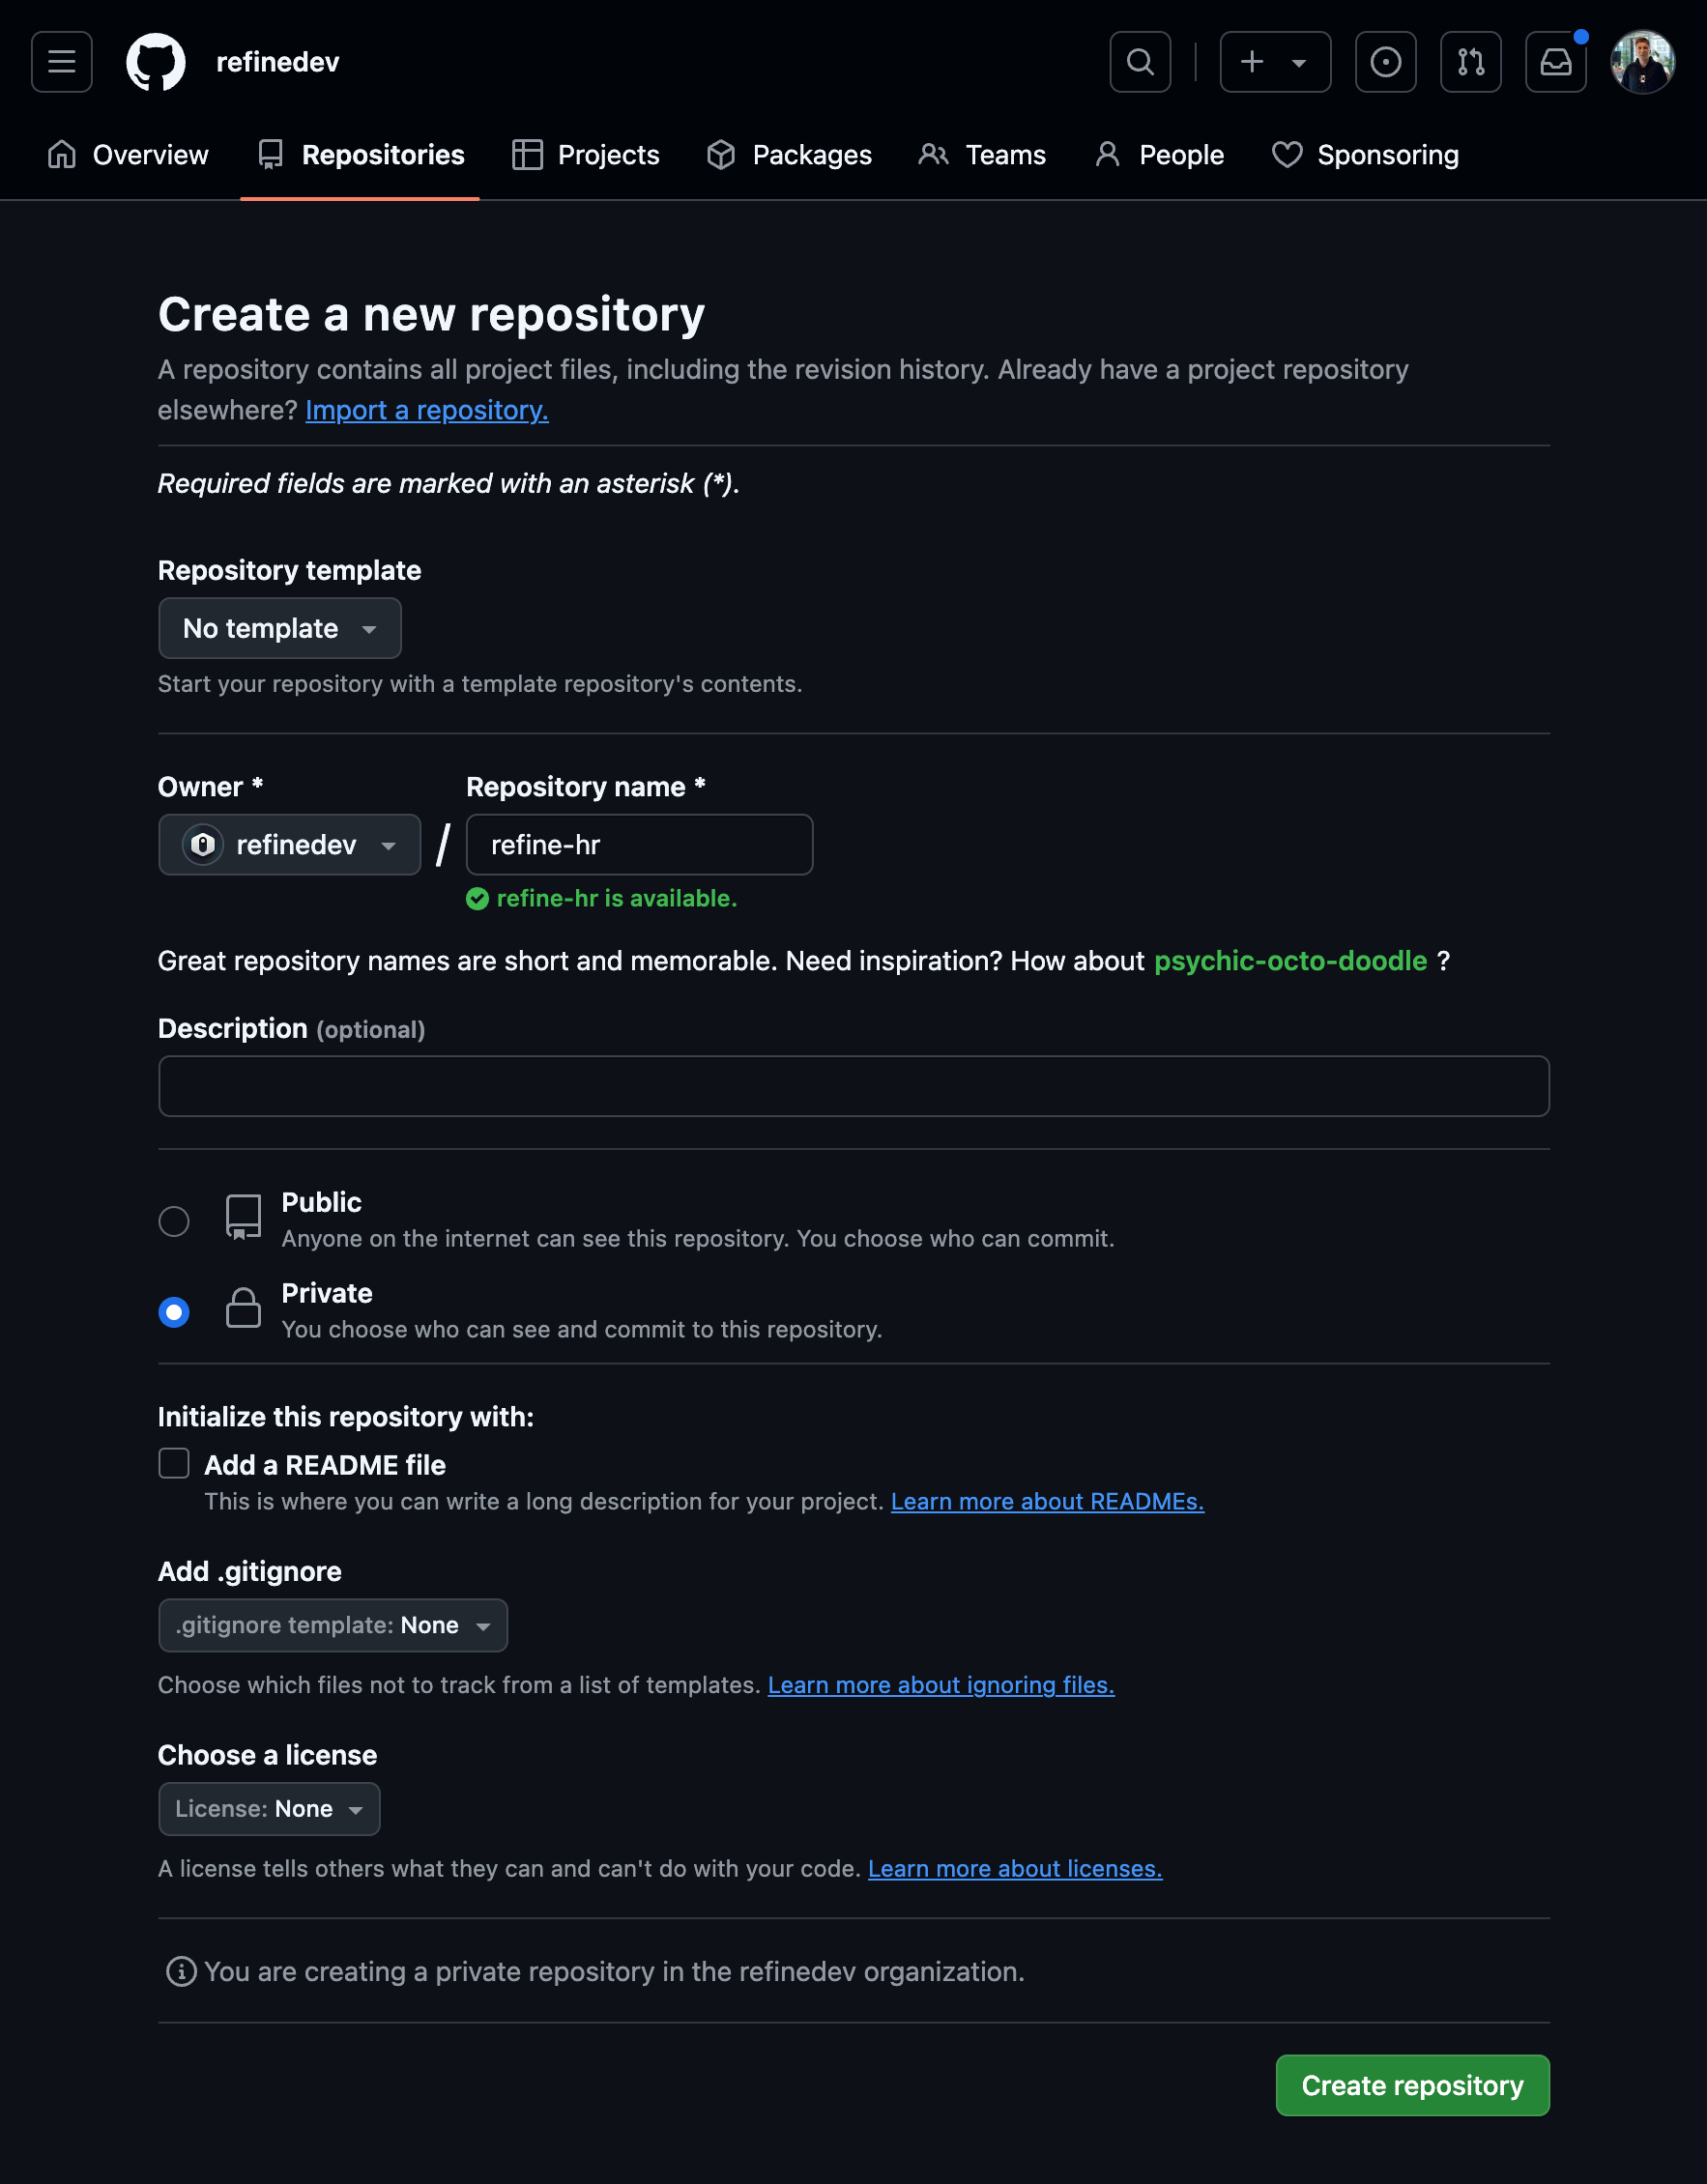
In this step, we’ll deploy the application to the DigitalOcean App Platform. To do that, we’ll host the source code on GitHub and connect the GitHub repository to the App Platform.
Next, specify that you want to push your code to the main branch with this command:
git branch -M main
Finally, push the code to the GitHub repository with this command:
git push -u origin main
When prompted, enter your GitHub credentials to push your code.
You’ll receive a success message after the code is pushed to the GitHub repository.
In this section, you pushed your project to GitHub so that you can access it using DigitalOcean Apps. The next step is to create a new DigitalOcean App using your project and set up automatic deployment.
During this, you would take a React application and prepare it for deployment via DigitalOcean’s App Platform. You would link your GitHub repository to DigitalOcean, configure how the app will build, and then create an initial deployment of a project. After the project is deployed, additional changes you make will be automatically rebuilt and updated.
By the end of this step, you will have your application deployed on DigitalOcean with continuous delivery catered for.
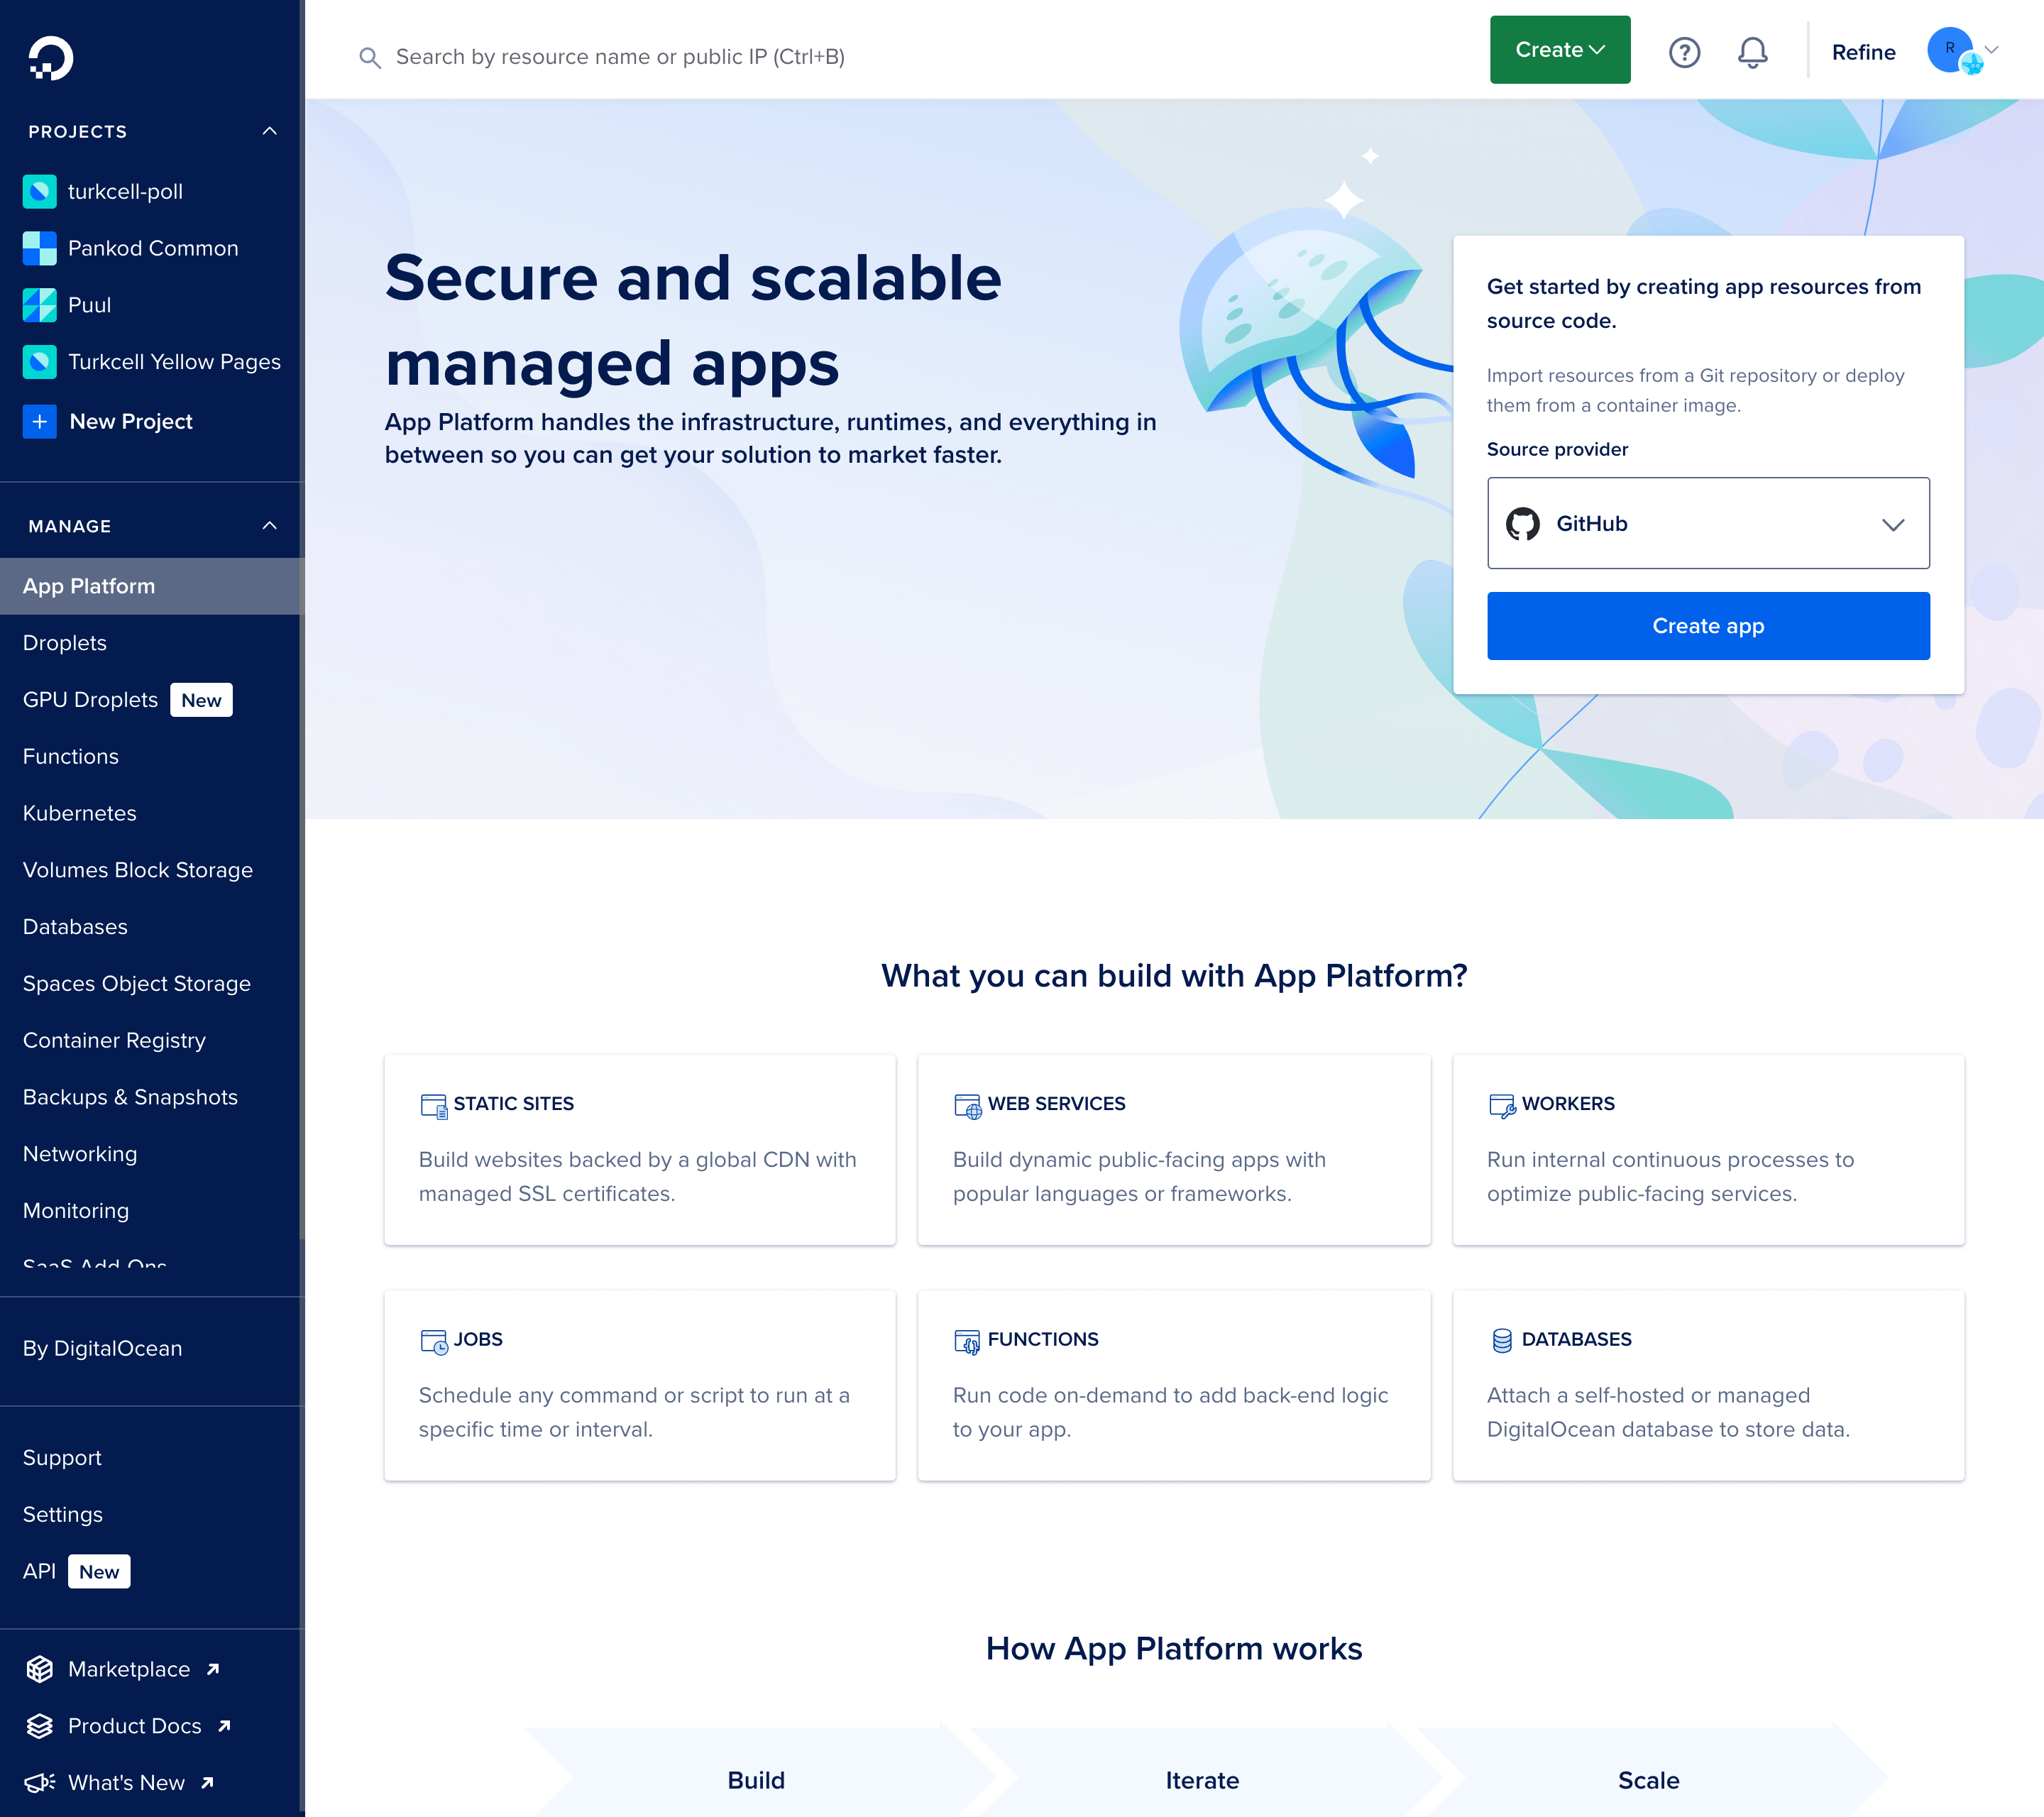
Log in to your DigitalOcean account and navigate to the Apps page. Click the Create App button:
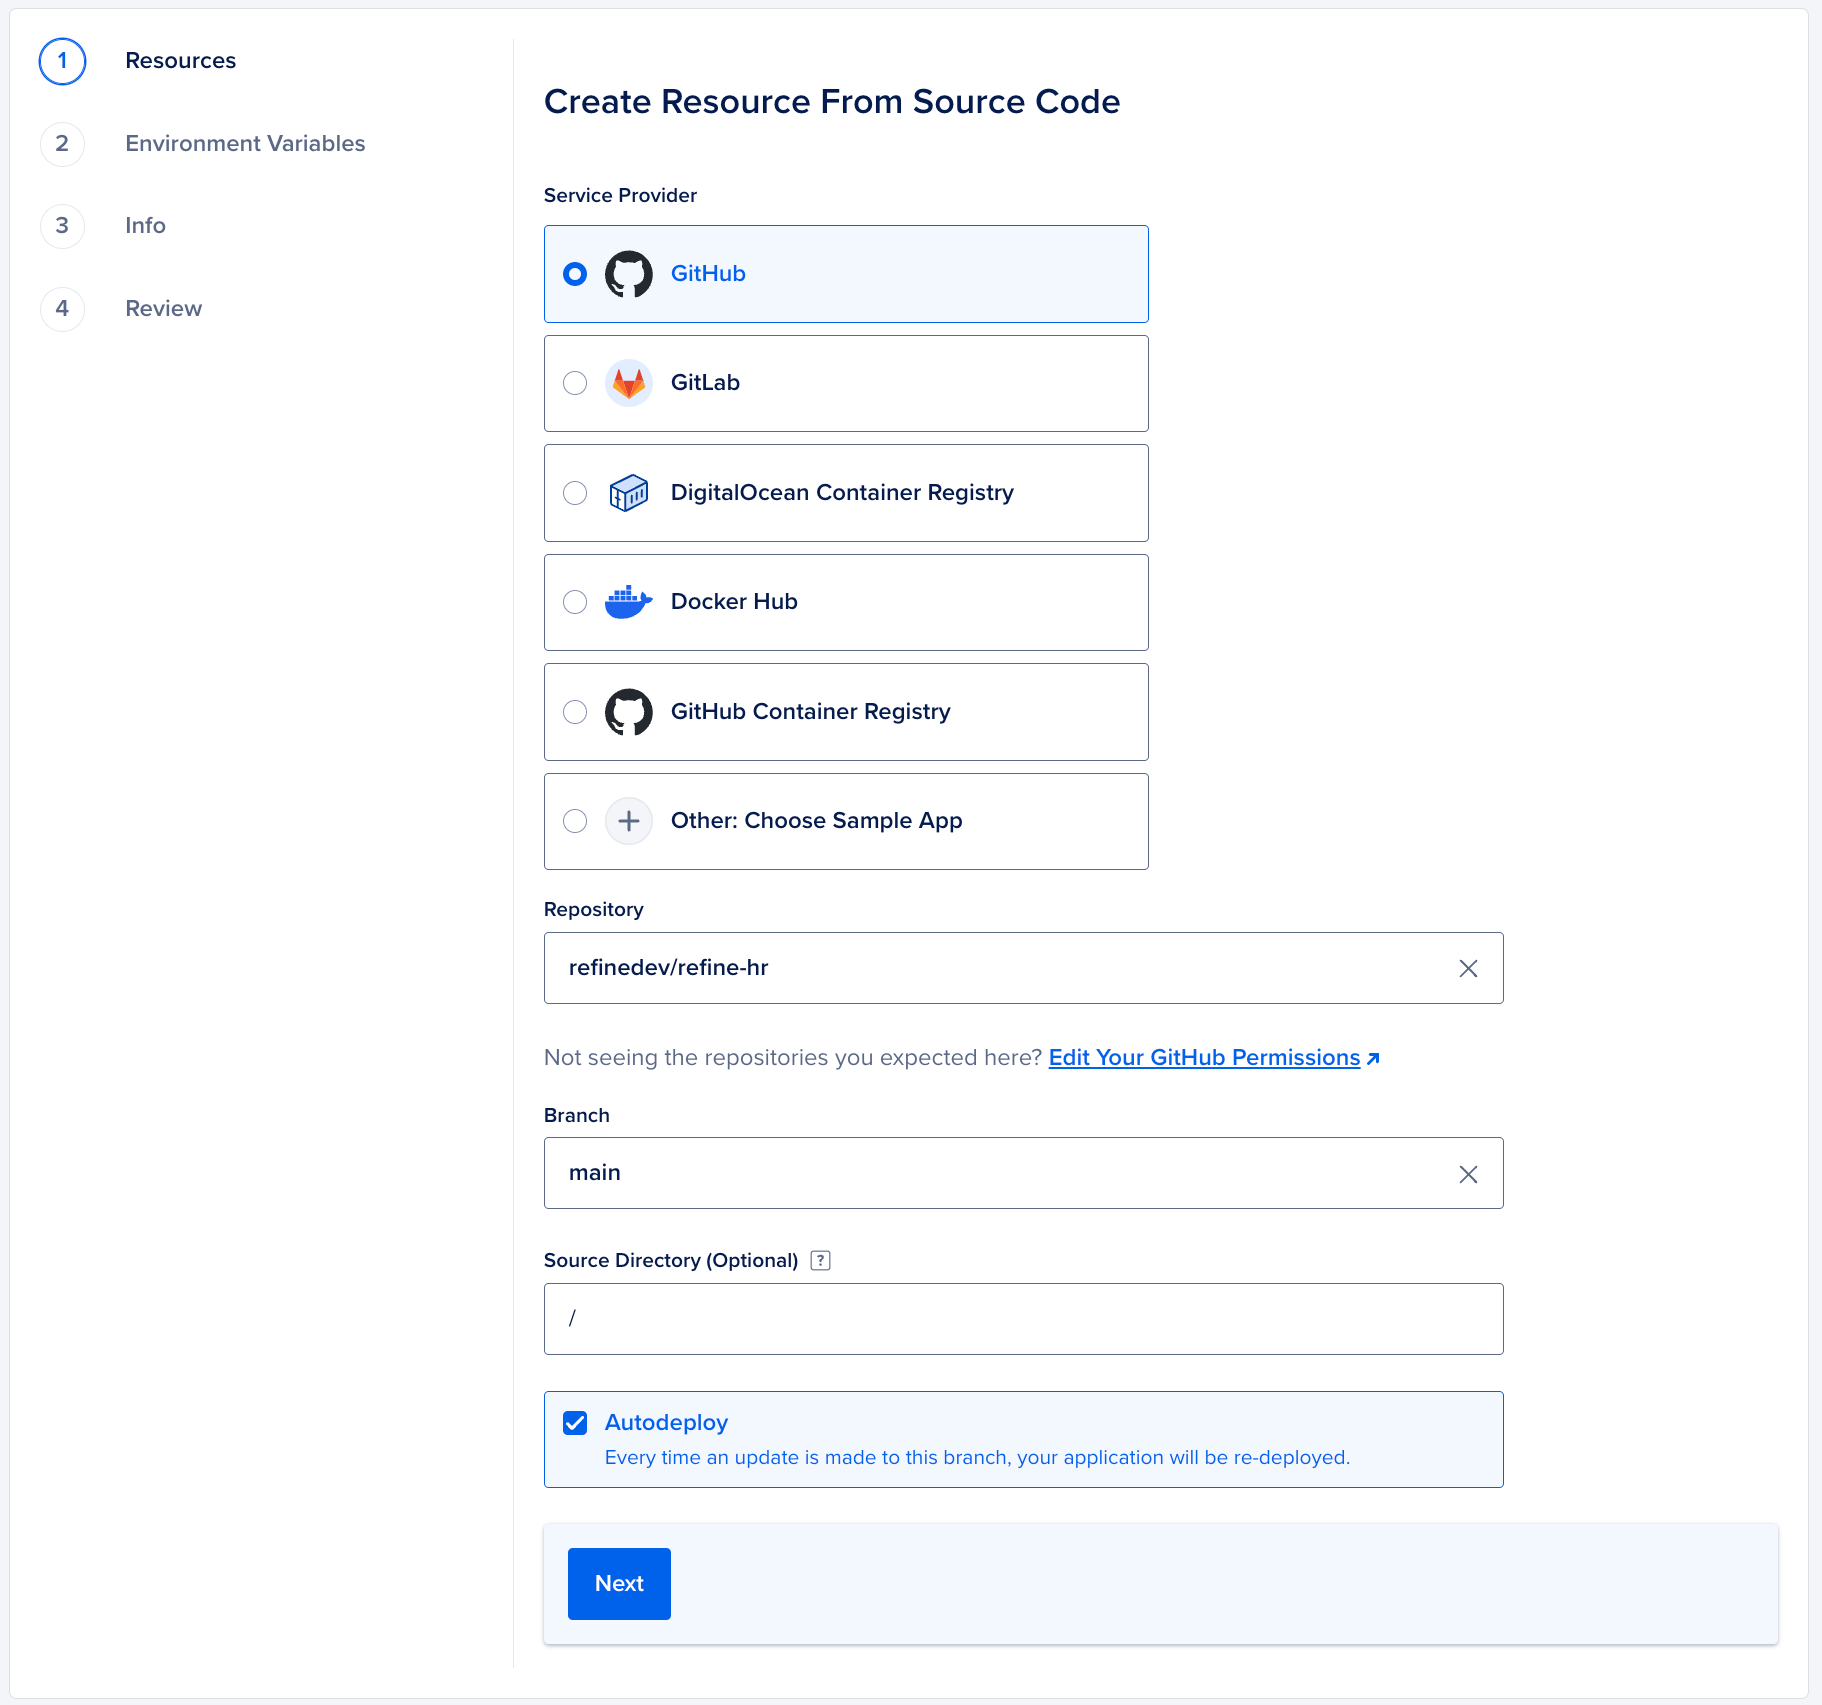
If you haven’t connected your GitHub account to DigitalOcean, you’ll be prompted to do so. Click the Connect to GitHub button. A new window will open, asking you to authorize DigitalOcean to access your GitHub account.
After you authorize DigitalOcean, you’ll be redirected back to the DigitalOcean Apps page. The next step is to select your GitHub repository. After you select your repository, you’ll be prompted to select a branch to deploy. Select the main branch and click the Next button.
After that, you’ll see the configuration steps for your application. In this tutorial, you can click the Next button to skip the configuration steps. However, you can also configure your application as you wish.
Wait for the build to complete. After the build is complete, press Live App to access your project in the browser. It will be the same as the project you tested locally, but this will be live on the web with a secure URL. Also, you can follow this tutorial available on DigitalOcean community site to learn how to deploy react based applications to App Platform.
Note: In case you build fails to deploy successfully, you can configure your build command on DigitalOcean to use npm install --production=false && npm run build && npm prune --production instead of npm run build
If you want to learn more about Refine, you can check out the documentation and if you have any questions or feedback, you can join the Refine Discord Server.