


Welcome to Day 5 of 12 Days of DigitalOcean! Yesterday, you set up your Birthday Reminder Service to run on DigitalOcean Functions, meaning it’s now serverless and cloud-ready. 🎉 Today, you will be taking it a step further by automating it to run on its own schedule—no manual input required.
By the end of this guide, your service (or any other function you’re working on) will run automatically at a set time every day. That means no more remembering to trigger it yourself—it just works.
Why Automate?
Deploying your function to the cloud was a big win yesterday, but having to run it manually defeats the purpose of automation. Today’s focus is on scheduling the service to run automatically—like clockwork—so you can set it and forget it. DigitalOcean Functions has built-in scheduling using Triggers for this exact purpose, and you have two ways to set it up.
🚀 What You’ll Learn
By the end of today, you’ll know how to:
- Set up a daily trigger to run your function automatically.
- Learn two ways to do this—through the DigitalOcean Control Panel or with the
doctlCLI andproject.yml. - Test the setup to make sure it works.
🛠 What You’ll Need
Before getting started, ensure you have the following:
- A function already deployed on DigitalOcean (e.g., the Birthday Reminder Service from Day 4: Building a Birthday Reminder Service) to automate with triggers.
- If using the
doctlCLI, you’ll need theproject.ymlfile for your function. You can check out Day 4 for instructions on installing and setting up thedoctlCLI, and creating theproject.ymlfile.
🧑🍳 Recipe for Day 5: Automating Functions with Triggers
Step 1: Set Up a Trigger for Your Function
DigitalOcean gives you two options for setting up triggers:
- Option 1: Use the Control Panel for quick and easy setup.
- Option 2: Use the
doctlCLI for more robust and programmatic control.
Warning: Remember that triggers created in the Control Panel are lost if you redeploy the function using the CLI. If you’ll be redeploying often, use Option 2 to add triggers directly to the project.yml file.
Option 1: Using the Control Panel to Create a Trigger
The easiest way to set up a trigger is through the DigitalOcean Control Panel. It’s quick, requires no setup, and is ideal for simple one-off configurations.
- Navigate to the main Functions page in the DigitalOcean dashboard.
- Find your function (e.g.,
reminders/birthdays) and click the Triggers tab.
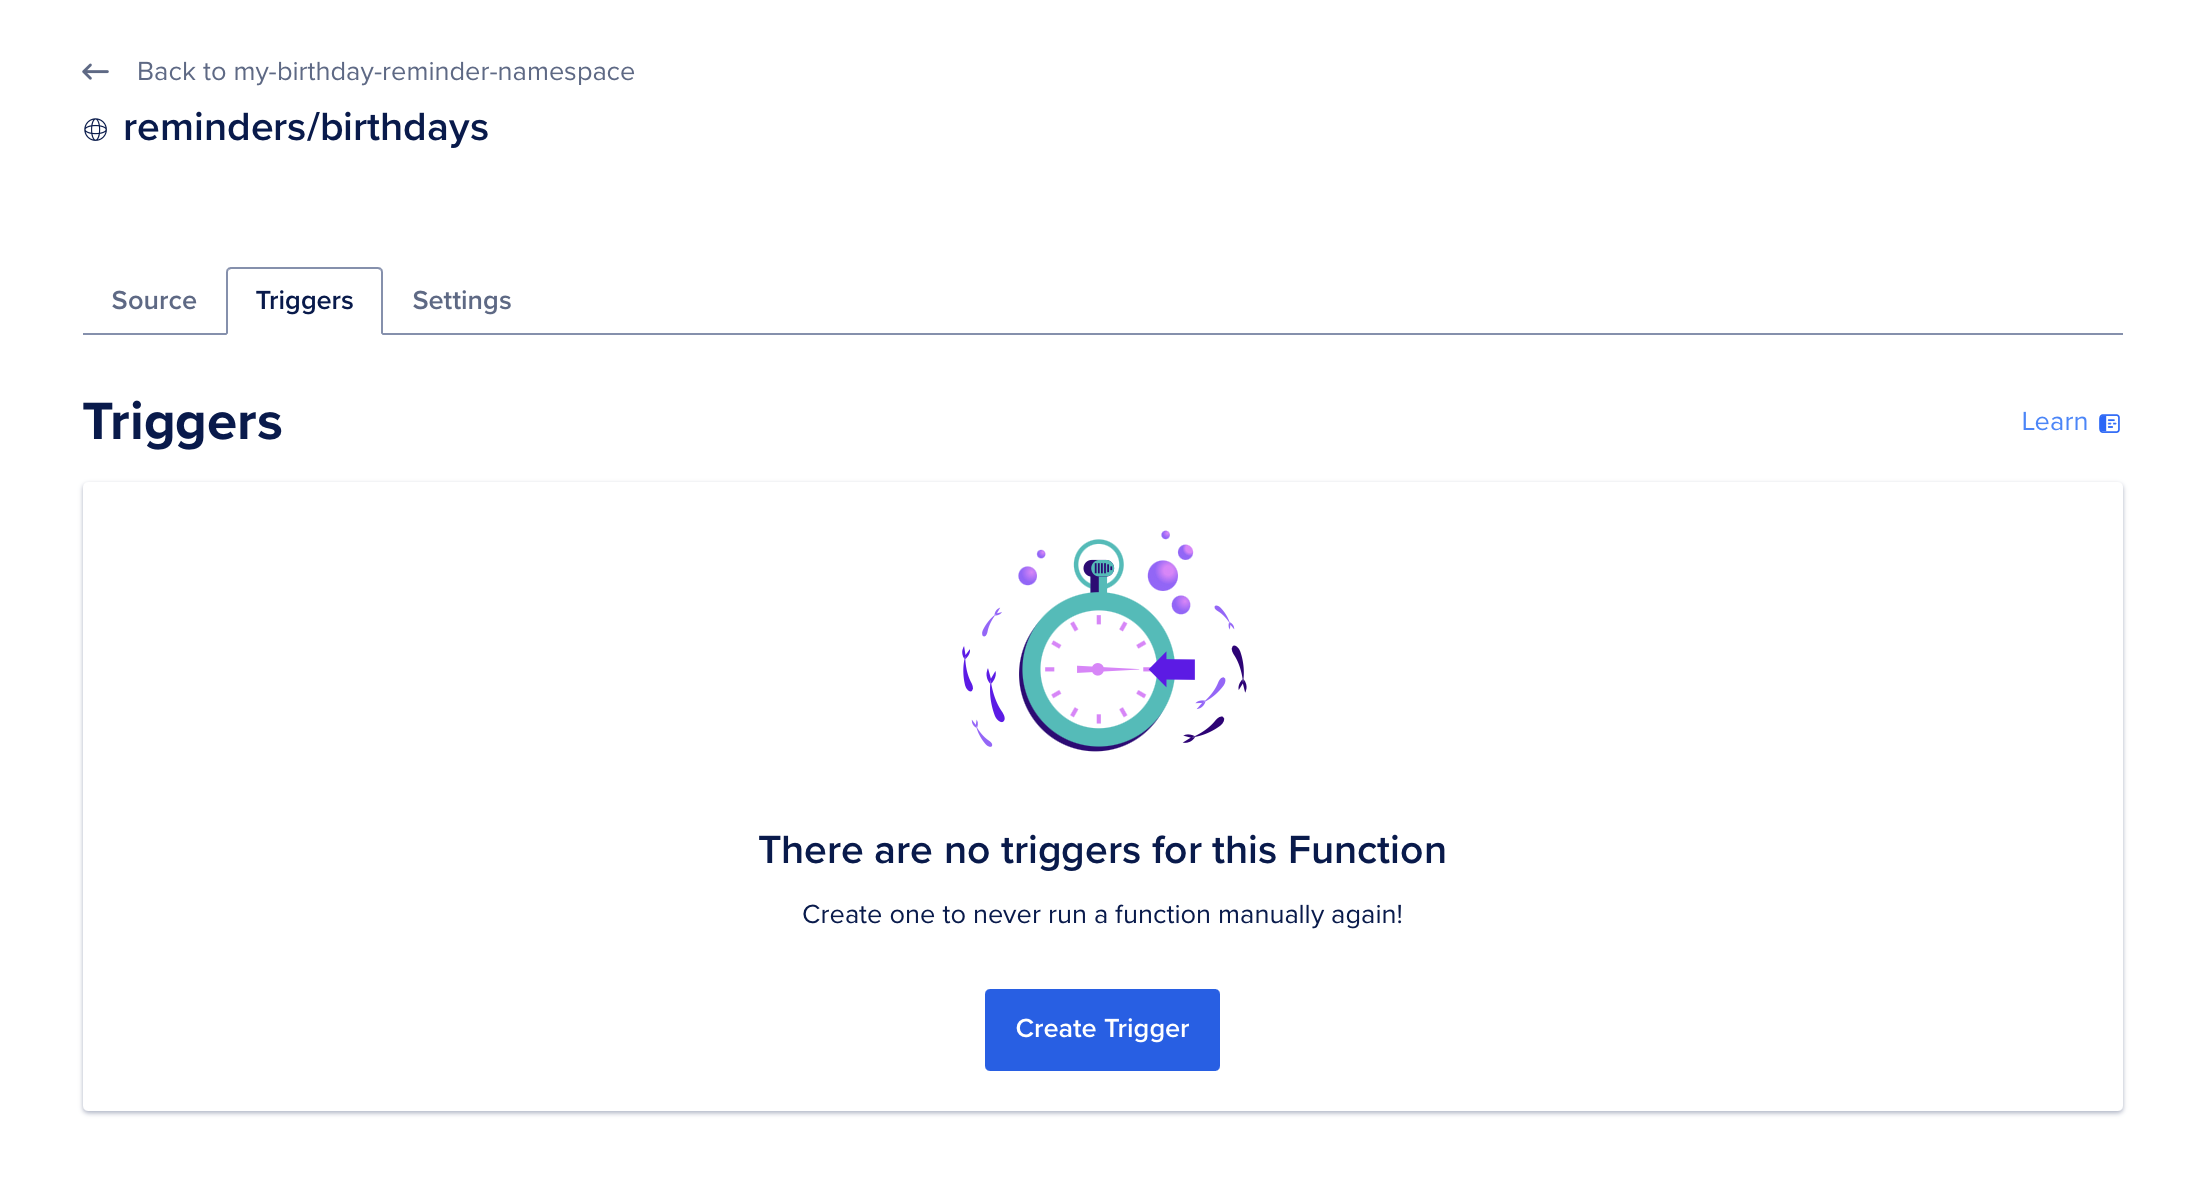
- Click Create Trigger, add a Name for your trigger. This can be anything descriptive, like
daily-birthday-trigger. The name must contain only alphanumeric characters, dashes, and periods. - Add a cron expression to set the schedule. For example,
0 9 * * *means the function will run every day at 9:00 AM.
Note: If you not sure how cron works? Check out crontab.guru for a handy guide.
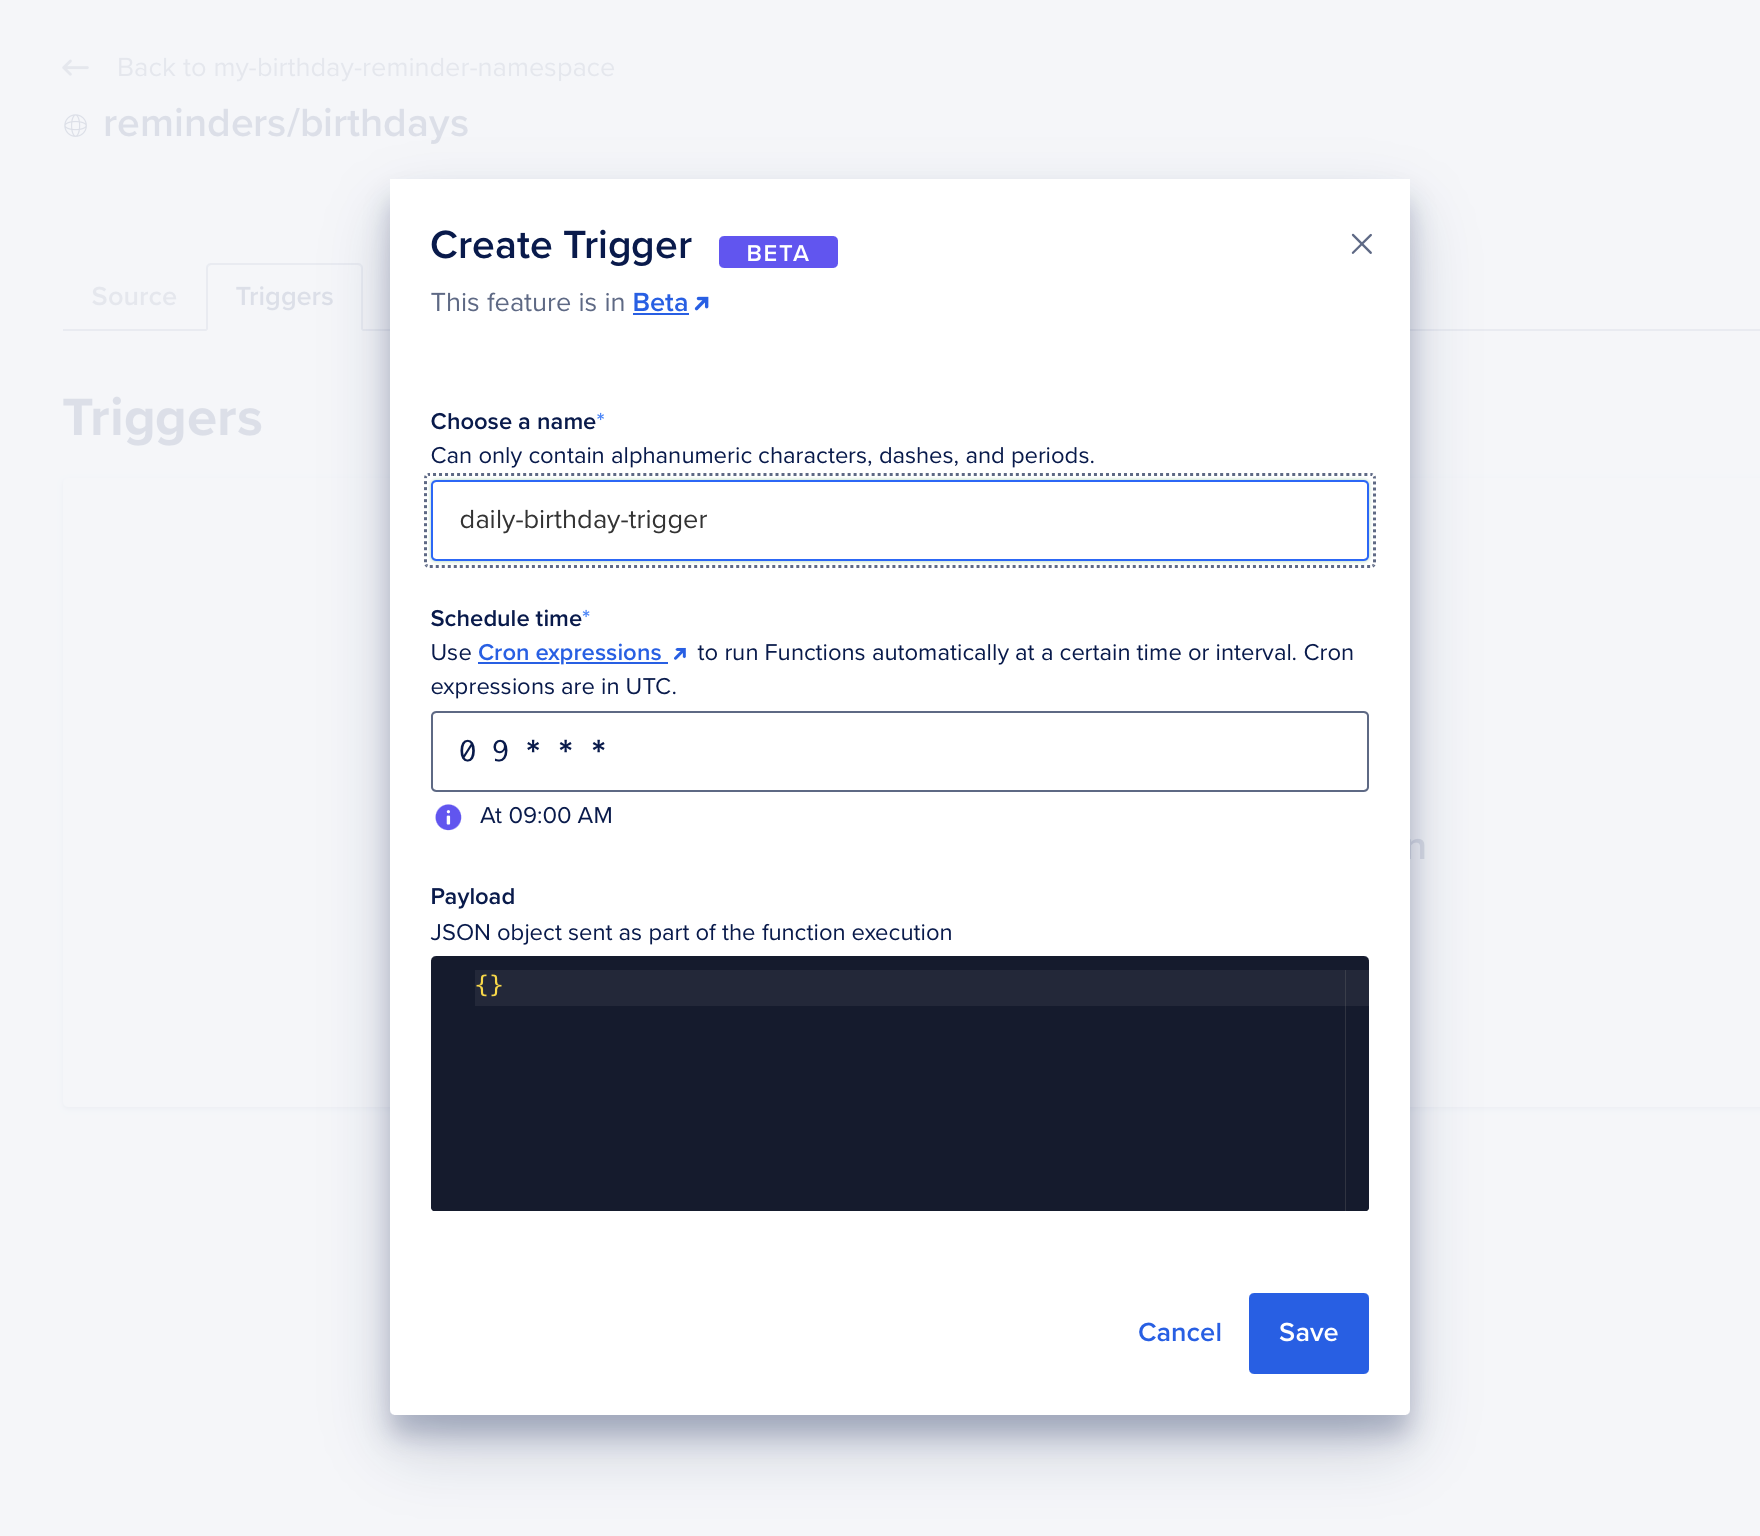
- Save the trigger.
Once you’ve created your trigger, it’s a good idea to test it to ensure everything works as expected. Jump to the Test the Automation section below to learn how.
Warning: While the dashboard is simple and effective, any triggers you create here will be overwritten or deleted if you redeploy the function using the CLI. For frequent updates or programmatic deployments, skip to Option 2.
Option 2: Using the doctl CLI with project.yml
You can also create triggers by adding them directly to your project.yml file. This method is more reliable for frequent redeployments because it ensures your triggers are always included in the function’s configuration. Unlike the Control Panel option described earlier, this approach prevents triggers from being overwritten or lost during redeployments.
Here’s how you can set it up:
-
Open your
project.ymlfile from Day 4: Deploying Birthday Notifications with DigitalOcean Functions. It might look something like this: -
Add a
triggerssection to your function configuration to define the schedule: -
Final updated
project.ymlfile:This tells DigitalOcean to run the
birthdaysfunction every day at 9:00 AM.-
triggerssection: Defines the name, type, and schedule for the trigger. You can name your trigger anything descriptive, likedaily-birthday-trigger. -
cron: Specifies the time the function will run daily in UTC. The cron expression0 9 * * *for example, schedules the function to run every day at 9:00 AM.
-
-
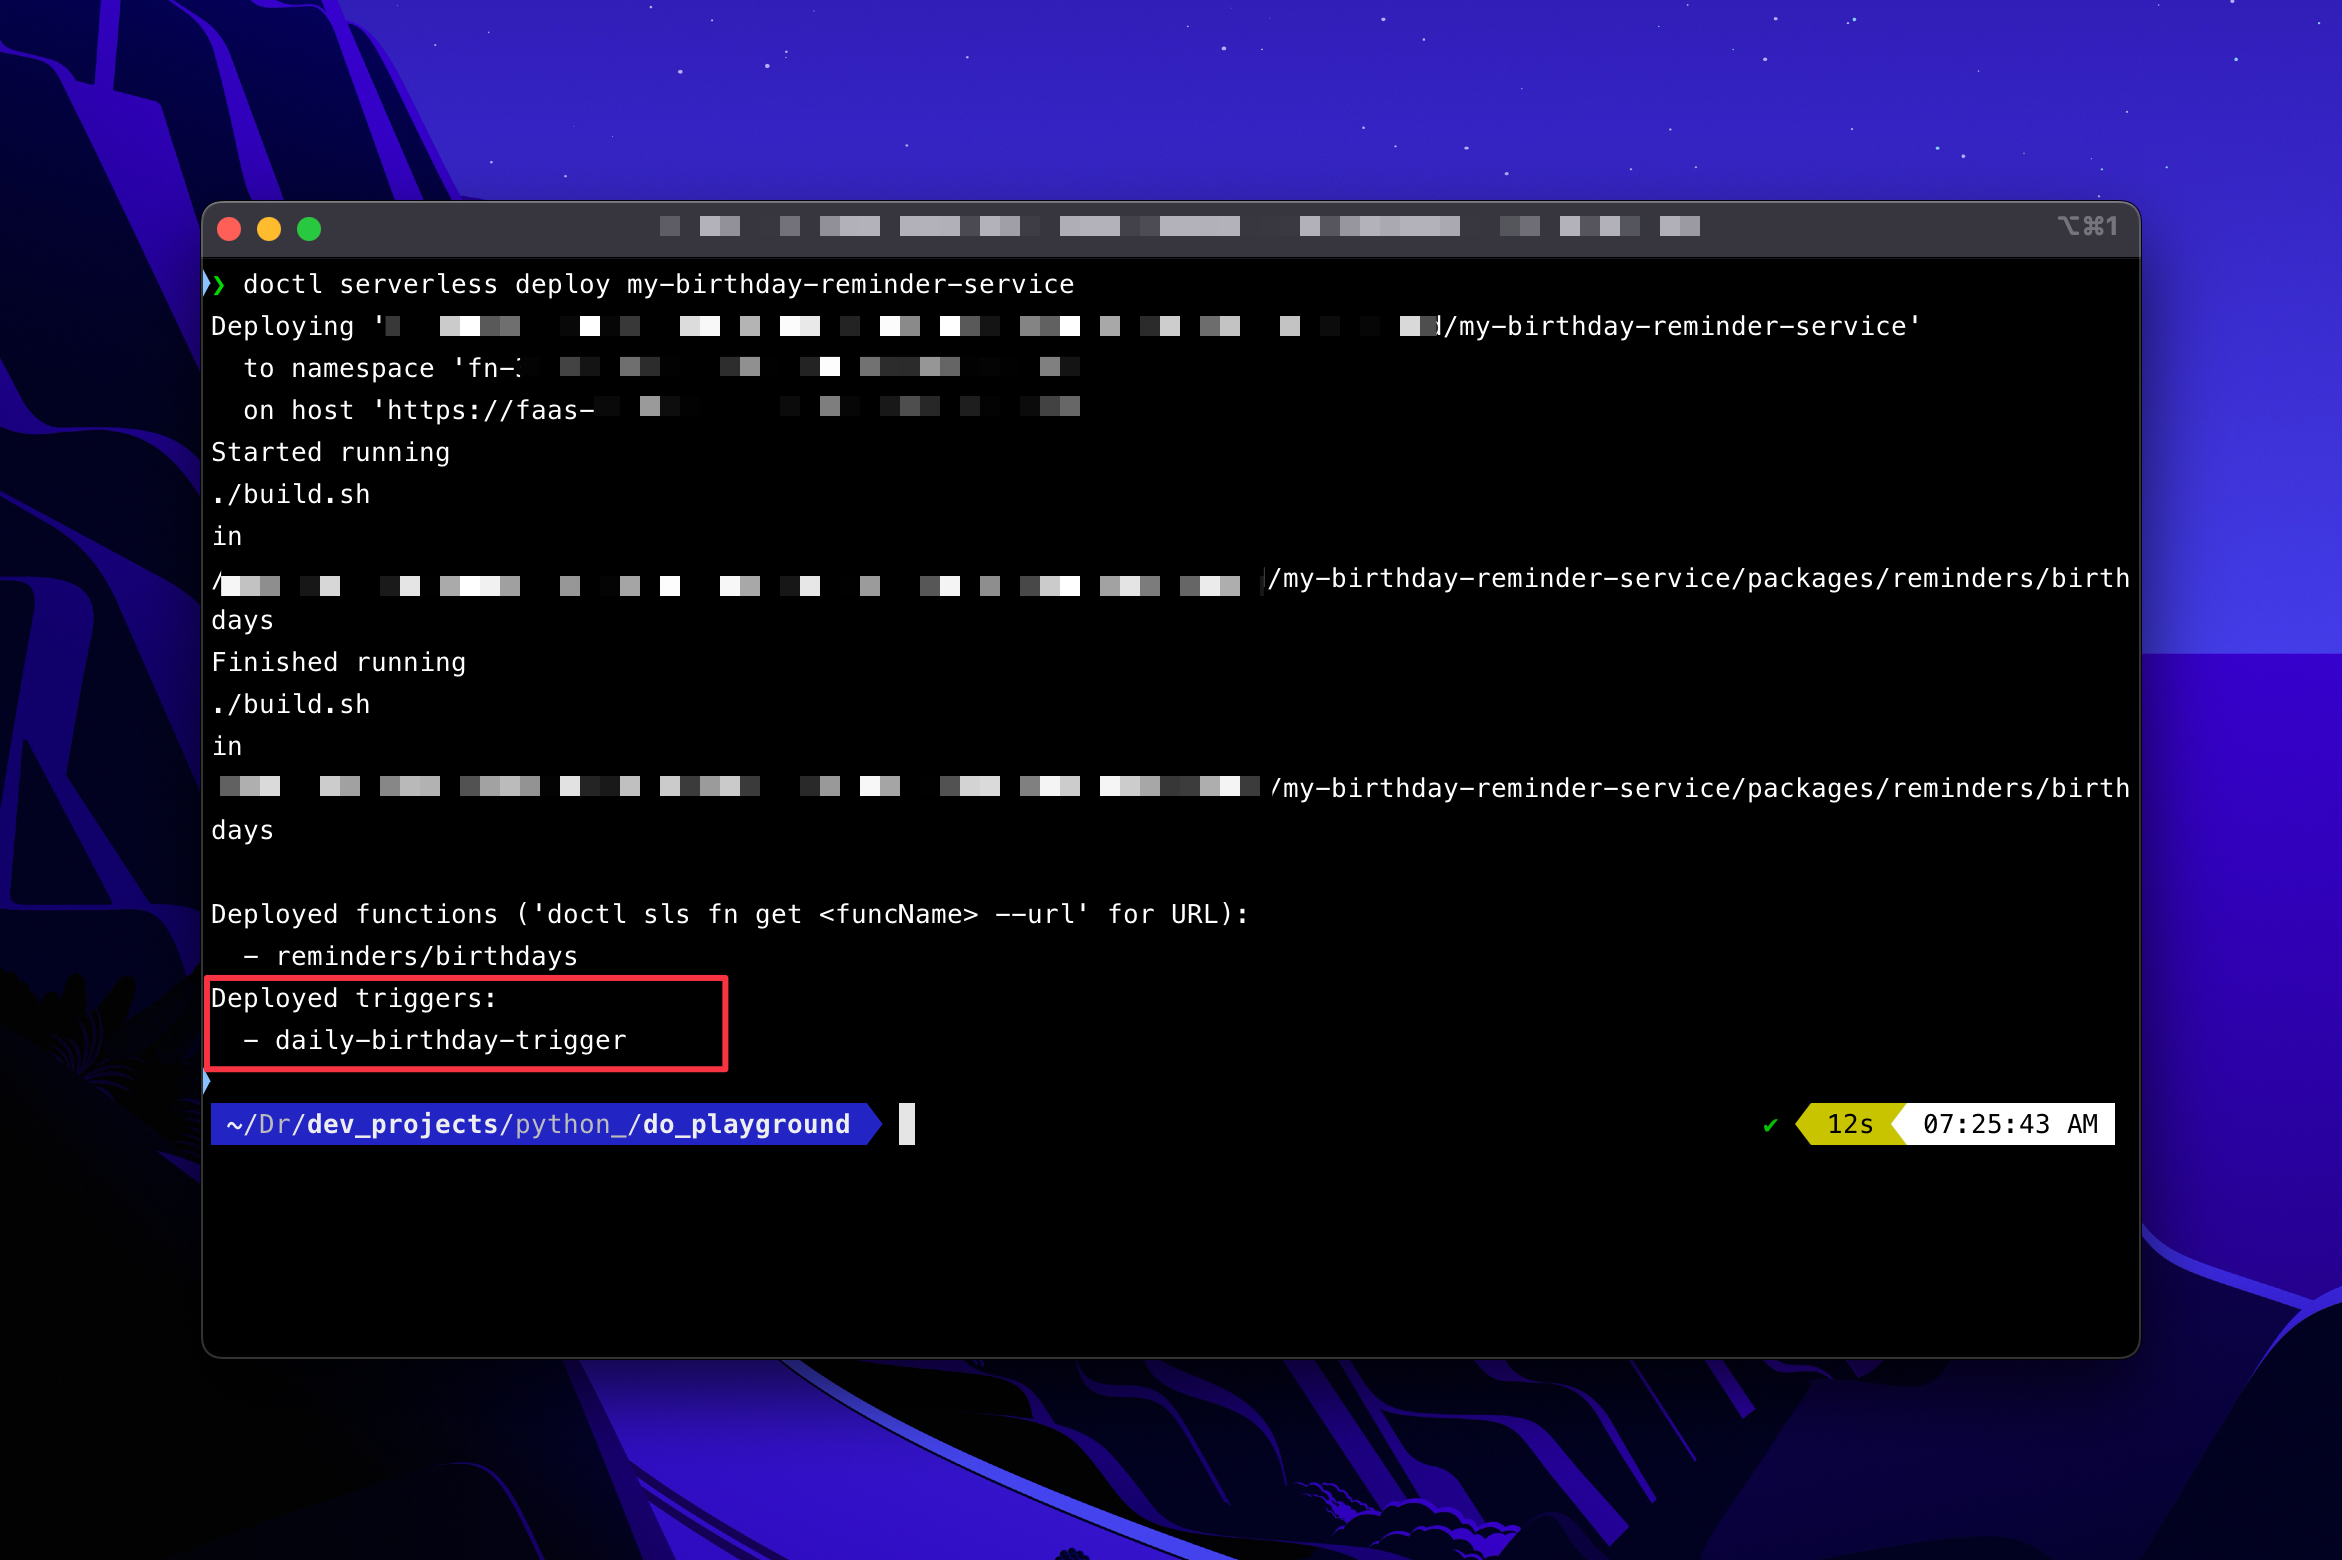
Save the file and deploy it by running the following command from the directory containing the
my-birthday-reminder-servicefolder:Important: Make sure to run the command from the parent directory, not inside the
my-birthday-reminder-servicefolder. Running it from the wrong location can result in an error like this: -
Once the deployment is successful, you’ll see a confirmation message similar to this:
-
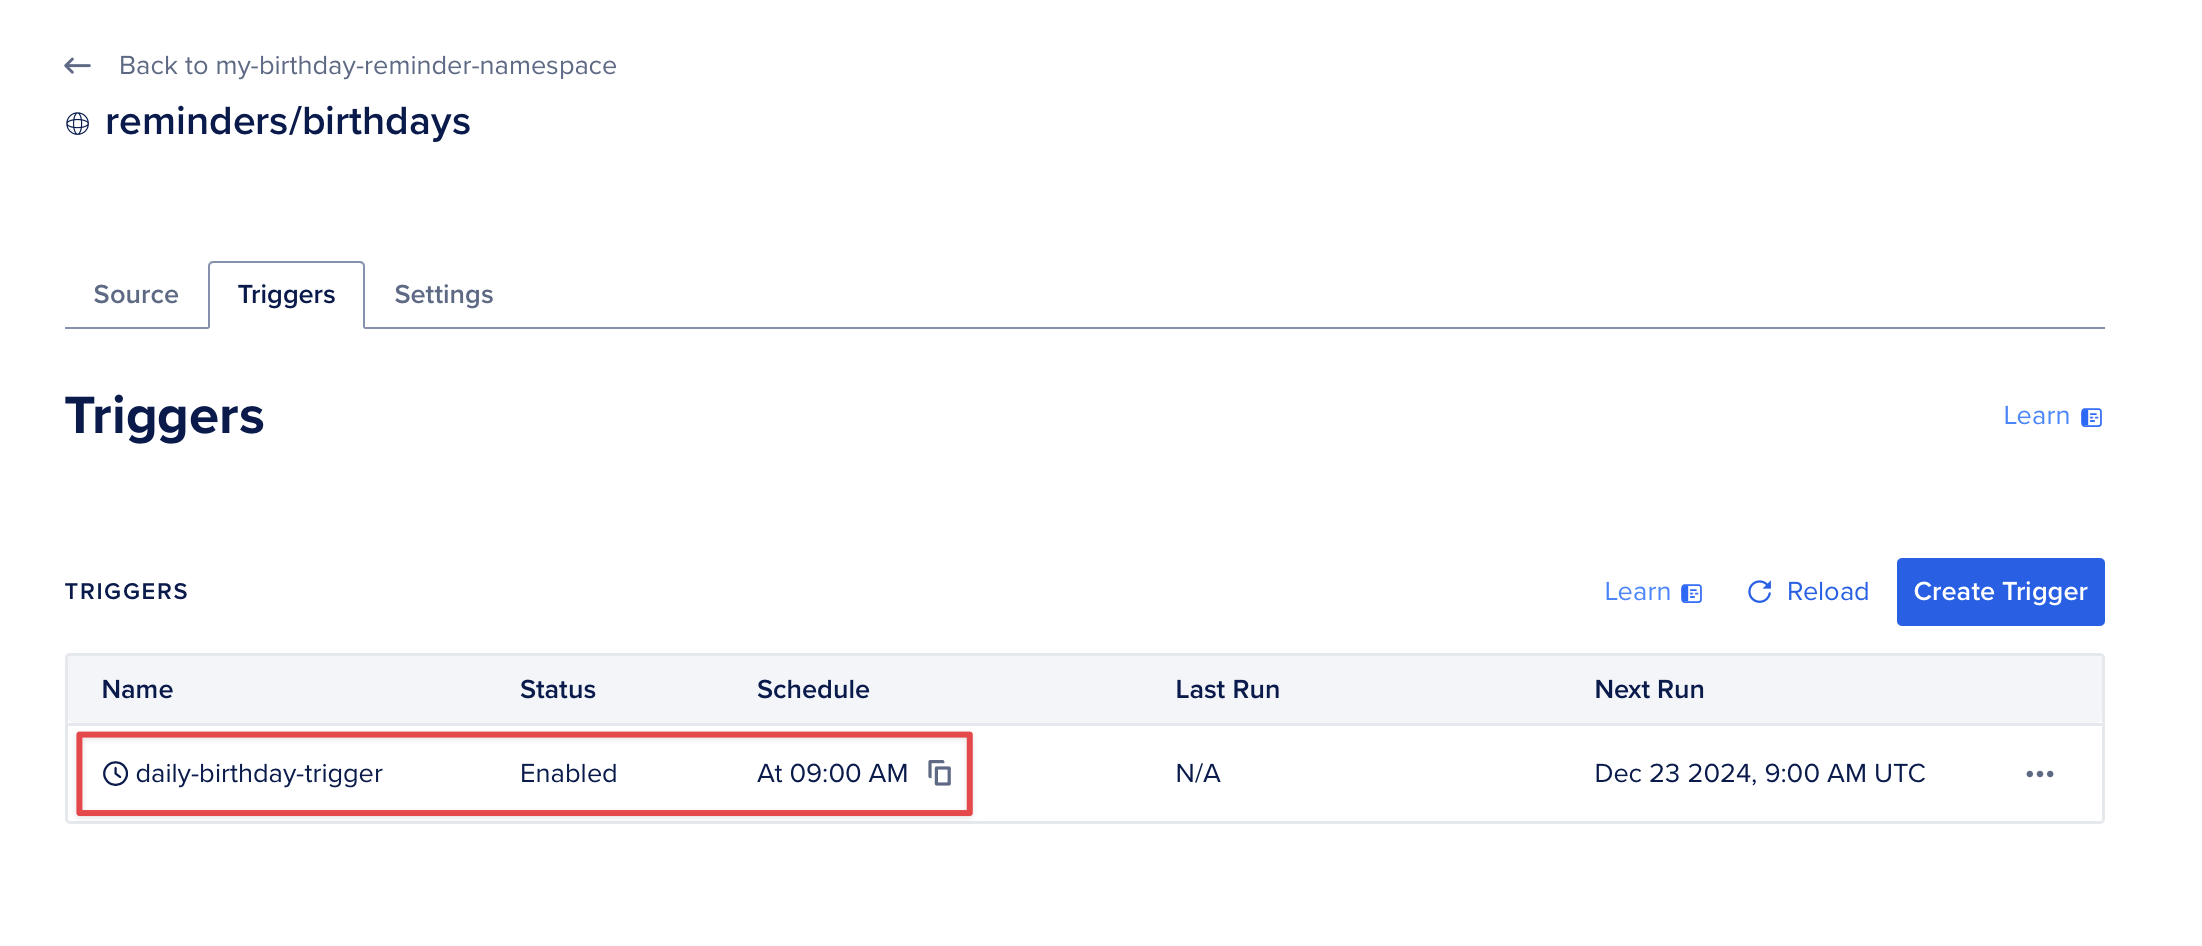
Go to your dashboard to verify that the trigger has been created under the Functions section.
Pro Tip: To test your trigger, temporarily set the cron expression to a few minutes from now (e.g., 28 9 * * * if it’s 9:25 AM). After confirming that it works, update it back to your intended schedule and redeploy.
Step 2: Test the Automation
Let’s test your triggers to make sure they’re working. Instead of waiting for them to fire on their usual schedule, you can temporarily set them to run a few minutes from now. Here’s how to do it:
-
Set the cron expression for your trigger to a few minutes from the current time (in UTC). For example, if it’s 9:25 AM UTC, set the cron expression to
28 9 * * *so the function runs at 9:28 AM UTC.Note: Not sure how to convert your local time to UTC? Tools like Time Zone Converter can help.
-
Save the updated trigger (if using the Control Panel) or redeploy your updated
project.ymlfile (if using the CLI): -
Wait for the trigger to execute, then check the activation logs to confirm the function ran successfully:
Note: Activation logs record details about when your function was executed, including whether it ran successfully or encountered errors. They’re a helpful way to verify that your trigger fired at the scheduled time.
This command will return the details of the most recent activation of your function. For example, you might see something like this:
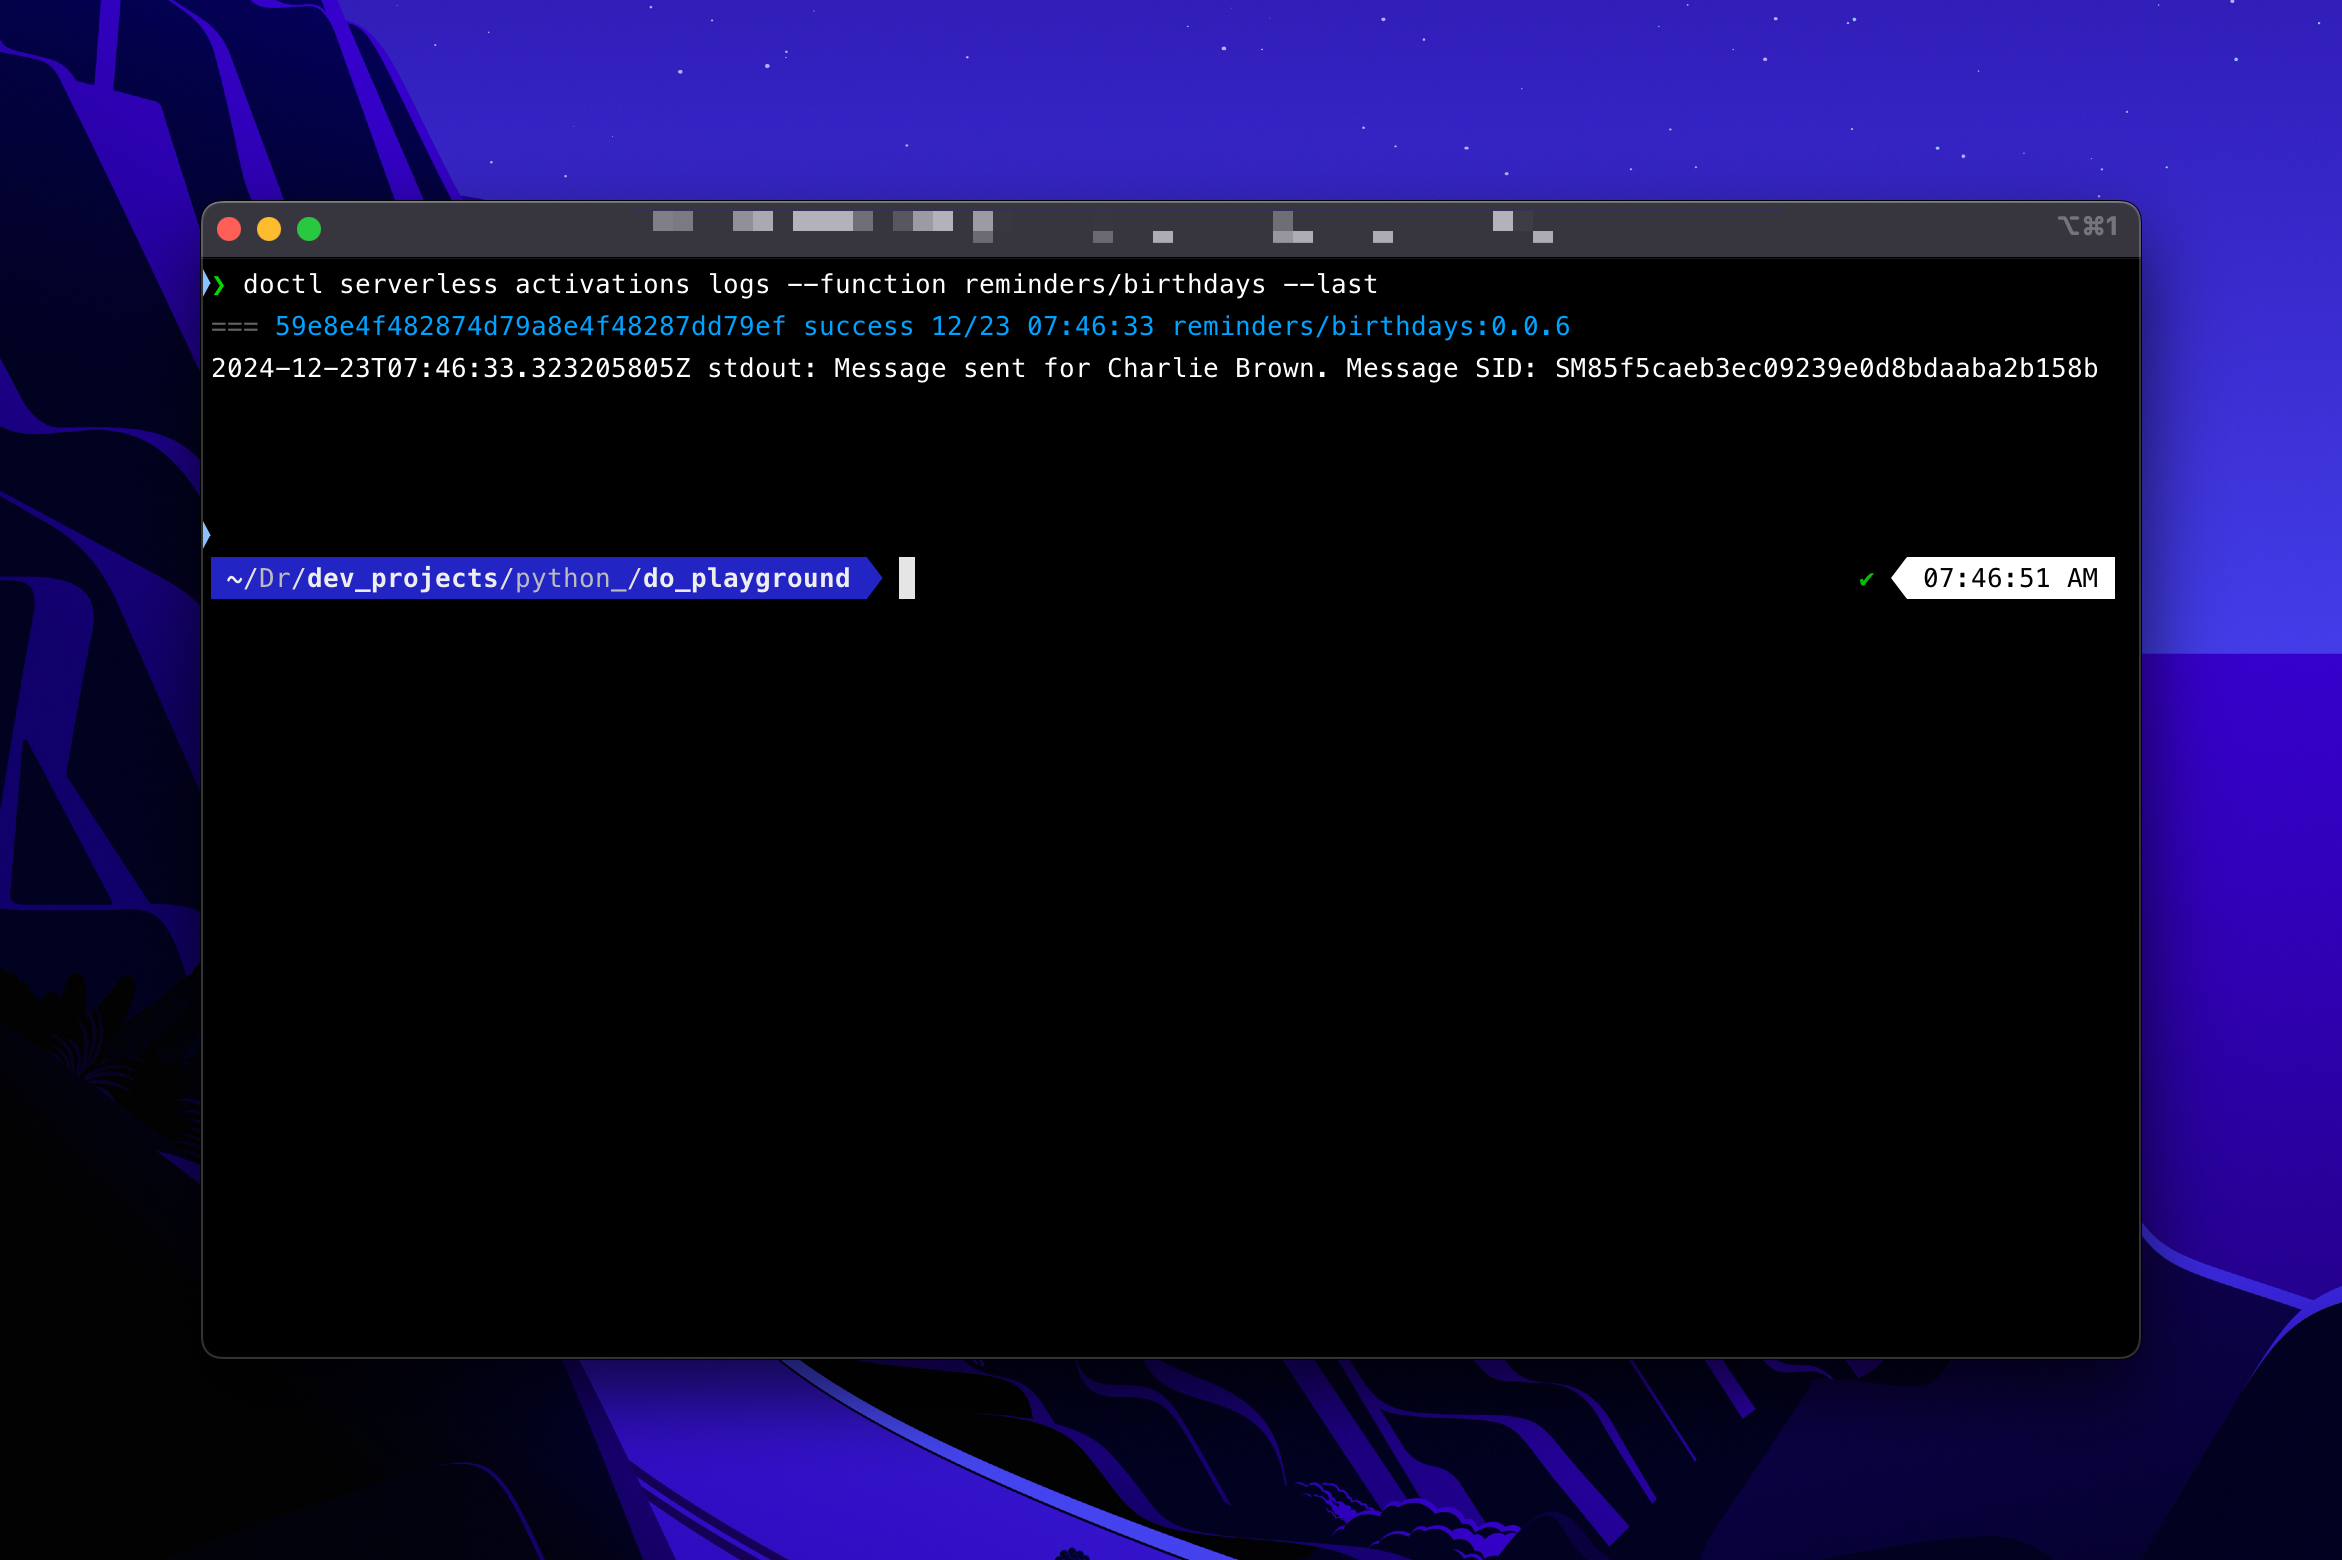
This confirms that the trigger fired and the function was activated successfully! 🎉
Note: Once you’ve verified everything is working, update the cron expression to your intended schedule (e.g., 0 9 * * * for 9:00 AM UTC daily) and save or redeploy.
A Quick Note on Logs
While the activations logs command is a great way to check recent executions, sometimes you’ll need more detailed logs to debug or investigate issues with your function. DigitalOcean also provides options to forward these logs to external logging services, making monitoring and troubleshooting your application easier over time.
On Day 6, you will learn to view logs directly, interpret them effectively, and set up log forwarding to external services like Logtail or Papertrail. These tools will help you easily stay on top of your function’s performance.
🎁 Wrap-Up
Here’s what you accomplished today:
- You automated your Birthday Reminder Service (or any other function) to run daily.
- You learned two ways to set up triggers—through the Control Panel and with the
doctlCLI. - You tested your setup to ensure it works as expected.
Here are the previous tutorials from this series:
- Day 1: Setting Up a PostgreSQL Database for Birthday Reminders
- Day 2: Connecting to Your PostgreSQL Database with Python
- Day 3: Checking Birthdays and Sending SMS Notifications
- Day 4: Deploying Birthday Notifications to Functions
Up Next: Now that your service runs independently, the next step is monitoring it effectively. In the next tutorial, you will learn how to view your function logs and forward them to external services to simplify tracking and troubleshooting. See you then!
Source:
https://www.digitalocean.com/community/tutorials/automating-birthday-reminders-with-triggers