في هذا الدورس، سنقوم بتنفيذ شريط التنقل في تطبيق الأندرويد الخاص بنا. شريط التنقل في الأندرويد هو قائمة جانبية، وهو عنصر واجهة المستخدم المهم. سترى شريط التنقل في معظم تطبيقات الأندرويد، وهو مشابه لأشرطة قوائم التنقل في المواقع الإلكترونية.
شريط التنقل في الأندرويد
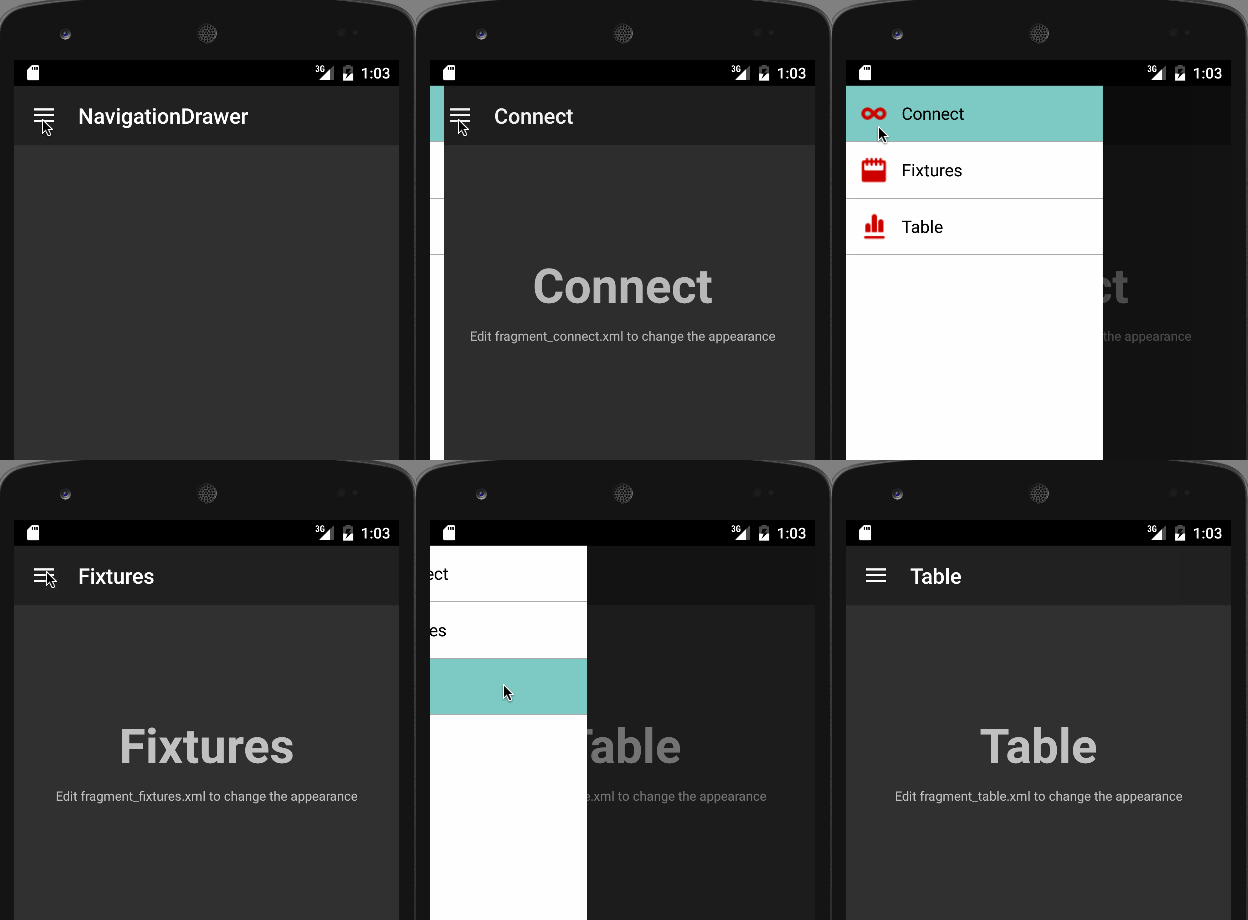
شريط التنقل في الأندرويد هو قائمة جانبية تنزلق إلى اليسار تُستخدم لعرض الروابط الهامة في التطبيق. يسهل شريط التنقل التنقل بين هذه الروابط. لا يكون مرئيًا افتراضيًا ويحتاج إلى فتحه إما بالتمرير من اليسار أو النقر على رمزه في شريط العنوان. وبشكل عام، يُعتبر شريط التنقل لوحًا تفاعليًا، يعد بديلاً لشاشة النشاط التي كانت مخصصة خصيصًا لعرض جميع الخيارات والروابط في التطبيق. في هذا الدورس حول شريط التنقل في الأندرويد، سنقوم بتنفيذ شريط التنقل باستخدام واجهة برمجة التطبيقات للتخطيط (Drawer Layout) المتاحة في مكتبة دعم الأندرويد. سنعرض 3 عروض شاشة فرعية يمكن فتحها من عناصر شريط التنقل.
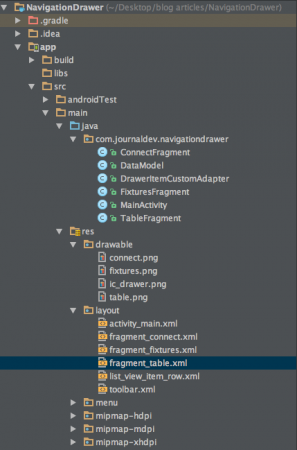
هيكل مشروع شريط التنقل في الأندرويد
مثال على درج التنقل في أندرويد
لتنفيذ درج التنقل، نحتاج أولاً إلى إضافة android.support.v4.widget.DrawerLayout كجذر لتخطيط النشاط كما هو موضح أدناه. activity_main.xml
<android.support.v4.widget.DrawerLayout
    xmlns:android="https://schemas.android.com/apk/res/android"
    android:id="@+id/drawer_layout"
    android:layout_width="match_parent"
    android:layout_height="match_parent" >


    <LinearLayout
        android:layout_width="match_parent"
        android:layout_height="match_parent"
        android:orientation="vertical">

    <LinearLayout
        android:id="@+id/container_toolbar"
        android:layout_width="match_parent"
        android:layout_height="wrap_content"
        android:orientation="vertical">

        <include
            android:id="@+id/toolbar"
            layout="@layout/toolbar" />
    </LinearLayout>


    <FrameLayout
        android:id="@+id/content_frame"
        android:layout_width="match_parent"
        android:layout_height="match_parent" />

    </LinearLayout>

    <ListView
        android:id="@+id/left_drawer"
        android:layout_width="240dp"
        android:layout_height="match_parent"
        android:layout_gravity="start"
        android:background="#FFFFFF"
        android:choiceMode="singleChoice"
        android:divider="@android:color/darker_gray"
        android:dividerHeight="1dp" />

</android.support.v4.widget.DrawerLayout>
خيارات القائمة في درج التنقل مخزنة في شكل ListView. كل خيار يفتح في FrameLayout. لقد استخدمنا ToolBar بدلاً من ActionBar هنا. تم تقديم ToolBar منذ أندرويد 5.0 كتعميم لـ ActionBar. يمنحنا مزيدًا من التحكم والمرونة لتعديله وأسهل في التداخل مع عرض آخر في التسلسل الهرمي. يتم تحديد تخطيط ToolBar في تخطيط xml المعطى أدناه. toolbar.xml
<android.support.v7.widget.Toolbar xmlns:android="https://schemas.android.com/apk/res/android"
    xmlns:local="https://schemas.android.com/apk/res-auto"
    android:id="@+id/toolbar"
    android:layout_width="match_parent"
    android:layout_height="wrap_content"
    android:minHeight="?attr/actionBarSize"
    android:background="?attr/colorPrimary"
    local:theme="@style/ThemeOverlay.AppCompat.Dark.ActionBar"
    local:popupTheme="@style/ThemeOverlay.AppCompat.Light" />
نحتاج إلى استخدام السمة Theme.AppCompat.NoActionBar في styles.xml عند استخدام شريط الأدوات. تم تقديم تخطيط لصفوف ListView في درج التنقل أدناه. list_view_item_row.xml
<RelativeLayout xmlns:android="https://schemas.android.com/apk/res/android"
    android:layout_width="match_parent"
    android:layout_height="wrap_content"
    android:background="?android:attr/activatedBackgroundIndicator"
    android:minHeight="?android:attr/listPreferredItemHeightSmall"
    android:padding="10dp" >

    <ImageView
        android:id="@+id/imageViewIcon"
        android:layout_width="wrap_content"
        android:layout_height="wrap_content"
        android:layout_alignParentLeft="true"
        android:layout_alignParentTop="true"
        android:paddingRight="10dp" />

    <TextView
        android:id="@+id/textViewName"
        android:layout_width="wrap_content"
        android:layout_height="wrap_content"
        android:layout_centerVertical="true"
        android:layout_toRightOf="@+id/imageViewIcon"
        android:paddingRight="10dp"
        android:text="Item Name"
        android:textColor="@android:color/black"
        android:textAppearance="?android:attr/textAppearanceListItemSmall"
        />

</RelativeLayout>
يتم وضع عناصر درج التنقل في مصفوفة سلسلة في ملف strings.xml كما هو موضح أدناه. strings.xml
<string-array name="navigation_drawer_items_array">
        <item>Connect</item>
        <item>Fixtures</item>
        <item>Table</item>
    </string-array>
تستخدم فئة DataModel.java لتعريف الكائنات لعناصر قائمة الدرج. DataModel.java
package com.journaldev.navigationdrawer;

public class DataModel {

    public int icon;
    public String name;

    // Constructor.
    public DataModel(int icon, String name) {

        this.icon = icon;
        this.name = name;
    }
}
تم تخزين عناصر الدرج في شكل ListView. لذا نحتاج إلى استخدام فئة محول لتوفير تلك البيانات لفئة النشاط. DrawerItemCustomAdapter.java
package com.journaldev.navigationdrawer;

import android.app.Activity;
import android.content.Context;
import android.view.LayoutInflater;
import android.view.View;
import android.view.ViewGroup;
import android.widget.ArrayAdapter;
import android.widget.ImageView;
import android.widget.TextView;

public class DrawerItemCustomAdapter extends ArrayAdapter<DataModel> {

    Context mContext;
    int layoutResourceId;
    DataModel data[] = null;

    public DrawerItemCustomAdapter(Context mContext, int layoutResourceId, DataModel[] data) {

        super(mContext, layoutResourceId, data);
        this.layoutResourceId = layoutResourceId;
        this.mContext = mContext;
        this.data = data;
    }

    @Override
    public View getView(int position, View convertView, ViewGroup parent) {

        View listItem = convertView;

        LayoutInflater inflater = ((Activity) mContext).getLayoutInflater();
        listItem = inflater.inflate(layoutResourceId, parent, false);

        ImageView imageViewIcon = (ImageView) listItem.findViewById(R.id.imageViewIcon);
        TextView textViewName = (TextView) listItem.findViewById(R.id.textViewName);

        DataModel folder = data[position];


        imageViewIcon.setImageResource(folder.icon);
        textViewName.setText(folder.name);

        return listItem;
    }
}
الشفرة المصدرية MainActivity.java معروضة أدناه. MainActivity.java
package com.journaldev.navigationdrawer;

import android.support.v4.app.Fragment;
import android.support.v4.app.FragmentManager;
import android.support.v4.widget.DrawerLayout;
import android.support.v7.app.AppCompatActivity;
import android.os.Bundle;
import android.support.v7.widget.Toolbar;
import android.util.Log;
import android.view.MenuItem;
import android.view.View;
import android.widget.AdapterView;
import android.widget.ListView;

public class MainActivity extends AppCompatActivity {

    private String[] mNavigationDrawerItemTitles;
    private DrawerLayout mDrawerLayout;
    private ListView mDrawerList;
    Toolbar toolbar;
    private CharSequence mDrawerTitle;
    private CharSequence mTitle;
    android.support.v7.app.ActionBarDrawerToggle mDrawerToggle;

    @Override
    protected void onCreate(Bundle savedInstanceState) {
        super.onCreate(savedInstanceState);
        setContentView(R.layout.activity_main);
        mTitle = mDrawerTitle = getTitle();
        mNavigationDrawerItemTitles= getResources().getStringArray(R.array.navigation_drawer_items_array);
        mDrawerLayout = (DrawerLayout) findViewById(R.id.drawer_layout);
        mDrawerList = (ListView) findViewById(R.id.left_drawer);

        setupToolbar();

        DataModel[] drawerItem = new DataModel[3];

        drawerItem[0] = new DataModel(R.drawable.connect, "Connect");
        drawerItem[1] = new DataModel(R.drawable.fixtures, "Fixtures");
        drawerItem[2] = new DataModel(R.drawable.table, "Table");
        getSupportActionBar().setDisplayHomeAsUpEnabled(false);
        getSupportActionBar().setHomeButtonEnabled(true);

        DrawerItemCustomAdapter adapter = new DrawerItemCustomAdapter(this, R.layout.list_view_item_row, drawerItem);
        mDrawerList.setAdapter(adapter);
        mDrawerList.setOnItemClickListener(new DrawerItemClickListener());
        mDrawerLayout = (DrawerLayout) findViewById(R.id.drawer_layout);
        mDrawerLayout.setDrawerListener(mDrawerToggle);
        setupDrawerToggle();

    }

    private class DrawerItemClickListener implements ListView.OnItemClickListener {

        @Override
        public void onItemClick(AdapterView parent, View view, int position, long id) {
            selectItem(position);
        }

    }

    private void selectItem(int position) {

        Fragment fragment = null;

        switch (position) {
            case 0:
                fragment = new ConnectFragment();
                break;
            case 1:
                fragment = new FixturesFragment();
                break;
            case 2:
                fragment = new TableFragment();
                break;

            default:
                break;
        }

        if (fragment != null) {
            FragmentManager fragmentManager = getSupportFragmentManager();
            fragmentManager.beginTransaction().replace(R.id.content_frame, fragment).commit();

            mDrawerList.setItemChecked(position, true);
            mDrawerList.setSelection(position);
            setTitle(mNavigationDrawerItemTitles[position]);
            mDrawerLayout.closeDrawer(mDrawerList);

        } else {
            Log.e("MainActivity", "Error in creating fragment");
        }
    }

    @Override
    public boolean onOptionsItemSelected(MenuItem item) {

        if (mDrawerToggle.onOptionsItemSelected(item)) {
            return true;
        }

        return super.onOptionsItemSelected(item);
    }

    @Override
    public void setTitle(CharSequence title) {
        mTitle = title;
        getSupportActionBar().setTitle(mTitle);
    }

    @Override
    protected void onPostCreate(Bundle savedInstanceState) {
        super.onPostCreate(savedInstanceState);
        mDrawerToggle.syncState();
    }

    void setupToolbar(){
        toolbar = (Toolbar) findViewById(R.id.toolbar);
        setSupportActionBar(toolbar);
        getSupportActionBar().setDisplayShowHomeEnabled(true);
    }

    void setupDrawerToggle(){
        mDrawerToggle = new android.support.v7.app.ActionBarDrawerToggle(this,mDrawerLayout,toolbar,R.string.app_name, R.string.app_name);
        // هذا مطلوب لتغيير رمز Drawer Toggle عند تغيير الحالة.
        mDrawerToggle.syncState();
    }
}
في الشفرة أعلاه getSupportActionBar().setDisplayHomeAsUpEnabled(false); يُستخدم لإخفاء زر الرجوع الافتراضي. في هذه الشفرة ، قمنا باستخدام فئة DrawerItemClickListener التي تحمل الفراغ المقابل لعنصر القائمة الذي تم النقر فوقه باستخدام FragmentManager. أيضًا يتم تغيير عنوان شريط الأدوات إلى عنصر القائمة الذي تم النقر عليه باستخدام setTitle(mNavigationDrawerItemTitles[position]);. تم توفير فئات الفراغات وتخطيطاتها المقابلة أدناه. ConnectFragment.java
package com.journaldev.navigationdrawer;

import android.os.Bundle;
import android.support.v4.app.Fragment;
import android.view.LayoutInflater;
import android.view.View;
import android.view.ViewGroup;

public class ConnectFragment extends Fragment {

    public ConnectFragment() {
    }

    @Override
    public View onCreateView(LayoutInflater inflater, ViewGroup container, Bundle savedInstanceState) {

        View rootView = inflater.inflate(R.layout.fragment_connect, container, false);

        return rootView;
    }

}
تم تعريف تخطيط الفراغ أعلاه أدناه. fragment_connect.xml
<RelativeLayout xmlns:android="https://schemas.android.com/apk/res/android"
    xmlns:tools="https://schemas.android.com/tools"
    android:layout_width="match_parent"
    android:layout_height="match_parent"
    android:orientation="vertical">


    <TextView
        android:id="@+id/label"
        android:layout_alignParentTop="true"
        android:layout_marginTop="100dp"
        android:layout_width="fill_parent"
        android:layout_height="wrap_content"
        android:gravity="center_horizontal"
        android:textSize="45dp"
        android:text="Connect"
        android:textStyle="bold"/>

    <TextView
        android:layout_below="@id/label"
        android:layout_centerInParent="true"
        android:layout_width="fill_parent"
        android:layout_height="wrap_content"
        android:textSize="12dp"
        android:layout_marginTop="10dp"
        android:gravity="center_horizontal"
        android:text="Edit fragment_connect.xml to change the appearance"
        android:id="@+id/textView2" />

</RelativeLayout>
البنود الأخرى يتم تعريفها بنفس الطريقة كما هو موضح أعلاه لذا سنتجاهلها هنا.
مثال على درجة السحب لـ Android
أدناه هو الإخراج الناتج عن تطبيقنا مثال على درجة السحب لـ Android.  ينهي هذا درس مثال درجة السحب لنظام Android. يمكنك تنزيل المشروع النهائي مشروع درجة السحب لنظام Android من الرابط أدناه.
Source:
https://www.digitalocean.com/community/tutorials/android-navigation-drawer-example-tutorial


