في هذا البرنامج التعليمي، سنتطلع بعمق على الميزات التي يوفرها Android TextInputLayout لنا. Android TextInputLayout هو عنصر تصميم يأتي مع مكتبة دعم تصميم المواد.
Android TextInputLayout
يوسع Android TexInputLayout LinearLayout. الاستخدام الأساسي لـ TextInputLayout هو العمل كغلاف لـ EditText (أو أحد أحفادها) وتمكين تحريك تلميحات العنوان. قاعدة عامة: يجب أن يكون TextInputLayout يحتوي على TextInputEditText بدلاً من الـ EditText العادي. لماذا؟ TextInputEditText هو فئة فرعية من EditText ومصممة للاستخدام كطفل لـ TextInputLayout. علاوة على ذلك، ستظهر تحذيرًا إذا تم استخدام EditText بدلاً من ذلك : تمت إضافة EditText وليس TextInputEditText. يرجى التبديل إلى استخدام تلك الفئة بدلاً من ذلك. TextInputLayout يقدم الكثير أكثر من عرض تسميات تلميح عائمة.
ميزات Android TextInputLayout
بعض الميزات التي سنغطيها في هذا البرنامج التعليمي هي:
- تمكين/تعطيل تسميات العناوين العائمة
- تمكين/تعطيل تحريك تسميات العناوين العائمة
- عرض رسائل الخطأ
- عرض عداد الأحرف
- التنبيه للمستخدم عند تجاوز عدد الأحرف الخاصة به
- تخصيص مظهر النص لتلميح عائم، وعلامة الخطأ، وعداد الأحرف
- زر تبديل رؤية كلمة المرور
سنتناول كل من هذه الميزات ونقوم بتنفيذها في مشروع Android Studio.
مثال على هيكل مشروع Android TextInputLayout
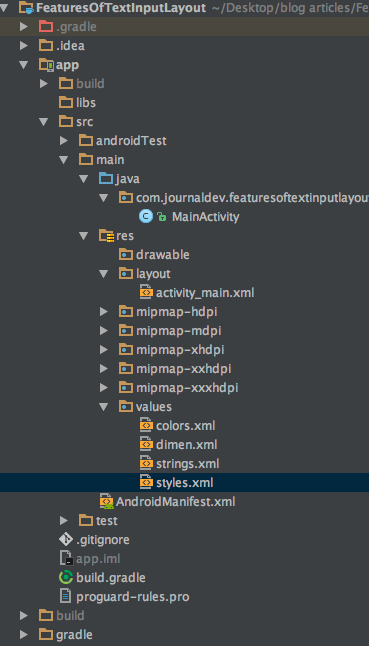 هذا هو تطبيق نشاط واحد. سنقوم بفعل كل شيء داخل تخطيط، نشاط، وملفات
 styles.xml و colors.xml. أولاً، قم بإضافة التبعية لمكتبة دعم التصميم داخل ملف build.gradle كما هو موضح أدناه.
compile 'com.android.support:design:25.3.1'
تمكين/تعطيل تلميحات الطفو
تم تمكين تلميحات الطفو بشكل افتراضي في TextInputLayout. لتعطيلها، نحتاج إلى إضافة السمة التالية داخل العلامة: app:hintEnabled="false". الشيفرة البرمجية XML أدناه هي من تخطيط activity_main.xml وتحتوي على ثلاث حقول EditText.
<?xml version="1.0" encoding="utf-8"?>
<ScrollView xmlns:android="https://schemas.android.com/apk/res/android"
    xmlns:app="https://schemas.android.com/apk/res-auto"
    xmlns:tools="https://schemas.android.com/tools"
    android:layout_width="match_parent"
    android:layout_height="wrap_content"
    tools:context="com.journaldev.featuresoftextinputlayout.MainActivity">

    <LinearLayout
        android:layout_width="match_parent"
        android:layout_height="wrap_content"
        android:orientation="vertical">


        <android.support.design.widget.TextInputEditText
            android:layout_width="match_parent"
            android:layout_height="wrap_content"
            android:layout_margin="@dimen/activity_horizontal_margin"
            android:hint="TextInputEditText" />


        <android.support.design.widget.TextInputLayout
            android:layout_width="match_parent"
            android:layout_height="match_parent"
            android:layout_margin="@dimen/activity_horizontal_margin">

            <android.support.design.widget.TextInputEditText
                android:layout_width="match_parent"
                android:layout_height="wrap_content"
                android:hint="Floating Hint Enabled Default" />

        </android.support.design.widget.TextInputLayout>


        <android.support.design.widget.TextInputLayout
            android:layout_width="match_parent"
            android:layout_height="wrap_content"
            android:layout_margin="@dimen/activity_horizontal_margin"
            app:hintEnabled="false">

            <android.support.design.widget.TextInputEditText
                android:layout_width="match_parent"
                android:layout_height="wrap_content"
                android:hint="Floating Hint Disabled" />

        </android.support.design.widget.TextInputLayout>

</LinearLayout>
</ScrollView>
تم تعطيل تلميح العنصر EditText الثالث العائم. دعنا نرى الناتج الذي يعطيه الكود أعلاه: 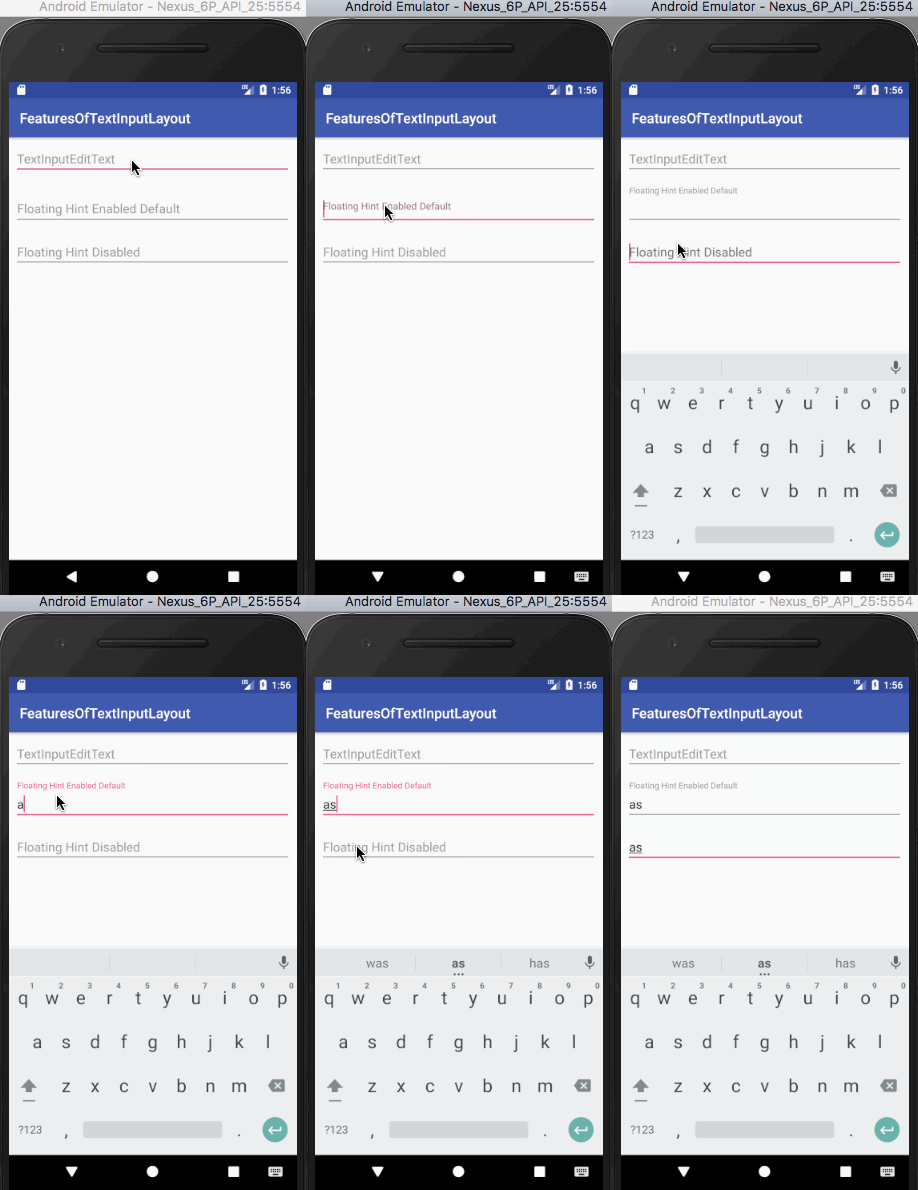
تمكين/تعطيل تحريك تلميح العنصر العائم
على غرار الميزة السابقة، يتم تمكين تحريك تلميح العنصر العائم افتراضيًا. لتعطيله، نحتاج إلى إضافة السمة التالية داخل علامة TextInputLayout. app:hintAnimationEnabled="false" الشيفرة البرمجية XML أدناه هي من تخطيط activity_main.xml وتحتوي على حقول EditText لأي من الحالتين.
<?xml version="1.0" encoding="utf-8"?>
<ScrollView xmlns:android="https://schemas.android.com/apk/res/android"
    xmlns:app="https://schemas.android.com/apk/res-auto"
    xmlns:tools="https://schemas.android.com/tools"
    android:layout_width="match_parent"
    android:layout_height="wrap_content"
    tools:context="com.journaldev.featuresoftextinputlayout.MainActivity">

    <LinearLayout
        android:layout_width="match_parent"
        android:layout_height="wrap_content"
        android:orientation="vertical">

        <android.support.design.widget.TextInputLayout
            android:layout_width="match_parent"
            android:layout_height="match_parent"
            android:layout_margin="@dimen/activity_horizontal_margin">

            <android.support.design.widget.TextInputEditText
                android:layout_width="match_parent"
                android:layout_height="wrap_content"
                android:hint="Floating Hint Enabled Default" />

        </android.support.design.widget.TextInputLayout>


        <android.support.design.widget.TextInputLayout
            android:layout_width="match_parent"
            android:layout_height="wrap_content"
            android:layout_margin="@dimen/activity_horizontal_margin"
            app:hintAnimationEnabled="false">

            <android.support.design.widget.TextInputEditText
                android:layout_width="match_parent"
                android:layout_height="wrap_content"
                android:hint="Hint Animation Disabled" />

        </android.support.design.widget.TextInputLayout>

</LinearLayout>
</ScrollView>
يظهر الناتج من الكود أعلاه أدناه. 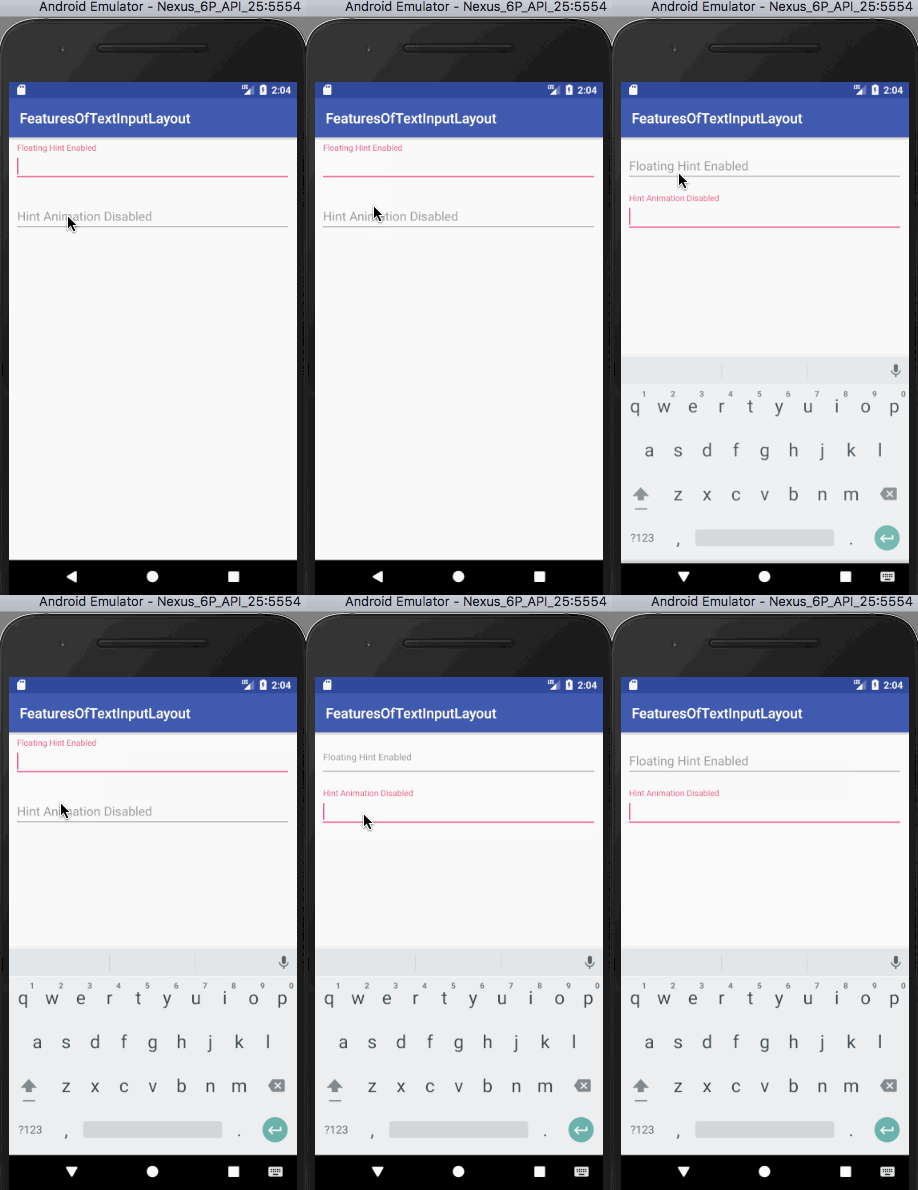 يجدر بالذكر أن العنصر EditText الثاني لا يقوم بتحريك تلميحه العائم عند التركيز.
تنسيق نص التلميح TextAppearance
لاستخدام ألوان وأحجام نص مخصصة للتلميحات، يتم استخدام السمة التالية: app:hintTextAppearance="@style/HintText" يتم كتابة نمط HintText داخل ملف styles.xml كما هو موضح أدناه.
<style name="HintText" parent="TextAppearance.Design.Hint">
        <item name="android:textSize">16sp</item>
        <item name="android:textColor">@color/colorPrimary</item>
    </style>
الكود XML التالي هو من تخطيط activity_main.xml ويحتوي على حقول إدخال النص سواء مع أو بدون استخدام hintTextAppearance.
<?xml version="1.0" encoding="utf-8"?>
<ScrollView xmlns:android="https://schemas.android.com/apk/res/android"
    xmlns:app="https://schemas.android.com/apk/res-auto"
    xmlns:tools="https://schemas.android.com/tools"
    android:layout_width="match_parent"
    android:layout_height="wrap_content"
    tools:context="com.journaldev.featuresoftextinputlayout.MainActivity">

    <LinearLayout
        android:layout_width="match_parent"
        android:layout_height="wrap_content"
        android:orientation="vertical">

        <android.support.design.widget.TextInputLayout
            android:layout_width="match_parent"
            android:layout_height="match_parent"
            android:layout_margin="@dimen/activity_horizontal_margin">

            <android.support.design.widget.TextInputEditText
                android:layout_width="match_parent"
                android:layout_height="wrap_content"
                android:hint="Floating Hint Enabled" />

        </android.support.design.widget.TextInputLayout>


        <android.support.design.widget.TextInputLayout
            android:layout_width="match_parent"
            android:layout_height="match_parent"
            android:layout_margin="@dimen/activity_horizontal_margin"
            app:hintTextAppearance="@style/HintText">

            <android.support.design.widget.TextInputEditText
                android:layout_width="match_parent"
                android:layout_height="wrap_content"
                android:hint="Custom Hint TextAppearance" />

        </android.support.design.widget.TextInputLayout>

</LinearLayout>
</ScrollView>
يتم عرض نتيجة الكود أعلاه كما هو مبين أدناه. 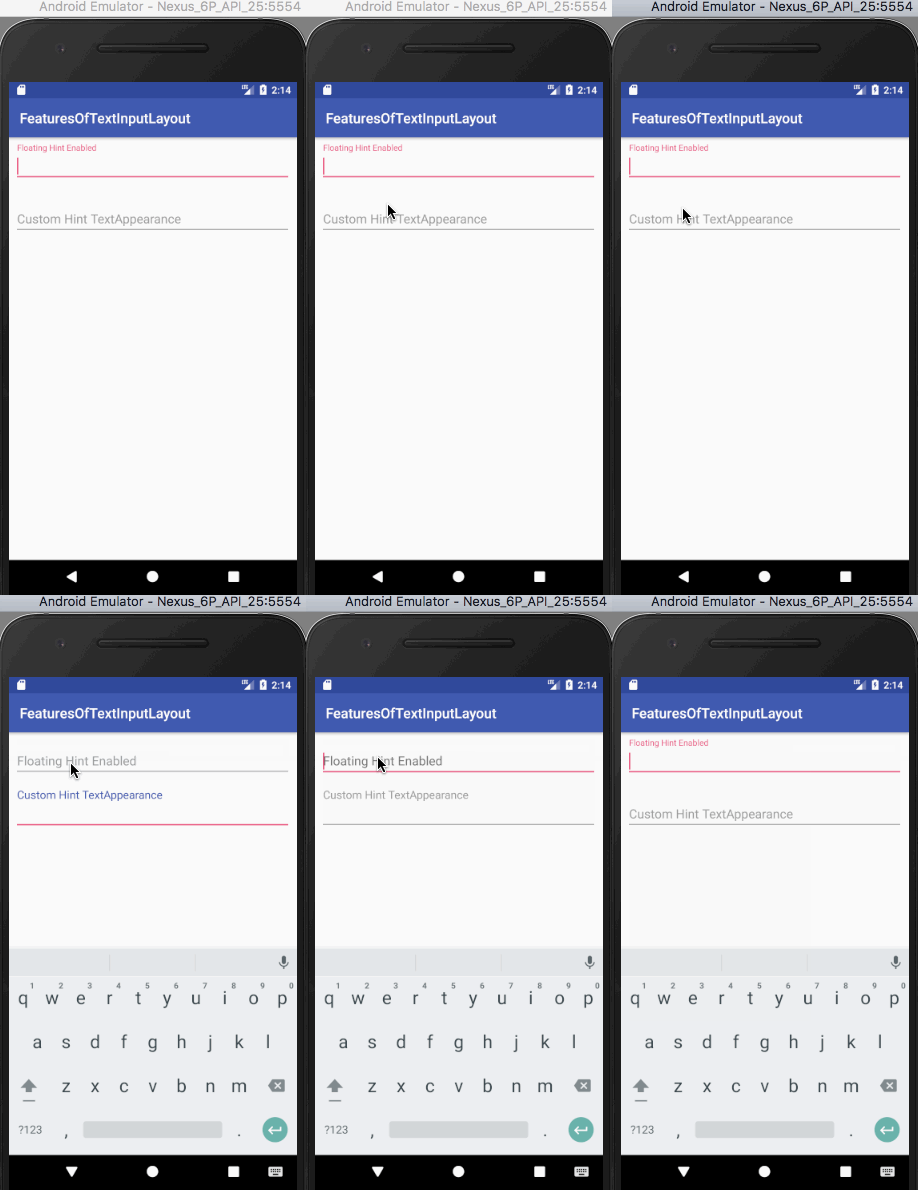
عداد الأحرف
عداد الأحرف هو ميزة تستخدمها العديد من التطبيقات. (تذكر حد الأحرف في Twitter؟). قم بتعيين app:counterEnabled إلى true و app:counterMaxLength بأقصى عدد من الأحرف التي ترغب فيها في TextInputLayout. يتم عرض عداد الأحرف بشكل افتراضي أسفل حقل إدخال النص (أسفل اليمين) وأثناء كتابة هذا البرنامج التعليمي، لا يوجد طريقة لتغيير الموضع حتى الآن. تنسيق عداد الأحرف مشابه لتنسيق نص التلميح. app:counterTextAppearance هي السمة المستخدمة في هذا الوقت. قمنا بإضافة النمط التالي داخل ملف styles.xml في مشروعنا.
<style name="CounterText" parent="TextAppearance.Design.Counter">
        <item name="android:textSize">16sp</item>
        <item name="android:textColor">@color/my_pink</item>
    </style>
الكود XML التالي هو من تخطيط activity_main.xml ويحتوي على حقول إدخال النص مع عداد أحرف افتراضي وآخر مخصص.
<?xml version="1.0" encoding="utf-8"?>
<ScrollView xmlns:android="https://schemas.android.com/apk/res/android"
    xmlns:app="https://schemas.android.com/apk/res-auto"
    xmlns:tools="https://schemas.android.com/tools"
    android:layout_width="match_parent"
    android:layout_height="wrap_content"
    tools:context="com.journaldev.featuresoftextinputlayout.MainActivity">

    <LinearLayout
        android:layout_width="match_parent"
        android:layout_height="wrap_content"
        android:orientation="vertical">

        <android.support.design.widget.TextInputLayout
            android:layout_width="match_parent"
            android:layout_height="wrap_content"
            android:layout_margin="@dimen/activity_horizontal_margin"
            app:counterEnabled="true"
            app:counterMaxLength="5"
            app:hintTextAppearance="@style/HintText">

            <android.support.design.widget.TextInputEditText
                android:layout_width="match_parent"
                android:layout_height="wrap_content"
                android:hint="Character Counter Limit 10" />

        </android.support.design.widget.TextInputLayout>


        <android.support.design.widget.TextInputLayout
            android:layout_width="match_parent"
            android:layout_height="wrap_content"
            android:layout_margin="@dimen/activity_horizontal_margin"
            app:counterEnabled="true"
            app:counterMaxLength="5"
            app:counterTextAppearance="@style/CounterText"
            app:hintTextAppearance="@style/HintText">

            <android.support.design.widget.TextInputEditText
                android:layout_width="match_parent"
                android:layout_height="wrap_content"
                android:hint="Character Counter Custom TextAppearance" />

        </android.support.design.widget.TextInputLayout>

</LinearLayout>
</ScrollView>
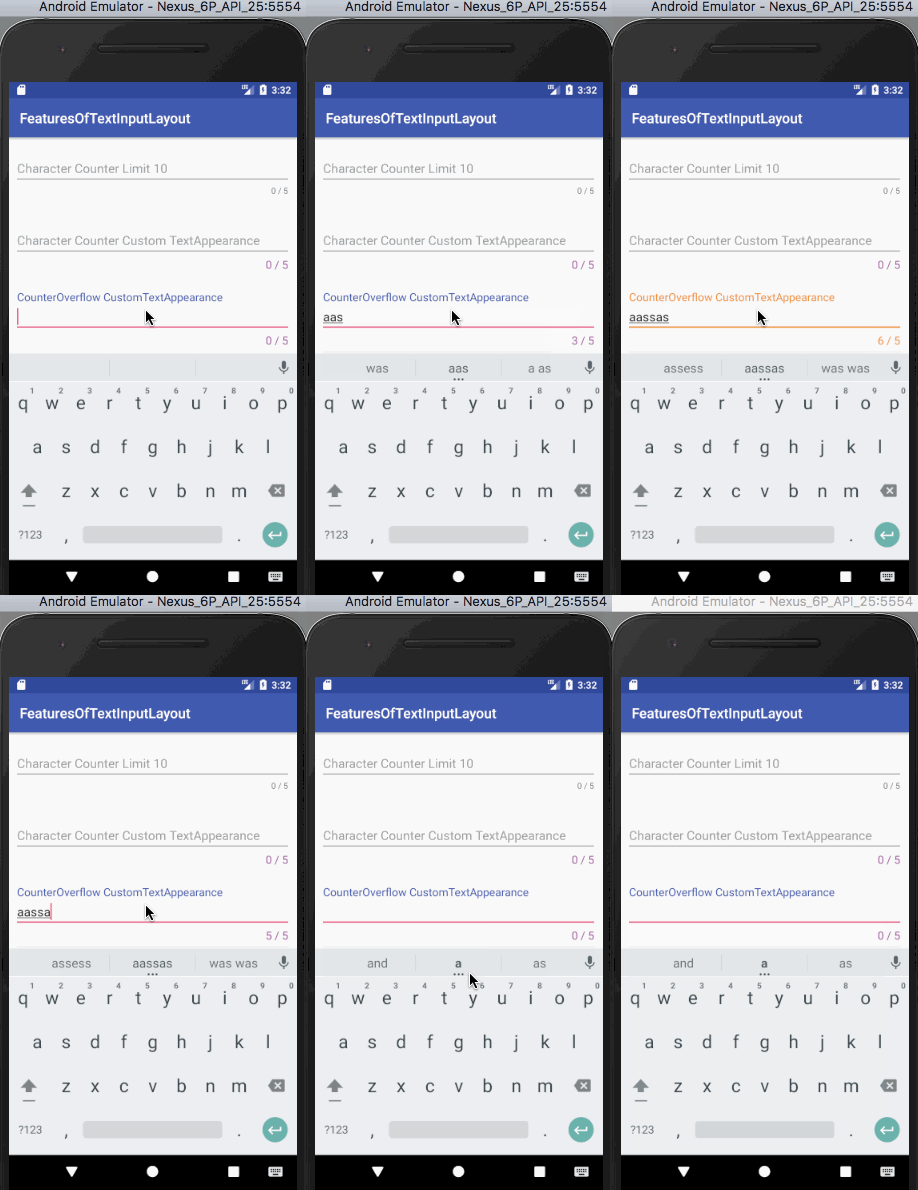
إليك الناتج من الكود أعلاه. 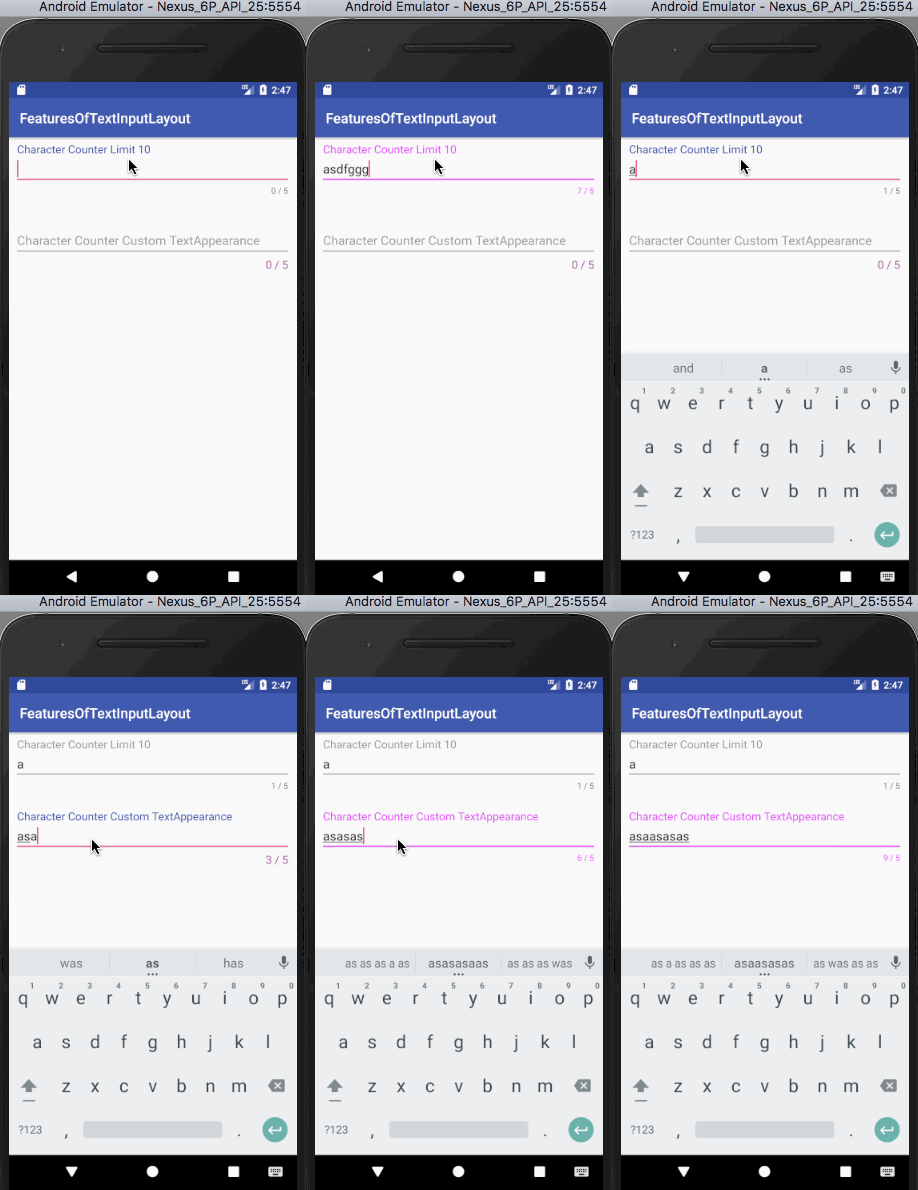 دعنا نلاحظ الناتج أعلاه بعناية.
- يتغير لون النص الموجود في حقل EditText الأول، ولون التلميح ولون المؤشر عند تجاوز عدد الأحرف.
- يقوم حقل EditText الثاني بنفس الأمر، ولكنه أيضًا يغير لون النص المخصص للعداد وحجم النص المخصص عند تجاوز الحد.
لتحديد النمط الذي نحتاجه عند تجاوز عداد الأحرف لحدوده، نحتاج إلى استخدام سمة counterFlow التي سنراها في الخطوة التالية.
تجاوز عداد الأحرف
كما رأينا في الأعلى عند تجاوز عدد الأحرف الحد المحدد، يستخدم النص الموجود في العداد السمات المحددة في counterFlow. إذا لم تكن السمات موجودة، فسيستمر في استخدام السمات الافتراضية كما رأينا في الناتج أعلاه. نحتاج إلى استخدام المعلمة التالية app:counterOverflowTextAppearance النمط الخاص بـ CounterOverflow موجود داخل styles.xml:
 <style name="CounterOverFlow" parent="TextAppearance.Design.Counter.Overflow">
        <item name="android:textSize">16sp</item>
        <item name="android:textColor">@color/my_orange</item>
    </style>
أضف قطعة الكود التالية إلى تخطيط activity_main.xml السابق:
<android.support.design.widget.TextInputLayout
            android:layout_width="match_parent"
            android:layout_height="wrap_content"
            android:layout_margin="@dimen/activity_horizontal_margin"
            app:counterEnabled="true"
            app:counterMaxLength="5"
            app:counterOverflowTextAppearance="@style/CounterOverFlow"
            app:counterTextAppearance="@style/CounterText"
            app:hintTextAppearance="@style/HintText">

            <android.support.design.widget.TextInputEditText
                android:layout_width="match_parent"
                android:layout_height="wrap_content"
                android:hint="CounterOverflow CustomTextAppearance" />

        </android.support.design.widget.TextInputLayout>
تسمية الخطأ
إعداد app:errorEnabled على true يتيح لنا عرض نص خطأ في حالة معينة تحت حقل EditText الخاص بنا. لتنسيق نص الخطأ، سنستخدم السمة app:errorTextAppearance ونضيف الكود التالي داخل ملف styles.xml.
<style name="ErrorText" parent="TextAppearance.Design.Error">
        <item name="android:textSize">16sp</item>
        <item name="android:textColor">@color/my_black</item>
    </style>
الكود الـ XML أدناه هو من تخطيط activity_main.xml ويحتوي على حقول EditText لتسمية خطأ افتراضية وخصصة.
<?xml version="1.0" encoding="utf-8"?>
<ScrollView xmlns:android="https://schemas.android.com/apk/res/android"
    xmlns:app="https://schemas.android.com/apk/res-auto"
    xmlns:tools="https://schemas.android.com/tools"
    android:layout_width="match_parent"
    android:layout_height="wrap_content"
    tools:context="com.journaldev.featuresoftextinputlayout.MainActivity">

    <LinearLayout
        android:layout_width="match_parent"
        android:layout_height="wrap_content"
        android:orientation="vertical">

        <android.support.design.widget.TextInputLayout
            android:id="@+id/errorInputLayout"
            android:layout_width="match_parent"
            android:layout_height="wrap_content"
            android:layout_margin="@dimen/activity_horizontal_margin"
            app:counterEnabled="true"
            app:counterMaxLength="5"
            app:counterOverflowTextAppearance="@style/CounterOverFlow"
            app:counterTextAppearance="@style/CounterText"
            app:errorEnabled="true"
            app:hintTextAppearance="@style/HintText">

            <android.support.design.widget.TextInputEditText
                android:id="@+id/errorEditText"
                android:layout_width="match_parent"
                android:layout_height="wrap_content"
                android:hint="Default Error Label" />

        </android.support.design.widget.TextInputLayout>


        <android.support.design.widget.TextInputLayout
            android:id="@+id/customErrorInputLayout"
            android:layout_width="match_parent"
            android:layout_height="wrap_content"
            android:layout_margin="@dimen/activity_horizontal_margin"
            app:counterEnabled="true"
            app:counterMaxLength="5"
            app:counterOverflowTextAppearance="@style/CounterOverFlow"
            app:counterTextAppearance="@style/CounterText"
            app:errorEnabled="true"
            app:errorTextAppearance="@style/ErrorText"
            app:hintTextAppearance="@style/HintText">

            <android.support.design.widget.TextInputEditText
                android:id="@+id/customErrorEditText"
                android:layout_width="match_parent"
                android:layout_height="wrap_content"
                android:hint="Custom Error Label" />

        </android.support.design.widget.TextInputLayout>

</LinearLayout>
</ScrollView>
لعرض نص الخطأ، سيتعين علينا استدعاء الطريقة setError(String) على مثيل من TextInputLayout في فئة MainActivity.java كما هو موضح أدناه.
package com.journaldev.featuresoftextinputlayout;

import android.support.design.widget.TextInputEditText;
import android.support.design.widget.TextInputLayout;
import android.support.v7.app.AppCompatActivity;
import android.os.Bundle;
import android.text.Editable;
import android.text.TextWatcher;

public class MainActivity extends AppCompatActivity {


    TextInputLayout errorInputLayout, customErrorInputLayout;
    TextInputEditText errorEditText, customErrorEditText;

    @Override
    protected void onCreate(Bundle savedInstanceState) {
        super.onCreate(savedInstanceState);
        setContentView(R.layout.activity_main);

        errorEditText = (TextInputEditText) findViewById(R.id.errorEditText);
        errorInputLayout = (TextInputLayout) findViewById(R.id.errorInputLayout);

        customErrorEditText = (TextInputEditText) findViewById(R.id.customErrorEditText);
        customErrorInputLayout = (TextInputLayout) findViewById(R.id.customErrorInputLayout);

        errorEditText.addTextChangedListener(new TextWatcher() {
            @Override
            public void beforeTextChanged(CharSequence s, int start, int count, int after) {

            }

            @Override
            public void onTextChanged(CharSequence s, int start, int before, int count) {

            }

            @Override
            public void afterTextChanged(Editable s) {

                if (s.length() > errorInputLayout.getCounterMaxLength())
                    errorInputLayout.setError("Max character length is " + errorInputLayout.getCounterMaxLength());
                else
                    errorInputLayout.setError(null);

            }
        });

        customErrorEditText.addTextChangedListener(new TextWatcher() {
            @Override
            public void beforeTextChanged(CharSequence s, int start, int count, int after) {

            }

            @Override
            public void onTextChanged(CharSequence s, int start, int before, int count) {

            }

            @Override
            public void afterTextChanged(Editable s) {

                if (s.length() > customErrorInputLayout.getCounterMaxLength())
                    customErrorInputLayout.setError("Max character length is " + customErrorInputLayout.getCounterMaxLength());
                else
                    customErrorInputLayout.setError(null);

            }
        });


    }
}
في الكود أعلاه، نقوم بإضافة TextChangedListener (الذي ينفذ TextWatcher) على كل حالة من TextInputEditText. نقوم بعرض تسمية الخطأ عندما يتجاوز عدد الأحرف الحالي الحد الأقصى للعداد. لمسح تسمية الخطأ، نقوم بتعيين القيمة داخل setError() كـ null. الناتج الذي يعطينا الكود أعلاه هو: 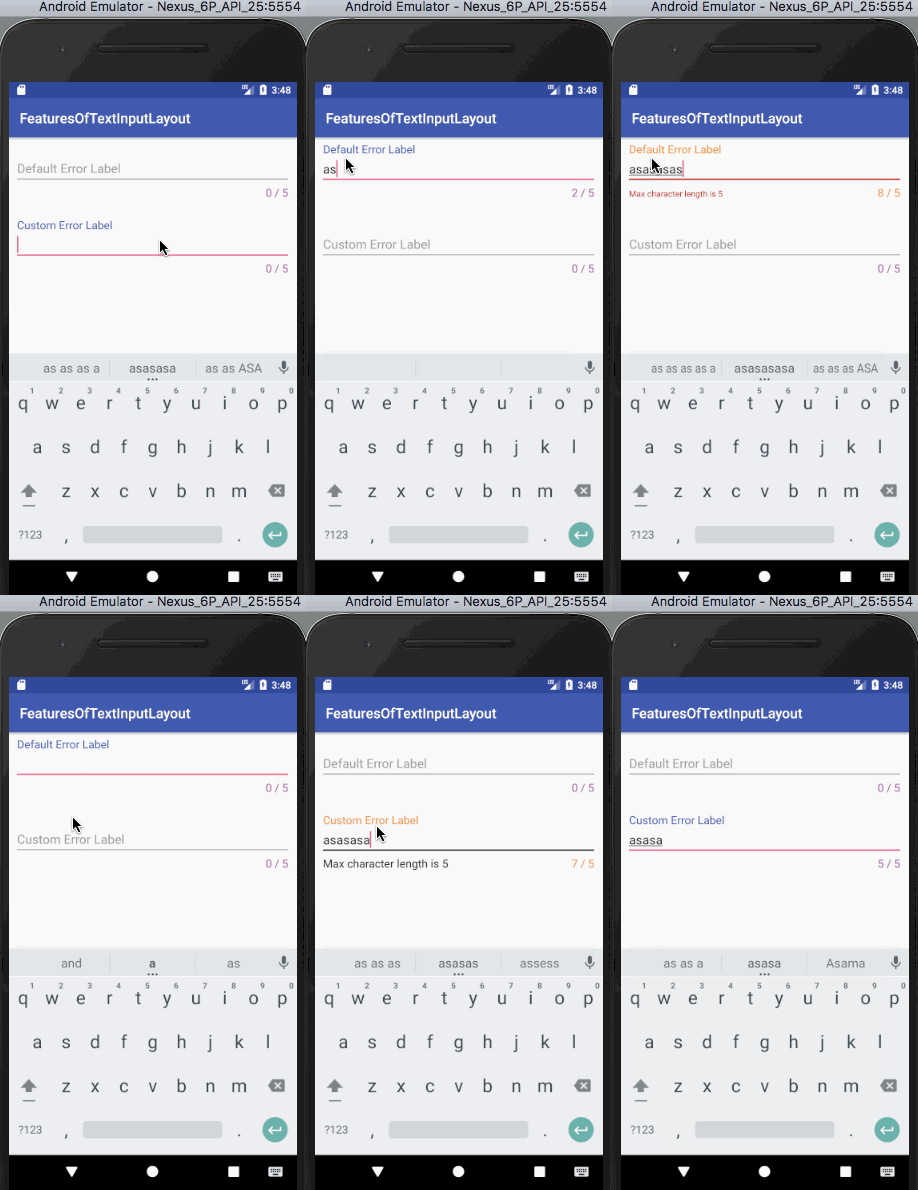 ملاحظة: مؤشر حقل النص يستخدم نفس لون تسمية الخطأ. يتجاوز اللون الذي يتم تعيينه بواسطة counterOverflow لذلك يكون له أعلى أولوية.
عرض تبديل كلمة المرور
ضبط app:passwordToggleEnabled إلى true يتيح لك إظهار/إخفاء كلمة المرور. لتغيير لون الأيقونة، استخدم app:passwordToggleTint. الكود الـ xml أدناه هو من تخطيط activity_main.xml ويحتوي على حقول EditText لتبديل رؤية كلمة المرور (أيقونة افتراضية ومع تظليل)
<?xml version="1.0" encoding="utf-8"?>
<ScrollView xmlns:android="https://schemas.android.com/apk/res/android"
    xmlns:app="https://schemas.android.com/apk/res-auto"
    xmlns:tools="https://schemas.android.com/tools"
    android:layout_width="match_parent"
    android:layout_height="wrap_content"
    tools:context="com.journaldev.featuresoftextinputlayout.MainActivity">

    <LinearLayout
        android:layout_width="match_parent"
        android:layout_height="wrap_content"
        android:orientation="vertical">

        <android.support.design.widget.TextInputLayout
            android:layout_width="match_parent"
            android:layout_height="wrap_content"
            android:layout_margin="@dimen/activity_horizontal_margin"
            app:counterEnabled="true"
            app:counterMaxLength="5"
            app:counterOverflowTextAppearance="@style/CounterOverFlow"
            app:counterTextAppearance="@style/CounterText"
            app:hintTextAppearance="@style/HintText"
            app:passwordToggleEnabled="true">

            <android.support.design.widget.TextInputEditText
                android:layout_width="match_parent"
                android:layout_height="wrap_content"
                android:hint="Password Visibility Toggle"
                android:inputType="textPassword" />

        </android.support.design.widget.TextInputLayout>


        <android.support.design.widget.TextInputLayout
            android:layout_width="match_parent"
            android:layout_height="wrap_content"
            android:layout_margin="@dimen/activity_horizontal_margin"
            app:counterEnabled="true"
            app:counterMaxLength="5"
            app:counterOverflowTextAppearance="@style/CounterOverFlow"
            app:counterTextAppearance="@style/CounterText"
            app:hintTextAppearance="@style/HintText"
            app:passwordToggleEnabled="true"
            app:passwordToggleTint="@color/my_orange">

            <android.support.design.widget.TextInputEditText
                android:layout_width="match_parent"
                android:layout_height="wrap_content"
                android:hint="Password Visibility Toggle Tint"
                android:inputType="textPassword" />

        </android.support.design.widget.TextInputLayout>
</LinearLayout>
</ScrollView>
الناتج الذي يظهره الشيفرة أعلاه هو: 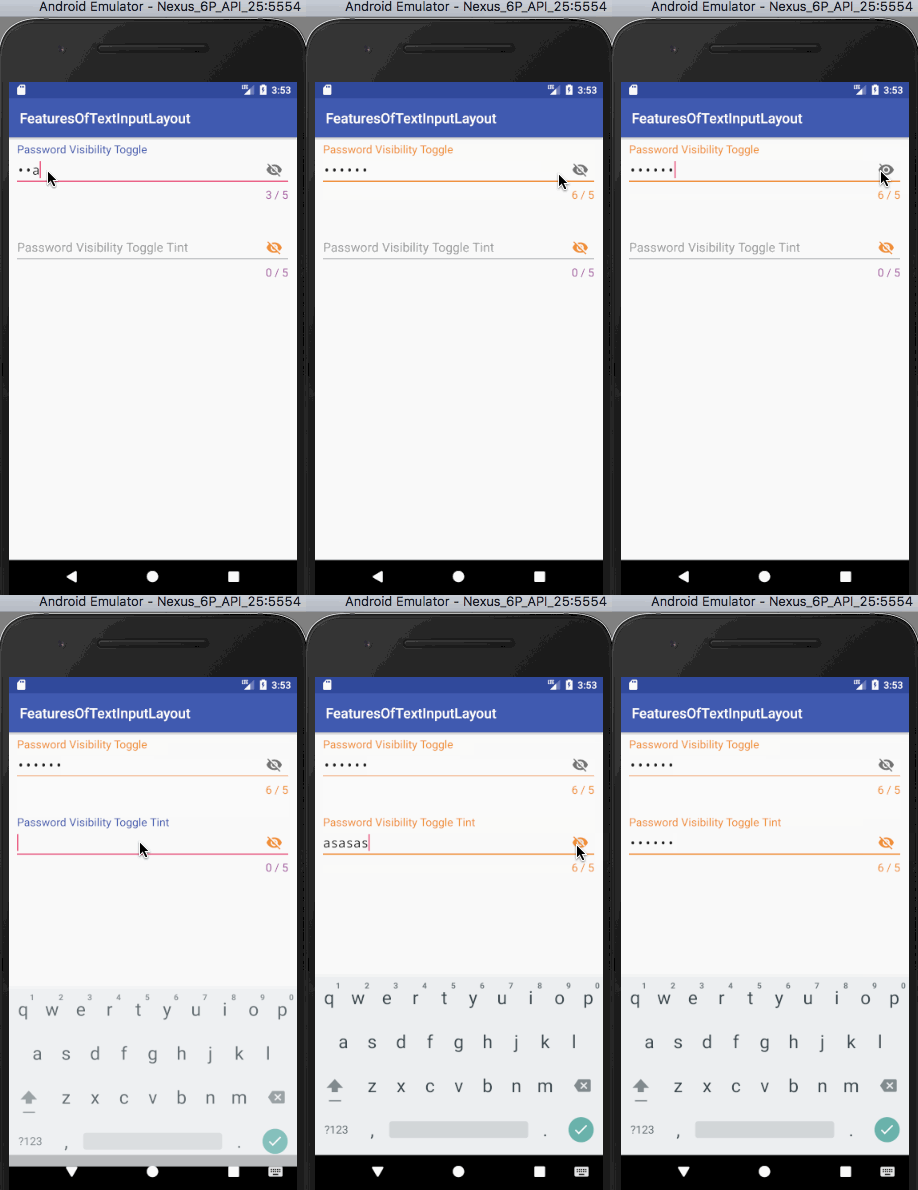 ملحوظة: يمكننا استخدام رموزنا المخصصة الخاصة بالرؤية لتبديل كلمة المرور باستخدام
 app:passwordToggleDrawable. وبهذا ننهي هذا البرنامج التعليمي. لقد قمنا بتغطية جميع الميزات الرئيسية الموجودة في TextInputLayout. يمكنك تنزيل مشروع مثال Android TextInputLayout من الرابط أدناه. يتضمن كل قطعة من الشيفرة أعلاه.
تنزيل مشروع Android TextInputLayout
المرجع: مستندات Android الرسمية
Source:
https://www.digitalocean.com/community/tutorials/android-textinputlayout-example


