مرحبًا بك في مثال خدمات الويب القائمة على Spring Restful و XML و JSON. قبل فترة من الزمن ، كتبت مقالًا حول “Spring REST JSON” ولقد تلقيت الكثير من التعليقات تسأل عن كيفية تغيير البرنامج لدعم XML. تلقيت أيضًا بعض رسائل البريد الإلكتروني تسأل عن كيفية جعل التطبيق يدعم كل من XML و JSON.
Spring REST XML و JSON
I thought to write an article about Spring REST XML and JSON application where I will show you how easily we can extend the existing application to support XML. Since I will be making changes to the existing project, make sure you first download it from below link.
تنزيل مشروع Spring Restful Webservice
قم الآن بإجراء التغييرات التالية في ملف تكوين حبوب الربيع.
-
تحديد حبوب من نوع
Jaxb2RootElementHttpMessageConverter.<beans:bean id="xmlMessageConverter" class="org.springframework.http.converter.xml.Jaxb2RootElementHttpMessageConverter"> </beans:bean> -
إضافة الحبوب المكونة أعلاه إلى خاصية
messageConvertersفيRequestMappingHandlerAdapter.<beans:bean class="org.springframework.web.servlet.mvc.method.annotation.RequestMappingHandlerAdapter"> <beans:property name="messageConverters"> <beans:list> <beans:ref bean="jsonMessageConverter"/> <beans:ref bean="xmlMessageConverter"/> </beans:list> </beans:property> </beans:bean>
بعد التغييرات السابقة، ستبدو ملف تكوين الفاصلة النهائي لدينا على النحو التالي. servlet-context.xml
<?xml version="1.0" encoding="UTF-8"?>
<beans:beans xmlns="https://www.springframework.org/schema/mvc"
xmlns:xsi="https://www.w3.org/2001/XMLSchema-instance"
xmlns:beans="https://www.springframework.org/schema/beans"
xmlns:context="https://www.springframework.org/schema/context"
xsi:schemaLocation="https://www.springframework.org/schema/mvc https://www.springframework.org/schema/mvc/spring-mvc.xsd
https://www.springframework.org/schema/beans https://www.springframework.org/schema/beans/spring-beans.xsd
https://www.springframework.org/schema/context https://www.springframework.org/schema/context/spring-context.xsd">
<!-- DispatcherServlet Context: defines this servlet's request-processing infrastructure -->
<!-- Enables the Spring MVC @Controller programming model -->
<annotation-driven />
<!-- Handles HTTP GET requests for /resources/** by efficiently serving up static resources in the ${webappRoot}/resources directory -->
<resources mapping="/resources/**" location="/resources/" />
<!-- Resolves views selected for rendering by @Controllers to .jsp resources in the /WEB-INF/views directory -->
<beans:bean class="org.springframework.web.servlet.view.InternalResourceViewResolver">
<beans:property name="prefix" value="/WEB-INF/views/" />
<beans:property name="suffix" value=".jsp" />
</beans:bean>
<!-- Configure to plugin JSON as request and response in method handler -->
<beans:bean class="org.springframework.web.servlet.mvc.method.annotation.RequestMappingHandlerAdapter">
<beans:property name="messageConverters">
<beans:list>
<beans:ref bean="jsonMessageConverter"/>
<beans:ref bean="xmlMessageConverter"/>
</beans:list>
</beans:property>
</beans:bean>
<!-- Configure bean to convert JSON to POJO and vice versa -->
<beans:bean id="jsonMessageConverter" class="org.springframework.http.converter.json.MappingJackson2HttpMessageConverter">
</beans:bean>
<beans:bean id="xmlMessageConverter" class="org.springframework.http.converter.xml.Jaxb2RootElementHttpMessageConverter">
</beans:bean>
<context:component-scan base-package="com.journaldev.spring.controller" />
</beans:beans>
نحن نعلم أنه للعمل مع تجزئة JAXB لفئة، نحتاج لتعليقها بتعليق @XmlRootElement. لذا أضف هذا إلى فئة النموذج الخاصة بنا Employee. Employee.java
@XmlRootElement
public class Employee implements Serializable{

//لا يوجد تغيير في الكود
}
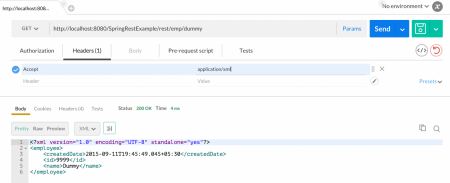
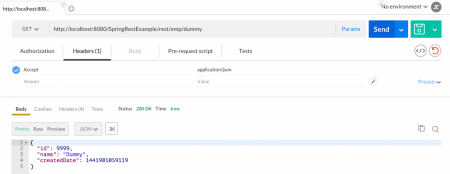
هذا هو، انتهينا. ستدعم تطبيقنا الربيع كل من تنسيق JSON وتنسيق XML. سيدعم حتى طلب XML مع استجابة JSON والعكس بالعكس. فيما يلي بعض لقطات الشاشة التي توضح ذلك في العمل. ملاحظة: أستخدم تطبيق Postman Chrome لهذا الغرض، يمكنك استخدام أي عميل REST للاختبار. 1. استجابة XML: تأكد من تمرير رأس الطلب “Accept” كـ “application/xml”.  2. استجابة JSON: تأكد من تمرير رأس الطلب “Accept” كـ “application/json”.
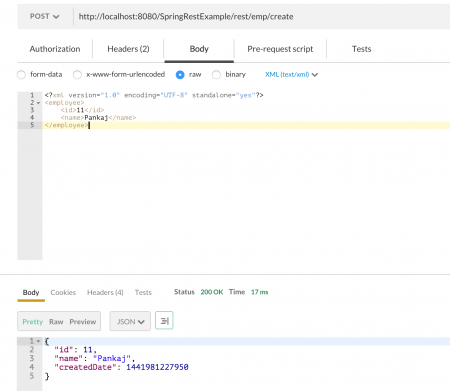
  3. طلب XML مع استجابة JSON: تأكد من أن رأس الطلب “Accept” هو “application/json” ورأس النوع المحتوى “Content-Type” هو “text/xml” كما هو موضح في الصور التالية.
 هذا كل ما يتعلق بمثال خدمات الويب الراحة في الربيع لدعم كل من XML و JSON. يمكنك أن ترى مدى سهولة توسيع إطار الربيع، وهذا هو أحد الأسباب الرئيسية لشهرة إطار الربيع.
Source:
https://www.digitalocean.com/community/tutorials/spring-rest-xml-and-json-example


