


الربيع هو واحد من أكثر الأطر Java EE استخداماً. لقد رأينا في وقت سابق كيفية استخدام Spring MVC لإنشاء تطبيقات الويب بناءً على Java. اليوم سنتعلم كيفية إنشاء خدمات الويب الراحية في الربيع باستخدام Spring MVC ومن ثم اختبارها باستخدام عميل Rest. في النهاية، سننظر أيضًا في كيفية استدعاء خدمة الويب الراحية في الربيع باستخدام واجهة برمجة تطبيقات Spring RestTemplate. 
الربيع REST
سنستخدم أحدث إصدار لـ Spring 4.0.0.RELEASE ونستفيد من تكامل Spring Jackson JSON لإرسال الاستجابة JSON في استجابة استدعاء rest. تم تطوير البرنامج التعليمي في بيئة تطوير STS لإنشاء رمز قالب Spring MVC بسهولة ثم تم توسيعه لتنفيذ هندسة البرمجيات Restful. قم بإنشاء مشروع Spring MVC جديد في STS ، وسيبدو مشروعنا النهائي كما في الصورة أدناه. سنتطلع إلى كل من العناصر واحدا تلو الآخر. 
ملفات تكوين Spring REST XML
ملف pom.xml الخاص بنا يبدو كما يلي.
<?xml version="1.0" encoding="UTF-8"?>
<project xmlns="https://maven.apache.org/POM/4.0.0" xmlns:xsi="https://www.w3.org/2001/XMLSchema-instance"
	xsi:schemaLocation="https://maven.apache.org/POM/4.0.0 https://maven.apache.org/maven-v4_0_0.xsd">
	<modelVersion>4.0.0</modelVersion>
	<groupId>com.journaldev</groupId>
	<artifactId>SpringRestExample</artifactId>
	<name>SpringRestExample</name>
	<packaging>war</packaging>
	<version>1.0.0-BUILD-SNAPSHOT</version>
	<properties>
		<java-version>1.6</java-version>
		<org.springframework-version>4.0.0.RELEASE</org.springframework-version>
		<org.aspectj-version>1.7.4</org.aspectj-version>
		<org.slf4j-version>1.7.5</org.slf4j-version>
		<jackson.databind-version>2.2.3</jackson.databind-version>
	</properties>
	<dependencies>
		<!-- Jackson -->
		<dependency>
			<groupId>com.fasterxml.jackson.core</groupId>
			<artifactId>jackson-databind</artifactId>
			<version>${jackson.databind-version}</version>
		</dependency>
		<!-- Spring -->
		<dependency>
			<groupId>org.springframework</groupId>
			<artifactId>spring-context</artifactId>
			<version>${org.springframework-version}</version>
			<exclusions>
				<!-- Exclude Commons Logging in favor of SLF4j -->
				<exclusion>
					<groupId>commons-logging</groupId>
					<artifactId>commons-logging</artifactId>
				</exclusion>
			</exclusions>
		</dependency>
		<dependency>
			<groupId>org.springframework</groupId>
			<artifactId>spring-webmvc</artifactId>
			<version>${org.springframework-version}</version>
		</dependency>

		<!-- AspectJ -->
		<dependency>
			<groupId>org.aspectj</groupId>
			<artifactId>aspectjrt</artifactId>
			<version>${org.aspectj-version}</version>
		</dependency>

		<!-- Logging -->
		<dependency>
			<groupId>org.slf4j</groupId>
			<artifactId>slf4j-api</artifactId>
			<version>${org.slf4j-version}</version>
		</dependency>
		<dependency>
			<groupId>org.slf4j</groupId>
			<artifactId>jcl-over-slf4j</artifactId>
			<version>${org.slf4j-version}</version>
			<scope>runtime</scope>
		</dependency>
		<dependency>
			<groupId>org.slf4j</groupId>
			<artifactId>slf4j-log4j12</artifactId>
			<version>${org.slf4j-version}</version>
			<scope>runtime</scope>
		</dependency>
		<dependency>
			<groupId>log4j</groupId>
			<artifactId>log4j</artifactId>
			<version>1.2.15</version>
			<exclusions>
				<exclusion>
					<groupId>javax.mail</groupId>
					<artifactId>mail</artifactId>
				</exclusion>
				<exclusion>
					<groupId>javax.jms</groupId>
					<artifactId>jms</artifactId>
				</exclusion>
				<exclusion>
					<groupId>com.sun.jdmk</groupId>
					<artifactId>jmxtools</artifactId>
				</exclusion>
				<exclusion>
					<groupId>com.sun.jmx</groupId>
					<artifactId>jmxri</artifactId>
				</exclusion>
			</exclusions>
			<scope>runtime</scope>
		</dependency>

		<!-- @Inject -->
		<dependency>
			<groupId>javax.inject</groupId>
			<artifactId>javax.inject</artifactId>
			<version>1</version>
		</dependency>

		<!-- Servlet -->
		<dependency>
			<groupId>javax.servlet</groupId>
			<artifactId>servlet-api</artifactId>
			<version>2.5</version>
			<scope>provided</scope>
		</dependency>
		<dependency>
			<groupId>javax.servlet.jsp</groupId>
			<artifactId>jsp-api</artifactId>
			<version>2.1</version>
			<scope>provided</scope>
		</dependency>
		<dependency>
			<groupId>javax.servlet</groupId>
			<artifactId>jstl</artifactId>
			<version>1.2</version>
		</dependency>

		<!-- Test -->
		<dependency>
			<groupId>junit</groupId>
			<artifactId>junit</artifactId>
			<version>4.7</version>
			<scope>test</scope>
		</dependency>
	</dependencies>
	<build>
		<plugins>
			<plugin>
				<artifactId>maven-eclipse-plugin</artifactId>
				<version>2.9</version>
				<configuration>
					<additionalProjectnatures>
						<projectnature>org.springframework.ide.eclipse.core.springnature</projectnature>
					</additionalProjectnatures>
					<additionalBuildcommands>
						<buildcommand>org.springframework.ide.eclipse.core.springbuilder</buildcommand>
					</additionalBuildcommands>
					<downloadSources>true</downloadSources>
					<downloadJavadocs>true</downloadJavadocs>
				</configuration>
			</plugin>
			<plugin>
				<groupId>org.apache.maven.plugins</groupId>
				<artifactId>maven-compiler-plugin</artifactId>
				<version>2.5.1</version>
				<configuration>
					<source>1.6</source>
					<target>1.6</target>
					<compilerArgument>-Xlint:all</compilerArgument>
					<showWarnings>true</showWarnings>
					<showDeprecation>true</showDeprecation>
				</configuration>
			</plugin>
			<plugin>
				<groupId>org.codehaus.mojo</groupId>
				<artifactId>exec-maven-plugin</artifactId>
				<version>1.2.1</version>
				<configuration>
					<mainClass>org.test.int1.Main</mainClass>
				</configuration>
			</plugin>
		</plugins>

	</build>
</project>
تقوم أداة STS بتوليد ملف pom.xml لنا. ومع ذلك ، قمت بتحديث إصدار Spring Framework و AspectJ و SLF4J و Jackson إلى الإصدار الأحدث حتى تاريخ اليوم. معظم الجزء مشترك ومولد تلقائيًا ، النقطة المهمة للملاحظة هي أنني قمت بإضافة مكتبات Jackson JSON في التبعية لأننا سنستخدم ذلك لتحويل الكائنات إلى JSON والعكس.
<?xml version="1.0" encoding="UTF-8"?>
<web-app version="2.5" xmlns="https://java.sun.com/xml/ns/javaee"
	xmlns:xsi="https://www.w3.org/2001/XMLSchema-instance"
	xsi:schemaLocation="https://java.sun.com/xml/ns/javaee https://java.sun.com/xml/ns/javaee/web-app_2_5.xsd">

	<!-- The definition of the Root Spring Container shared by all Servlets and Filters -->
	<context-param>
		<param-name>contextConfigLocation</param-name>
		<param-value>/WEB-INF/spring/root-context.xml</param-value>
	</context-param>

	<!-- Creates the Spring Container shared by all Servlets and Filters -->
	<listener>
		<listener-class>org.springframework.web.context.ContextLoaderListener</listener-class>
	</listener>

	<!-- Processes application requests -->
	<servlet>
		<servlet-name>appServlet</servlet-name>
		<servlet-class>org.springframework.web.servlet.DispatcherServlet</servlet-class>
		<init-param>
			<param-name>contextConfigLocation</param-name>
			<param-value>/WEB-INF/spring/appServlet/servlet-context.xml</param-value>
		</init-param>
		<load-on-startup>1</load-on-startup>
	</servlet>

	<servlet-mapping>
		<servlet-name>appServlet</servlet-name>
		<url-pattern>/</url-pattern>
	</servlet-mapping>

</web-app>
تم إنشاء هذا الملف تلقائيًا ولم أقم بتغيير أي شيء فيه. ومع ذلك ، إذا كنت ترغب في تغيير ملفات تكوين السياق وموقعها ، يمكنك القيام بذلك في ملف web.xml.
<?xml version="1.0" encoding="UTF-8"?>
<beans xmlns="https://www.springframework.org/schema/beans"
	xmlns:xsi="https://www.w3.org/2001/XMLSchema-instance"
	xsi:schemaLocation="https://www.springframework.org/schema/beans https://www.springframework.org/schema/beans/spring-beans.xsd">

	<!-- Root Context: defines shared resources visible to all other web components -->

</beans>
يحتوي هذا الملف على الموارد المشتركة التي ستكون مرئية لجميع مكونات الويب. سنقوم بتطوير خدمة استراحة بسيطة ولهذا السبب لم أغير أي شيء هنا.
<?xml version="1.0" encoding="UTF-8"?>
<beans:beans xmlns="https://www.springframework.org/schema/mvc"
	xmlns:xsi="https://www.w3.org/2001/XMLSchema-instance"
	xmlns:beans="https://www.springframework.org/schema/beans"
	xmlns:context="https://www.springframework.org/schema/context"
	xsi:schemaLocation="https://www.springframework.org/schema/mvc https://www.springframework.org/schema/mvc/spring-mvc.xsd
		https://www.springframework.org/schema/beans https://www.springframework.org/schema/beans/spring-beans.xsd
		https://www.springframework.org/schema/context https://www.springframework.org/schema/context/spring-context.xsd">

	<!-- DispatcherServlet Context: defines this servlet's request-processing infrastructure -->

	<!-- Enables the Spring MVC @Controller programming model -->
	<annotation-driven />

	<!-- Handles HTTP GET requests for /resources/** by efficiently serving up static resources in the ${webappRoot}/resources directory -->
	<resources mapping="/resources/**" location="/resources/" />

	<!-- Resolves views selected for rendering by @Controllers to .jsp resources in the /WEB-INF/views directory -->
	<beans:bean class="org.springframework.web.servlet.view.InternalResourceViewResolver">
		<beans:property name="prefix" value="/WEB-INF/views/" />
		<beans:property name="suffix" value=".jsp" />
	</beans:bean>

	<!-- Configure to plugin JSON as request and response in method handler -->
	<beans:bean class="org.springframework.web.servlet.mvc.method.annotation.RequestMappingHandlerAdapter">
		<beans:property name="messageConverters">
			<beans:list>
				<beans:ref bean="jsonMessageConverter"/>
			</beans:list>
		</beans:property>
	</beans:bean>

	<!-- Configure bean to convert JSON to POJO and vice versa -->
	<beans:bean id="jsonMessageConverter" class="org.springframework.http.converter.json.MappingJackson2HttpMessageConverter">
	</beans:bean>

	<context:component-scan base-package="com.journaldev.spring.controller" />

</beans:beans>
معظم الجزء هو مولد تلقائي ويحتوي على تكوينات قالبية. ومع ذلك ، من النقاط المهمة للملاحظة هي عنصر annotation-driven لدعم تكوين الأنوتيشنات وتوصيل MappingJackson2HttpMessageConverter إلى RequestMappingHandlerAdapter messageConverters بحيث يتم تفعيل واجهة برمجة التطبيقات لجاكسون وتحويل JSON إلى كائنات جافا والعكس. من خلال هذا التكوين ، سنستخدم JSON في هيئة الطلب وسنتلقى بيانات JSON في الاستجابة.
فئات نموذج Spring REST
لنكتب فئة POJO بسيطة ستعمل كإدخال وإخراج لطرق خدمة الويب الخاصة بنا.
package com.journaldev.spring.model;

import java.io.Serializable;
import java.util.Date;

import com.fasterxml.jackson.databind.annotation.JsonSerialize;
import com.fasterxml.jackson.databind.ser.std.DateSerializer;

public class Employee implements Serializable{

	private static final long serialVersionUID = -7788619177798333712L;

	private int id;
	private String name;
	private Date createdDate;

	public int getId() {
		return id;
	}
	public void setId(int id) {
		this.id = id;
	}
	public String getName() {
		return name;
	}
	public void setName(String name) {
		this.name = name;
	}

	@JsonSerialize(using=DateSerializer.class)
	public Date getCreatedDate() {
		return createdDate;
	}
	public void setCreatedDate(Date createdDate) {
		this.createdDate = createdDate;
	}


}
النقطة الهامة الوحيدة التي يجب ملاحظتها هي استخدام التعليق @JsonSerialize لاستخدام فئة DateSerializer لتحويل التاريخ من نوع جافا إلى تنسيق JSON والعكس.
نقاط نهاية خدمة الويب الراحلة لفصل الربيع
سنمتلك نقاط نهاية خدمة الويب الراحلة التالية.
| Sl. No | URI | HTTP Method | Details |
|---|---|---|---|
| 1 | /rest/emp/dummy | GET | Health Check service, to insert a dummy data in the Employees data storage |
| 2 | /rest/emp/{id} | GET | To get the Employee object based on the id |
| 3 | /rest/emps | GET | To get the list of all the Employees in the data store |
| 4 | /rest/emp/create | POST | To create the Employee object and store it |
| 5 | /rest/emp/delete/{id} | PUT | To delete the Employee object from the data storage based on the id |
لدينا فئة تحدد جميع هذه الـ URI كثوابت سلسلة.
package com.journaldev.spring.controller;

public class EmpRestURIConstants {

	public static final String DUMMY_EMP = "/rest/emp/dummy";
	public static final String GET_EMP = "/rest/emp/{id}";
	public static final String GET_ALL_EMP = "/rest/emps";
	public static final String CREATE_EMP = "/rest/emp/create";
	public static final String DELETE_EMP = "/rest/emp/delete/{id}";
}
فئة تحكم خدمة الويب الراحلة لفصل الربيع
ستقوم فئتنا EmployeeController بنشر جميع نقاط نهاية خدمة الويب المذكورة أعلاه. دعونا نلقي نظرة على كود الفئة ثم سنتعلم عن كل من الأساليب بتفصيل.
package com.journaldev.spring.controller;

import java.util.ArrayList;
import java.util.Date;
import java.util.HashMap;
import java.util.List;
import java.util.Map;
import java.util.Set;

import org.slf4j.Logger;
import org.slf4j.LoggerFactory;
import org.springframework.stereotype.Controller;
import org.springframework.web.bind.annotation.PathVariable;
import org.springframework.web.bind.annotation.RequestBody;
import org.springframework.web.bind.annotation.RequestMapping;
import org.springframework.web.bind.annotation.RequestMethod;
import org.springframework.web.bind.annotation.ResponseBody;

import com.journaldev.spring.model.Employee;

/**
 * Handles requests for the Employee service.
 */
@Controller
public class EmployeeController {

	private static final Logger logger = LoggerFactory.getLogger(EmployeeController.class);

	//خريطة لتخزين الموظفين، في الواقع يجب علينا استخدام قاعدة البيانات
	Map empData = new HashMap();

	@RequestMapping(value = EmpRestURIConstants.DUMMY_EMP, method = RequestMethod.GET)
	public @ResponseBody Employee getDummyEmployee() {
		logger.info("Start getDummyEmployee");
		Employee emp = new Employee();
		emp.setId(9999);
		emp.setName("Dummy");
		emp.setCreatedDate(new Date());
		empData.put(9999, emp);
		return emp;
	}

	@RequestMapping(value = EmpRestURIConstants.GET_EMP, method = RequestMethod.GET)
	public @ResponseBody Employee getEmployee(@PathVariable("id") int empId) {
		logger.info("Start getEmployee. ID="+empId);

		return empData.get(empId);
	}

	@RequestMapping(value = EmpRestURIConstants.GET_ALL_EMP, method = RequestMethod.GET)
	public @ResponseBody List getAllEmployees() {
		logger.info("Start getAllEmployees.");
		List emps = new ArrayList();
		Set empIdKeys = empData.keySet();
		for(Integer i : empIdKeys){
			emps.add(empData.get(i));
		}
		return emps;
	}

	@RequestMapping(value = EmpRestURIConstants.CREATE_EMP, method = RequestMethod.POST)
	public @ResponseBody Employee createEmployee(@RequestBody Employee emp) {
		logger.info("Start createEmployee.");
		emp.setCreatedDate(new Date());
		empData.put(emp.getId(), emp);
		return emp;
	}

	@RequestMapping(value = EmpRestURIConstants.DELETE_EMP, method = RequestMethod.PUT)
	public @ResponseBody Employee deleteEmployee(@PathVariable("id") int empId) {
		logger.info("Start deleteEmployee.");
		Employee emp = empData.get(empId);
		empData.remove(empId);
		return emp;
	}

}
للبساطة، أقوم بتخزين بيانات جميع الموظفين في HashMap empData. تُستخدم تعليقات @RequestMapping لتعيين رابط الطلب إلى طريقة المعالج. يمكننا أيضًا تحديد طريقة HTTP يجب استخدامها بواسطة تطبيق العميل لاستدعاء الطريقة الباقية. تستخدم تعليقات @ResponseBody لتعيين كائن الاستجابة في هيئة الاستجابة. بمجرد أن يُعاد كائن الاستجابة بواسطة طريقة المعالج، يبدأ MappingJackson2HttpMessageConverter في تحويله إلى استجابة JSON. تعليقات @PathVariable هي الطريقة السهلة لاستخراج البيانات من عنوان URI الباقي وتعيينها إلى وسيط الطريقة. تُستخدم تعليقات @RequestBody لتعيين بيانات JSON في جسم الطلب إلى كائن الموظف، ويتم ذلك مرة أخرى عن طريق التحويل MappingJackson2HttpMessageConverter. بقية الشفرة بسيطة وواضحة ذاتيًا، تطبيقنا جاهز للنشر والاختبار. ما عليك سوى تصديره كملف WAR ونسخه في دليل تطبيق الويب في حاوي servlet. إذا كان لديك الخادم مكون في STS، يمكنك ببساطة تشغيله على الخادم لنشره. أستخدم WizTools RestClient لاستدعاء المكالمات الباقية ولكن يمكنك أيضًا استخدام إضافة Chrome Postman. توضح اللقطات الفوتوغرافية أدناه الاستدعاءات المختلفة لواجهات برمجة التطبيقات الباقية التي يتم عرضها بواسطة تطبيقنا والنتائج الخاصة بها. فحص الصحة – استدعاء REST للحصول على موظف دمية  استدعاء REST POST لإنشاء موظف: تأكد من تعيين نوع محتوى الطلب إلى “application/json” وإلا فستحصل على رمز الخطأ HTTP 415.
  استدعاء REST للحصول على موظف
  استدعاء REST لحذف الموظف
 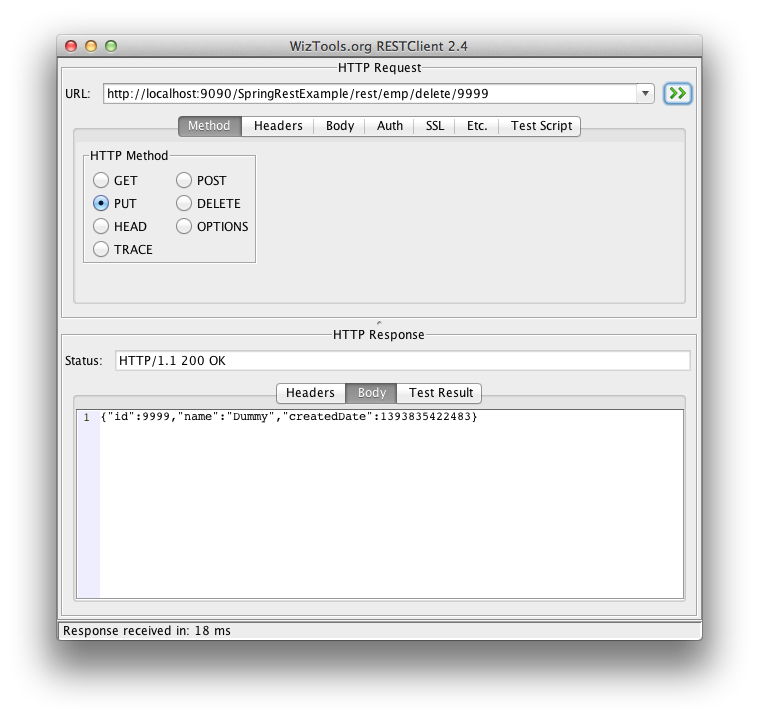 استدعاء REST للحصول على جميع الموظفين
برنامج عميل Spring Rest
يعتبر عملاء Rest جيدين لاختبار خدمات الويب الخاصة بنا ولكن في معظم الأحيان، نحتاج إلى استدعاء خدمات الويب عبر برنامجنا. يمكننا استخدام Spring RestTemplate لاستدعاء هذه الأساليب بسهولة. فيما يلي برنامج بسيط يستدعي أساليب التطبيق الخاص بنا باستخدام واجهة برمجة التطبيقات RestTemplate.
package com.journaldev.spring;

import java.util.LinkedHashMap;
import java.util.List;

import org.springframework.web.client.RestTemplate;

import com.journaldev.spring.controller.EmpRestURIConstants;
import com.journaldev.spring.model.Employee;

public class TestSpringRestExample {

	public static final String SERVER_URI = "https://localhost:9090/SpringRestExample";

	public static void main(String args[]){

		testGetDummyEmployee();
		System.out.println("*****");
		testCreateEmployee();
		System.out.println("*****");
		testGetEmployee();
		System.out.println("*****");
		testGetAllEmployee();
	}

	private static void testGetAllEmployee() {
		RestTemplate restTemplate = new RestTemplate();
		//لا يمكننا الحصول على List لأن محول JSON لا يعرف نوع
		// الكائن في القائمة وبالتالي يحوله إلى نوع كائن JSON افتراضي LinkedHashMap
		List emps = restTemplate.getForObject(SERVER_URI+EmpRestURIConstants.GET_ALL_EMP, List.class);
		System.out.println(emps.size());
		for(LinkedHashMap map : emps){
			System.out.println("ID="+map.get("id")+",Name="+map.get("name")+",CreatedDate="+map.get("createdDate"));;
		}
	}

	private static void testCreateEmployee() {
		RestTemplate restTemplate = new RestTemplate();
		Employee emp = new Employee();
		emp.setId(1);emp.setName("Pankaj Kumar");
		Employee response = restTemplate.postForObject(SERVER_URI+EmpRestURIConstants.CREATE_EMP, emp, Employee.class);
		printEmpData(response);
	}

	private static void testGetEmployee() {
		RestTemplate restTemplate = new RestTemplate();
		Employee emp = restTemplate.getForObject(SERVER_URI+"/rest/emp/1", Employee.class);
		printEmpData(emp);
	}

	private static void testGetDummyEmployee() {
		RestTemplate restTemplate = new RestTemplate();
		Employee emp = restTemplate.getForObject(SERVER_URI+EmpRestURIConstants.DUMMY_EMP, Employee.class);
		printEmpData(emp);
	}

	public static void printEmpData(Employee emp){
		System.out.println("ID="+emp.getId()+",Name="+emp.getName()+",CreatedDate="+emp.getCreatedDate());
	}
}
معظم البرنامج سهل الفهم، ومع ذلك عند استدعاء أسلوب الراحة الذي يعيد مجموعة، نحتاج إلى استخدام LinkedHashMap لأن تحويل JSON إلى كائن لا يعرف عن كائن Employee ويحوله إلى مجموعة من LinkedHashMap. يمكننا كتابة طريقة مساعدة للتحويل من LinkedHashMap إلى كائن Java Bean لدينا. عند تشغيل البرنامج أعلاه، نحصل على الناتج التالي في وحدة التحكم.
ID=9999,Name=Dummy,CreatedDate=Tue Mar 04 21:02:41 PST 2014
*****
ID=1,Name=Pankaj Kumar,CreatedDate=Tue Mar 04 21:02:41 PST 2014
*****
ID=1,Name=Pankaj Kumar,CreatedDate=Tue Mar 04 21:02:41 PST 2014
*****
2
ID=1,Name=Pankaj Kumar,CreatedDate=1393995761654
ID=9999,Name=Dummy,CreatedDate=1393995761381
نقطة أخرى هي أن طرق RestTemplate put لا تحتوي على خيار لتعيين كائن الاستجابة لأن طريقة PUT يجب استخدامها لتخزين شيء على الخادم ويجب أن يكون رمز الحالة البسيط HTTP 200 كافيًا.
تنزيل مشروع خدمة الويب الراحية Spring
هذا كل شيء بالنسبة لدرس تطبيق الويب الربيعي. قم بتنزيل المشروع النموذجي من الرابط أعلاه وقم بالتلاعب به لتتعلم المزيد. تحديث: بسبب العديد من الطلبات لتقديم مثال مماثل مع XML وكذلك دعم كل من XML و JSON، قمت بتوسيع هذا التطبيق في مثال Spring REST XML JSON لدعم طلبات واستجابات XML و JSON. أوصي بشدة بأن تقوم بالمرور من خلاله لترى جمال إطار الربيع وكيفية سهولة تحقيق هذا.
يمكنك تنزيل المشروع الكامل من مستودعنا على GitHub.