تحميل الملفات هو مهمة شائعة جدًا في أي تطبيق ويب. لقد رأينا سابقًا كيفية تحميل الملفات في Servlet و تحميل الملفات في Struts2. اليوم سنتعلم عن تحميل الملفات في Spring، وتحديدًا تحميل الملفات في Spring MVC لملفات واحدة ومتعددة.
تحميل الملفات في Spring MVC
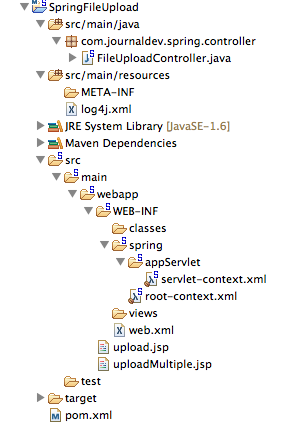
يوفر إطار عمل Spring MVC دعمًا لتحميل الملفات من خلال دمج واجهة برمجة التطبيقات Apache Commons FileUpload. عملية تحميل الملفات سهلة للغاية وتتطلب تكوينات بسيطة. سنقوم بإنشاء مشروع بسيط Spring MVC في STS والذي سيبدو كما في الصورة أدناه.  يعتبر معظم الجزء الجزء القياسي المولد تلقائيًا بواسطة أداة STS، وسنركز على التغييرات المطلوبة للاستفادة من دمج تحميل الملفات في Spring.
المعتمدات Maven لـ Apache Commons FileUpload
أولاً، نحتاج إلى إضافة معتمدات Apache Commons FileUpload في ملف pom.xml الخاص بنا، بحيث تكون ملفات الـ JAR المطلوبة جزءًا من تطبيق الويب. فيما يلي مقتطف من المعتمدات في ملف pom.xml الخاص بي.
<!-- Apache Commons FileUpload -->
<dependency>
	<groupId>commons-fileupload</groupId>
	<artifactId>commons-fileupload</artifactId>
	<version>1.3.1</version>
</dependency>

<!-- Apache Commons IO -->
<dependency>
	<groupId>commons-io</groupId>
	<artifactId>commons-io</artifactId>
	<version>2.4</version>
</dependency>
صفحات عرض تحميل الملفات في Spring
سنقوم بإنشاء صفحتين JSP للسماح بتحميل ملف واحد وعدة ملفات في تطبيق الويب Spring. كود صفحة upload.jsp:
<%@ taglib uri="https://java.sun.com/jsp/jstl/core" prefix="c" %>
<%@ page session="false" %>
<html>
<head>
<title>Upload File Request Page</title>
</head>
<body>
	<form method="POST" action="uploadFile" enctype="multipart/form-data">
		File to upload: <input type="file" name="file"><br />
		Name: <input type="text" name="name"><br /> <br />
		<input type="submit" value="Upload"> Press here to upload the file!
	</form>
</body>
</html>
كود صفحة uploadMultiple.jsp:
<%@ taglib uri="https://java.sun.com/jsp/jstl/core" prefix="c" %>
<%@ page session="false" %>
<html>
<head>
<title>Upload Multiple File Request Page</title>
</head>
<body>
	<form method="POST" action="uploadMultipleFile" enctype="multipart/form-data">
		File1 to upload: <input type="file" name="file"><br />
		Name1: <input type="text" name="name"><br /> <br />
		File2 to upload: <input type="file" name="file"><br />
		Name2: <input type="text" name="name"><br /> <br />
		<input type="submit" value="Upload"> Press here to upload the file!
	</form>
</body>
</html>
لاحظ أن هذه الملفات هي ملفات HTML بسيطة، لا أستخدم أي علامات JSP أو Spring لتجنب التعقيد. النقطة المهمة للملاحظة هي أن نوع تشفير النموذج enctype يجب أن يكون multipart/form-data، بحيث يعرف تطبيق الويب Spring أن الطلب يحتوي على بيانات ملف يجب معالجتها. كما لاحظ أنه بالنسبة للملفات المتعددة، حقل النموذج “file” و “name” هما نفسهما في حقول الإدخال، بحيث يتم إرسال البيانات على شكل مصفوفة. سنأخذ المصفوفة الداخلية ونحلل بيانات الملف ونخزنها في اسم الملف المعطى.
تكوين الجزء الجزئي لنظام Spring MVC
للاستفادة من Apache Commons FileUpload في التعامل مع طلبات الأجزاء الجزئية، كل ما نحتاج إليه هو تكوين حبة multipartResolver بفئة org.springframework.web.multipart.commons.CommonsMultipartResolver. يبدو ملف التكوين النهائي الخاص بنا كما هو موضح أدناه. كود servlet-context.xml:
<?xml version="1.0" encoding="UTF-8"?>
<beans:beans xmlns="https://www.springframework.org/schema/mvc"
	xmlns:xsi="https://www.w3.org/2001/XMLSchema-instance" xmlns:beans="https://www.springframework.org/schema/beans"
	xmlns:context="https://www.springframework.org/schema/context"
	xsi:schemaLocation="https://www.springframework.org/schema/mvc https://www.springframework.org/schema/mvc/spring-mvc.xsd
		https://www.springframework.org/schema/beans https://www.springframework.org/schema/beans/spring-beans.xsd
		https://www.springframework.org/schema/context https://www.springframework.org/schema/context/spring-context.xsd">

	<!-- DispatcherServlet Context: defines this servlet's request-processing
		infrastructure -->

	<!-- Enables the Spring MVC @Controller programming model -->
	<annotation-driven />

	<!-- Handles HTTP GET requests for /resources/** by efficiently serving
		up static resources in the ${webappRoot}/resources directory -->
	<resources mapping="/**" location="/" />

	<!-- Resolves views selected for rendering by @Controllers to .jsp resources
		in the /WEB-INF/views directory -->
	<beans:bean
		class="org.springframework.web.servlet.view.InternalResourceViewResolver">
		<beans:property name="prefix" value="/WEB-INF/views/" />
		<beans:property name="suffix" value=".jsp" />
	</beans:bean>

	<beans:bean id="multipartResolver"
		class="org.springframework.web.multipart.commons.CommonsMultipartResolver">

		 <!-- setting maximum upload size -->
		<beans:property name="maxUploadSize" value="100000" />

	</beans:bean>

	<context:component-scan base-package="com.journaldev.spring.controller" />

</beans:beans>
لاحظ أنني قمت بتعيين حد أقصى لحجم التحميل عن طريق توفير قيمة خاصية maxUploadSize لحبة multipartResolver. إذا نظرت إلى شيفرة المصدر لفئة DispatcherServlet، سترى أنه تم تعريف متغير MultipartResolver بالاسم multipartResolver وتهيئته في الطريقة أدناه.
private void initMultipartResolver(ApplicationContext context)
  {
    try
    {
      this.multipartResolver = ((MultipartResolver)context.getBean("multipartResolver", MultipartResolver.class));
      if (this.logger.isDebugEnabled()) {
        this.logger.debug("Using MultipartResolver [" + this.multipartResolver + "]");
      }
    }
    catch (NoSuchBeanDefinitionException ex)
    {
      this.multipartResolver = null;
      if (this.logger.isDebugEnabled())
        this.logger.debug("Unable to locate MultipartResolver with name 'multipartResolver': no multipart request handling provided");
    }
  }
بهذا التكوين، سيتم التعامل مع أي طلب بـ enctype كـ multipart/form-data من قبل multipartResolver قبل تمريره إلى فئة الوحدة التحكم.
فئة تحكم تحميل ملف Spring
شيفرة الفئة التحكم بسيطة جداً، نحتاج إلى تعريف طرق المعالجة لـ uploadFile و uploadMultipleFile. شيفرة FileUploadController.java:
package com.journaldev.spring.controller;

import java.io.BufferedOutputStream;
import java.io.File;
import java.io.FileOutputStream;

import org.slf4j.Logger;
import org.slf4j.LoggerFactory;
import org.springframework.stereotype.Controller;
import org.springframework.web.bind.annotation.RequestMapping;
import org.springframework.web.bind.annotation.RequestMethod;
import org.springframework.web.bind.annotation.RequestParam;
import org.springframework.web.bind.annotation.ResponseBody;
import org.springframework.web.multipart.MultipartFile;

/**
 * Handles requests for the application file upload requests
 */
@Controller
public class FileUploadController {

	private static final Logger logger = LoggerFactory
			.getLogger(FileUploadController.class);

	/**
	 * Upload single file using Spring Controller
	 */
	@RequestMapping(value = "/uploadFile", method = RequestMethod.POST)
	public @ResponseBody
	String uploadFileHandler(@RequestParam("name") String name,
			@RequestParam("file") MultipartFile file) {

		if (!file.isEmpty()) {
			try {
				byte[] bytes = file.getBytes();

				// إنشاء الدليل لتخزين الملف
				String rootPath = System.getProperty("catalina.home");
				File dir = new File(rootPath + File.separator + "tmpFiles");
				if (!dir.exists())
					dir.mkdirs();

				// إنشاء الملف على الخادم
				File serverFile = new File(dir.getAbsolutePath()
						+ File.separator + name);
				BufferedOutputStream stream = new BufferedOutputStream(
						new FileOutputStream(serverFile));
				stream.write(bytes);
				stream.close();

				logger.info("Server File Location="
						+ serverFile.getAbsolutePath());

				return "You successfully uploaded file=" + name;
			} catch (Exception e) {
				return "You failed to upload " + name + " => " + e.getMessage();
			}
		} else {
			return "You failed to upload " + name
					+ " because the file was empty.";
		}
	}

	/**
	 * Upload multiple file using Spring Controller
	 */
	@RequestMapping(value = "/uploadMultipleFile", method = RequestMethod.POST)
	public @ResponseBody
	String uploadMultipleFileHandler(@RequestParam("name") String[] names,
			@RequestParam("file") MultipartFile[] files) {

		if (files.length != names.length)
			return "Mandatory information missing";

		String message = "";
		for (int i = 0; i < files.length; i++) {
			MultipartFile file = files[i];
			String name = names[i];
			try {
				byte[] bytes = file.getBytes();

				// إنشاء الدليل لتخزين الملف
				String rootPath = System.getProperty("catalina.home");
				File dir = new File(rootPath + File.separator + "tmpFiles");
				if (!dir.exists())
					dir.mkdirs();

				// إنشاء الملف على الخادم
				File serverFile = new File(dir.getAbsolutePath()
						+ File.separator + name);
				BufferedOutputStream stream = new BufferedOutputStream(
						new FileOutputStream(serverFile));
				stream.write(bytes);
				stream.close();

				logger.info("Server File Location="
						+ serverFile.getAbsolutePath());

				message = message + "You successfully uploaded file=" + name
						+ "
";
			} catch (Exception e) {
				return "You failed to upload " + name + " => " + e.getMessage();
			}
		}
		return message;
	}
}
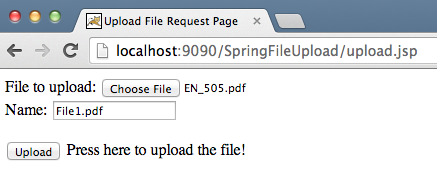
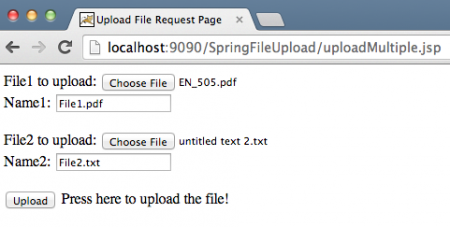
لاحظ استخدام تعليقات Spring التي تسهل حياتنا وتجعل الشيفرة تبدو أكثر قراءة. تُستخدم طريقة uploadFileHandler للتعامل مع حالة تحميل ملف واحد، بينما تُستخدم الطريقة uploadMultipleFileHandler للتعامل مع حالة تحميل ملفات متعددة. في الواقع، يمكننا أن نكون لدينا طريقة واحدة للتعامل مع كلتا الحالتين. الآن قم بتصدير التطبيق كملف WAR ونشره في حاوية خدم الطلبات Tomcat. عند تشغيل التطبيق، تُظهر الصور أدناه لنا الطلبات والاستجابات.
مثال على تحميل ملف Spring MVC


 يمكنك التحقق من سجلات الخادم لمعرفة الموقع الذي تم فيه تخزين الملفات. قم بتنزيل المشروع من الرابط أعلاه والعب به للتعلم المزيد.


